Ubuntu 16.04 LTS 成功编译 Android 6.0 源码教程
2016-06-15 14:54
846 查看
1 前言
经过3天奋战,终于在Ubuntu 16.04上把Android 6.0的源码编译出来了,各种配置,各种error,各种爬坑,特写此博客记录爬坑经历。先上图,Ubuntu上编译完后成功运行模拟器,如图: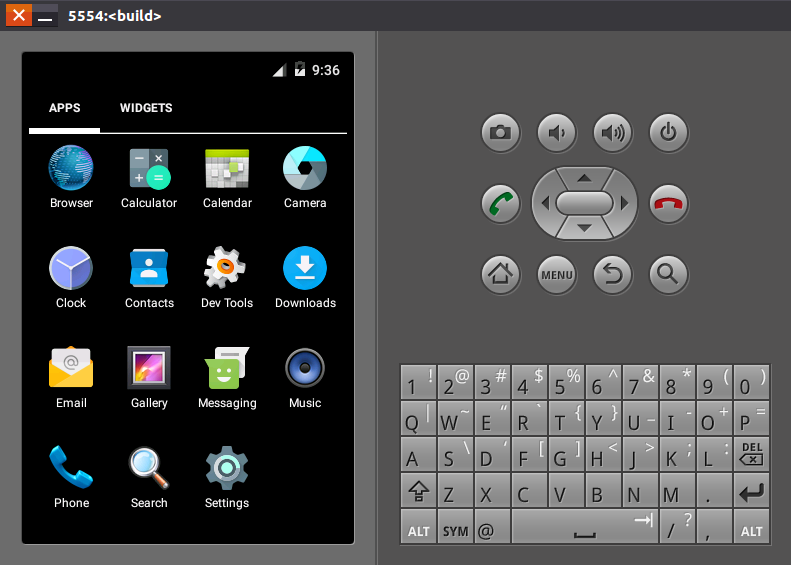
2 编译环境
UbuntuKylin 16.04 LTSAndroid 6.0_r1
Open JDK 7
3 准备工作
(1) 下载Android 6.0源码.Androdi 6.0源码下载地址: http://pan.baidu.com/s/1o6N86a2
感谢下面这位博主上传源码,我也是从他的博客下载的源码:
http://blog.csdn.net/ilittleone/article/details/6823441
下载源码请在Windows下面下载,迅雷不解释。
注意:源码的存放路径不能有中文,否则编译到系统内置的apk的时候会报错无法解析class.dex文件
(2) 解压源码,合并文件。
下载完毕后,使用下面命令合并:
<code class="hljs avrasm has-numbering" style="display: block; padding: 0px; color: inherit; box-sizing: border-box; font-family: 'Source Code Pro', monospace;font-size:undefined; white-space: pre; border-radius: 0px; word-wrap: normal; background: transparent;">cat Android6_r1_*>Android6_r1<span class="hljs-preprocessor" style="color: rgb(68, 68, 68); box-sizing: border-box;">.tgz</span></code><ul class="pre-numbering" style="box-sizing: border-box; position: absolute; width: 50px; top: 0px; left: 0px; margin: 0px; padding: 6px 0px 40px; border-right-width: 1px; border-right-style: solid; border-right-color: rgb(221, 221, 221); list-style: none; text-align: right; background-color: rgb(238, 238, 238);"><li style="box-sizing: border-box; padding: 0px 5px;">1</li></ul><ul class="pre-numbering" style="box-sizing: border-box; position: absolute; width: 50px; top: 0px; left: 0px; margin: 0px; padding: 6px 0px 40px; border-right-width: 1px; border-right-style: solid; border-right-color: rgb(221, 221, 221); list-style: none; text-align: right; background-color: rgb(238, 238, 238);"><li style="box-sizing: border-box; padding: 0px 5px;">1</li></ul>
合并完后,使用下面命令校验hash:
<code class="hljs avrasm has-numbering" style="display: block; padding: 0px; color: inherit; box-sizing: border-box; font-family: 'Source Code Pro', monospace;font-size:undefined; white-space: pre; border-radius: 0px; word-wrap: normal; background: transparent;">md5sum Android6_r1<span class="hljs-preprocessor" style="color: rgb(68, 68, 68); box-sizing: border-box;">.tgz</span></code><ul class="pre-numbering" style="box-sizing: border-box; position: absolute; width: 50px; top: 0px; left: 0px; margin: 0px; padding: 6px 0px 40px; border-right-width: 1px; border-right-style: solid; border-right-color: rgb(221, 221, 221); list-style: none; text-align: right; background-color: rgb(238, 238, 238);"><li style="box-sizing: border-box; padding: 0px 5px;">1</li></ul><ul class="pre-numbering" style="box-sizing: border-box; position: absolute; width: 50px; top: 0px; left: 0px; margin: 0px; padding: 6px 0px 40px; border-right-width: 1px; border-right-style: solid; border-right-color: rgb(221, 221, 221); list-style: none; text-align: right; background-color: rgb(238, 238, 238);"><li style="box-sizing: border-box; padding: 0px 5px;">1</li></ul>
此时会生成一个hash串,如图:

对比你下载的文件里面的hash.txt,如果一致那么继续,不一致则文件损坏,重新下载。
(3) 解压源码。
tar -zxvf Android6_r1.tgz
解压源码是个漫长的过程,解压后会在当前目录下生成一个mydroid的文件夹。如果你发现源码的路径有中文,需要移动源码,请复制压缩包,然后再使用命令解压,而不要直接复制解压后的文件夹。
(4) 安装Ubuntu 16.04
编译Android源码最好直接安装Linux,不要使用虚拟机,编译源码是个漫长的过程,虚拟机要十几个小时,博主直接在电脑上装Ubuntu,编译只需要3个小时。实体机可避免虚拟机的很多问题,例如:磁盘空间不足,内存不够等等。更重要的是,编译源码是个不断爬坑的过程,实体机可以很快的遇到错误,然后解决问题,继续编译,再次遇到错误,而虚拟机这个周期会很漫长,因而浪费大量时间。实体机解压速度也比虚拟机快得多。Ubuntu与windows兼容做的很好,可以直接把Ubuntu当作一个windows程序安装,也可以单独安装,如果单独安装请务必给/home分区分配至少120G空间,因为编译后的Android系统真的很大。
强烈建议下载Ubuntu镜像,然后使用软碟通刻录到U盘,通过U盘把Ubuntu安装到物理机器上。
(5) Ubuntu安装教程参考下面链接,Ubuntu 16.04安装方法也是一样的 :
http://jingyan.baidu.com/article/59703552e0a6e18fc007409f.html
4 安装依赖
<code class="hljs lasso has-numbering" style="display: block; padding: 0px; color: inherit; box-sizing: border-box; font-family: 'Source Code Pro', monospace;font-size:undefined; white-space: pre; border-radius: 0px; word-wrap: normal; background: transparent;">sudo apt<span class="hljs-attribute" style="box-sizing: border-box;">-get</span> install <span class="hljs-attribute" style="box-sizing: border-box;">-y</span> git flex bison gperf build<span class="hljs-attribute" style="box-sizing: border-box;">-essential</span> libncurses5<span class="hljs-attribute" style="box-sizing: border-box;">-dev</span>:i386
sudo apt<span class="hljs-attribute" style="box-sizing: border-box;">-get</span> install libx11<span class="hljs-attribute" style="box-sizing: border-box;">-dev</span>:i386 libreadline6<span class="hljs-attribute" style="box-sizing: border-box;">-dev</span>:i386 libgl1<span class="hljs-attribute" style="box-sizing: border-box;">-mesa</span><span class="hljs-attribute" style="box-sizing: border-box;">-dev</span> g<span class="hljs-subst" style="color: rgb(0, 0, 0); box-sizing: border-box;">++-</span>multilib
sudo apt<span class="hljs-attribute" style="box-sizing: border-box;">-get</span> install tofrodos python<span class="hljs-attribute" style="box-sizing: border-box;">-markdown</span> libxml2<span class="hljs-attribute" style="box-sizing: border-box;">-utils</span> xsltproc zlib1g<span class="hljs-attribute" style="box-sizing: border-box;">-dev</span>:i386
sudo apt<span class="hljs-attribute" style="box-sizing: border-box;">-get</span> install dpkg<span class="hljs-attribute" style="box-sizing: border-box;">-dev</span> libsdl1<span class="hljs-number" style="color: rgb(0, 102, 102); box-sizing: border-box;">.2</span><span class="hljs-attribute" style="box-sizing: border-box;">-dev</span> libesd0<span class="hljs-attribute" style="box-sizing: border-box;">-dev</span>
sudo apt<span class="hljs-attribute" style="box-sizing: border-box;">-get</span> install git<span class="hljs-attribute" style="box-sizing: border-box;">-core</span> gnupg flex bison gperf build<span class="hljs-attribute" style="box-sizing: border-box;">-essential</span>
sudo apt<span class="hljs-attribute" style="box-sizing: border-box;">-get</span> install zip curl zlib1g<span class="hljs-attribute" style="box-sizing: border-box;">-dev</span> gcc<span class="hljs-attribute" style="box-sizing: border-box;">-multilib</span> g<span class="hljs-subst" style="color: rgb(0, 0, 0); box-sizing: border-box;">++-</span>multilib
sudo apt<span class="hljs-attribute" style="box-sizing: border-box;">-get</span> install libc6<span class="hljs-attribute" style="box-sizing: border-box;">-dev</span><span class="hljs-attribute" style="box-sizing: border-box;">-i386</span>
sudo apt<span class="hljs-attribute" style="box-sizing: border-box;">-get</span> install lib32ncurses5<span class="hljs-attribute" style="box-sizing: border-box;">-dev</span> x11proto<span class="hljs-attribute" style="box-sizing: border-box;">-core</span><span class="hljs-attribute" style="box-sizing: border-box;">-dev</span> libx11<span class="hljs-attribute" style="box-sizing: border-box;">-dev</span>
sudo apt<span class="hljs-attribute" style="box-sizing: border-box;">-get</span> install lib32z<span class="hljs-attribute" style="box-sizing: border-box;">-dev</span> ccache
sudo apt<span class="hljs-attribute" style="box-sizing: border-box;">-get</span> install libgl1<span class="hljs-attribute" style="box-sizing: border-box;">-mesa</span><span class="hljs-attribute" style="box-sizing: border-box;">-dev</span> libxml2<span class="hljs-attribute" style="box-sizing: border-box;">-utils</span> xsltproc unzip m4</code><ul class="pre-numbering" style="box-sizing: border-box; position: absolute; width: 50px; top: 0px; left: 0px; margin: 0px; padding: 6px 0px 40px; border-right-width: 1px; border-right-style: solid; border-right-color: rgb(221, 221, 221); list-style: none; text-align: right; background-color: rgb(238, 238, 238);"><li style="box-sizing: border-box; padding: 0px 5px;">1</li><li style="box-sizing: border-box; padding: 0px 5px;">2</li><li style="box-sizing: border-box; padding: 0px 5px;">3</li><li style="box-sizing: border-box; padding: 0px 5px;">4</li><li style="box-sizing: border-box; padding: 0px 5px;">5</li><li style="box-sizing: border-box; padding: 0px 5px;">6</li><li style="box-sizing: border-box; padding: 0px 5px;">7</li><li style="box-sizing: border-box; padding: 0px 5px;">8</li><li style="box-sizing: border-box; padding: 0px 5px;">9</li><li style="box-sizing: border-box; padding: 0px 5px;">10</li></ul><ul class="pre-numbering" style="box-sizing: border-box; position: absolute; width: 50px; top: 0px; left: 0px; margin: 0px; padding: 6px 0px 40px; border-right-width: 1px; border-right-style: solid; border-right-color: rgb(221, 221, 221); list-style: none; text-align: right; background-color: rgb(238, 238, 238);"><li style="box-sizing: border-box; padding: 0px 5px;">1</li><li style="box-sizing: border-box; padding: 0px 5px;">2</li><li style="box-sizing: border-box; padding: 0px 5px;">3</li><li style="box-sizing: border-box; padding: 0px 5px;">4</li><li style="box-sizing: border-box; padding: 0px 5px;">5</li><li style="box-sizing: border-box; padding: 0px 5px;">6</li><li style="box-sizing: border-box; padding: 0px 5px;">7</li><li style="box-sizing: border-box; padding: 0px 5px;">8</li><li style="box-sizing: border-box; padding: 0px 5px;">9</li><li style="box-sizing: border-box; padding: 0px 5px;">10</li></ul>
Ubuntu 16.04请务必使用上面的依赖,Ubuntu 16.04需要的依赖和Ubuntu 14.04所需要的依赖是不同的,博主照着Ubuntu 14.04的依赖结果掉进大坑,详见后面的编译过程记录.
5 安装open JDK7
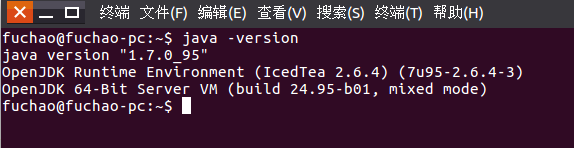
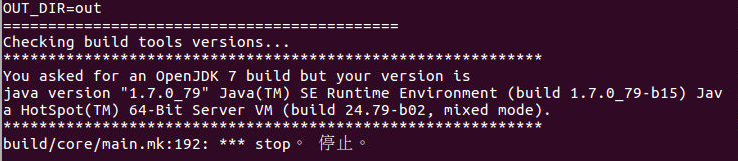
从Android 6.0开始Android源码的编译需要安装OpenJDK,不能使用Oracle JDK,而且Android 6.0只能使用OpenJDK7,如下图:
由于Ubuntu 16.04没有OpenJDK7的源,因此在16.04上安装OpenJDK7需要执行下面的命令:
<code class="hljs lasso has-numbering" style="display: block; padding: 0px; color: inherit; box-sizing: border-box; font-family: 'Source Code Pro', monospace;font-size:undefined; white-space: pre; border-radius: 0px; word-wrap: normal; background: transparent;">sudo add<span class="hljs-attribute" style="box-sizing: border-box;">-apt</span><span class="hljs-attribute" style="box-sizing: border-box;">-repository</span> ppa:openjdk<span class="hljs-attribute" style="box-sizing: border-box;">-r</span>/ppa
sudo apt<span class="hljs-attribute" style="box-sizing: border-box;">-get</span> update
sudo apt<span class="hljs-attribute" style="box-sizing: border-box;">-get</span> install openjdk<span class="hljs-subst" style="color: rgb(0, 0, 0); box-sizing: border-box;">-</span><span class="hljs-number" style="color: rgb(0, 102, 102); box-sizing: border-box;">7</span><span class="hljs-attribute" style="box-sizing: border-box;">-jdk</span> </code><ul class="pre-numbering" style="box-sizing: border-box; position: absolute; width: 50px; top: 0px; left: 0px; margin: 0px; padding: 6px 0px 40px; border-right-width: 1px; border-right-style: solid; border-right-color: rgb(221, 221, 221); list-style: none; text-align: right; background-color: rgb(238, 238, 238);"><li style="box-sizing: border-box; padding: 0px 5px;">1</li><li style="box-sizing: border-box; padding: 0px 5px;">2</li><li style="box-sizing: border-box; padding: 0px 5px;">3</li></ul><ul class="pre-numbering" style="box-sizing: border-box; position: absolute; width: 50px; top: 0px; left: 0px; margin: 0px; padding: 6px 0px 40px; border-right-width: 1px; border-right-style: solid; border-right-color: rgb(221, 221, 221); list-style: none; text-align: right; background-color: rgb(238, 238, 238);"><li style="box-sizing: border-box; padding: 0px 5px;">1</li><li style="box-sizing: border-box; padding: 0px 5px;">2</li><li style="box-sizing: border-box; padding: 0px 5px;">3</li></ul>
配置OpenJDK.打开/etc/profile文件:
<code class="hljs bash has-numbering" style="display: block; padding: 0px; color: inherit; box-sizing: border-box; font-family: 'Source Code Pro', monospace;font-size:undefined; white-space: pre; border-radius: 0px; word-wrap: normal; background: transparent;"><span class="hljs-built_in" style="color: rgb(102, 0, 102); box-sizing: border-box;">sudo</span> gedit /etc/profile</code><ul class="pre-numbering" style="box-sizing: border-box; position: absolute; width: 50px; top: 0px; left: 0px; margin: 0px; padding: 6px 0px 40px; border-right-width: 1px; border-right-style: solid; border-right-color: rgb(221, 221, 221); list-style: none; text-align: right; background-color: rgb(238, 238, 238);"><li style="box-sizing: border-box; padding: 0px 5px;">1</li></ul><ul class="pre-numbering" style="box-sizing: border-box; position: absolute; width: 50px; top: 0px; left: 0px; margin: 0px; padding: 6px 0px 40px; border-right-width: 1px; border-right-style: solid; border-right-color: rgb(221, 221, 221); list-style: none; text-align: right; background-color: rgb(238, 238, 238);"><li style="box-sizing: border-box; padding: 0px 5px;">1</li></ul>
在末尾追加下面代码:
<code class="hljs bash has-numbering" style="display: block; padding: 0px; color: inherit; box-sizing: border-box; font-family: 'Source Code Pro', monospace;font-size:undefined; white-space: pre; border-radius: 0px; word-wrap: normal; background: transparent;"><span class="hljs-keyword" style="color: rgb(0, 0, 136); box-sizing: border-box;">export</span> JAVA_HOME=/usr/lib/jvm/java-<span class="hljs-number" style="color: rgb(0, 102, 102); box-sizing: border-box;">7</span>-openjdk-amd64
<span class="hljs-keyword" style="color: rgb(0, 0, 136); box-sizing: border-box;">export</span> JRE_HOME=<span class="hljs-variable" style="color: rgb(102, 0, 102); box-sizing: border-box;">${JAVA_HOME}</span>/jre
<span class="hljs-keyword" style="color: rgb(0, 0, 136); box-sizing: border-box;">export</span> CLASSPATH=.:<span class="hljs-variable" style="color: rgb(102, 0, 102); box-sizing: border-box;">${JAVA_HOME}</span>/lib:<span class="hljs-variable" style="color: rgb(102, 0, 102); box-sizing: border-box;">${JRE_HOME}</span>/lib
<span class="hljs-keyword" style="color: rgb(0, 0, 136); box-sizing: border-box;">export</span> PATH=<span class="hljs-variable" style="color: rgb(102, 0, 102); box-sizing: border-box;">${JAVA_HOME}</span>/bin:<span class="hljs-variable" style="color: rgb(102, 0, 102); box-sizing: border-box;">$PATH</span></code><ul class="pre-numbering" style="box-sizing: border-box; position: absolute; width: 50px; top: 0px; left: 0px; margin: 0px; padding: 6px 0px 40px; border-right-width: 1px; border-right-style: solid; border-right-color: rgb(221, 221, 221); list-style: none; text-align: right; background-color: rgb(238, 238, 238);"><li style="box-sizing: border-box; padding: 0px 5px;">1</li><li style="box-sizing: border-box; padding: 0px 5px;">2</li><li style="box-sizing: border-box; padding: 0px 5px;">3</li><li style="box-sizing: border-box; padding: 0px 5px;">4</li></ul><ul class="pre-numbering" style="box-sizing: border-box; position: absolute; width: 50px; top: 0px; left: 0px; margin: 0px; padding: 6px 0px 40px; border-right-width: 1px; border-right-style: solid; border-right-color: rgb(221, 221, 221); list-style: none; text-align: right; background-color: rgb(238, 238, 238);"><li style="box-sizing: border-box; padding: 0px 5px;">1</li><li style="box-sizing: border-box; padding: 0px 5px;">2</li><li style="box-sizing: border-box; padding: 0px 5px;">3</li><li style="box-sizing: border-box; padding: 0px 5px;">4</li></ul>
修改了/etc/profile文件需要重启才能生效,但使用下面命令可以在不重启的情况下在当前bash环境生效:
<code class="hljs bash has-numbering" style="display: block; padding: 0px; color: inherit; box-sizing: border-box; font-family: 'Source Code Pro', monospace;font-size:undefined; white-space: pre; border-radius: 0px; word-wrap: normal; background: transparent;"><span class="hljs-built_in" style="color: rgb(102, 0, 102); box-sizing: border-box;">source</span> /etc/profile</code><ul class="pre-numbering" style="box-sizing: border-box; position: absolute; width: 50px; top: 0px; left: 0px; margin: 0px; padding: 6px 0px 40px; border-right-width: 1px; border-right-style: solid; border-right-color: rgb(221, 221, 221); list-style: none; text-align: right; background-color: rgb(238, 238, 238);"><li style="box-sizing: border-box; padding: 0px 5px;">1</li></ul><ul class="pre-numbering" style="box-sizing: border-box; position: absolute; width: 50px; top: 0px; left: 0px; margin: 0px; padding: 6px 0px 40px; border-right-width: 1px; border-right-style: solid; border-right-color: rgb(221, 221, 221); list-style: none; text-align: right; background-color: rgb(238, 238, 238);"><li style="box-sizing: border-box; padding: 0px 5px;">1</li></ul>
检查OpenJDK配置是否正确:
<code class="hljs livecodeserver has-numbering" style="display: block; padding: 0px; color: inherit; box-sizing: border-box; font-family: 'Source Code Pro', monospace;font-size:undefined; white-space: pre; border-radius: 0px; word-wrap: normal; background: transparent;">java -<span class="hljs-built_in" style="color: rgb(102, 0, 102); box-sizing: border-box;">version</span></code><ul class="pre-numbering" style="box-sizing: border-box; position: absolute; width: 50px; top: 0px; left: 0px; margin: 0px; padding: 6px 0px 40px; border-right-width: 1px; border-right-style: solid; border-right-color: rgb(221, 221, 221); list-style: none; text-align: right; background-color: rgb(238, 238, 238);"><li style="box-sizing: border-box; padding: 0px 5px;">1</li></ul><ul class="pre-numbering" style="box-sizing: border-box; position: absolute; width: 50px; top: 0px; left: 0px; margin: 0px; padding: 6px 0px 40px; border-right-width: 1px; border-right-style: solid; border-right-color: rgb(221, 221, 221); list-style: none; text-align: right; background-color: rgb(238, 238, 238);"><li style="box-sizing: border-box; padding: 0px 5px;">1</li></ul>
配置正确则如下图:
6 修改源码
修改 mydroid/art/build/Android.common_build.mk文件,定位到75行,将下面的代码:
<code class="hljs perl has-numbering" style="display: block; padding: 0px; color: inherit; box-sizing: border-box; font-family: 'Source Code Pro', monospace;font-size:undefined; white-space: pre; border-radius: 0px; word-wrap: normal; background: transparent;">ifne<span class="hljs-string" style="color: rgb(0, 136, 0); box-sizing: border-box;">q (<span class="hljs-variable" style="color: rgb(102, 0, 102); box-sizing: border-box;">$(</span>WITHOUT_HOST_CLANG)</span>,true)</code><ul class="pre-numbering" style="box-sizing: border-box; position: absolute; width: 50px; top: 0px; left: 0px; margin: 0px; padding: 6px 0px 40px; border-right-width: 1px; border-right-style: solid; border-right-color: rgb(221, 221, 221); list-style: none; text-align: right; background-color: rgb(238, 238, 238);"><li style="box-sizing: border-box; padding: 0px 5px;">1</li></ul><ul class="pre-numbering" style="box-sizing: border-box; position: absolute; width: 50px; top: 0px; left: 0px; margin: 0px; padding: 6px 0px 40px; border-right-width: 1px; border-right-style: solid; border-right-color: rgb(221, 221, 221); list-style: none; text-align: right; background-color: rgb(238, 238, 238);"><li style="box-sizing: border-box; padding: 0px 5px;">1</li></ul>
改为:
<code class="hljs perl has-numbering" style="display: block; padding: 0px; color: inherit; box-sizing: border-box; font-family: 'Source Code Pro', monospace;font-size:undefined; white-space: pre; border-radius: 0px; word-wrap: normal; background: transparent;">ife<span class="hljs-string" style="color: rgb(0, 136, 0); box-sizing: border-box;">q (<span class="hljs-variable" style="color: rgb(102, 0, 102); box-sizing: border-box;">$(</span>WITHOUT_HOST_CLANG)</span>,false)</code><ul class="pre-numbering" style="box-sizing: border-box; position: absolute; width: 50px; top: 0px; left: 0px; margin: 0px; padding: 6px 0px 40px; border-right-width: 1px; border-right-style: solid; border-right-color: rgb(221, 221, 221); list-style: none; text-align: right; background-color: rgb(238, 238, 238);"><li style="box-sizing: border-box; padding: 0px 5px;">1</li></ul><ul class="pre-numbering" style="box-sizing: border-box; position: absolute; width: 50px; top: 0px; left: 0px; margin: 0px; padding: 6px 0px 40px; border-right-width: 1px; border-right-style: solid; border-right-color: rgb(221, 221, 221); list-style: none; text-align: right; background-color: rgb(238, 238, 238);"><li style="box-sizing: border-box; padding: 0px 5px;">1</li></ul>
如果不修改这里,会遇到一个比较棘手的编译错误,修改的目的是把CLANG这个编译选项关掉,详见后面的编译记录,百度搜狗都无解,这个错误只会在Ubuntu16.04上遇到,Ubuntu14.04则不存在这个问题,解决这个编译错误花费一天时间,还好咱英语好,在歪果人的论坛上看了几篇帖子,终于搞定了。这里顺便说一下小技巧:
遇到编译错误,请把error后面的错误信息全部复制,然后用搜狗搜英文网页,不要用百度那个渣渣
7 开始编译
(1) 在 .bashrc文件末尾添加:export USE_CCACHE = 1<code class="hljs bash has-numbering" style="display: block; padding: 0px; color: inherit; box-sizing: border-box; font-family: 'Source Code Pro', monospace;font-size:undefined; white-space: pre; border-radius: 0px; word-wrap: normal; background: transparent;"><span class="hljs-built_in" style="color: rgb(102, 0, 102); box-sizing: border-box;">echo</span> <span class="hljs-keyword" style="color: rgb(0, 0, 136); box-sizing: border-box;">export</span> USE_CCACHE=<span class="hljs-number" style="color: rgb(0, 102, 102); box-sizing: border-box;">1</span> >> ~/.bashrc</code><ul class="pre-numbering" style="box-sizing: border-box; position: absolute; width: 50px; top: 0px; left: 0px; margin: 0px; padding: 6px 0px 40px; border-right-width: 1px; border-right-style: solid; border-right-color: rgb(221, 221, 221); list-style: none; text-align: right; background-color: rgb(238, 238, 238);"><li style="box-sizing: border-box; padding: 0px 5px;">1</li></ul><ul class="pre-numbering" style="box-sizing: border-box; position: absolute; width: 50px; top: 0px; left: 0px; margin: 0px; padding: 6px 0px 40px; border-right-width: 1px; border-right-style: solid; border-right-color: rgb(221, 221, 221); list-style: none; text-align: right; background-color: rgb(238, 238, 238);"><li style="box-sizing: border-box; padding: 0px 5px;">1</li></ul>
(2) 为了提高编译效率,设置编译器高速缓存:
<code class="hljs lasso has-numbering" style="display: block; padding: 0px; color: inherit; box-sizing: border-box; font-family: 'Source Code Pro', monospace;font-size:undefined; white-space: pre; border-radius: 0px; word-wrap: normal; background: transparent;">prebuilts/misc/linux<span class="hljs-attribute" style="box-sizing: border-box;">-x86</span>/ccache/ccache <span class="hljs-attribute" style="box-sizing: border-box;">-M</span> <span class="hljs-number" style="color: rgb(0, 102, 102); box-sizing: border-box;">50</span>G</code><ul class="pre-numbering" style="box-sizing: border-box; position: absolute; width: 50px; top: 0px; left: 0px; margin: 0px; padding: 6px 0px 40px; border-right-width: 1px; border-right-style: solid; border-right-color: rgb(221, 221, 221); list-style: none; text-align: right; background-color: rgb(238, 238, 238);"><li style="box-sizing: border-box; padding: 0px 5px;">1</li></ul><ul class="pre-numbering" style="box-sizing: border-box; position: absolute; width: 50px; top: 0px; left: 0px; margin: 0px; padding: 6px 0px 40px; border-right-width: 1px; border-right-style: solid; border-right-color: rgb(221, 221, 221); list-style: none; text-align: right; background-color: rgb(238, 238, 238);"><li style="box-sizing: border-box; padding: 0px 5px;">1</li></ul>
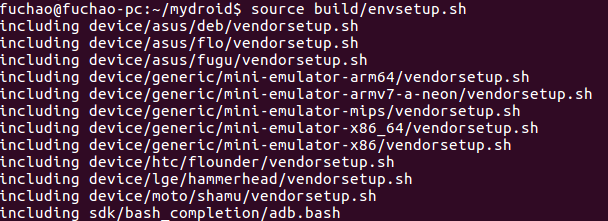
(3) 接着导入编译Android源码所需的环境变量和其它参数:
<code class="hljs bash has-numbering" style="display: block; padding: 0px; color: inherit; box-sizing: border-box; font-family: 'Source Code Pro', monospace;font-size:undefined; white-space: pre; border-radius: 0px; word-wrap: normal; background: transparent;"><span class="hljs-built_in" style="color: rgb(102, 0, 102); box-sizing: border-box;">source</span> build/envsetup.sh</code><ul class="pre-numbering" style="box-sizing: border-box; position: absolute; width: 50px; top: 0px; left: 0px; margin: 0px; padding: 6px 0px 40px; border-right-width: 1px; border-right-style: solid; border-right-color: rgb(221, 221, 221); list-style: none; text-align: right; background-color: rgb(238, 238, 238);"><li style="box-sizing: border-box; padding: 0px 5px;">1</li></ul><ul class="pre-numbering" style="box-sizing: border-box; position: absolute; width: 50px; top: 0px; left: 0px; margin: 0px; padding: 6px 0px 40px; border-right-width: 1px; border-right-style: solid; border-right-color: rgb(221, 221, 221); list-style: none; text-align: right; background-color: rgb(238, 238, 238);"><li style="box-sizing: border-box; padding: 0px 5px;">1</li></ul>
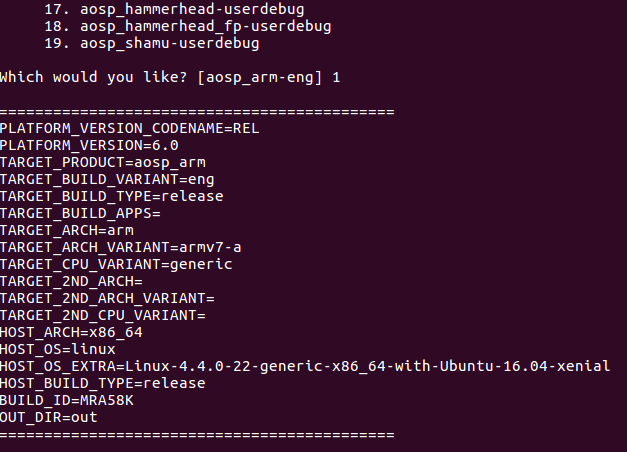
(4) 运行lunch命令选择编译目标:
<code class="hljs has-numbering" style="display: block; padding: 0px; color: inherit; box-sizing: border-box; font-family: 'Source Code Pro', monospace;font-size:undefined; white-space: pre; border-radius: 0px; word-wrap: normal; background: transparent;">lunch</code><ul class="pre-numbering" style="box-sizing: border-box; position: absolute; width: 50px; top: 0px; left: 0px; margin: 0px; padding: 6px 0px 40px; border-right-width: 1px; border-right-style: solid; border-right-color: rgb(221, 221, 221); list-style: none; text-align: right; background-color: rgb(238, 238, 238);"><li style="box-sizing: border-box; padding: 0px 5px;">1</li></ul><ul class="pre-numbering" style="box-sizing: border-box; position: absolute; width: 50px; top: 0px; left: 0px; margin: 0px; padding: 6px 0px 40px; border-right-width: 1px; border-right-style: solid; border-right-color: rgb(221, 221, 221); list-style: none; text-align: right; background-color: rgb(238, 238, 238);"><li style="box-sizing: border-box; padding: 0px 5px;">1</li></ul>
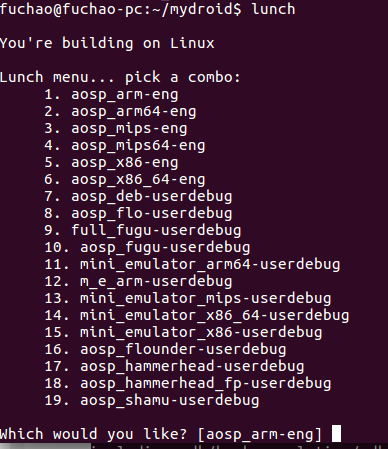
选择1:
(5) 开始编译,执行make -j8, 8为同时编译的线程数,一般google推荐这个数字为2倍的cpu个数再加上2,比如4核,就是10。博主使用的是8:
<code class="hljs lasso has-numbering" style="display: block; padding: 0px; color: inherit; box-sizing: border-box; font-family: 'Source Code Pro', monospace;font-size:undefined; white-space: pre; border-radius: 0px; word-wrap: normal; background: transparent;">make <span class="hljs-attribute" style="box-sizing: border-box;">-j8</span></code><ul class="pre-numbering" style="box-sizing: border-box; position: absolute; width: 50px; top: 0px; left: 0px; margin: 0px; padding: 6px 0px 40px; border-right-width: 1px; border-right-style: solid; border-right-color: rgb(221, 221, 221); list-style: none; text-align: right; background-color: rgb(238, 238, 238);"><li style="box-sizing: border-box; padding: 0px 5px;">1</li></ul><ul class="pre-numbering" style="box-sizing: border-box; position: absolute; width: 50px; top: 0px; left: 0px; margin: 0px; padding: 6px 0px 40px; border-right-width: 1px; border-right-style: solid; border-right-color: rgb(221, 221, 221); list-style: none; text-align: right; background-color: rgb(238, 238, 238);"><li style="box-sizing: border-box; padding: 0px 5px;">1</li></ul>
关于cpu个数,可以用下面命令查看:
<code class="hljs haskell has-numbering" style="display: block; padding: 0px; color: inherit; box-sizing: border-box; font-family: 'Source Code Pro', monospace;font-size:undefined; white-space: pre; border-radius: 0px; word-wrap: normal; background: transparent;"><span class="hljs-title" style="box-sizing: border-box;">cat</span> /<span class="hljs-keyword" style="color: rgb(0, 0, 136); box-sizing: border-box;">proc</span>/cpuinfo</code><ul class="pre-numbering" style="box-sizing: border-box; position: absolute; width: 50px; top: 0px; left: 0px; margin: 0px; padding: 6px 0px 40px; border-right-width: 1px; border-right-style: solid; border-right-color: rgb(221, 221, 221); list-style: none; text-align: right; background-color: rgb(238, 238, 238);"><li style="box-sizing: border-box; padding: 0px 5px;">1</li></ul><ul class="pre-numbering" style="box-sizing: border-box; position: absolute; width: 50px; top: 0px; left: 0px; margin: 0px; padding: 6px 0px 40px; border-right-width: 1px; border-right-style: solid; border-right-color: rgb(221, 221, 221); list-style: none; text-align: right; background-color: rgb(238, 238, 238);"><li style="box-sizing: border-box; padding: 0px 5px;">1</li></ul>
好了,开始编译了,接下来就是不断error,不断修复,继续编译的过程,下面记录我的爬坑经历
7 编译记录
我是参照下面这篇文章开始编译的:http://www.linuxidc.com/Linux/2016-01/127292p2.htm
如果一帆风顺,我也就用不着写这篇博客了,然而他用的是Ubuntu14.04,我用的最新的Ubuntu16.04,按照上面这篇博文,遇到很多坑,这里记录以下爬坑经历:
(1) 依赖不同。Ubuntu 14和16的依赖选项是不同的:
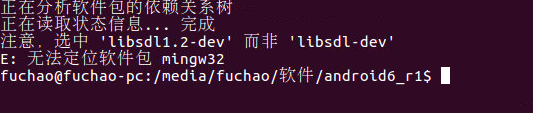
于是将
libsdl1.2-dev改为
libsdl-dev,将
mingw32去掉
(2) JDK配置错误。
先用Oracle JDK8报下面错:
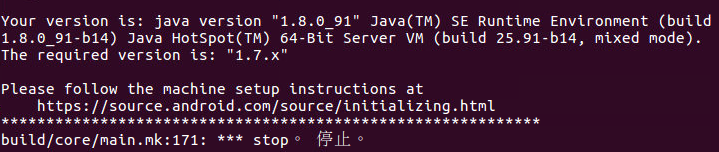
改为Oracle JDK7报下面错:
后改为OpenJDK7解决问题。
(3) 大坑。接着遇到下面错误:
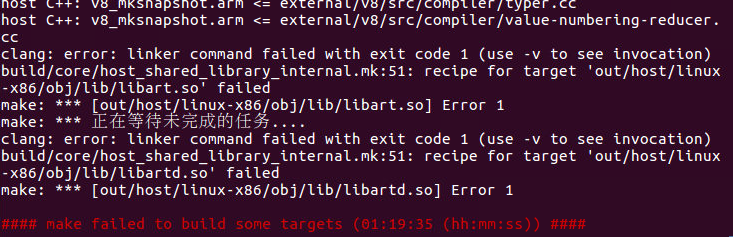
仔细看错误:
<code class="hljs vbnet has-numbering" style="display: block; padding: 0px; color: inherit; box-sizing: border-box; font-family: 'Source Code Pro', monospace;font-size:undefined; white-space: pre; border-radius: 0px; word-wrap: normal; background: transparent;">clang: <span class="hljs-keyword" style="color: rgb(0, 0, 136); box-sizing: border-box;">error</span>: linker command failed <span class="hljs-keyword" style="color: rgb(0, 0, 136); box-sizing: border-box;">with</span> <span class="hljs-keyword" style="color: rgb(0, 0, 136); box-sizing: border-box;">exit</span> code</code><ul class="pre-numbering" style="box-sizing: border-box; position: absolute; width: 50px; top: 0px; left: 0px; margin: 0px; padding: 6px 0px 40px; border-right-width: 1px; border-right-style: solid; border-right-color: rgb(221, 221, 221); list-style: none; text-align: right; background-color: rgb(238, 238, 238);"><li style="box-sizing: border-box; padding: 0px 5px;">1</li></ul><ul class="pre-numbering" style="box-sizing: border-box; position: absolute; width: 50px; top: 0px; left: 0px; margin: 0px; padding: 6px 0px 40px; border-right-width: 1px; border-right-style: solid; border-right-color: rgb(221, 221, 221); list-style: none; text-align: right; background-color: rgb(238, 238, 238);"><li style="box-sizing: border-box; padding: 0px 5px;">1</li></ul>
其实这个是系统使用clang编辑器报的错,百度了一下,解决方法一般是将
art/build/Android.common_build.mk文件
ifneq
($(WITHOUT_HOST_CLANG),true)
改为
ifeq ($(WITHOUT_HOST_CLANG),false)
然而纸上得来终觉浅,绝知此事要躬行,因为,这并没有什么卵用,至少现在没有卵用。不信,请看下面的帖子:
http://ask.csdn.net/questions/253318
我试了一下,也没用,还是没解决问题,好像这个是新系统的兼容问题,百度搜狗一天,没有进展,后来发现了下面这篇帖子,也是14.04编译Android6.0的:
http://blog.csdn.net/lewif/article/details/49762993
抱着反正无聊试一试的想法,把上面这篇帖子中的依赖一通复制(所以最终用的依赖是两篇帖子加起来的依赖):
<code class="hljs lasso has-numbering" style="display: block; padding: 0px; color: inherit; box-sizing: border-box; font-family: 'Source Code Pro', monospace;font-size:undefined; white-space: pre; border-radius: 0px; word-wrap: normal; background: transparent;">sudo apt<span class="hljs-attribute" style="box-sizing: border-box;">-get</span> install git<span class="hljs-attribute" style="box-sizing: border-box;">-core</span> gnupg flex bison gperf build<span class="hljs-attribute" style="box-sizing: border-box;">-essential</span> <span class="hljs-subst" style="color: rgb(0, 0, 0); box-sizing: border-box;">\</span>
zip curl zlib1g<span class="hljs-attribute" style="box-sizing: border-box;">-dev</span> gcc<span class="hljs-attribute" style="box-sizing: border-box;">-multilib</span> g<span class="hljs-subst" style="color: rgb(0, 0, 0); box-sizing: border-box;">++-</span>multilib libc6<span class="hljs-attribute" style="box-sizing: border-box;">-dev</span><span class="hljs-attribute" style="box-sizing: border-box;">-i386</span> <span class="hljs-subst" style="color: rgb(0, 0, 0); box-sizing: border-box;">\</span>
lib32ncurses5<span class="hljs-attribute" style="box-sizing: border-box;">-dev</span> x11proto<span class="hljs-attribute" style="box-sizing: border-box;">-core</span><span class="hljs-attribute" style="box-sizing: border-box;">-dev</span> libx11<span class="hljs-attribute" style="box-sizing: border-box;">-dev</span> lib32z<span class="hljs-attribute" style="box-sizing: border-box;">-dev</span> ccache <span class="hljs-subst" style="color: rgb(0, 0, 0); box-sizing: border-box;">\</span>
libgl1<span class="hljs-attribute" style="box-sizing: border-box;">-mesa</span><span class="hljs-attribute" style="box-sizing: border-box;">-dev</span> libxml2<span class="hljs-attribute" style="box-sizing: border-box;">-utils</span> xsltproc unzip m4</code><ul class="pre-numbering" style="box-sizing: border-box; position: absolute; width: 50px; top: 0px; left: 0px; margin: 0px; padding: 6px 0px 40px; border-right-width: 1px; border-right-style: solid; border-right-color: rgb(221, 221, 221); list-style: none; text-align: right; background-color: rgb(238, 238, 238);"><li style="box-sizing: border-box; padding: 0px 5px;">1</li><li style="box-sizing: border-box; padding: 0px 5px;">2</li><li style="box-sizing: border-box; padding: 0px 5px;">3</li><li style="box-sizing: border-box; padding: 0px 5px;">4</li></ul><ul class="pre-numbering" style="box-sizing: border-box; position: absolute; width: 50px; top: 0px; left: 0px; margin: 0px; padding: 6px 0px 40px; border-right-width: 1px; border-right-style: solid; border-right-color: rgb(221, 221, 221); list-style: none; text-align: right; background-color: rgb(238, 238, 238);"><li style="box-sizing: border-box; padding: 0px 5px;">1</li><li style="box-sizing: border-box; padding: 0px 5px;">2</li><li style="box-sizing: border-box; padding: 0px 5px;">3</li><li style="box-sizing: border-box; padding: 0px 5px;">4</li></ul>
然后
make clean,重新再来,接着就睡觉去了。
一觉醒来,然后……..你以为我就编粗来了?呵呵,这个错误是终于编过去了,可是又遇到下面的错误:

解决这个错误,又花费一番力气,在歪果人的论坛上看到下面这篇帖子:
http://forum.xda-developers.com/chef-central/android/guide-how-to-setup-ubuntu-16-04-lts-t3363669/page2
注意看这个帖子的15楼,哈哈,这个时候找到解决方法了,再修改
art / build/Android.common_build.mk文件
<code class="hljs perl has-numbering" style="display: block; padding: 0px; color: inherit; box-sizing: border-box; font-family: 'Source Code Pro', monospace;font-size:undefined; white-space: pre; border-radius: 0px; word-wrap: normal; background: transparent;"> ifne<span class="hljs-string" style="color: rgb(0, 136, 0); box-sizing: border-box;">q (<span class="hljs-variable" style="color: rgb(102, 0, 102); box-sizing: border-box;">$(</span>WITHOUT_HOST_CLANG)</span>,true)</code><ul class="pre-numbering" style="box-sizing: border-box; position: absolute; width: 50px; top: 0px; left: 0px; margin: 0px; padding: 6px 0px 40px; border-right-width: 1px; border-right-style: solid; border-right-color: rgb(221, 221, 221); list-style: none; text-align: right; background-color: rgb(238, 238, 238);"><li style="box-sizing: border-box; padding: 0px 5px;">1</li></ul><ul class="pre-numbering" style="box-sizing: border-box; position: absolute; width: 50px; top: 0px; left: 0px; margin: 0px; padding: 6px 0px 40px; border-right-width: 1px; border-right-style: solid; border-right-color: rgb(221, 221, 221); list-style: none; text-align: right; background-color: rgb(238, 238, 238);"><li style="box-sizing: border-box; padding: 0px 5px;">1</li></ul>
改为:
<code class="hljs perl has-numbering" style="display: block; padding: 0px; color: inherit; box-sizing: border-box; font-family: 'Source Code Pro', monospace;font-size:undefined; white-space: pre; border-radius: 0px; word-wrap: normal; background: transparent;">ife<span class="hljs-string" style="color: rgb(0, 136, 0); box-sizing: border-box;">q (<span class="hljs-variable" style="color: rgb(102, 0, 102); box-sizing: border-box;">$(</span>WITHOUT_HOST_CLANG)</span>,false)</code><ul class="pre-numbering" style="box-sizing: border-box; position: absolute; width: 50px; top: 0px; left: 0px; margin: 0px; padding: 6px 0px 40px; border-right-width: 1px; border-right-style: solid; border-right-color: rgb(221, 221, 221); list-style: none; text-align: right; background-color: rgb(238, 238, 238);"><li style="box-sizing: border-box; padding: 0px 5px;">1</li></ul><ul class="pre-numbering" style="box-sizing: border-box; position: absolute; width: 50px; top: 0px; left: 0px; margin: 0px; padding: 6px 0px 40px; border-right-width: 1px; border-right-style: solid; border-right-color: rgb(221, 221, 221); list-style: none; text-align: right; background-color: rgb(238, 238, 238);"><li style="box-sizing: border-box; padding: 0px 5px;">1</li></ul>
重新编译,解决问题。
(4) 中文路径,坑。

遇到这个问题也是很难百度到,哎,最后把源码换到了全英文的路径下面,解决这个问题。注意移动源码的时候不要直接复制mydroid文件夹,一个小时都复制不完,所以正确的方法是复制压缩包,然后再解压一遍。
接下来就编译成功了。
8 编译成功
编译成功后如下图: 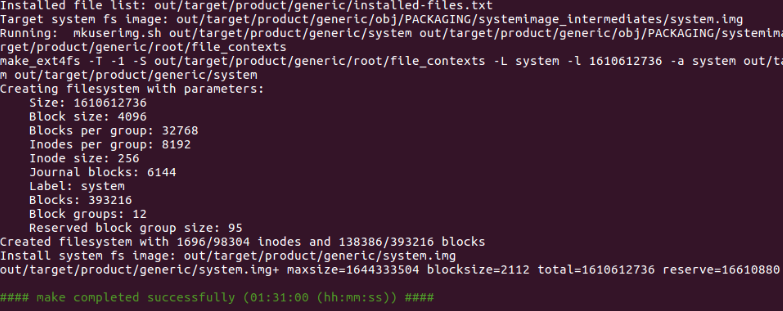
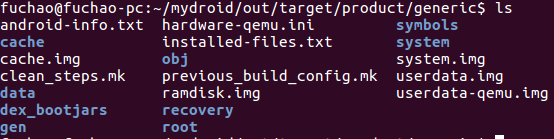
进入mydroid/out/target/product/generic目录,可以看到编译好的文件:
启动模拟器:
<code class="hljs has-numbering" style="display: block; padding: 0px; color: inherit; box-sizing: border-box; font-family: 'Source Code Pro', monospace;font-size:undefined; white-space: pre; border-radius: 0px; word-wrap: normal; background: transparent;">emulator</code><ul class="pre-numbering" style="box-sizing: border-box; position: absolute; width: 50px; top: 0px; left: 0px; margin: 0px; padding: 6px 0px 40px; border-right-width: 1px; border-right-style: solid; border-right-color: rgb(221, 221, 221); list-style: none; text-align: right; background-color: rgb(238, 238, 238);"><li style="box-sizing: border-box; padding: 0px 5px;">1</li></ul><ul class="pre-numbering" style="box-sizing: border-box; position: absolute; width: 50px; top: 0px; left: 0px; margin: 0px; padding: 6px 0px 40px; border-right-width: 1px; border-right-style: solid; border-right-color: rgb(221, 221, 221); list-style: none; text-align: right; background-color: rgb(238, 238, 238);"><li style="box-sizing: border-box; padding: 0px 5px;">1</li></ul>
稍等一会,就可以出现开头的模拟器画面了,哈哈,打完收工。
9 附录:Ubuntu 16.04编译ROM英文教程
最后,附上在看帖子的时候发现的,在Ubuntu16.04上编译AOSP、CyanogenMod的教程,当然是英文的啦:http://forum.xda-developers.com/chef-central/android/guide-how-to-setup-ubuntu-16-04-lts-t3363669
10 总结
Android系统源码的编译就是不断和各种error做斗争的过程,考验程序员获取信息的能力,遇到error的时候只能各种百度搜狗,但这也是非常锻炼能力的过程,博主在编译过程中最大的体会就是:英语一定要好,哈哈。如果你成功编译出来了,或者编译遇到问题,欢迎给我留言。

相关文章推荐
- Android 自定义View
- AAPT err(Facade for): libpng error: Not a PNG file 错误解决
- Android:Ubuntu 16.04上编译Android主线最新代码
- cordova安装插件时发现cordova-android的版本过低
- Android.mk 语法
- Android 更换应用图标无效
- android activity 全屏非全屏切换
- Android之Notification(一):通知的基本用法
- Android Studio 项目导入太慢的解决方法
- Android RecycleView上拉加载BaseAdapter(二)
- android.util.AndroidRuntimeException: Calling startActivity from outside of an Activity context
- Android5.0录屏
- Android之实现登陆页面分析
- Android SparseArray源码详解
- Android自定义视图 View 之重要知识点 Path 详解
- android手机推送视频到服务端
- Google Android开发者文档系列-开发企业App
- Android-Tab单选控件
- Android中Selector的用法
- 导入Android Studio工程