实战Walker之闪屏界面的实现分析
2016-06-14 22:19
369 查看
当用户启动应用程序时,首先出现一闪屏界面,显示三秒后,跳到主界面,这里假设先跳转到登录界面。
一。修改自动生成的activity_welcome.xml文件,主要代码如下:
二。修改AndroidManifest.xml文件,修改闪屏界面为全屏模式,代码如下:
三。修改WelcomActivity,实现停顿三秒后跳转
方式二:使用Handler完成跳转,代码如下:
界面效果图:
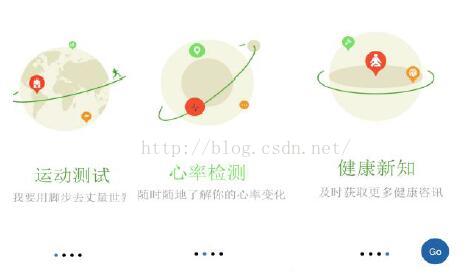
通过引导界面,用户能够快速了解应用的主要功能。当滑动到最后一个界面时,点击Go进入到主界面。下面开始讲述实现过程。
一。设计引导界面整体布局,修改自动生成的activity_guide.xml文件,在布局文件里首先加入ViewPager这个组件,然后加入四个ImageView组件,主要代码如下:
其中bg_point_select.xml文件如下:
bg_point.xml文件如下:
二。定义好要切换的布局文件view1_of_pager.xml文件、view2_of_pager.xml文件、view3_of_pager.xml文件、view4_of_pager.xml文件,其中只有背景图片不同,代码如下:
view4_of_pager.xml文件代码:
start_select.xml文件如下:
start_before.xml文件如下:
编写GuideAdapter类继承自PageAdapter,代码如下:
最后,修改GuideActivity类,代码如下:
完成这些操作后,闪屏界面就实现了。
一。修改自动生成的activity_welcome.xml文件,主要代码如下:
<RelativeLayout xmlns:android="http://schemas.android.com/apk/res/android"
xmlns:tools="http://schemas.android.com/tools"
android:layout_width="match_parent"
android:layout_height="match_parent"
android:background="@drawable/welcome_bg"
tools:context=".WelcomeActivity" >

</RelativeLayout>
二。修改AndroidManifest.xml文件,修改闪屏界面为全屏模式,代码如下:
<activity
android:name="cn.edu.bztc.walkersimulate.WelcomeActivity"
android:label="@string/title_activity_welcome"
android:theme="@android:style/Theme.NoTitleBar.Fullscreen" >

</activity>
三。修改WelcomActivity,实现停顿三秒后跳转
方式一:利用动画持续时间,动画结束后跳转,主要代码如下:
public class WelcomeActivity extends Activity {
@Override
protected void onCreate(Bundle savedInstanceState) {
super.onCreate(savedInstanceState);
setContentView(R.layout.activity_welcome);
RelativeLayout layoutWelcome = (RelativeLayout) findViewById(R.id.layoutWelcome);
AlphaAnimation alphaAnimation = new AlphaAnimation(0.1f, 1.0f);
alphaAnimation.setDuration(3000);
layoutWelcome.startAnimation(alphaAnimation);
alphaAnimation.setAnimationListener(new AnimationListener() {
@Override
public void onAnimationStart(Animation animation) {
}

@Override
public void onAnimationRepeat(Animation animation) {
}

@Override
public void onAnimationEnd(Animation animation) {
Intent intent = new Intent(WelcomeActivity.this,
LoginActivity.class);
startActivity(intent);
}
});
}

}
方式二:使用Handler完成跳转,代码如下:
public void run() {
Intent intent=new Intent(WelcomeActivity.this,LoginActivity.class);
startActivity(intent);
}
},3000);
< 方式三,使用多线程完成跳转,主要代码如下:
public void run() {
try {
Thread.sleep(3000);
Intent intent = new Intent(WelcomeActivity.this,
LoginActivity.class);
startActivity(intent);}
}
界面效果图:
通过引导界面,用户能够快速了解应用的主要功能。当滑动到最后一个界面时,点击Go进入到主界面。下面开始讲述实现过程。
一。设计引导界面整体布局,修改自动生成的activity_guide.xml文件,在布局文件里首先加入ViewPager这个组件,然后加入四个ImageView组件,主要代码如下:
<RelativeLayout xmlns:android="http://schemas.android.com/apk/res/android"
xmlns:tools="http://schemas.android.com/tools"
android:layout_width="match_parent"
android:layout_height="match_parent"
tools:context=".GuideActivity" >

<android.support.v4.view.ViewPager
android:id="@+id/vpGuide"
android:layout_width="wrap_content"
android:layout_height="wrap_content"
android:layout_alignParentLeft="true"
android:layout_alignParentTop="true" >
</android.support.v4.view.ViewPager>
<!-- 底部的四个圆点 -->

<LinearLayout
android:layout_width="wrap_content"
android:layout_height="wrap_content"
android:layout_alignParentBottom="true"
android:layout_centerHorizontal="true"
android:layout_marginBottom="40dp" >

<ImageView
android:id="@+id/guide_dot1"
android:layout_width="wrap_content"
android:layout_height="wrap_content"
android:background="@drawable/bg_point_selected" />

<ImageView
android:id="@+id/guide_dot2"
android:layout_width="wrap_content"
android:layout_height="wrap_content"
android:layout_marginLeft="10dp"
android:background="@drawable/bg_point" />

<ImageView
android:id="@+id/guide_dot3"
android:layout_width="wrap_content"
android:layout_height="wrap_content"
android:layout_marginLeft="10dp"
android:background="@drawable/bg_point" />

<ImageView
android:id="@+id/guide_dot4"
android:layout_width="wrap_content"
android:layout_height="wrap_content"
android:layout_marginLeft="10dp"
android:background="@drawable/bg_point" />
</LinearLayout>

</RelativeLayout>
其中bg_point_select.xml文件如下:
<?xml version="1.0" encoding="utf-8"?>
<shape xmlns:android="http://schemas.android.com/apk/res/android"
android:shape="oval" >

<solid android:color="#427AB7" />

<size
android:height="8dp"
android:width="8dp" />

</shape>
bg_point.xml文件如下:
<?xml version="1.0" encoding="utf-8"?>
<shape xmlns:android="http://schemas.android.com/apk/res/android"
android:shape="oval" >

<solid android:color="@android:color/black" />

<size
android:height="8dp"
android:width="8dp" />

</shape>
二。定义好要切换的布局文件view1_of_pager.xml文件、view2_of_pager.xml文件、view3_of_pager.xml文件、view4_of_pager.xml文件,其中只有背景图片不同,代码如下:
<?xml version="1.0" encoding="utf-8"?>
<LinearLayout xmlns:android="http://schemas.android.com/apk/res/android"
android:layout_width="match_parent"
android:layout_height="match_parent"
android:background="@drawable/guide_1"
android:orientation="vertical" >

</LinearLayout>
view4_of_pager.xml文件代码:
<?xml version="1.0" encoding="utf-8"?>
<RelativeLayout xmlns:android="http://schemas.android.com/apk/res/android"
android:layout_width="match_parent"
android:layout_height="match_parent"
android:background="@drawable/guide_1"
android:orientation="vertical" >

<TextView
android:id="@+id/tvGo"
android:layout_width="wrap_content"
android:layout_height="wrap_content"
android:layout_alignParentBottom="true"
android:layout_alignParentRight="true"
android:layout_marginBottom="16dp"
android:layout_marginRight="19dp"
android:background="@drawable/start_select"
android:gravity="center"
android:text="Go"
android:textColor="#ffffff"
android:textSize="30sp" />

</RelativeLayout>
start_select.xml文件如下:
<?xml version="1.0" encoding="utf-8"?>
<selector xmlns:android="http://schemas.android.com/apk/res/android">

<item android:drawable="@drawable/start_before" android:state_pressed="false"/>
<item android:drawable="@drawable/start_after" android:state_pressed="true"/>

</selector>
start_before.xml文件如下:
<?xml version="1.0" encoding="utf-8"?>
<shape xmlns:android="http://schemas.android.com/apk/res/android"
android:shape="oval" >

<soli
9c20
d android:color="#2362A7" />

<size
android:height="80dp"
android:width="80dp" />

</shape>
编写GuideAdapter类继承自PageAdapter,代码如下:
public class GuideAdapter extends PagerAdapter {
private List<View> views;

public GuideAdapter(List<View> views) {
this.views = views;
}

@Override
public int getCount() {
return views.size();
}

@Override
public boolean isViewFromObject(View view, Object object) {
return view == object;
}

@Override
public Object instantiateItem(ViewGroup container, int position) {
container.addView(views.get(position));
return views.get(position);
}

@Override
public void destroyItem(ViewGroup container, int position, Object object) {
View view = views.get(position);
container.removeView(view);
}
}
最后,修改GuideActivity类,代码如下:
public class GuideActivity extends Activity {
private List<View> guideViews;
private ViewPager vpGuide;
private int[] guide_dots = { R.id.guide_dot1, R.id.guide_dot2,

R.id.guide_dot3, R.id.guide_dot4 };// 4个导航点
private ImageView[] dots;
private TextView tvGo;

@Override
protected void onCreate(Bundle savedInstanceState) {
super.onCreate(savedInstanceState);
setContentView(R.layout.activity_guide);
initGuideViews();
tvGo = (TextView) findViewById(R.id.tvGo);
initDots();
setListeners();
}

private void initDots() {
dots = new ImageView[4];
for (int i = 0; i < dots.length; i++) {
dots[i] = (ImageView) findViewById(guide_dots[i]);
}
}

private void setListeners() {
vpGuide.setOnPageChangeListener(new OnPageChangeListener() {
@Override
public void onPageSelected(int position) {
for (int i = 0; i < guide_dots.length; i++) {
if (position == i) {
dots[i].setImageResource(R.drawable.bg_point_selected);
} else {
dots[i].setImageResource(R.drawable.bg_point);
}
}
}

@Override
public void onPageScrolled(int arg0, float arg1, int arg2) {
}

@Override
public void onPageScrollStateChanged(int arg0) {
}
});

tvGo.setOnClickListener(new OnClickListener() {
@Override
public void onClick(View view) {
Intent intent = new Intent(GuideActivity.this,
LoginActivity.class);
startActivity(intent);
}
});
}

private void initGuideViews() {
vpGuide = (ViewPager) findViewById(R.id.vpGuide);
// 准备好切换的view
guideViews = new ArrayList<View>();
LayoutInflater layoutInflater = LayoutInflater.from(this);
guideViews.add(layoutInflater.inflate(R.layout.view1ofpager, null));
guideViews.add(layoutInflater.inflate(R.layout.view2ofpager, null));
guideViews.add(layoutInflater.inflate(R.layout.view3ofpager, null));
guideViews.add(layoutInflater.inflate(R.layout.view4ofpager, null));
GuideAdapter guideAdapter = new GuideAdapter(guideViews);
vpGuide.setAdapter(guideAdapter);
}
}
完成这些操作后,闪屏界面就实现了。
