centos fastdfs 多服务器 多硬盘 多组 配置详解
2016-06-12 21:38
645 查看
说正文前,先感谢happy_fish100提供的fastdfs,轻量级的分布式文件服务器。
随着用户量的变大,图片,视频等的量会不断的增大,这个时候一个硬盘可能不够用了,就要加硬盘。硬盘加不了时,就要增加服务器了。同一组服务器,文件服务器的东西是一样,不同组的服务器,有不同的文件,不同的组之间,共同组建了文件服务器的所有内容。
下面说一下,安装配置的过程,这里配置的方法,根开发者提供的方法不一样,我没有用到fastdfs-nginx-module,通过配置nginx实现了fastdfs-nginx-module的功能。
一,Fastdfs的下载
地址:http://sourceforge.net/projects/fastdfs/files/FastDFS%20Server%20Source%20Code/
二,服务器,以及系统
我用的centos 6.5 x86_64 ,fastdfs v5.01架构如下:
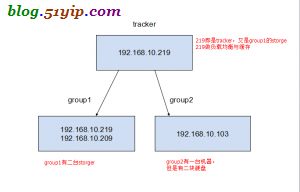
架构图
这里的tracker是单点的,如果出了故障就郁闷了,以前搞过一次多tracker,不过版本比较老了。请参考:fastdfs 多服务器 配置
三,安装fastdfs和nginx
1,安装nginx
查看复制打印?
//安装,gcc,automake,autoconf等依赖包
[root@localhost download]$ yum install gettext gettext-devel libXft libXft-devel libXpm libXpm-devel\
automake autoconf libXtst-devel gtk+-devel gcc zlib-devel libpng-devel gtk2-devel glib-devel
//安装FastDFS
[root@localhost download]# tar zxf FastDFS_v5.01.tar.gz
[root@localhost download]# cd FastDFS
[root@localhost download]# ./make.sh
[root@localhost download]# ./make.sh install
//安装成功有以下内容
[root@localhost fdfs]# ll /usr/local/bin/ |grep fdfs
-rwxr-xr-x 1 root root 522870 7月 4 03:20 fdfs_appender_test
-rwxr-xr-x 1 root root 522823 7月 4 03:20 fdfs_appender_test1
-rwxr-xr-x 1 root root 513975 7月 4 03:20 fdfs_append_file
-rwxr-xr-x 1 root root 513393 7月 4 03:20 fdfs_crc32
-rwxr-xr-x 1 root root 513927 7月 4 03:20 fdfs_delete_file
-rwxr-xr-x 1 root root 514329 7月 4 03:20 fdfs_download_file
-rwxr-xr-x 1 root root 514093 7月 4 03:20 fdfs_file_info
-rwxr-xr-x 1 root root 525024 7月 4 03:20 fdfs_monitor
-rwxr-xr-x 1 root root 1179642 7月 4 03:20 fdfs_storaged
-rwxr-xr-x 1 root root 529805 7月 4 03:20 fdfs_test
-rwxr-xr-x 1 root root 527726 7月 4 03:20 fdfs_test1
-rwxr-xr-x 1 root root 655761 7月 4 03:20 fdfs_trackerd
-rwxr-xr-x 1 root root 514173 7月 4 03:20 fdfs_upload_appender
-rwxr-xr-x 1 root root 514951 7月 4 03:20 fdfs_upload_file
2,安装nginx
[root@localhost fdfs]# yum install nginx
所有机器的fastdfs和nginx安装方法都是一样。
四,配置192.168.10.219服务器
1,配置tracker和storage
查看复制打印?
[root@localhost fdfs]# vim /etc/fdfs/tracker.conf
port=22122 #设置tracker的端口号
base_path=/var/www/fastdfs #设置tracker的数据文件和日志目录(需预先创建)
如果要调优,参考:http://bbs.chinaunix.net/forum.php?mod=viewthread&tid=1941456
查看复制打印?
[root@localhost fdfs]# vim /etc/fdfs/storage.conf
group_name=group1 #组名,根据实际情况修改
port=23000 #设置storage的端口号
base_path=/var/www/fastdfs #设置storage的日志目录(需预先创建)
store_path_count=1 #存储路径个数,需要和store_path个数匹配
store_path0=/var/www/fastdfs #存储路径
tracker_server=192.168.10.219:22122 #tracker服务器的IP地址和端口号
2,tracker的nginx配置
查看复制打印?
[root@localhost nginx]# cat /etc/nginx/nginx.conf #配置主配置文件
user nginx;
worker_processes 1;
events {
worker_connections 65535; #最大链接数
use epoll; #新版本的Linux可使用epoll加快处理性能
}
error_log /var/log/nginx/error.log;
pid /var/run/nginx.pid;
http {
server_names_hash_bucket_size 128;
client_header_buffer_size 32k;
large_client_header_buffers 4 32k;
client_max_body_size 300m;
sendfile on;
tcp_nopush on;
proxy_redirect off;
proxy_set_header Host $http_host;
proxy_set_header X-Real-IP $remote_addr;
proxy_set_header X-Forwarded-For $proxy_add_x_forwarded_for;
proxy_connect_timeout 90;
proxy_send_timeout 90;
proxy_read_timeout 90;
proxy_buffer_size 16k;
proxy_buffers 4 64k;
proxy_busy_buffers_size 128k;
proxy_temp_file_write_size 128k;
log_format main '$remote_addr - $remote_user [$time_local] "$request" '
'$status $body_bytes_sent "$http_referer" '
'"$http_user_agent" "$http_x_forwarded_for"';
access_log /var/log/nginx/access.log main;
#设置缓存存储路径、存储方式、分配内存大小、磁盘最大空间、缓存期限
proxy_cache_path /var/cache/nginx/proxy_cache levels=1:2 keys_zone=http-cache:500m max_size=10g inactive=30d;
proxy_temp_path /var/cache/nginx/proxy_cache/tmp;
upstream fdfs_group1 { #设置group1的服务器
server 192.168.10.209:8080 weight=1 max_fails=2 fail_timeout=30s;
server 192.168.10.219:8080 weight=1 max_fails=2 fail_timeout=30s;
}
upstream fdfs_group2 { #设置group2的服务器
server 192.168.10.103:10000 weight=1 max_fails=2 fail_timeout=30s;
}
include /etc/nginx/conf.d/*.conf;
}
查看复制打印?
[root@localhost fdfs]# cat /etc/nginx/conf.d/tracker.conf #配置nginx的tracker
server {
listen 80; #设置服务器端口
server_name 192.168.10.219;
location /group1/M00 { #设置group1的负载均衡参数
proxy_next_upstream http_502 http_504 error timeout invalid_header;
proxy_cache http-cache;
proxy_cache_valid 200 304 12h;
proxy_cache_key $uri$is_args$args;
proxy_pass http://fdfs_group1;
expires 30d;
}
location ~* /group2/(M00|M01) { #设置group2的负载均衡参数
proxy_next_upstream http_502 http_504 error timeout invalid_header;
proxy_cache http-cache;
proxy_cache_valid 200 304 12h;
proxy_cache_key $uri$is_args$args;
proxy_pass http://fdfs_group2;
expires 30d;
}
}
查看复制打印?
[root@localhost conf.d]# cat /etc/nginx/conf.d/storage.conf #配置nginx的storage
server
{
listen 8080;
server_name 192.168.10.219;
location /group1/M00/ {
root /var/www/fastdfs/data;
rewrite ^/group1/M00/(.*) /$1 break;
}
}
3,启动tracker,storage和nginx
查看复制打印?
//启动
[root@localhost fdfs]# /usr/local/bin/fdfs_trackerd /etc/fdfs/tracker.conf restart
[root@localhost fdfs]# /usr/local/bin/fdfs_storaged /etc/fdfs/storage.conf restart
[root@localhost fdfs]# /etc/init.d/nginx start
在这里有一点要注意,就是要先启动tracker在启动storage,如果nginx报目录没有建,创建一下,在重新启动
五,配置192.168.10.209服务器
1,配置storage
查看复制打印?
[root@localhost fdfs]# vim /etc/fdfs/storage.conf
group_name=group1 #组名,根据实际情况修改
port=23000 #设置storage的端口号
base_path=/var/www/fastdfs #设置storage的日志目录(需预先创建)
store_path_count=1 #存储路径个数,需要和store_path个数匹配
store_path0=/var/www/fastdfs #存储路径
tracker_server=192.168.10.219:22122 #tracker服务器的IP地址和端口号
2,nginx配置
查看复制打印?
[root@localhost conf.d]# cat /etc/nginx/conf.d/storage.conf #配置storage
server
{
listen 8080;
server_name 192.168.10.209;
location /group1/M00/ {
root /var/www/fastdfs/data;
rewrite ^/group1/M00/(.*) /$1 break;
}
}
3,启动
查看复制打印?
//启动
[root@localhost fdfs]# /usr/local/bin/fdfs_storaged /etc/fdfs/storage.conf restart
[root@localhost fdfs]# /etc/init.d/nginx start
六,配置192.168.10.103服务器
1,配置storage
查看复制打印?
[root@localhost fdfs]# vim /etc/fdfs/storage.conf
group_name=group2 #组名,根据实际情况修改
port=23000 #设置storage的端口号
base_path=/var/www/fastdfs #设置storage的日志目录(需预先创建)
store_path_count=2 #存储路径个数,需要和store_path个数匹配
store_path0=/var/www/fastdfs #存储路径
store_path1=/mnt/usb/fastdfs2 #硬盘2的存储路径
tracker_server=192.168.10.219:22122 #tracker服务器的IP地址和端口号
在这里有一点要注意,就是有二块硬盘,存文件的目录也有二个
2,配置nginx
查看复制打印?
[root@localhost conf.d]# cat /etc/nginx/conf.d/storage.conf #配置storage
server
{
listen 10000;
server_name 192.168.10.103;
location /group2/M01/ {
root /mnt/usb/fastdfs2/data;
rewrite ^/group2/M01/(.*) /$1 break;
}
location /group2/M00/ {
root /var/www/fastdfs/data;
rewrite ^/group2/M00/(.*) /$1 break;
}
}
3,启动
查看复制打印?
//启动
[root@localhost fdfs]# /usr/local/bin/fdfs_storaged /etc/fdfs/storage.conf restart
[root@localhost fdfs]# /etc/init.d/nginx start
到这儿就安装配置好了,有一点要注意:
就是访问文件服务器的文件时,地址要用tracker的地址,例如:
http://192.168.10.219/group2/M01/00/00/wKgKZ1PAEquAbLj1AAK4TxGeCvM649.jpg

相关文章推荐
- i2c协议
- linux下安装R
- Linux下 swap分区 虚拟内存 的创建、调整、修改、挂载
- Linux中 LVM逻辑卷基础操作 简明教程
- linux文件管理(结构)
- 中断处理机制与工作队列
- 对linux中signal()函数的理解
- ft5x0x驱动分析
- Linux SSH生成及使用
- mplayer 音乐播放器封装类
- Linux及安全——程序破解
- Linux及安全——ELF实践
- linux查看机器的资源命令
- 9.Linux应用编程——信号灯(System——进程)
- 7.Linux应用编程——共享内存
- 6.Linux应用编程——管道、信号
- 5.Linux应用编程——信号量(POSIX—线程)
- 4.Linux应用编程——线程
- CentOS 5.X安装 Scipy
- 2.Linux应用编程——标准IO