Centos6.5下VNC Server配置
2016-06-10 14:46
525 查看
整个流程如下~
1.首先,检查下本机是否安装了vnc:
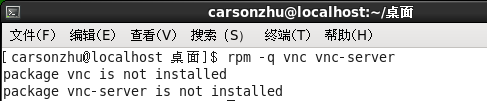
提示没有安装,那么开始装吧:
2.先关闭防火墙
查看防火墙状态:
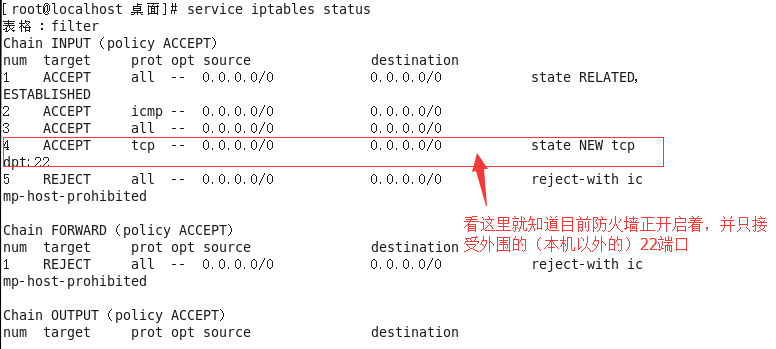
关闭防火墙:

注:要切到root下
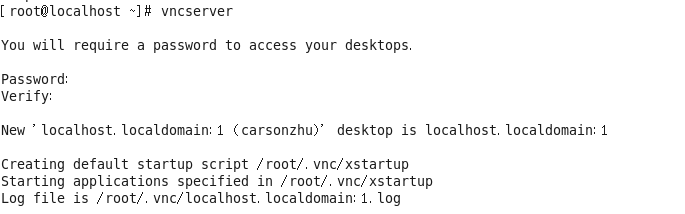
3.启动vncserver,会要求你输入两次进行连接的初始密码
4.添加root系统环境配置
在最后面加上如下两行:
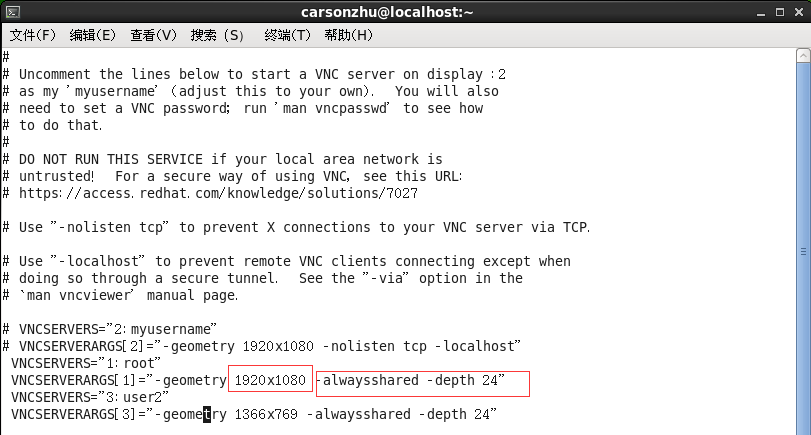
说明:
(1)-alwaysshared表示同一个显示端口允许多用户同时登录 -depth代为色深,参数有8、16、24、32;
(2)-nolisten tcp -localhost 表示不支持tcp,只能在本地测试访问;
(3)VNCSERVERS=是设定可以使用VNC服务器的帐号,可以设定多个,但中间要用空格隔开。注意前面的数字“1”或是“2”,当你要从其它电脑来VNC服务器时,就需要用IP:1这种方法,而不能直接用IP。
(4)下面两行[1][2]最好与上面那个相对应,后面的800X600可以换成你电脑支持的分辨率。注意中间的”x”不是“*”,而是小写字母”x”。
5.修改远程桌面显示配置文件:
6.查看vnc服务所使用的端口:
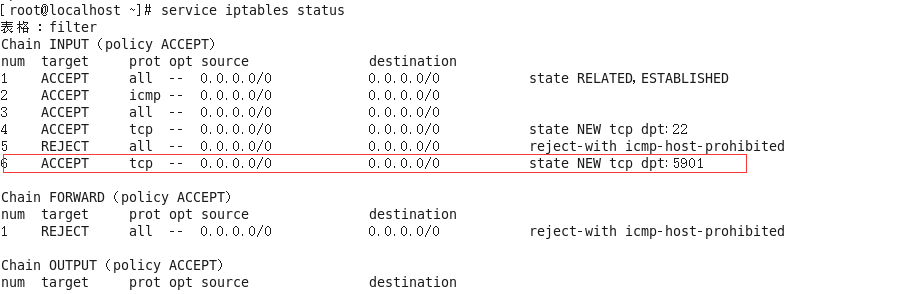
由于iptables防火墙默认会阻止vnc远程桌面,所以需要在iptables中允许通过(当然你可以直接关闭防火墙):
解决方法:
依样画葫芦添加端口5091
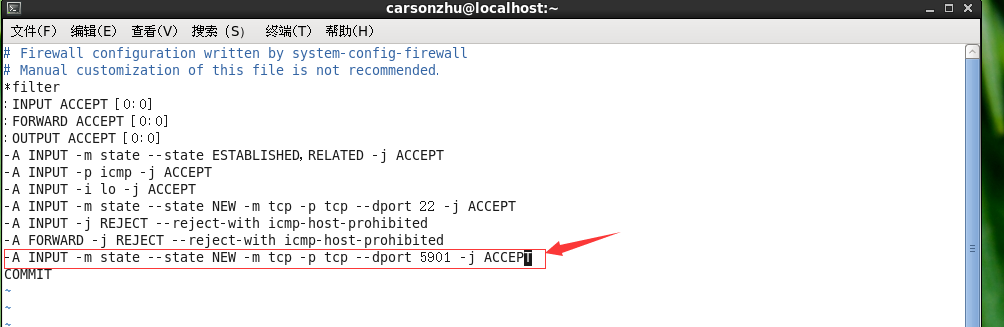
重启防火墙:
再次查看防火墙状态:
7.开机自启动vncserver服务:
8.vnc的反向连接设置:
在大多数情况下,vncserver总处于监听状态,vnc client主动向服务器发出请求从而建立连接。然而在
一些特殊的场合,需要让vnc客户机处于监听状态,vncsrever主动向客户机发出连接请求,此谓vnc的
反向连接。
主要步骤:
a、启动vnc client,使vncviewer处于监听状态;
# vncviewer -listen
b、启动vncserver
# vncserver
c、在vncserver端执行vncconnect命令,发起server到client的请求;
# vncconnect -display :1 192.168.80.120
9. 修改vnc密码:
修改vnc密码的方法是执行:vncpasswd
输入两次密码即可。
10.检查服务器端VNC Server是否正常运行中:
执行:ps -ef|grep vnc
如果vnc在执行,可以看到类似的消息:
说明是序号为“:1”vnc进程在端口为5901上进行监听
11.可能会遇到的问题:
a、黑屏
在Linux里安装配置完VNC服务端,发现多用户登陆会出现黑屏的情况,具体的现象为:
客户端可以通过IP与会话号登陆进入系统,但登陆进去是漆黑一片,除了一个叉形的鼠标以外,伸手不见五指。
原因:用户的VNC的启动文件权限未设置正确。
解决方法:将黑屏用户的xstartup(一般为:/用户目录/.vnc/xstartup)文件的属性修改为755(rwxr-xr-x)。
完后杀掉所有已经启动的VNC客户端:
vncserver -kill :1
vncserver -kill :2 (注意:-kill与:1或:2中间有一空格)
最后重启vncserver服务即可! # /etc/init.d/vncserver restart
注意:vncserver只能由启动它的用户来关闭,即时是root也不能关闭其它用户开启的vncserver,
除非用kill命令暴力杀死进程。
b、Windows下如何登陆VNC Server
(1)从浏览器登录(浏览器需要安装JAVA支持库,作为java applet来实现,才能登录控制VNC服务器,可以yum install java*安装)
直接从浏览器中输入如下地址: http://xxx.xxx.xxx.xxx:5901
可参考的文章:CentOS6.3下VNCServer的配置
CentOS Linux下VNC Server远程桌面配置详解
linux里vim和vi到底有啥区别
Linux netstat命令详解
1.首先,检查下本机是否安装了vnc:
提示没有安装,那么开始装吧:
2.先关闭防火墙
查看防火墙状态:
关闭防火墙:
注:要切到root下
[carsonzhu@localhost 桌面]$ yum install vnc vnc-server
Loaded plugins: fastestmirror, refresh-packagekit, security
You need to be root to perform this command.
[carsonzhu@localhost 桌面]$ su
密码:
[root@localhost 桌面]# yum install vnc vnc-server
Loading mirror speeds from cached hostfile
* base: mirror.bit.edu.cn
* extras: mirror.bit.edu.cn
* updates: mirror.bit.edu.cn
Setting up Install Process
Resolving Dependencies
--> Running transaction check
---> Package tigervnc.x86_64 0:1.1.0-18.el6 will be installed
---> Package tigervnc-server-module.x86_64 0:1.1.0-18.el6 will be installed
--> Finished Dependency Resolution

Dependencies Resolved

================================================================================
Package                      Arch         Version             Repository  Size
================================================================================
Installing:
tigervnc                     x86_64       1.1.0-18.el6        base       184 k
tigervnc-server-module       x86_64       1.1.0-18.el6        base       213 k

Transaction Summary
================================================================================
Install       2 Package(s)

Total download size: 398 k
Installed size: 1.0 M
Is this ok [y/N]: y
Downloading Packages:
(1/2): tigervnc-1.1.0-18.el6.x86_64.rpm                  | 184 kB     00:00
(2/2): tigervnc-server-module-1.1.0-18.el6.x86_64.rpm    | 213 kB     00:00
--------------------------------------------------------------------------------
Total                                           330 kB/s | 398 kB     00:01
Running rpm_check_debug
Running Transaction Test
Transaction Test Succeeded
Running Transaction
Installing : tigervnc-1.1.0-18.el6.x86_64                                 1/2
Installing : tigervnc-server-module-1.1.0-18.el6.x86_64                   2/2
Verifying  : tigervnc-server-module-1.1.0-18.el6.x86_64                   1/2
Verifying  : tigervnc-1.1.0-18.el6.x86_64                                 2/2

Installed:
tigervnc.x86_64 0:1.1.0-18.el6  tigervnc-server-module.x86_64 0:1.1.0-18.el6

Complete!
3.启动vncserver,会要求你输入两次进行连接的初始密码
4.添加root系统环境配置
[root@localhost ~]# vi /etc/sysconfig/vncservers
在最后面加上如下两行:
说明:
(1)-alwaysshared表示同一个显示端口允许多用户同时登录 -depth代为色深,参数有8、16、24、32;
(2)-nolisten tcp -localhost 表示不支持tcp,只能在本地测试访问;
(3)VNCSERVERS=是设定可以使用VNC服务器的帐号,可以设定多个,但中间要用空格隔开。注意前面的数字“1”或是“2”,当你要从其它电脑来VNC服务器时,就需要用IP:1这种方法,而不能直接用IP。
(4)下面两行[1][2]最好与上面那个相对应,后面的800X600可以换成你电脑支持的分辨率。注意中间的”x”不是“*”,而是小写字母”x”。
5.修改远程桌面显示配置文件:
[root@localhost .vnc]# vim xstartup
[root@localhost .vnc]# pwd
/root/.vnc
6.查看vnc服务所使用的端口:
[root@localhost ~]# netstat -tunlp
Active Internet connections (only servers)
Proto Recv-Q Send-Q Local Address               Foreign Address             State       PID/Program name
tcp        0      0 0.0.0.0:5901                0.0.0.0:*                   LISTEN      31175/Xvnc
tcp        0      0 0.0.0.0:111                 0.0.0.0:*                   LISTEN      1947/rpcbind
tcp        0      0 0.0.0.0:22                  0.0.0.0:*                   LISTEN      2167/sshd
tcp        0      0 127.0.0.1:631               0.0.0.0:*                   LISTEN      2050/cupsd
tcp        0      0 127.0.0.1:25                0.0.0.0:*                   LISTEN      2337/master
tcp        0      0 0.0.0.0:55400               0.0.0.0:*                   LISTEN      1993/rpc.statd
tcp        0      0 :::111                      :::*                        LISTEN      1947/rpcbind
tcp        0      0 :::22                       :::*                        LISTEN      2167/sshd
tcp        0      0 ::1:631                     :::*                        LISTEN      2050/cupsd
tcp        0      0 ::1:25                      :::*                        LISTEN      2337/master
tcp        0      0 :::53124                    :::*                        LISTEN      1993/rpc.statd
udp        0      0 0.0.0.0:111                 0.0.0.0:*                               1947/rpcbind
udp        0      0 0.0.0.0:631                 0.0.0.0:*                               2050/cupsd
udp        0      0 0.0.0.0:897                 0.0.0.0:*                               1993/rpc.statd
udp        0      0 0.0.0.0:40530               0.0.0.0:*                               1993/rpc.statd
udp        0      0 0.0.0.0:850                 0.0.0.0:*                               1947/rpcbind
udp        0      0 :::111                      :::*                                    1947/rpcbind
udp        0      0 :::850                      :::*                                    1947/rpcbind
udp        0      0 :::57309                    :::*                                    1993/rpc.statd
由于iptables防火墙默认会阻止vnc远程桌面,所以需要在iptables中允许通过(当然你可以直接关闭防火墙):
解决方法:
依样画葫芦添加端口5091
重启防火墙:
[root@localhost ~]# /etc/init.d/iptables restart
iptables:将链设置为政策 ACCEPT:filter                    [确定]
iptables:清除防火墙规则:                                 [确定]
iptables:正在卸载模块:                                   [确定]
iptables:应用防火墙规则:                                 [确定]
再次查看防火墙状态:
7.开机自启动vncserver服务:
[root@localhost ~]# chkconfig vncserver on
8.vnc的反向连接设置:
在大多数情况下,vncserver总处于监听状态,vnc client主动向服务器发出请求从而建立连接。然而在
一些特殊的场合,需要让vnc客户机处于监听状态,vncsrever主动向客户机发出连接请求,此谓vnc的
反向连接。
主要步骤:
a、启动vnc client,使vncviewer处于监听状态;
# vncviewer -listen
b、启动vncserver
# vncserver
c、在vncserver端执行vncconnect命令,发起server到client的请求;
# vncconnect -display :1 192.168.80.120
9. 修改vnc密码:
修改vnc密码的方法是执行:vncpasswd
输入两次密码即可。
10.检查服务器端VNC Server是否正常运行中:
执行:ps -ef|grep vnc
如果vnc在执行,可以看到类似的消息:
[root@localhost ~]# ps -ef|grep vnc
root     31175     1  0 14:16 pts/4    00:00:06 /usr/bin/Xvnc :1 -desktop localhost.localdomain:1 (carsonzhu) -auth /root/.xauthJFVt39 -geometry 1024x768 -rfbwait 30000 -rfbauth /root/.vnc/passwd -rfbport 5901 -fp catalogue:/etc/X11/fontpath.d -pn
root     31181 31180  0 14:16 pts/4    00:00:00 vncconfig -iconic
root     33492 31039  0 16:38 pts/4    00:00:00 grep vnc
说明是序号为“:1”vnc进程在端口为5901上进行监听
11.可能会遇到的问题:
a、黑屏
在Linux里安装配置完VNC服务端,发现多用户登陆会出现黑屏的情况,具体的现象为:
客户端可以通过IP与会话号登陆进入系统,但登陆进去是漆黑一片,除了一个叉形的鼠标以外,伸手不见五指。
原因:用户的VNC的启动文件权限未设置正确。
解决方法:将黑屏用户的xstartup(一般为:/用户目录/.vnc/xstartup)文件的属性修改为755(rwxr-xr-x)。
完后杀掉所有已经启动的VNC客户端:
vncserver -kill :1
vncserver -kill :2 (注意:-kill与:1或:2中间有一空格)
最后重启vncserver服务即可! # /etc/init.d/vncserver restart
注意:vncserver只能由启动它的用户来关闭,即时是root也不能关闭其它用户开启的vncserver,
除非用kill命令暴力杀死进程。
b、Windows下如何登陆VNC Server
(1)从浏览器登录(浏览器需要安装JAVA支持库,作为java applet来实现,才能登录控制VNC服务器,可以yum install java*安装)
直接从浏览器中输入如下地址: http://xxx.xxx.xxx.xxx:5901
可参考的文章:CentOS6.3下VNCServer的配置
CentOS Linux下VNC Server远程桌面配置详解
linux里vim和vi到底有啥区别
Linux netstat命令详解

相关文章推荐
- MPICH2 Linux集群搭建前期准备
- linux文本编辑乱码问题处理
- Linux环境之进程调度算法
- Linux文件查找命令 - find
- 论Linux非图形界面下如何上传文件到百度云盘
- centos7 confluence5.8.10安装 配置 汉化以及破解
- 从一个错误映射到centos7 firewalld 防火墙的使用
- Linux 默认的目录介绍
- DOS 和 Linux 常用命令的对比
- 嵌入式Linux裸机开发(十二)——iNand简介
- [linux]软连接和硬连接
- 【linux】rpm常见命令
- 一个简单的epoll使用例子
- linux防火墙之iptables
- Linux下Clock skew detected的解决办法
- CentOS 卸载OpenJdk
- centos中QT报错/usr/bin/ld: error: cannot find -lGL
- 如何选择适合你的linux操作系统,参考2016年的趋势吧。
- Linux内核完全注释阅读笔记1:O(1)时间复杂度查找timeout定时器
- 嵌入式Linux裸机开发(十一)——Nandflash