Spring Boot入门例子
2016-06-10 00:36
627 查看
首先使用Maven导入必要的jar
<project xmlns="http://maven.apache.org/POM/4.0.0" xmlns:xsi="http://www.w3.org/2001/XMLSchema-instance"
xsi:schemaLocation="http://maven.apache.org/POM/4.0.0 http://maven.apache.org/xsd/maven-4.0.0.xsd"> <modelVersion>4.0.0</modelVersion>

<groupId>springboot</groupId>
<artifactId>springboot</artifactId>
<version>0.0.1-SNAPSHOT</version>
<packaging>jar</packaging>

<name>springboot</name>
<url>http://maven.apache.org</url>

<properties>
<project.build.sourceEncoding>UTF-8</project.build.sourceEncoding>
</properties>

<!-- Spring Boot 启动父依赖 -->
<parent>
<groupId>org.springframework.boot</groupId>
<artifactId>spring-boot-starter-parent</artifactId>
<version>1.3.3.RELEASE</version>
</parent>

<dependencies>

<!-- Spring Boot web依赖 -->
<dependency>
<groupId>org.springframework.boot</groupId>
<artifactId>spring-boot-starter-web</artifactId>
</dependency>

<dependency>
<groupId>junit</groupId>
<artifactId>junit</artifactId>
<scope>test</scope>
</dependency>
</dependencies>
</project>
加入一个Controller
package cn.springboot.controller;
import org.springframework.boot.autoconfigure.EnableAutoConfiguration;
import org.springframework.web.bind.annotation.PathVariable;
import org.springframework.web.bind.annotation.RequestMapping;
import org.springframework.web.bind.annotation.RestController;
import cn.springboot.dto.People;
@EnableAutoConfiguration
@RestController
public class HelloController {
@RequestMapping("/")
public String sayHello() {
return "Hello,World!";
}
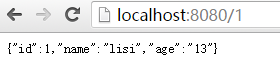
@RequestMapping("/{id}")
public People getPeople(@PathVariable Integer id) {
People people = new People();
people.setId(id);
people.setAge("13");
people.setName("lisi");
return people;
}
}@RestController告诉Spring以字符串的形式渲染结果,并直接返回给调用者。
@EnableAutoConfiguration 。这个注解告诉Spring Boot根据添加的jar依赖猜测你想如何配置Spring。
一个启动类
package cn.springboot.application;

import org.springframework.boot.SpringApplication;
import org.springframework.boot.autoconfigure.SpringBootApplication;

import cn.springboot.controller.HelloController;

@SpringBootApplication
public class Application {

public static void main(String[] args) {
SpringApplication.run(HelloController.class, args);
}
}
我们的main方法通过调用run,将业务委托给了Spring Boot的SpringApplication类。SpringApplication将引导我们的应用,启动Spring,相应地启动被自动配置的Tomcat web服务器。我们需要将 Example.class 作为参数传递给run方法来告诉SpringApplication谁是主要的Spring组件。为了暴露任何的命令行参数,args数组也会被传递过去。
启动后就可以进行访问了
结果如下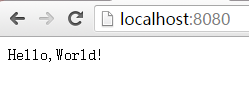
参考
官方的《Spring Boot Reference Guide》
相关文章推荐
- 详解Spring Boot Junit单元测试
- 详解Spring Boot 集成Shiro和CAS
- spring boot 1.5.4 集成shiro+cas,实现单点登录和权限控制
- Spring Boot工程支持HTTP和HTTPS,HTTP重定向HTTPS
- Spring拦截器中@Value无效的解决办法
- SpringBoot+Dubbo+Mybatis 项目升级版本(Gradle)
- idea使用gradle搭建SpringBoot
- spring boot mysql
- springboot 开发入门,及问题汇总
- SpringBoot和Mybatis整合
- Spring Boot 中使用log4jdbc记录SQL的运行时参数
- spring boot 使用h2数据库配置(内存模式)
- spring-boot 配置多数据源多orm框架混用
- spring boot 将dependency 从fat jar 中抽取出来
- 禁用springboot中对mongodb的autoConfiguration
- springboot集成httpinvoker的客户端
- spring boot 起步-原型实例
- springboot 配置多数据源
- springboot springjpa 支持多个数据源
- spring-boot环境搭建