idea使用gradle搭建SpringBoot
2016-01-20 08:47
846 查看
摘要: 新项目开坑,本来是想用jdk1.6+maven进行开发的,愿意是想兼容性高一点的,但后面想想,既然是新的项目为什么还用旧的技术呢,经过再三考虑,决定新项目要革新,按java8的规范,gradle构建,springBoot做框架,走起
首先介绍一下gradle,Gradle 是以 Groovy 语言为基础,面向Java应用为主.基于DSL(领域特定语言)语法的自动化构建工具,目前来说应该算是比较新的自动化构建工具了。为什么不用Maven要用Gradle呢,两个字:简洁!我们来对比一下
Maven定义
Gradle定义
对,你没看错,就仅仅是一行就定义好了。比原来繁琐的xml简单了很多。
好言归正传,我们来看看同过idea怎么构建springBoot的gradle项目的。
第一步,创建gradle项目,这个地方直接上图。

创建gradle项目

设置项目名称后点击finish

第二步,配置build.gradle
待项目创建完成后,就要对build.gradle进行修改,添加springBoot的依赖

以下是添加的代码
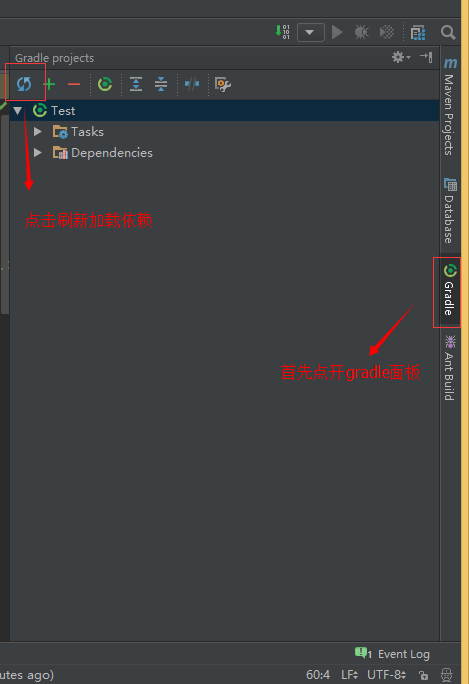
第三步,导入依赖
在idea右手的侧边栏找到gradle的面板,点开后,刷新项目就能自动下载对应的依赖包了
第四步,创建springBoot示例
在项目中创建Maven约定风格的目录结构,例如
src\main\java
src\main\Resources 等等
添加包,例如
com.test
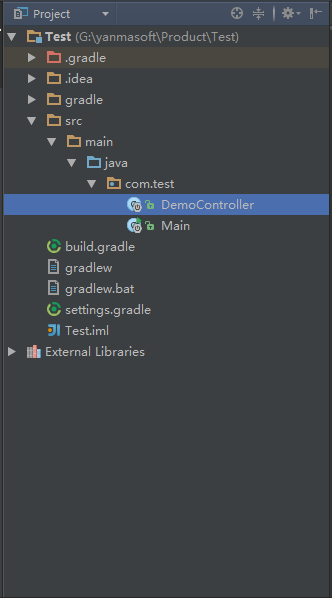
最后添加springBoot的启动类和controller
Main.java
DemoConrtallor.jva
最后直接运行Main.java就会自己启动集成的tomcat了,访问:http://localhost:8080/app/demo就能看到效果,轻轻松松构建完成
首先介绍一下gradle,Gradle 是以 Groovy 语言为基础,面向Java应用为主.基于DSL(领域特定语言)语法的自动化构建工具,目前来说应该算是比较新的自动化构建工具了。为什么不用Maven要用Gradle呢,两个字:简洁!我们来对比一下
Maven定义
<dependency>
<groupId>org.springframework.boot</groupId>
<artifactId>spring-boot-starter-web</artifactId>
</dependency>
Gradle定义
compile 'org.springframework.boot:spring-boot-starter-web'
对,你没看错,就仅仅是一行就定义好了。比原来繁琐的xml简单了很多。
好言归正传,我们来看看同过idea怎么构建springBoot的gradle项目的。
第一步,创建gradle项目,这个地方直接上图。
创建gradle项目
设置项目名称后点击finish
第二步,配置build.gradle
待项目创建完成后,就要对build.gradle进行修改,添加springBoot的依赖
以下是添加的代码
buildscript {
repositories {
mavenLocal()//maven的本地仓
jcenter()//官方仓
}
dependencies {
classpath("org.gradle.api.plugins:gradle-tomcat-plugin:1.2.5")
classpath("org.springframework.boot:spring-boot-gradle-plugin:
3ff0
1.2.3.RELEASE")
}
}

apply plugin: 'java'
apply plugin: 'idea'
apply plugin: 'spring-boot'

version = '1.0'
buildDir = 'target'

jar {
baseName = 'product_catering'
version =  '1.0'
}

configurations {
//不进行依赖传递,否则要下载很多依赖项
//例如 flex-framework
starling.transitive = false
}

repositories {
mavenLocal()
jcenter()
}

[compileJava, javadoc, compileTestJava]*.options*.encoding = 'UTF-8'

dependencies {
//compile : 编译时需要的依赖
//runtime : 运行时需要的依赖,包括compile
//testCompile : testCase编译时需要的依赖
//testRuntime : testCase运行时需要的依赖,包括testCompile
//还有两个不常用的archives、defaul
compile 'org.springframework.boot:spring-boot-starter-web'
compile 'org.springframework:spring-jdbc:4.1.4.RELEASE'
compile 'org.springframework.boot:spring-boot-starter-data-jpa'
compile 'org.hsqldb:hsqldb'
compile 'org.apache.tomcat:tomcat-jdbc:8.0.18'
testCompile 'junit:junit:4.11'
testCompile 'org.springframework.boot:spring-boot-starter-test'
}

idea.project {
jdkName = '1.8'
languageLevel = '1.8'
}
第三步,导入依赖
在idea右手的侧边栏找到gradle的面板,点开后,刷新项目就能自动下载对应的依赖包了
第四步,创建springBoot示例
在项目中创建Maven约定风格的目录结构,例如
src\main\java
src\main\Resources 等等
添加包,例如
com.test
最后添加springBoot的启动类和controller
Main.java
/**
* server 主入口
* Created by Kenry.xian on 2015/5/27 0016.
*/
@Configuration //标明这个是SpringBoot的配置类,可以通过类配置代替原有的XML配置方式
@EnableAutoConfiguration //启动bean自动注入
@ComponentScan //启动自动搜索bean
public class Main extends WebMvcConfigurerAdapter {
public static void main(String[] args) throws Exception {
SpringApplication.run(Main.class);
}
}
DemoConrtallor.jva
/**
* Created by Kenry on 2015/5/27 0016.
*/
@RestController //标注此类为Controller
@EnableAutoConfiguration //启动自动注入

@RequestMapping("/app")
public class DemoController {

@RequestMapping("/demo")
@ResponseBody
public Map<String, String> version(){
HashMap<String, String> result = new HashMap<String, String>();
result.put("show", "Hello world");
return result;
}
}
最后直接运行Main.java就会自己启动集成的tomcat了,访问:http://localhost:8080/app/demo就能看到效果,轻轻松松构建完成

相关文章推荐
- SourceProvider.getJniDirectories
- 执行失败的任务 ': processDebugManifest'
- Android Studio使用教程(六):Gradle多渠道打包
- 详解Spring Boot 集成Shiro和CAS
- Android Studio使用教程(四):Gradle基础
- Android Studio使用教程(五):Gradle命令详解和导入第三方包
- spring boot 1.5.4 集成shiro+cas,实现单点登录和权限控制
- IntelliJ IDEA & Android Studio的调整优化
- Win7安装gradle
- Intellij IDEA控制台乱码解决方法
- idea中切换svn地址不起作用
- 使用Ant构建SSH项目(Intellij IDEA版)
- 关于Android Studio 和 Gradle的那些事儿
- Gradle这个黑盒子
- idea常用设置
- Intellij idea使用Git@Osc发布项目(干货)
- maven用户试用gradle
- IntelliJ IDEA使用Application Server开发普通Java Web项目
- IntelliJ IDEA使用Maven快速开发Java Web项目,并添加JFinal依赖
- 在线安装 IntelliJ IDEA的 golang 插件