自定义优惠券
2016-06-04 16:19
337 查看
最近做项目的时候,加入优惠券模块,效果图如下:
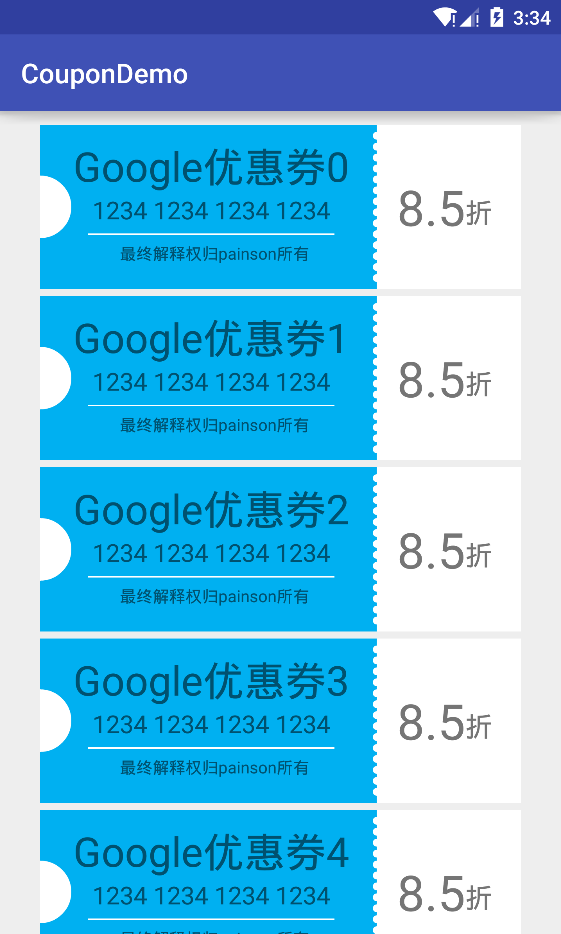
下面简单的说下实现过程。
首先是自定义了一个控件CouponView,该控件继承了LinearLayout,该控件有如下几个自定义属性:
其中radius表示的是右边那列小锯齿的半径大小,sawtooth_color表示左边的锯齿部分的背景颜色,background_color表示整体的背景颜色,sawtooth_width_gap表示锯齿之间的间隙大小,sawtooth_weight表示左边含有锯齿部分的宽度占整个布局的宽度比例。
接下来在CouponView中获取到这些属性:
获取参数这个没什么好说的,获取完参数之后别忘了初始化Paint,还有千万别漏了setWillNotDraw(false),如果不设置该属性为false,onDraw有可能不会被调用到:
接着根据既有数值算出锯齿的个数及剩余空间:
这里的剩余空间是指根据指定的半径大小画了mRCircleNum个 半圆后还剩余的高度,用于指定画半圆的开始的位置。
接下来就是draw的过程了:
这里需要说明的是画左边的半圆用的是drawArc而不是drawCircle,因为drawCircle会画出整个圆,所以这里通过计算弧度来画半圆。其余的都比较简单,不用多说。
最后在布局文件中使用就行了:
代码就这么多,基本实现了该效果。
附上代码:
CouponDemo
下面简单的说下实现过程。
首先是自定义了一个控件CouponView,该控件继承了LinearLayout,该控件有如下几个自定义属性:
<declare-styleable name="CouponView">
<attr name="radius" format="dimension"/>
<attr name="sawtooth_color" format="color"/>
<attr name="background_color" format="color"/>
<attr name="sawtooth_width_gap" format="dimension"/>
<attr name="sawtooth_weight" format="float"/>
</declare-styleable>
其中radius表示的是右边那列小锯齿的半径大小,sawtooth_color表示左边的锯齿部分的背景颜色,background_color表示整体的背景颜色,sawtooth_width_gap表示锯齿之间的间隙大小,sawtooth_weight表示左边含有锯齿部分的宽度占整个布局的宽度比例。
接下来在CouponView中获取到这些属性:
TypedArray a = context.obtainStyledAttributes(attrs, R.styleable.CouponView);
int n = a.getIndexCount();
for (int i = 0; i < n; i++) {

int attr = a.getIndex(i);
switch (attr) {
case R.styleable.CouponView_radius:
mRRadius = a.getDimension(attr, 10);
break;
case R.styleable.CouponView_sawtooth_color:
mSawtoothColor = a.getColor(attr, 0);
break;
case R.styleable.CouponView_sawtooth_width_gap:
mRCircleGap = a.getDimension(attr, 8);
break;
case R.styleable.CouponView_sawtooth_weight:
mSawtoothWeight = a.getFloat(attr, 0.65f);
break;
case R.styleable.CouponView_background_color:
mBackgroundColor = a.getColor(attr, 0);
}
}
a.recycle();
获取参数这个没什么好说的,获取完参数之后别忘了初始化Paint,还有千万别漏了setWillNotDraw(false),如果不设置该属性为false,onDraw有可能不会被调用到:
mPaint = new Paint(Paint.ANTI_ALIAS_FLAG);
mPaint.setDither(true);
mPaint.setStyle(Paint.Style.FILL);
//别忘了将该属性设置为false
setWillNotDraw(false);
接着根据既有数值算出锯齿的个数及剩余空间:
@Override
protected void onLayout(boolean changed, int l, int t, int r, int b) {
super.onLayout(changed, l, t, r, b);
if(changed) {
//计算剩余空间
if (mRRemain == 0) {
mRRemain = (int) (b - t - mRCircleGap - getPaddingTop() - getPaddingBottom()) % (2 * mRRadius + mRCircleGap);
}
//计算锯齿半圆个数
mRCircleNum = (int) ((b - t - mRCircleGap - getPaddingTop() - getPaddingBottom()) / (2 * mRRadius + mRCircleGap));
}
}
这里的剩余空间是指根据指定的半径大小画了mRCircleNum个 半圆后还剩余的高度,用于指定画半圆的开始的位置。
接下来就是draw的过程了:
float width = getWidth() - getPaddingLeft() - getPaddingRight();
float height = getHeight() - getPaddingTop() - getPaddingBottom();
mPaint.setColor(mSawtoothColor);
//画锯齿背景
canvas.drawRect(getPaddingLeft(), getPaddingTop(), getPaddingLeft() + (width * mSawtoothWeight), getPaddingTop() + height, mPaint);

mPaint.setColor(mBackgroundColor);
//画锯齿部分
for (int i = 0; i < mRCircleNum; i++) {
float y = mRCircleGap + mRRadius + mRRemain / 2 + ((mRCircleGap + mRRadius * 2) * i) + getPaddingTop();
canvas.drawCircle(getPaddingLeft() + width * mSawtoothWeight, y, mRRadius, mPaint);
}
//画右边剩余部分
canvas.drawRect(getPaddingLeft() + width * mSawtoothWeight, getPaddingTop(), width + getPaddingLeft(), height + getPaddingTop(), mPaint);
mPaint);
//画左边的大的半圆
mOval.set(getPaddingLeft() - mLRadius,
getPaddingTop() + (height - 2 * mLRadius) / 2,
getPaddingLeft() + mLRadius,
getPaddingTop() + (height - 2 * mLRadius) / 2 + 2 * mLRadius);
canvas.drawArc(mOval, -90, 180, true, mPaint);
这里需要说明的是画左边的半圆用的是drawArc而不是drawCircle,因为drawCircle会画出整个圆,所以这里通过计算弧度来画半圆。其余的都比较简单,不用多说。
最后在布局文件中使用就行了:
<com.example.coupondemo.view.CouponView xmlns:android="http://schemas.android.com/apk/res/android"
xmlns:coupon="http://schemas.android.com/apk/res-auto"
coupon:background_color="@android:color/white"
coupon:sawtooth_color="@color/coupon_sawtooth_bg_color"
coupon:sawtooth_weight="0.7"
android:layout_width="match_parent"
android:layout_height="120dp"
android:paddingLeft="30dp"
android:paddingRight="30dp"
android:orientation="horizontal">
代码就这么多,基本实现了该效果。
附上代码:
CouponDemo

相关文章推荐
- flex 控件的重要属性
- PostgreSQL教程(三):表的继承和分区表详解
- 学习Winform文本类控件(Label、Button、TextBox)
- Delphi控件ListView的属性及使用方法详解
- Lua面向对象之类和继承浅析
- 浅析Ruby中继承和消息的相关知识
- web下载的ActiveX控件自动更新
- WinForm实现按名称递归查找控件的方法
- C#中父窗口和子窗口之间控件互操作实例
- 设计引导--一个鸭子游戏引发的设计理念(多态,继承,抽象,接口,策略者模式)
- Android编程之Button控件用法实例分析
- Android控件之CheckBox、RadioButton用法实例分析
- 在Android开发中使用自定义组合控件的例子
- 一款超酷的Android自定义加载控件
- Android重写View实现全新的控件
- C++实现不能被继承的类实例分析
- MFC中动态创建控件以及事件响应实现方法
- WinForm自定义函数FindControl实现按名称查找控件
- C# 面向对象三大特性:封装、继承、多态
- Android控件之ProgressBar用法实例分析