Glide加载图片流程(Part One)
2016-06-04 00:00
429 查看
摘要: 由于项目的需要,这几天对[Glide](https://github.com/bumptech/glide)的执行过程做了简单的了解,希望对想了解Glide基本用法的朋友能有所帮助。
由于项目的需要,这几天对Glide的执行过程做了简单的了解,希望对想了解Glide基本用法的朋友能有所帮助。
注意
此系列博客基于Glide V3.7.0版本源码
这里假设朋友们能够在Android Studio中正确引入Glide相关的依赖,如果有不懂的朋友,请参考官方文档引入依赖。
为了让朋友们尽快的了解Glide加载图片的流程,我们就从最简单的方式入手。请看如下代码:
代码清单1-1
使用Glide加载图片就是这么简单!!!
然而,简单的背后往往隐藏了太多的未知数,那么现在我们就来看看这几行简单代码背后究竟隐藏了哪些奇妙的东西。现在就和博主一起开启Glide的学习之旅吧 :)
首先获取一个
我们只考虑常规情况下使用的场景(不考虑缓存等情况,后文与此相同),由上面的代码,我们很容易定位到
由于我们是初次调用Glide加载图片,所以这里会创建一个新的
我们进入到
在上述代码中,我们顺藤摸瓜,来到
在获取
接下来我们继续查看
好了,重头戏该上演了,我们来看看
这个方法相对比较长,但是理解起来较为简单。主要就是注册一些DataLoadProvider、ModelLoader的factory以及几个Transcoder。为了更直观的理解和查询,我将它们罗列成下面三张表:(PS:这三张表对于理解Glide的加载流程很重要)
表1-1 ModelType到DataType的映射表
注 编号(14*)并不是在构造方法中直接注册的 factory 而是在
表1-2 DataType到ResourceType的映射表
表1-3 ResourceType到TranscodeType的映射
上表 标题 提到的 ModelType、DataType、ResourceType和TranscodeType在
对于这四种范型的理解是了解Glide运行的关键,接口
从代码中我们得知,该方法返回了一个
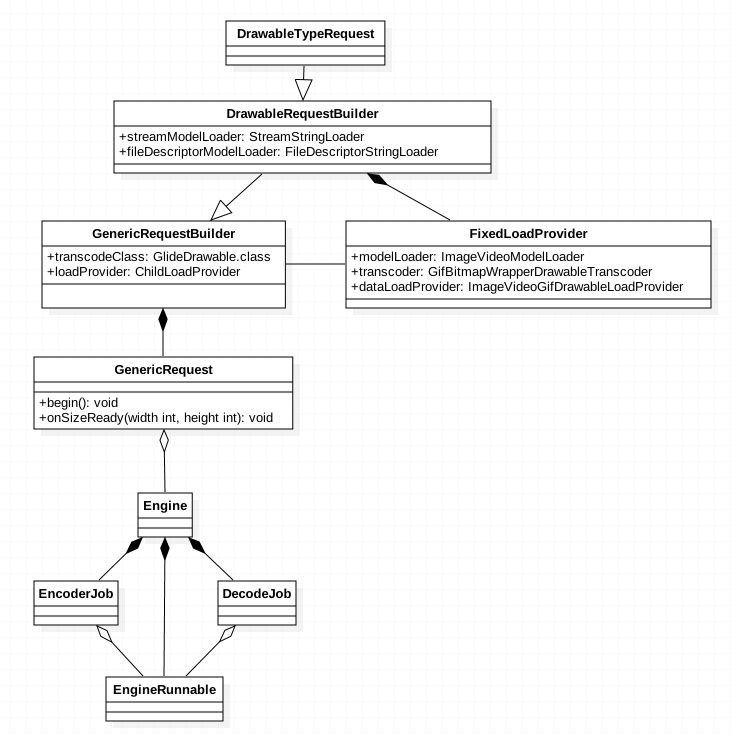
图1-1 Request继承关系图
注意 理解了上图的朋友可以直接跳到下一小节,下面的描述很枯燥 :(
该对象的继承关系为
很显然,上面方法中的泛型
在
有
我们顺藤摸瓜,找到了
在上述方法中,我们定位到这行代码:
在这行代码中,我们是通过调用
很显然,我们是首先从Map表
紧接着就生成了一个
在创建
代码清单1-2
在这个方法中,我们重点留意下
有关
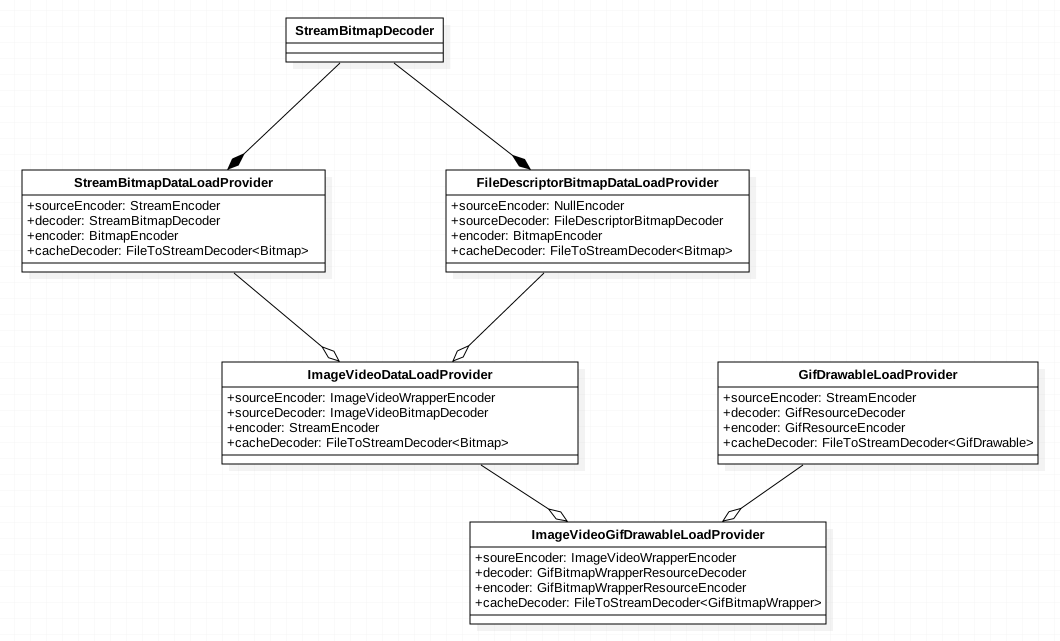
图1-2 ImageVideoGifDrawableLoadProvider类关系图
回到
我们暂且忽略图片的变换逻辑,只看图片的加载过程。在步骤(二)中我们很容易确定,该方法中的
代码清单1-3
这个方法我们需要重点关心的是
我们先忽略缩略图问题,直接到本方法的最后来看看
这个方法涉及到了很多实例对象,而这些实例对象中,我们首先需要关注的就是
获取到
很显然,这一行代码便是要加载我们的图片了。按图索骥,我们来到了
在该方法中,我们要关注的是该类的
代码清单1-4
在
看到这里我们就明白了,在
按照步骤(二)中获取
由于我们是初次调用Glide来加载图片,所以会生成一个
我们接着代码清单1-4往下看,有这么一行代码:
这一行便是加载图片并显示的过程了。我们进到
在这个方法中,我们主要关心的是
代码清单1-5
进一步,我们来到
不考虑缓存问题,进入
进入到
代码清单1-6
接着我们来查看
看到这里,我们终算拿到了数据源:
这里的
顺着该方法走下去,我们便明白了,
在这里,我们拿到的数据源是一个InputStream输入流。而我们的要看到的是一张张的图片。这又是如何获取的呢?
OK,顺着方法往下看,我们来到这行:
顺着方法往下看:
同样避开缓存不谈,直接看下面这行:
追本溯源,这里的
我们顺着
在这个方法中,会根据
结合着图1-2,我们定位到了
好吧,我们又回到了
哈哈,我们终于看到了
拿到Bitmap后我们再次回到
方法中我们主要是关注下面这行:
这里
这里我们又迎来了一个“狠角色”
从前面我们已经知道,此处的
这里的
没错,这里的
OK,这里我们拿到一个包装类
在拿到
沿着方法的调用顺序,我们回到了
这个回调方法中回传的不再是我们前面获取到的
接着往下看:
在该方法中,我们关注这么两行代码:
这里的
找到它的基类,我们会发现最终又回到了它的
到这里,我们Glide加载图片的主要流程就结束了。其中涉及到的图片转换、缓存、动画等问题我会在此系列博客中有所涉及,这里先暂且不提。
后面的文章中我们会重点来查看Glide的缓存过程,请大家多多指点多多交流。
由于项目的需要,这几天对Glide的执行过程做了简单的了解,希望对想了解Glide基本用法的朋友能有所帮助。
注意
此系列博客基于Glide V3.7.0版本源码
这里假设朋友们能够在Android Studio中正确引入Glide相关的依赖,如果有不懂的朋友,请参考官方文档引入依赖。
为了让朋友们尽快的了解Glide加载图片的流程,我们就从最简单的方式入手。请看如下代码:
ImageView fullscreenView = (ImageView) findViewById(R.id.fullscreen_view);
String imageUrl = "http://image.url.com";
Glide.with(this)
.load(imageUrl)
.into(fullscreenView);
代码清单1-1
使用Glide加载图片就是这么简单!!!
然而,简单的背后往往隐藏了太多的未知数,那么现在我们就来看看这几行简单代码背后究竟隐藏了哪些奇妙的东西。现在就和博主一起开启Glide的学习之旅吧 :)
一、with(this)
在上述代码清单1-1中,我是在FragmentActivity子类中调用了Glide的with方法,SO这里的
this即是指
FragmentActivity的子类实例。我们点击查看其源码,如下:
public static RequestManager with(FragmentActivity activity) {
RequestManagerRetriever retriever = RequestManagerRetriever.get();
return retriever.get(activity);
}
首先获取一个
RequestManagerRetriever实例,通过该实例得到
RequestManager对象。我们现在进入
RequestManagerRetriever#get(FragmentActivity)方法中来具体看看
RequestManager的获取过程:
public RequestManager get(FragmentActivity activity) {
if (Util.isOnBackgroundThread()) {
return get(activity.getApplicationContext());
} else {
assertNotDestroyed(activity);
FragmentManager fm = activity.getSupportFragmentManager();
return supportFragmentGet(activity, fm);
}
}
我们只考虑常规情况下使用的场景(不考虑缓存等情况,后文与此相同),由上面的代码,我们很容易定位到
supportFragmentGet方法:
RequestManager supportFragmentGet(Context context, FragmentManager fm) {
SupportRequestManagerFragment current = getSupportRequestManagerFragment(fm);
RequestManager requestManager = current.getRequestManager();
if (requestManager == null) {
requestManager = new RequestManager(context, current.getLifecycle(), current.getRequestManagerTreeNode());
current.setRequestManager(requestManager);
}
return requestManager;
}
由于我们是初次调用Glide加载图片,所以这里会创建一个新的
RequestManager实例,并存入
SupportRequestManagerFragment的
current实例中。传入
RequestManager对象中的
Lifecycle和
RequestManagerTreeNode我们后面再说。这里需要注意的是,在创建
RequestManager对象时,默认创建了一个
RequestTracker对象和
OptionsApplier对象,以及我们的
Glide对象。
我们进入到
RequestManager的构造函数中,定位到
glide实例的获取过程:
RequestManager(Context context, final Lifecycle lifecycle, RequestManagerTreeNode treeNode,
RequestTracker requestTracker, ConnectivityMonitorFactory factory) {
this.context = context.getApplicationContext();
this.lifecycle = lifecycle;
this.treeNode = treeNode;
this.requestTracker = requestTracker;
this.glide = Glide.get(context);
this.optionsApplier = new OptionsApplier();

//省略其它无关代码
...........................
...........................
}
在上述代码中,我们顺藤摸瓜,来到
Glide类的
get方法中:
public static Glide get(Context context) {
if (glide == null) {
synchronized (Glide.class) {
if (glide == null) {
Context applicationContext = context.getApplicationContext();
List<GlideModule> modules = new ManifestParser(applicationContext).parse();

GlideBuilder builder = new GlideBuilder(applicationContext);
for (GlideModule module : modules) {
module.applyOptions(applicationContext, builder);
}
glide = builder.createGlide();
for (GlideModule module : modules) {
module.registerComponents(applicationContext, glide);
}
}
}
}

return glide;
}
在获取
Glide的实例过程中,我们看到Glide会从AndroidManifest.xml文件中查询我们注册的
GlideModule。同时将
GlideBuilder和
Glide的实例传入我们注册的
GlideModule的对应方法中。由此我们可以了解到,如果想预先控制
Glide的一些行为,可以在我们的
GlideModule的
applyOtions和
registerComponents方法中做控制。
接下来我们继续查看
GlideBuilder的
createGlide方法,直接定位到方法的最后一行:
new Glide(engine, memoryCache, bitmapPool, context, decodeFormat);
好了,重头戏该上演了,我们来看看
Glide类的构造函数:
Glide(Engine engine, MemoryCache memoryCache, BitmapPool bitmapPool, Context context, DecodeFormat decodeFormat) {
this.engine = engine;
this.bitmapPool = bitmapPool;
this.memoryCache = memoryCache;
this.decodeFormat = decodeFormat;
loaderFactory = new GenericLoaderFactory(context);
mainHandler = new Handler(Looper.getMainLooper());
bitmapPreFiller = new BitmapPreFiller(memoryCache, bitmapPool, decodeFormat);

dataLoadProviderRegistry = new DataLoadProviderRegistry();

StreamBitmapDataLoadProvider streamBitmapLoadProvider =
new StreamBitmapDataLoadProvider(bitmapPool, decodeFormat);
dataLoadProviderRegistry.register(InputStream.class, Bitmap.class, streamBitmapLoadProvider);

FileDescriptorBitmapDataLoadProvider fileDescriptorLoadProvider =
new FileDescriptorBitmapDataLoadProvider(bitmapPool, decodeFormat);
dataLoadProviderRegistry.register(ParcelFileDescriptor.class, Bitmap.class, fileDescriptorLoadProvider);

ImageVideoDataLoadProvider imageVideoDataLoadProvider =
new ImageVideoDataLoadProvider(streamBitmapLoadProvider, fileDescriptorLoadProvider);
dataLoadProviderRegistry.register(ImageVideoWrapper.class, Bitmap.class, imageVideoDataLoadProvider);

GifDrawableLoadProvider gifDrawableLoadProvider =
new GifDrawableLoadProvider(context, bitmapPool);
dataLoadProviderRegistry.register(InputStream.class, GifDrawable.class, gifDrawableLoadProvider);

dataLoadProviderRegistry.register(ImageVideoWrapper.class, GifBitmapWrapper.class,
new ImageVideoGifDrawableLoadProvider(imageVideoDataLoadProvider, gifDrawableLoadProvider, bitmapPool));

dataLoadProviderRegistry.register(InputStream.class, File.class, new StreamFileDataLoadProvider());

register(File.class, ParcelFileDescriptor.class, new FileDescriptorFileLoader.Factory());
register(File.class, InputStream.class, new StreamFileLoader.Factory());
register(int.class, ParcelFileDescriptor.class, new FileDescriptorResourceLoader.Factory());
register(int.class, InputStream.class, new StreamResourceLoader.Factory());
register(Integer.class, ParcelFileDescriptor.class, new FileDescriptorResourceLoader.Factory());
register(Integer.class, InputStream.class, new StreamResourceLoader.Factory());
register(String.class, ParcelFileDescriptor.class, new FileDescriptorStringLoader.Factory());
register(String.class, InputStream.class, new StreamStringLoader.Factory());
register(Uri.class, ParcelFileDescriptor.class, new FileDescriptorUriLoader.Factory());
register(Uri.class, InputStream.class, new StreamUriLoader.Factory());
register(URL.class, InputStream.class, new StreamUrlLoader.Factory());
register(GlideUrl.class, InputStream.class, new HttpUrlGlideUrlLoader.Factory());
register(byte[].class, InputStream.class, new StreamByteArrayLoader.Factory());

transcoderRegistry.register(Bitmap.class, GlideBitmapDrawable.class,
new GlideBitmapDrawableTranscoder(context.getResources(), bitmapPool));
transcoderRegistry.register(GifBitmapWrapper.class, GlideDrawable.class,
new GifBitmapWrapperDrawableTranscoder(
new GlideBitmapDrawableTranscoder(context.getResources(), bitmapPool)));

bitmapCenterCrop = new CenterCrop(bitmapPool);
drawableCenterCrop = new GifBitmapWrapperTransformation(bitmapPool, bitmapCenterCrop);

bitmapFitCenter = new FitCenter(bitmapPool);
drawableFitCenter = new GifBitmapWrapperTransformation(bitmapPool, bitmapFitCenter);
}这个方法相对比较长,但是理解起来较为简单。主要就是注册一些DataLoadProvider、ModelLoader的factory以及几个Transcoder。为了更直观的理解和查询,我将它们罗列成下面三张表:(PS:这三张表对于理解Glide的加载流程很重要)
表1-1 ModelType到DataType的映射表
| ID | modelClass | resourceClass | factory |
|---|---|---|---|
| 1 | File | ParcelFileDescriptor | FileDescriptorFileLoader |
| 2 | File | InputStream | StreamFileLoader |
| 3 | int | ParcelFileDescriptor | FileDescriptorResourceLoader |
| 4 | int | InputStream | StreamResourceLoader |
| 5 | Integer | ParcelFileDescriptor | FileDescriptorResourceLoader |
| 6 | Integer | InputStream | StreamResourceLoader |
| 7 | String | ParcelFileDescriptor | FileDescriptorStringLoader |
| 8 | String | InputStream | StreamStringLoader |
| 9 | Uri | ParcelFileDescriptor | FileDescriptorUriLoader |
| 10 | Uri | InputStream | StreamUriLoader |
| 11 | URL | InputStream | StreamUrlLoader |
| 12 | GlideUrl | InputStream | HttpUrlGlideUrlLoader |
| 13 | byte[] | InputStream | StreamByteArrayLoader |
| 14* | [ModelType] | ImageVideoWrapper | ImageVideoModelLoader |
DrawableRequestBuidler中创建的一个 ModelLoader 。
表1-2 DataType到ResourceType的映射表
| ID | dataClass | resourceClass | dataLoadProvider |
|---|---|---|---|
| 1 | InputStream | Bitmap | StreamBitmapDataLoadProvider |
| 2 | ParcelFileDescriptor | Bitmap | FileDescriptorBitmapDataLoadProvider |
| 3 | ImageVideoWrapper | Bitmap | ImageVideoDataLoadProvider |
| 4 | InputStream | GifDrawable | GifDrawableLoadProvider |
| 5 | ImageVideoWrapper | GifBitmapWrapper | ImageVideoGifDrawableLoadProvider |
| 6 | InputStream | File | StreamFileDataLoadProvider |
| ID | decodedClass | transcodedClass | transcoder |
|---|---|---|---|
| 1 | Bitmap | GlideBitmapDrawable | GlideBitmapDrawableTranscoder |
| 2 | GifBitmapWrapper | GlideDrawable | GifBitmapWrapperDrawableTranscoder |
GenericRequestBuilder类的注释中有说明:
/**
* A generic class that can handle setting options and staring loads for generic resource types.
*
* @param <ModelType> The type of model representing the resource.
* @param <DataType> The data type that the resource {@link com.bumptech.glide.load.model.ModelLoader} will provide that
*                  can be decoded by the {@link com.bumptech.glide.load.ResourceDecoder}.
* @param <ResourceType> The type of the resource that will be loaded.
* @param <TranscodeType> The type of resource the decoded resource will be transcoded to.
*/
public class GenericRequestBuilder<ModelType, DataType, ResourceType, TranscodeType> implements Cloneable {
//省略代码部分
}对于这四种范型的理解是了解Glide运行的关键,接口
LoadProvider范型A、T、Z、R与此对应。博主在这几个范型种绕了半天。大家只要参照着上面的三张表来看Glide源码,相信一定会有柳暗花明的感觉 :)
/**
* An extension of {@link com.bumptech.glide.provider.DataLoadProvider} that also allows a
* {@link com.bumptech.glide.load.model.ModelLoader} and a
* {@link com.bumptech.glide.load.resource.transcode.ResourceTranscoder} to be retrieved.
*
* @param <A> The type of model.
* @param <T> The type of data that will be decoded from.
* @param <Z> The type of resource that will be decoded.
* @param <R> The type of resource that the decoded resource will be transcoded to.
*/
public interface LoadProvider<A, T, Z, R> extends DataLoadProvider<T, Z> {
//省略代码部分
}
二、load(imageUrl)
在步骤(一)中我们得到一个RequestManager对象,紧接着我们就来看看
RequestManager对象的
load(String)方法:
public DrawableTypeRequest<String> load(String string) {
return (DrawableTypeRequest<String>) fromString().load(string);
}
从代码中我们得知,该方法返回了一个
DrawableTypeRequest对象,有关
DrawableTypeRequest实例的初始化过程,直接上图,大家参考着上面提供的三张表应该不难理解:
图1-1 Request继承关系图
注意 理解了上图的朋友可以直接跳到下一小节,下面的描述很枯燥 :(
该对象的继承关系为
DrawableTypeRequest-->
DrawableRequestBuilder-->
GenericRequestBuilder。这个对象用于加载
load(String)参数所指代的内容。顺着
load(String)方法,我们来重点看看
fromString()-->
loadGeneric(Class<T> modelClass)方法。由
fromString()我们得知这里的
modelClass即为
String.class:
private <T> DrawableTypeRequest<T> loadGeneric(Class<T> modelClass) {
ModelLoader<T, InputStream> streamModelLoader = Glide.buildStreamModelLoader(modelClass, context);
ModelLoader<T, ParcelFileDescriptor> fileDescriptorModelLoader =
Glide.buildFileDescriptorModelLoader(modelClass, context);
if (modelClass != null && streamModelLoader == null && fileDescriptorModelLoader == null) {
throw new IllegalArgumentException("Unknown type " + modelClass + ". You must provide a Model of a type for"
+ " which there is a registered ModelLoader, if you are using a custom model, you must first call"
+ " Glide#register with a ModelLoaderFactory for your custom model class");
}

return optionsApplier.apply(
new DrawableTypeRequest<T>(modelClass, streamModelLoader, fileDescriptorModelLoader, context,
glide, requestTracker, lifecycle, optionsApplier));
}
很显然,上面方法中的泛型
T即指代
String。
在
loadGeneric(Class<T> modelClass)方法中,我们来看第一行代码:
ModelLoader<T, InputStream> streamModelLoader = Glide.buildStreamModelLoader(modelClass, context);
有
buildStreamModelLoader方法的注释我们得知,该方法是用来生成一个
ModelLoader实例来用于提供
InputStream输入源。
我们顺藤摸瓜,找到了
GenericLoaderFactory类中的
buildModelLoader(Class<T> modelClass, Class<Y> resourceClass)方法,该方法中的
T与
Y泛型在我们的调用过程中分别指代
String和
InputStream类型:
public synchronized <T, Y> ModelLoader<T, Y> buildModelLoader(Class<T> modelClass, Class<Y> resourceClass) {
ModelLoader<T, Y> result = getCachedLoader(modelClass, resourceClass);
if (result != null) {
// We've already tried to create a model loader and can't with the currently registered set of factories,
// but we can't use null to demonstrate that failure because model loaders that haven't been requested
// yet will be null in the cache. To avoid this, we use a special signal model loader.
if (NULL_MODEL_LOADER.equals(result)) {
return null;
} else {
return result;
}
}

final ModelLoaderFactory<T, Y> factory = getFactory(modelClass, resourceClass);
if (factory != null) {
result = factory.build(context, this);
cacheModelLoader(modelClass, resourceClass, result);
} else {
// We can't generate a model loader for the given arguments with the currently registered set of factories.
cacheNullLoader(modelClass, resourceClass);
}
return result;
}
在上述方法中,我们定位到这行代码:
final ModelLoaderFactory<T, Y> factory = getFactory(modelClass, resourceClass);
在这行代码中,我们是通过调用
getFactory(Class<T> modelClass, Class<Y> resourceClass)方法来产生一个
ModelLoaderFactory实例。现在我们就来看源码:
private <T, Y> ModelLoaderFactory<T, Y> getFactory(Class<T> modelClass, Class<Y> resourceClass) {
Map<Class/*Y*/, ModelLoaderFactory/*T, Y*/> resourceToFactories = modelClassToResourceFactories.get(modelClass);
ModelLoaderFactory/*T, Y*/ result = null;
if (resourceToFactories != null) {
result = resourceToFactories.get(resourceClass);
}

if (result == null) {
for (Class<? super T> registeredModelClass : modelClassToResourceFactories.keySet()) {
// This accounts for model subclasses, our map only works for exact matches. We should however still
// match a subclass of a model with a factory for a super class of that model if if there isn't a
// factory for that particular subclass. Uris are a great example of when this happens, most uris
// are actually subclasses for Uri, but we'd generally rather load them all with the same factory rather
// than trying to register for each subclass individually.
if (registeredModelClass.isAssignableFrom(modelClass)) {
Map<Class/*Y*/, ModelLoaderFactory/*T, Y*/> currentResourceToFactories =
modelClassToResourceFactories.get(registeredModelClass);
if (currentResourceToFactories != null) {
result = currentResourceToFactories.get(resourceClass);
if (result != null) {
break;
}
}
}
}
}

return result;
}
很显然,我们是首先从Map表
modelClassToResourceFactories中获取一个已注册的
ModelLoaderFactory对象。那么,我们所需要的
ModelLoaderFactory是否已经注册呢?翻看步骤(一)中提到的表1-1,是不是就是表中的ID 8 的内容?对应着条目8,我们获得了一个
StreamStringLoader对象。后面获取引用
fileDescriptorModelLoader的情况与此类似。
紧接着就生成了一个
DrawableTypeRequest<String>对象,经过
OptionsApplier对象进一步处理后返回到了之前
RequestManager的
fromString()方法。有关
OptionsApplier对象的作用,我们在后文会提到。这里我们只就简单认为返回了一个原生态的
DrawableTypeRequest<String>对象即可。
在创建
DrawableTypeRequest对象时,我们要提到一个重要的类
FixedLoadProvider(上文已经提及 :) )。这个类实例在后面请求网络图片时会用到。在
DrawableTypeRequest的构造函数中,我们是通过该对象的
buildProvider方法生成的:
private static <A, Z, R> FixedLoadProvider<A, ImageVideoWrapper, Z, R> buildProvider(Glide glide,
ModelLoader<A, InputStream> streamModelLoader,
ModelLoader<A, ParcelFileDescriptor> fileDescriptorModelLoader, Class<Z> resourceClass,
Class<R> transcodedClass,
ResourceTranscoder<Z, R> transcoder) {
if (streamModelLoader == null && fileDescriptorModelLoader == null) {
return null;
}

if (transcoder == null) {
transcoder = glide.buildTranscoder(resourceClass, transcodedClass);
}
DataLoadProvider<ImageVideoWrapper, Z> dataLoadProvider = glide.buildDataProvider(ImageVideoWrapper.class,
resourceClass);
ImageVideoModelLoader<A> modelLoader = new ImageVideoModelLoader<A>(streamModelLoader,
fileDescriptorModelLoader);
return new FixedLoadProvider<A, ImageVideoWrapper, Z, R>(modelLoader, transcoder, dataLoadProvider);
}
代码清单1-2
在这个方法中,我们重点留意下
transcoder实例、
DataLoadProvider类和
ImageVideoModelLoader类。通过
Glide的构造函数和表1-2、表1-3,我们很容易得到这里的
transcoder实例为
GifBitmapWrapperDrawableTranscoder对象(表1-3条目2),
DataLoadProvider实例为类
ImageVideoGifDrawableLoadProvider的对象(表1-2条目5),而这里的
ImageVideoModelLoader就对应了表1-1中的条目(14*)。
有关
ImageVideoGifDrawableLoadProvider的来龙去脉,直接看下图,后面数据流转图片的逻辑就靠它了:)
图1-2 ImageVideoGifDrawableLoadProvider类关系图
回到
RequestManager的
load(String string)方法,接下来即是调用
DrawableTypeRequest<String>对象的
load(String)方法了。这个方法很简单,只是保存了状态而已:
public GenericRequestBuilder<ModelType, DataType, ResourceType, TranscodeType> load(ModelType model) {
this.model = model;
isModelSet = true;
return this;
}
三、into(fullscreenView)
现在我们来看看加载图片的最后一步into(fullscreenView)。在这里,
fullscreenView是个
ImageView实例。据此我们顺着方法的调用定位到了
GenericRequestBuilder类的
into(ImageView view)方法:
public Target<TranscodeType> into(ImageView view) {
Util.assertMainThread();
if (view == null) {
throw new IllegalArgumentException("You must pass in a non null View");
}

if (!isTransformationSet && view.getScaleType() != null) {
switch (view.getScaleType()) {
case CENTER_CROP:
applyCenterCrop();
break;
case FIT_CENTER:
case FIT_START:
case FIT_END:
applyFitCenter();
break;
//$CASES-OMITTED$
default:
// Do nothing.
}
}

return into(glide.buildImageViewTarget(view, transcodeClass));
}
我们暂且忽略图片的变换逻辑,只看图片的加载过程。在步骤(二)中我们很容易确定,该方法中的
TranscodeType指代
GlideDrawable类,而
transcodeClass即为
GlideDrawable的一个实例(可参看图1-1)。代码
glide.buildImageViewTarget(view, transcodeClass)返回了一个
GlideDrawableImageViewTarget对象。这个类的作用后面在显示图片的时候会用到,这里暂且不表。下面我们来看方法
into(Y target):
public <Y extends Target<TranscodeType>> Y into(Y target) {
Util.assertMainThread();
if (target == null) {
throw new IllegalArgumentException("You must pass in a non null Target");
}
if (!isModelSet) {
throw new IllegalArgumentException("You must first set a model (try #load())");
}

Request previous = target.getRequest();

if (previous != null) {
previous.clear();
requestTracker.removeRequest(previous);
previous.recycle();
}

Request request = buildRequest(target);
target.setRequest(request);
lifecycle.addListener(target);
requestTracker.runRequest(request);

return target;
}
代码清单1-3
这个方法我们需要重点关心的是
Request类。这个类的具体子类即是根据图片路径来加载图片到ImageView中。现在我们就来看看这个
Request的具体实例(
buildRequest(Target<TranscodeType> target)--> buildRequestRecursive(Target<TranscodeType> target, ThumbnailRequestCoordinator parentCoordinator)):
private Request buildRequestRecursive(Target<TranscodeType> target, ThumbnailRequestCoordinator parentCoordinator) {
if (thumbnailRequestBuilder != null) {
if (isThumbnailBuilt) {
throw new IllegalStateException("You cannot use a request as both the main request and a thumbnail, "
+ "consider using clone() on the request(s) passed to thumbnail()");
}
// Recursive case: contains a potentially recursive thumbnail request builder.
if (thumbnailRequestBuilder.animationFactory.equals(NoAnimation.getFactory())) {
thumbnailRequestBuilder.animationFactory = animationFactory;
}

if (thumbnailRequestBuilder.priority == null) {
thumbnailRequestBuilder.priority = getThumbnailPriority();
}

if (Util.isValidDimensions(overrideWidth, overrideHeight)
&& !Util.isValidDimensions(thumbnailRequestBuilder.overrideWidth,
thumbnailRequestBuilder.overrideHeight)) {
thumbnailRequestBuilder.override(overrideWidth, overrideHeight);
}

ThumbnailRequestCoordinator coordinator = new ThumbnailRequestCoordinator(parentCoordinator);
Request fullRequest = obtainRequest(target, sizeMultiplier, priority, coordinator);
// Guard against infinite recursion.
isThumbnailBuilt = true;
// Recursively generate thumbnail requests.
Request thumbRequest = thumbnailRequestBuilder.buildRequestRecursive(target, coordinator);
isThumbnailBuilt = false;
coordinator.setRequests(fullRequest, thumbRequest);
return coordinator;
} else if (thumbSizeMultiplier != null) {
// Base case: thumbnail multiplier generates a thumbnail request, but cannot recurse.
ThumbnailRequestCoordinator coordinator = new ThumbnailRequestCoordinator(parentCoordinator);
Request fullRequest = obtainRequest(target, sizeMultiplier, priority, coordinator);
Request thumbnailRequest = obtainRequest(target, thumbSizeMultiplier, getThumbnailPriority(), coordinator);
coordinator.setRequests(fullRequest, thumbnailRequest);
return coordinator;
} else {
// Base case: no thumbnail.
return obtainRequest(target, sizeMultiplier, priority, parentCoordinator);
}
}
我们先忽略缩略图问题,直接到本方法的最后来看看
GenericRequest.obtain()方法(
obtainRequest()-->GenericRequest.obtain()):
private Request obtainRequest(Target<TranscodeType> target, float sizeMultiplier, Priority priority,
RequestCoordinator requestCoordinator) {
return GenericRequest.obtain(
loadProvider,
model,
signature,
context,
priority,
target,
sizeMultiplier,
placeholderDrawable,
placeholderId,
errorPlaceholder,
errorId,
fallbackDrawable,
fallbackResource,
requestListener,
requestCoordinator,
glide.getEngine(),
transformation,
transcodeClass,
isCacheable,
animationFactory,
overrideWidth,
overrideHeight,
diskCacheStrategy);
}
这个方法涉及到了很多实例对象,而这些实例对象中,我们首先需要关注的就是
loadProvider和
glide.getEngine()两个具体对象。这两个对象在上面两个步骤中已经涉及。后面我们将看到它们的具体作用。
获取到
GenericRequest对象后,我们再次回到代码清单1-3的
Y into(Y target)方法中。我们看到有这一行代码:
requestTracker.runRequest(request);
很显然,这一行代码便是要加载我们的图片了。按图索骥,我们来到了
GenericRequest类的
begin()方法。
在该方法中,我们要关注的是该类的
onSizeReady(int width, int height)方法:
public void onSizeReady(int width, int height) {
if (Log.isLoggable(TAG, Log.VERBOSE)) {
logV("Got onSizeReady in " + LogTime.getElapsedMillis(startTime));
}
if (status != Status.WAITING_FOR_SIZE) {
return;
}
status = Status.RUNNING;

width = Math.round(sizeMultiplier * width);
height = Math.round(sizeMultiplier * height);

ModelLoader<A, T> modelLoader = loadProvider.getModelLoader();
final DataFetcher<T> dataFetcher = modelLoader.getResourceFetcher(model, width, height);

if (dataFetcher == null) {
onException(new Exception("Failed to load model: \'" + model + "\'"));
return;
}
ResourceTranscoder<Z, R> transcoder = loadProvider.getTranscoder();
if (Log.isLoggable(TAG, Log.VERBOSE)) {
logV("finished setup for calling load in " + LogTime.getElapsedMillis(startTime));
}
loadedFromMemoryCache = true;
loadStatus = engine.load(signature, width, height, dataFetcher, loadProvider, transformation, transcoder,
priority, isMemoryCacheable, diskCacheStrategy, this);
loadedFromMemoryCache = resource != null;
if (Log.isLoggable(TAG, Log.VERBOSE)) {
logV("finished onSizeReady in " + LogTime.getElapsedMillis(startTime));
}
}
代码清单1-4
在
onSizeReady方法中,我们再次看到了
loadProvider的影子。在步骤(二)的最后我们提到了
FixedLoadProvider对象,而这里的
loadProvider其实就是
FixedLoadProvider类的一个封装类
ChildLoadProvider的实例。此时朋友们可能有疑问,在什么时候
FixedLoadProvider对象就变成了
ChildLoadProvider对象了呢?其实就是在步骤(二)中获取
DrawableTypeRequest对象时进行了封装。在
DrawableTypeRequest的祖父类
GenericRequestBuilder的构造函数中:
this.loadProvider = loadProvider != null ? new ChildLoadProvider<ModelType, DataType, ResourceType, TranscodeType>(loadProvider) : null;
看到这里我们就明白了,在
GenericRequest的
onSizeReady方法中(见代码清单1-4),我们得到的
modelLoader对象即为步骤(二)中提到的
ImageVideoModelLoader类的实例。而这里的
dataFetcher对象即为
StringLoader类(
StreamStringLoader的基类)的方法
getResourceFetcher获取的
DataFetcher实例:
@Override
public DataFetcher<T> getResourceFetcher(String model, int width, int height) {
Uri uri;
if (TextUtils.isEmpty(model)) {
return null;
} else if (model.startsWith("/")) {
uri = toFileUri(model);
} else {
uri = Uri.parse(model);
final String scheme = uri.getScheme();
if (scheme == null) {
uri = toFileUri(model);
}
}

return uriLoader.getResourceFetcher(uri, width, height);
}
按照步骤(二)中获取
StreamStringLoader的方式,并结合表1-1,我们一步步得到上述方法中的
uriLoader实例即为
HttpUrlGlideUrlLoader对象。下面我们就来看看类
HttpUrlGlideUrlLoader的
getResourceFetcher方法:
@Override
public DataFetcher<InputStream> getResourceFetcher(GlideUrl model, int width, int height) {
// GlideUrls memoize parsed URLs so caching them saves a few object instantiations and time spent parsing urls.
GlideUrl url = model;
if (modelCache != null) {
url = modelCache.get(model, 0, 0);
if (url == null) {
modelCache.put(model, 0, 0, model);
url = model;
}
}
return new HttpUrlFetcher(url);
}
由于我们是初次调用Glide来加载图片,所以会生成一个
HttpUrlFetcher对象。而这个对象即是代码清单1-4中方法
onSizeReady的
DataFetcher对象实例
dataFetcher。
我们接着代码清单1-4往下看,有这么一行代码:
loadStatus = engine.load(signature, width, height, dataFetcher, loadProvider, transformation, transcoder, priority, isMemoryCacheable, diskCacheStrategy, this);
这一行便是加载图片并显示的过程了。我们进到
Engine的
load方法中(这里的
engine实例即为上述
GenericRequest.obtain中传递过来的
Engine对象,也就是在生成
Glide对象时
GlideBuilder创建的
Engine实例):
public <T, Z, R> LoadStatus load(Key signature, int width, int height, DataFetcher<T> fetcher,
DataLoadProvider<T, Z> loadProvider, Transformation<Z> transformation, ResourceTranscoder<Z, R> transcoder,
Priority priority, boolean isMemoryCacheable, DiskCacheStrategy diskCacheStrategy, ResourceCallback cb) {
Util.assertMainThread();

//这里省略了有关缓存方面的代码
..................
..................

EngineJob engineJob = engineJobFactory.build(key, isMemoryCacheable);
DecodeJob<T, Z, R> decodeJob = new DecodeJob<T, Z, R>(key, width, height, fetcher, loadProvider, transformation,
transcoder, diskCacheProvider, diskCacheStrategy, priority);
EngineRunnable runnable = new EngineRunnable(engineJob, decodeJob, priority);
jobs.put(key, engineJob);
engineJob.addCallback(cb);
engineJob.start(runnable);

return new LoadStatus(cb, engineJob);
}
在这个方法中,我们主要关心的是
EngineRunnable的
run方法:
@Override
public void run() {
if (isCancelled) {
return;
}

Exception exception = null;
Resource<?> resource = null;
try {
resource = decode();
} catch (Exception e) {
if (Log.isLoggable(TAG, Log.VERBOSE)) {
Log.v(TAG, "Exception decoding", e);
}
exception = e;
}

if (isCancelled) {
if (resource != null) {
resource.recycle();
}
return;
}

if (resource == null) {
onLoadFailed(exception);
} else {
onLoadComplete(resource);
}
}
代码清单1-5
进一步,我们来到
decode()方法中:
private Resource<?> decode() throws Exception {
if (isDecodingFromCache()) {
return decodeFromCache();
} else {
return decodeFromSource();
}
}
不考虑缓存问题,进入
decodeFromSource()方法中:
private Resource<?> decodeFromSource() throws Exception {
return decodeJob.decodeFromSource();
}
进入到
DecodeJob的
decodeFromSource方法:
public Resource<Z> decodeFromSource() throws Exception {
Resource<T> decoded = decodeSource();
return transformEncodeAndTranscode(decoded);
}
代码清单1-6
接着我们来查看
decodeSource方法:
private Resource<T> decodeSource() throws Exception {
Resource<T> decoded = null;
try {
long startTime = LogTime.getLogTime();
final A data = fetcher.loadData(priority);
if (Log.isLoggable(TAG, Log.VERBOSE)) {
logWithTimeAndKey("Fetched data", startTime);
}
if (isCancelled) {
return null;
}
decoded = decodeFromSourceData(data);
} finally {
fetcher.cleanup();
}
return decoded;
}
看到这里,我们终算拿到了数据源:
final A data = fetcher.loadData(priority);
这里的
fetcher即是我们上文提到的
HttpUrlFetcher类的实例,那么现在我们就来看看它是如何加载数据源的:
@Override
public InputStream loadData(Priority priority) throws Exception {
return loadDataWithRedirects(glideUrl.toURL(), 0 /*redirects*/, null /*lastUrl*/, glideUrl.getHeaders());
}
顺着该方法走下去,我们便明白了,
Glide默认加载网络图片是通过
HttpURLConnection方式。
在这里,我们拿到的数据源是一个InputStream输入流。而我们的要看到的是一张张的图片。这又是如何获取的呢?
OK,顺着方法往下看,我们来到这行:
decoded = decodeFromSourceData(data);
顺着方法往下看:
private Resource<T> decodeFromSourceData(A data) throws IOException {
final Resource<T> decoded;
if (diskCacheStrategy.cacheSource()) {
decoded = cacheAndDecodeSourceData(data);
} else {
long startTime = LogTime.getLogTime();
decoded = loadProvider.getSourceDecoder().decode(data, width, height);
if (Log.isLoggable(TAG, Log.VERBOSE)) {
logWithTimeAndKey("Decoded from source", startTime);
}
}
return decoded;
}
同样避开缓存不谈,直接看下面这行:
decoded = loadProvider.getSourceDecoder().decode(data, width, height);
追本溯源,这里的
loadProvider还是那个
FixdLoadProvider,而它的SourceDecoder即是步骤(二)中图1-2的
ImageVideoGifDrawableLoadProvider的
sourceDecoder,即类
GifBitmapWrapperResourceDecoder的实例。
我们顺着
GifBitmapWrapperResourceDecoder的
decode方法走,我们来到这个方法:
private GifBitmapWrapper decodeStream(ImageVideoWrapper source, int width, int height, byte[] bytes)
throws IOException {
InputStream bis = streamFactory.build(source.getStream(), bytes);
bis.mark(MARK_LIMIT_BYTES);
ImageHeaderParser.ImageType type = parser.parse(bis);
bis.reset();

GifBitmapWrapper result = null;
if (type == ImageHeaderParser.ImageType.GIF) {
result = decodeGifWrapper(bis, width, height);
}
// Decoding the gif may fail even if the type matches.
if (result == null) {
// We can only reset the buffered InputStream, so to start from the beginning of the stream, we need to
// pass in a new source containing the buffered stream rather than the original stream.
ImageVideoWrapper forBitmapDecoder = new ImageVideoWrapper(bis, source.getFileDescriptor());
result = decodeBitmapWrapper(forBitmapDecoder, width, height);
}
return result;
}
在这个方法中,会根据
ImageHeaderParser.ImageType来决定是解码为Gif图片还是Bitmap图片。这里我们就先来看看普通的Bitmap是如何解码的。而有关Gif图片的解码过程,有兴趣的朋友可以看看。后面的系列博客中我们再来一同研究交流。好了,直接上代码:
private GifBitmapWrapper decodeBitmapWrapper(ImageVideoWrapper toDecode, int width, int height) throws IOException {
GifBitmapWrapper result = null;

Resource<Bitmap> bitmapResource = bitmapDecoder.decode(toDecode, width, height);
if (bitmapResource != null) {
result = new GifBitmapWrapper(bitmapResource, null);
}

return result;
}
结合着图1-2,我们定位到了
ImageVideoBitmapDecoder的
decode方法中。很显然,这也是个不干事儿的主儿,走在一线的是它的
streamDecoder。这个成员变量在哪里初始化的呢?我们回到类
ImageVideoDataLoadProvider中,在其构造方法中我们找到了一点线索:
sourceDecoder = new ImageVideoBitmapDecoder(streamBitmapProvider.getSourceDecoder(),
fileDescriptorBitmapProvider.getSourceDecoder());
好吧,我们又回到了
Glide的构造函数中,参照着表1-2和图1-2来看,这里的sourceDecoder即是
StreamBitmapDecoder。话不多说,我们来看看该类中是否有我们要找的
decode方法吧:
@Override
public Resource<Bitmap> decode(InputStream source, int width, int height) {
Bitmap bitmap = downsampler.decode(source, bitmapPool, width, height, decodeFormat);
return BitmapResource.obtain(bitmap, bitmapPool);
}
哈哈,我们终于看到了
Bitmap的身影。进入
Downsampler中查看,好吧,这个我们留到后面再说。
拿到Bitmap后我们再次回到
GifBitmapWrapperResourceDecoder的
decodeBitmapWrapper方法中,很显然,这里对我们的Bitmap做了一次封装,返回了一个
GifBitmapWrapper对象。带着这个对象,我们回到代码清单1-6进入到
DecodeJob的
decodeFromSource方法中,查看
transformEncodeAndTranscode方法的调用:
private Resource<Z> transformEncodeAndTranscode(Resource<T> decoded) {
long startTime = LogTime.getLogTime();
Resource<T> transformed = transform(decoded);
if (Log.isLoggable(TAG, Log.VERBOSE)) {
logWithTimeAndKey("Transformed resource from source", startTime);
}

writeTransformedToCache(transformed);

startTime = LogTime.getLogTime();
Resource<Z> result = transcode(transformed);
if (Log.isLoggable(TAG, Log.VERBOSE)) {
logWithTimeAndKey("Transcoded transformed from source", startTime);
}
return result;
}
方法中我们主要是关注下面这行:
Resource<Z> result = transcode(transformed);
这里
transcode方法接受的参数
transformed是
GifBitmapWrapper转变后的
GifBitmapWrapper对象。这里暂且不表。我们来看
transcode方法:
private Resource<Z> transcode(Resource<T> transformed) {
if (transformed == null) {
return null;
}
return transcoder.transcode(transformed);
}
这里我们又迎来了一个“狠角色”
transcoder。为了找到它的来源,我们又回到了创建
FixedLoadProvider实例的地方代码清单1-2中。这里用到的
transcoder便是那里获得到的
GifBitmapWrapperDrawableTranscoder类的实例。我们来看看它的
transcode方法:
public Resource<GlideDrawable> transcode(Resource<GifBitmapWrapper> toTranscode) {
GifBitmapWrapper gifBitmap = toTranscode.get();
Resource<Bitmap> bitmapResource = gifBitmap.getBitmapResource();

final Resource<? extends GlideDrawable> result;
if (bitmapResource != null) {
result = bitmapDrawableResourceTranscoder.transcode(bitmapResource);
} else {
result = gifBitmap.getGifResource();
}
// This is unchecked but always safe, anything that extends a Drawable can be safely cast to a Drawable.
return (Resource<GlideDrawable>) result;
}
从前面我们已经知道,此处的
bitmapResource不为
null,所以会执行
bitmapDrawableResourceTranscoder.transcode(bitmapResource);
这里的
bitmapDrawableResourceTranscoder就是哪个呢?呵呵,我们再次来到
Glide的构造方法中,在方法最后几行,我们找到了线索:
transcoderRegistry.register(Bitmap.class, GlideBitmapDrawable.class,
new GlideBitmapDrawableTranscoder(context.getResources(), bitmapPool));
transcoderRegistry.register(GifBitmapWrapper.class, GlideDrawable.class,
new GifBitmapWrapperDrawableTranscoder(
new GlideBitmapDrawableTranscoder(context.getResources(), bitmapPool)));
没错,这里的
bitmapDrawableResourceTranscoder便是类
GlideBitmapDrawableTranscoder的实例。我们来一起看看它的
transcode方法:
@Override
public Resource<GlideBitmapDrawable> transcode(Resource<Bitmap> toTranscode) {
GlideBitmapDrawable drawable = new GlideBitmapDrawable(resources, toTranscode.get());
return new GlideBitmapDrawableResource(drawable, bitmapPool);
}
OK,这里我们拿到一个包装类
GlideBitmapDrawableResource。
在拿到
GlideBitmapDrawableResource后,我们再回到
EngineRunnable的
run方法中。有了数据源会调用
EngineRunnable的
onLoadComplete(Resource resource)方法:
private void onLoadComplete(Resource resource) {
manager.onResourceReady(resource);
}
沿着方法的调用顺序,我们回到了
GenericRequest的
onResourceReady方法:
public void onResourceReady(Resource<?> resource) {
//省略无关代码
..............
..............

Object received = resource.get();

//省略无关代码
..............
..............

onResourceReady(resource, (R) received);
}
这个回调方法中回传的不再是我们前面获取到的
GlideBitmapDrawableResource对象,而是被包装后的
EngineResource对象。不过这对我们理解Glide的图片加载流程没有任何的影响,依然可以认为是
GlideBitmapDrawableResource的对象。
received是从
GlideBitmapDrawableResource中获取到的
GlideBitmapDrawable。
接着往下看:
private void onResourceReady(Resource<?> resource, R result) {
// We must call isFirstReadyResource before setting status.
boolean isFirstResource = isFirstReadyResource();
status = Status.COMPLETE;
this.resource = resource;

if (requestListener == null || !requestListener.onResourceReady(result, model, target, loadedFromMemoryCache,
isFirstResource)) {
GlideAnimation<R> animation = animationFactory.build(loadedFromMemoryCache, isFirstResource);
target.onResourceReady(result, animation);
}

notifyLoadSuccess();

if (Log.isLoggable(TAG, Log.VERBOSE)) {
logV("Resource ready in " + LogTime.getElapsedMillis(startTime) + " size: "
+ (resource.getSize() * TO_MEGABYTE) + " fromCache: " + loadedFromMemoryCache);
}
}
在该方法中,我们关注这么两行代码:
GlideAnimation<R> animation = animationFactory.build(loadedFromMemoryCache, isFirstResource);
target.onResourceReady(result, animation);
这里的
target对象就是本小节一开始提到的
GlideDrawableImageViewTarget的实例。现在我们就来看看它的
onResourceReady方法:
public void onResourceReady(GlideDrawable resource, GlideAnimation<? super GlideDrawable> animation) {
//省略无关代码
.................
.................

super.onResourceReady(resource, animation);

//省略无关代码
.................
.................
}
找到它的基类,我们会发现最终又回到了它的
setResource方法:
@Override
protected void setResource(GlideDrawable resource) {
view.setImageDrawable(resource);
}
到这里,我们Glide加载图片的主要流程就结束了。其中涉及到的图片转换、缓存、动画等问题我会在此系列博客中有所涉及,这里先暂且不提。
总结
经过上面的三步骤,一张网络图片就加载到了我们的View上。当然,这其中涉及到的内容还有很多,我这里只是帮大家梳理下Glide加载图片的主要流程。现在再回头对照着步骤(一)中的三张表,相信大家对ModelType、DataType、ResourceType和TranscodeType会有更深的理解。从上面的分析中我们也看到了,理解了这四种范型对应的类的功能,也便理解了Glide的主要概念和功能。后面的文章中我们会重点来查看Glide的缓存过程,请大家多多指点多多交流。

相关文章推荐
- 使用C++实现JNI接口需要注意的事项
- Android IPC进程间通讯机制
- Android Manifest 用法
- [转载]Activity中ConfigChanges属性的用法
- Android之获取手机上的图片和视频缩略图thumbnails
- Android之使用Http协议实现文件上传功能
- Android学习笔记(二九):嵌入浏览器
- android string.xml文件中的整型和string型代替
- i-jetty环境搭配与编译
- android之定时器AlarmManager
- android wifi 无线调试
- Android Native 绘图方法
- Android java 与 javascript互访(相互调用)的方法例子
- android 代码实现控件之间的间距
- android FragmentPagerAdapter的“标准”配置
- Android"解决"onTouch和onClick的冲突问题
- android:installLocation简析
- android searchView的关闭事件
- SourceProvider.getJniDirectories