【简介】利用Arduino和Coolpy设计网关 —— 开源项目Coolpy
2016-05-31 18:20
627 查看
Coolpy API 官方文档:http://www.icoolpy.com/docs.html
1. Coolpy简介
Coolpy是一个开放的通用物联网服务平台,主要提供传感器数据的接入、存储和展现服务;Coolpy是跨平台的,Coolpy服务端可以运行在Windows、Linux、Mac、Android等主流操作系统,甚至可以运行在openWRT路由器和Arduino Yun中。Coolpy客户端使用HTML5技术开发,既可以运行于桌面设备,也可以运行于移动设备;Coolpy是开放源代码的,因此用户可以基于Coolpy源代码进行二次开发,极大可能地满足用户需求。1.1 Coolpy API简介
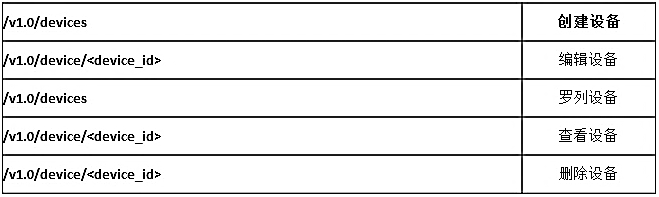
Coolpy对外有一套完整的API,使用这套API通过简单的HTTP请求,即可实现设备、传感器、数据点在服务端的创建、修改、查看、删除等动作。(1)设备(Devices)相关API
分别对下表中的URL发出HTTP POST、PUT、GET、GET、DELETE请求,将分别创建、编辑、罗列、查看、删除一个设备。
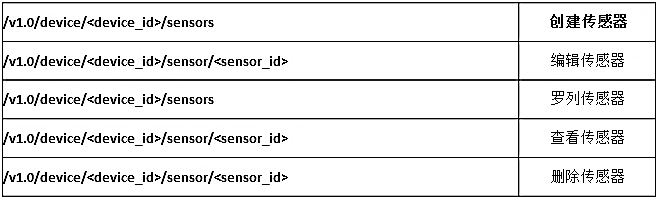
(2)传感器(Sensors) 相关API
分别对下表中的URL发出HTTP POST、PUT、GET、GET、DELETE请求,将分别创建、编辑、罗列、查看、删除一个传感器。
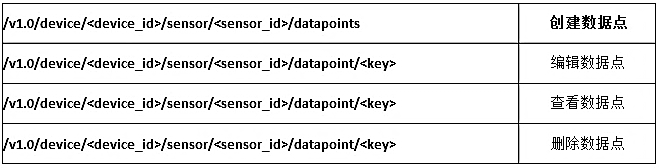
(3)数据点(Datapoints) 相关API
分别对下表中的URL发出HTTP POST、PUT、GET、DELETE请求,将分别创建、编辑、查看、删除一个数据点。
2. 开源软件Arduino Ethenet库简介
Arduino Ethenet是一个以AVR单片机和网络接口芯片W5100为硬件核心的软件库,它实现了AVR单片机的SPI接口驱动函数和网络接口芯片W5100的驱动函数,并在此基础上实现了Socket API函数,使开发者可以专注于应用程序的编写,而不需要花太多的精力在底层的驱动函数上。嵌入式HTTP应用开发因此变得简单、高效。使用Arduino Ethenet库构建HTTP客户端示例:
//设置硬件物理地址
byte mac[] = { 0xDE, 0xAD, 0xBE, 0xEF, 0xFE, 0xED };
//设置服务器地址
char server[] = "www.google.com";
//设置IP地址,假如DHCP分配IP失败,就使用这个IP
IPAddress ip(192,168,1,2);
EthernetClient client;
void setup() {
Serial.begin(9600);
if (Ethernet.begin(mac) == 0) {
Ethernet.begin(mac, ip);
}
//延时1S,要硬件初始化
delay(1000);
//请求与服务器连接
if (client.connect(server, 80)) {
Serial.println("connected");
// HTTP GET请求报文:
client.println("GET /search?q=arduino HTTP/1.1");
client.println("Host: www.google.com");
client.println("Connection: close");
client.println();
}
else {
Serial.println("connection failed");
}
}
void loop()
{
// 接收服务器返回的响应报文
if (client.available()) {
char c = client.read();
Serial.print(c);
}
// 假如与服务器断开连接,那么停止HTTP客户端
if (!client.connected()) {
Serial.println();
Serial.println("disconnecting.");
client.stop();
}
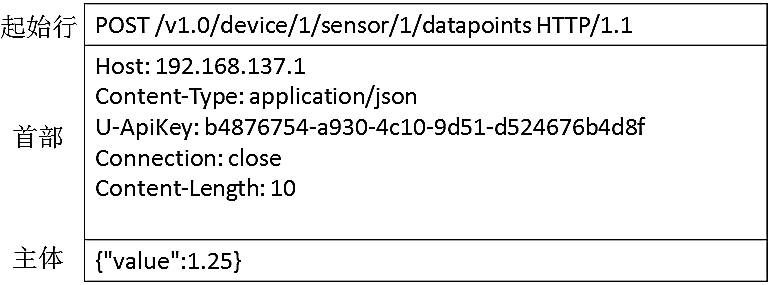
}3. HTTP POST、PUT、GET、DELETE请求的具体实现
(1)POST方法的实现POST请求报文格式:
POST请求具体实现:
void Post(String PostData,byte deviceID, byte sensorID)
{
// if you get a connection, report back via serial:
if (client.connect(server, port)) {
Serial.println("connecting.");
// Make a HTTP request:
client.print("POST /v1.0/device/");
client.print(deviceID);
client.print("/sensor/");
client.print(sensorID);
client.println("/datapoints HTTP/1.1");
client.print("Host:");
client.println(server);
client.println("Content-Type:application/json");
client.print("U-ApiKey:");
client.println(ukey);
client.println("Connection: close");
client.print("Content-Length: ");
client.println(PostData.length()+1);
client.println();
client.println(PostData);
}
else {
//If you didn't get a connection to the server:
Serial.println("connection failed.");
}
(2)PUT方法的实现
PUT请求报文格式:
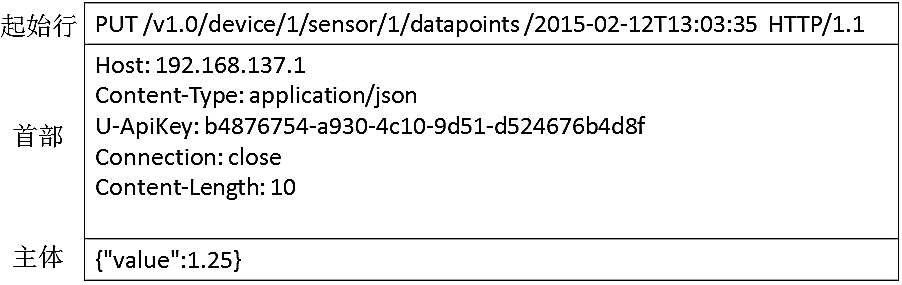
PUT方法具体实现:
void Post(String PostData,byte deviceID, byte sensorID)
{
if (client.connect(server, port)) {
// Make a HTTP request:
client.print("PUT /v1.0/device/");
client.print(device);
client.print("/sensor/");
client.print(sensor);
client.print("/datapoint/");
client.print(dpkey);
client.println(" HTTP/1.1");
client.print("Host:");
client.println(server);
client.println("Content-Type:application/json");
client.print("U-ApiKey:");
client.println(ukey);
client.println("Connection: close");
client.print("Content-Length: ");
client.println(PostData.length()+1);
client.println();
client.println(PostData);
}
else {
// kf you didn't get a connection to the server:
Serial.println("connection failed");
}
}
(3)GET方法的实现
GET请求报文格式:
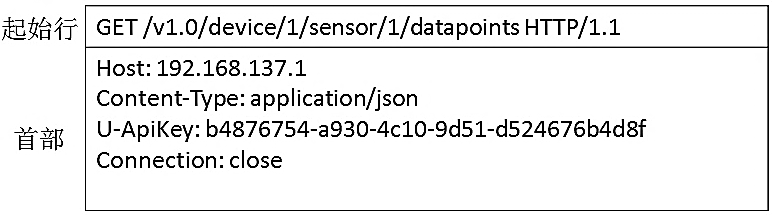
GET方法具体实现:
void Post(String PostData,byte deviceID, byte sensorID)
{
if (client.connect(server, port)) {
// Make a HTTP request:
client.print("GET /v1.0/device/");
client.print(device);
client.print("/sensor/");
client.print(sensor);
client.print("/datapoint/");
client.print(dpkey);
client.println(" HTTP/1.1");
client.print("Host:");
client.println(server);
client.println("Accept:");
client.print("U-ApiKey:");
client.println(ukey);
client.println("Connection: close");
client.println();
}
else {
// kf you didn't get a connection to the server:
Serial.println("connection failed");
}
}
(4)DELETE方法的实现
DELETE请求报文格式:
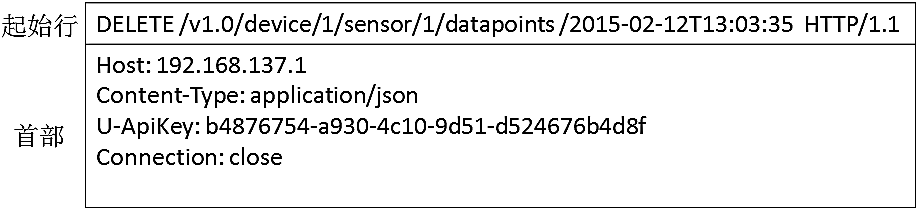
DELETE方法具体实现:
void Post(String PostData,byte deviceID, byte sensorID)
{
if (client.connect(server, port)) {
// Make a HTTP request:
client.print("DELETE /v1.0/device/");
client.print(device);
client.print("/sensor/");
client.print(sensor);
client.print("/datapoint/");
client.print(dpkey);
client.println(" HTTP/1.1");
client.print("Host:");
client.println(server);
client.println("Accept:");
client.print("U-ApiKey:");
client.println(ukey);
client.println("Connection: close");
client.println();
}
else {
// kf you didn't get a connection to the server:
Serial.println("connection failed");
}
}

相关文章推荐
- 基于Arduino+LabVIEW的多路数据采集系统
- 基于Arduino+LabVIEW的串口控制LED亮灭
- 基于Protues的Arduino学习笔记01-Arduino UNO实验板设计
- 《Arduino与LabVIEW开发实战》-前言
- Arduino(一)
- nrf24l01+arduino
- [极客]硬件极客最爱:支持WiFi的Arduino板到来
- Arduino、arm、树莓派、单片机四者有什么不同?
- (一) 驱动模块搭建与测试
- (二) 2WD智能小车搭建完成
- 现货首发 爱上Raspberry Pi 爱上树莓派 首本中文教材 正版图书
- 现货首发 爱上Raspberry Pi 爱上树莓派 首本中文教材 正版全新
- 玩于鼓掌之中的小老虎机——Tiny Tiger Machine
- 基于Arduino的RGB色灯上位机控制Demo
- arduino的String类
- 静态字符串模式匹配模板库
- Arduino串口的正确打开方式
- bluetooth控制Arduino单片机的红外发射装置(一)——Arduino部分
- bluetooth控制Arduino单片机的红外发射装置(二)——Android部分