android View的scrollTo,scrollBy方法详解
2016-05-29 23:32
561 查看
今天写一篇关于view滑动的基础技术点,首先讲下所有滑动应该都是基于View本身的scrollTo(),scrollBy(),像Scroller,ViewDrawHelper类都是基于它的封装,现在写例子看看2个方法怎么用的,
<RelativeLayout xmlns:android="http://schemas.android.com/apk/res/android"
xmlns:tools="http://schemas.android.com/tools"
android:layout_width="match_parent"
android:layout_height="match_parent"
>
<LinearLayout
android:id="@+id/ll_root"
android:layout_width="match_parent"
android:layout_height="match_parent"
android:background="#ff0000"
android:orientation="horizontal"
/>
</RelativeLayout>
布局中就一个LinearLayout,里面什么内容都没有,
public class MainActivity extends Activity {
private LinearLayout ll_root;
@Override
protected void onCreate(Bundle savedInstanceState) {
super.onCreate(savedInstanceState);
setContentView(R.layout.activity_main);
ll_root = (LinearLayout) findViewById(R.id.ll_root);
ll_root.setOnClickListener(new OnClickListener() {
@Override
public void onClick(View v) {
Toast.makeText(getApplicationContext(), "scrollTo方法演示", 1).show();
ll_root.scrollTo(100, 0);
}
});
}
}
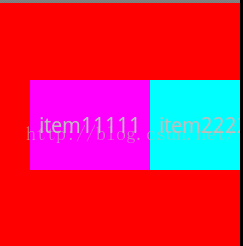
发现点击时候调用了scrollTo()方法并没有滑动,现在我在LienarLayout布局中添加2个子view,
<RelativeLayout xmlns:android="http://schemas.android.com/apk/res/android"
xmlns:tools="http://schemas.android.com/tools"
android:layout_width="match_parent"
android:layout_height="match_parent"
>
<LinearLayout
android:id="@+id/ll_root"
android:layout_width="match_parent"
android:layout_height="match_parent"
android:background="#ff0000"
android:orientation="horizontal"
android:gravity="center"
>
<TextView
android:layout_width="0dp"
android:layout_height="60dp"
android:text="item11111"
android:layout_weight="1"
android:gravity="center"
android:background="#ff00ff"
/>
<TextView
android:layout_width="0dp"
android:layout_height="60dp"
android:text="item22222"
android:layout_weight="1"
android:gravity="center"
android:background="#00ffff"
/>
</LinearLayout>
</RelativeLayout>
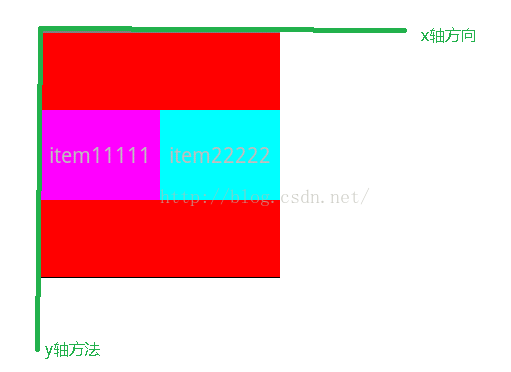
MainActivity类中的代码不变,效果:
现在发现点击LinearLayout,里面的textview位置有变化了,这样就得出一个很重要的结论:
当一个view调用scrollTo()时,是里面的内容进行滑动,不是本身view滑动!
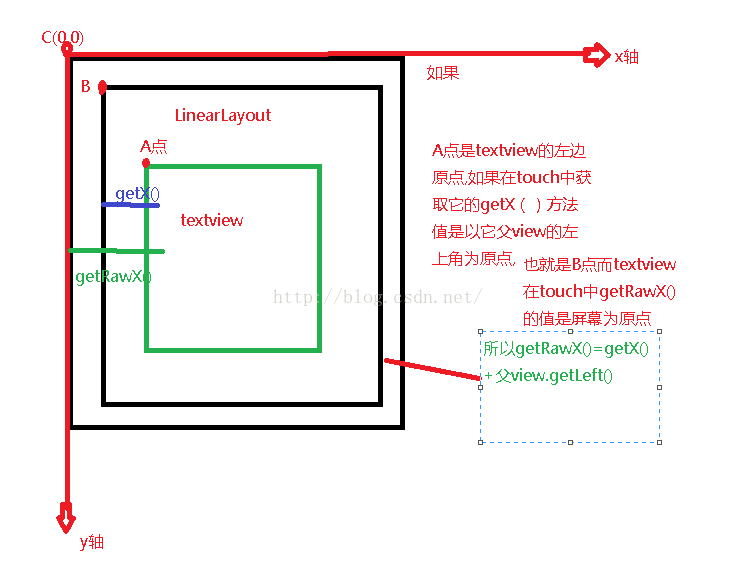
现在讨论为什么调用了scrollTo(100,0)它是x轴方法平移了100px,为什么是向左偏移了100px呢?这会涉及到二个问题,一个是参考点问题,一个是方向问题,首先说下参考点问题,相信知道对MotionEvent类都很熟悉,它封装了我们手指在屏幕上移动上一系列的操作,有按下,滑动,抬起等,它提供了getX(),getRawx()方法,那这个方法有什么区别呢?画图:
现在写例子来证明上面结论是否正确,
<RelativeLayout xmlns:android="http://schemas.android.com/apk/res/android"
xmlns:tools="http://schemas.android.com/tools"
android:layout_width="match_parent"
android:layout_height="match_parent"
>
<LinearLayout
android:id="@+id/ll_root"
android:layout_width="match_parent"
android:layout_height="match_parent"
android:background="#ff0000"
android:orientation="horizontal"
android:gravity="center"
android:layout_marginLeft="10px"
>
<TextView
android:id="@+id/tv1"
android:layout_width="0dp"
android:layout_height="60dp"
android:text="item11111"
android:layout_weight="1"
android:gravity="center"
android:background="#ff00ff"
/>
<TextView
android:layout_width="0dp"
android:layout_height="60dp"
android:text="item22222"
android:layout_weight="1"
android:gravity="center"
android:background="#00ffff"
/>
</LinearLayout>
</RelativeLayout>
现在我LinearLayout向左是10px,
tv1.setOnTouchListener(new OnTouchListener() {
@Override
public boolean onTouch(View v, MotionEvent event) {
switch (event.getAction()) {
case MotionEvent.ACTION_DOWN:
float x = event.getX();
float rawX = event.getRawX();
Log.e(TAG,"x="+x+":::rawX="+rawX);
break;
}
return false;
}
});
打印的log日记:

这二者是不是相差就是10个像素了,因为LinearLayout向左是10个px,就是离屏幕为10个px,我们也知道activity中也有个ouTouchEnevt()方法,这个event获取getX()和getRawX()都是以屏幕原点为参考点的,所以getX(),getRawX()方法获取的值是一样的,
@Override
public boolean onTouchEvent(MotionEvent event) {
switch (event.getAction()) {
case MotionEvent.ACTION_DOWN:
float x = event.getX();
float rawX = event.getRawX();
Log.e(TAG,"x="+x+":::rawX="+rawX);
break;
}
return super.onTouchEvent(event);
}
这里打印的log就不贴了,我已经验证了,而scrollTo()它的偏移量是以什么为参考点呢?是以当前调用scrollTo()方法的view的左上角为原点(也就是参考点),这个其实很好验证,你把调用scrollTo()方法的view离屏幕左侧多少个px,发现这个view调用scrollTo()传递的x,y方向偏移量都是一样的,这就证明了它不是以屏幕的左上角为参考点,而是以view左上角为参考点,
现在考虑上面留下的第二个问题就是偏移量问题,为什么ll_root.scrollTo(30, 0);发现它内容是向左移动了30px,我们知道x向右是正方向也就是正值,y轴向下是正方向,
这就要看看scrollTo()源码了,也许从这能找到我们想要的答案,
/**
* Set the scrolled position of your view. This will cause a call to
* {@link #onScrollChanged(int, int, int, int)} and the view will be
* invalidated.
* @param x the x position to scroll to
* @param y the y position to scroll to
*/
public void scrollTo(int x, int y) {
if (mScrollX != x || mScrollY != y) {
int oldX = mScrollX;
int oldY = mScrollY;
mScrollX = x;
mScrollY = y;
invalidateParentCaches();
onScrollChanged(mScrollX, mScrollY, oldX, oldY);
if (!awakenScrollBars()) {
postInvalidateOnAnimation();
}
}
}
从google的注释中意思是设置这个滑动view到某一个点,而不是距离,因为距离你可以累加,比如为什么你多次调用一个view的scrollTo(x,y)如果x,y值不变,发现它没动,现在结合源码解释下,
看到上面的代码有个if条件判断,x,y是我们从外面传递进来的值,mScrollX != x || mScrollY != y 这二个条件是关键,那么mScrollX和mScrollY表示啥意思呢?
/**
* The offset, in pixels, by which the content of this view is scrolled
* horizontally.
* {@hide}
*/
@ViewDebug.ExportedProperty(category = "scrolling")
protected int mScrollX;
/**
* The offset, in pixels, by which the content of this view is scrolled
* vertically.
* {@hide}
*/
@ViewDebug.ExportedProperty(category = "scrolling")
protected int mScrollY;
这是View源码中所定义的2个变量,它的注释意思是这个view滑动内容的偏移的像素,这有二个关键的词,一个是滑动内容,这个也就解释了博客中刚开始LinearLayout什么都没有的时候,调用scrollTo()方法没效果的原因,第二是偏移的像素点,View的源码中给我们提供了一个方法获取这个mScrollX值的方法就是getScrollX,现在我在没有调用view的scrollTo()方法之前调用getScrollX()和view调用scrollTo()后再调用getScrollX()看看这前后获取mScrollX这个值有什么不同,
protected void onCreate(Bundle savedInstanceState) {
super.onCreate(savedInstanceState);
setContentView(R.layout.activity_main);
ll_root = (LinearLayout) findViewById(R.id.ll_root);
tv1 = (TextView) findViewById(R.id.tv1);
Log.e(TAG,"没有调用scrollTo方法前 mScroll的值为"+ll_root.getScrollX());
ll_root.setOnClickListener(new OnClickListener() {
@Override
public void onClick(View v) {
ll_root.scrollTo(-30, 0);
Log.e(TAG,"调用scrollTo方法后 mScroll的值为"+ll_root.getScrollX());
}
});
}
log:

效果图:
发现它死向右滑动了30个像素,关于它为什么是向右滑动等下会解释,发现调用scrollTo(-30,0)之后它的mScrollX的值为-30,我现在对里面的变量简单做了下注释
if (mScrollX != x || mScrollY != y) {
int oldX = mScrollX;//oldX就是记录上次x轴偏移量
int oldY = mScrollY;//oldY就是记录上次y轴偏移量
mScrollX = x;//记录当前x轴偏移量
mScrollY = y;//记录当前y轴偏移量
invalidateParentCaches();
onScrollChanged(mScrollX, mScrollY, oldX, oldY);
if (!awakenScrollBars()) {
postInvalidateOnAnimation();//更新界面 要重新调用draw()方法
}
}
现在知道为什么多次调用同一个scrollTo(x,y)中x,y值没变而没效果的原因,因为你上次的偏移量和当前的偏移量(就是传递进去的x,y)相等,所以它没有调用if里面的postInvalidateOnAnimation()而没去重新绘制界面,我们知道重新绘制界面要调用draw()方法
public void draw(Canvas canvas) {
if (mClipBounds != null) {
canvas.clipRect(mClipBounds);
}
final int privateFlags = mPrivateFlags;
final boolean dirtyOpaque = (privateFlags & PFLAG_DIRTY_MASK) == PFLAG_DIRTY_OPAQUE &&
(mAttachInfo == null || !mAttachInfo.mIgnoreDirtyState);
mPrivateFlags = (privateFlags & ~PFLAG_DIRTY_MASK) | PFLAG_DRAWN;
/*
* Draw traversal performs several drawing steps which must be executed
* in the appropriate order:
*
* 1. Draw the background
* 2. If necessary, save the canvas' layers to prepare for fading
* 3. Draw view's content
* 4. Draw children
* 5. If necessary, draw the fading edges and restore layers
* 6. Draw decorations (scrollbars for instance)
*/
// Step 1, draw the background, if needed
int saveCount;
if (!dirtyOpaque) {
final Drawable background = mBackground;
if (background != null) {
final int scrollX = mScrollX;
final int scrollY = mScrollY;
if (mBackgroundSizeChanged) {
background.setBounds(0, 0, mRight - mLeft, mBottom - mTop);
mBackgroundSizeChanged = false;
}
if ((scrollX | scrollY) == 0) {
background.draw(canvas);
} else {
canvas.translate(scrollX, scrollY);
background.draw(canvas);
canvas.translate(-scrollX, -scrollY);
}
}
}
......................
}
draw()方法代码实在太多,在这就不方便贴,就贴了刚开始一部分,
if (!verticalEdges && !horizontalEdges) {
// Step 3, draw the content
if (!dirtyOpaque) onDraw(canvas);
// Step 4, draw the children
dispatchDraw(canvas);
// Step 6, draw decorations (scrollbars)
onDrawScrollBars(canvas);
if (mOverlay != null && !mOverlay.isEmpty()) {
mOverlay.getOverlayView().dispatchDraw(canvas);
}
// we're done...
return;
}
这里有一个onDrawScrollBars(canvas);方法,在这个方法最后几行代码有一个重新绘制界面的方法
if (invalidate) {
invalidate(left, top, right, bottom);
}
然后跟进去看这个invalidate()方法
public void invalidate(int l, int t, int r, int b) {
if (skipInvalidate()) {
return;
}
if ((mPrivateFlags & (PFLAG_DRAWN | PFLAG_HAS_BOUNDS)) == (PFLAG_DRAWN | PFLAG_HAS_BOUNDS) ||
(mPrivateFlags & PFLAG_DRAWING_CACHE_VALID) == PFLAG_DRAWING_CACHE_VALID ||
(mPrivateFlags & PFLAG_INVALIDATED) != PFLAG_INVALIDATED) {
mPrivateFlags &= ~PFLAG_DRAWING_CACHE_VALID;
mPrivateFlags |= PFLAG_INVALIDATED;
mPrivateFlags |= PFLAG_DIRTY;
final ViewParent p = mParent;
final AttachInfo ai = mAttachInfo;
//noinspection PointlessBooleanExpression,ConstantConditions
if (!HardwareRenderer.RENDER_DIRTY_REGIONS) {
if (p != null && ai != null && ai.mHardwareAccelerated) {
// fast-track for GL-enabled applications; just invalidate the whole hierarchy
// with a null dirty rect, which tells the ViewAncestor to redraw everything
p.invalidateChild(this, null);
return;
}
}
if (p != null && ai != null && l < r && t < b) {
final int scrollX = mScrollX;
final int scrollY = mScrollY;
final Rect tmpr = ai.mTmpInvalRect;
tmpr.set(l - scrollX, t - scrollY, r - scrollX, b - scrollY);
p.invalidateChild(this, tmpr);
}
}
}
看最后一个if条件也就是这几行代码
if (p != null && ai != null && l < r && t < b) {
final int scrollX = mScrollX;
final int scrollY = mScrollY;
final Rect tmpr = ai.mTmpInvalRect;
tmpr.set(l - scrollX, t - scrollY, r - scrollX, b - scrollY);
p.invalidateChild(this, tmpr);
}
我们看到定义了一个矩形tmpr,我们知道如何一个view在屏幕上都是一个矩形所绘制上去的,
tmpr.set(l - scrollX, t - scrollY, r - scrollX, b - scrollY);
这个l其实就是0,scrollX就是-30,这样矩形的 t - scrollY这个是没变的,还是0,现在画图分析:

这就是为什么调用了scrollTo(-30,0)是向左移动了,其实还有个概念问题,比如我LinearLayout调用scrollTo(30,0)而不是-30呢?效果会咋样
你会发现textview1有一部分看不见了,我们知道我们屏幕上所能看见的都是通过draw到Canvas上的,而Canvas是没有宽和高限制的,可以看作是内蒙大草原一样,无边无际,而我们所能看到的内容是有区域的,超过屏幕的宽和高是看不见的,
view还有一个scrollBy()方法,源码如下:
/**
* Move the scrolled position of your view. This will cause a call to
* {@link #onScrollChanged(int, int, int, int)} and the view will be
* invalidated.
* @param x the amount of pixels to scroll by horizontally
* @param y the amount of pixels to scroll by vertically
*/
public void scrollBy(int x, int y) {
scrollTo(mScrollX + x, mScrollY + y);
}
发现scrollBy()方法就是直接调用了scrollTo()方法,现在写个例子使用了scrollBy()方法
直接在activity的onTouchEvent()方法调用
@Override
public boolean onTouchEvent(MotionEvent event) {
ll_root.scrollBy(10, 0);
return super.onTouchEvent(event);
}
效果图:
scrollBy()是在之前的基础上累加x,y
现在另用scrollTo()实现下QQ滑动效果,
布局文件:
<RelativeLayout xmlns:android="http://schemas.android.com/apk/res/android"
xmlns:tools="http://schemas.android.com/tools"
android:layout_width="match_parent"
android:layout_height="match_parent"
>
<LinearLayout
android:id="@+id/ll_root"
android:layout_width="match_parent"
android:layout_height="50dp"
android:background="#ffffff"
android:orientation="horizontal"
>
<TextView
android:id="@+id/tv1"
android:layout_width="match_parent"
android:layout_height="50dp"
android:text="你有未读的消息"
android:gravity="center"
android:background="#ffffff"
/>
<TextView
android:layout_width="90px"
android:layout_height="50dp"
android:text="置顶"
android:gravity="center"
android:background="#e5e5e5"
/>
<TextView
android:layout_width="90px"
android:layout_height="50dp"
android:text="标为已读"
android:gravity="center"
android:background="#ff00ff"
/>
<TextView
android:layout_width="90px"
android:layout_height="50dp"
android:gravity="center"
android:background="#ff0000"
android:text="删除"
/>
</LinearLayout>
</RelativeLayout>
MainActivity中的逻辑
public class MainActivity extends Activity {
private static final String TAG = "MainActivity";
private LinearLayout ll_root;
private TextView tv1;
private float downX = 0;
@Override
protected void onCreate(Bundle savedInstanceState) {
super.onCreate(savedInstanceState);
setContentView(R.layout.activity_main);
ll_root = (LinearLayout) findViewById(R.id.ll_root);
}
@Override
public boolean onTouchEvent(MotionEvent event) {
switch (event.getAction()) {
case MotionEvent.ACTION_DOWN:
downX = event.getX();
break;
case MotionEvent.ACTION_MOVE:
float moveX = event.getX();
int scrollX = ll_root.getScrollX();
int newScrollX = (int) (scrollX+downX-moveX);
ll_root.scrollTo(newScrollX, 0);
downX = moveX;
break;
case MotionEvent.ACTION_UP:
break;
}
return super.onTouchEvent(event);
}
}
效果图:
发现是在activity的onTouchEnevt()方法中写滑动的逻辑,先分析下在touch中写的代码,为了分析,我在这个LinearLayout下面画点来记录我手指移动的轨迹,以及打log,
自定义的view
public class CustomPointView extends View {
private static final String TAG = "CustomPointView";
private Paint mPaint;
private float mPointX,mPointY;
private float prePointx,proPoingy;
private float[] pts;
private List<Float> lists;
public CustomPointView(Context context, AttributeSet attrs, int defStyleAttr) {
super(context, attrs, defStyleAttr);
mPaint = new Paint();
mPaint.setStrokeWidth(3);
lists = new ArrayList<Float>();
pts = new float[lists.size()];
}
public CustomPointView(Context context, AttributeSet attrs) {
super(context, attrs);
mPaint = new Paint();
mPaint.setStrokeWidth(3);
lists = new ArrayList<Float>();
pts = new float[lists.size()];
}
public CustomPointView(Context context) {
super(context);
mPaint = new Paint();
mPaint.setStrokeWidth(3);
lists = new ArrayList<Float>();
pts = new float[lists.size()];
}
@Override
protected void onDraw(Canvas canvas) {
mPaint.setColor(Color.RED);
if(lists.size()>0){
for(int i=0;i<lists.size();i++){
canvas.drawPoint(lists.get(i),30, mPaint);
}
}
}
public void setPoints(float x,float y){
this.mPointX = x;
this.mPointY = y;
lists.add(x);
invalidate();
}
}
在down的时候调用一下,在move时候调用一下,动态效果图:
下面的红线就是我画的手指在屏幕上移动的轨迹,分析如图:
好了,写到这里,洗澡睡觉!
<RelativeLayout xmlns:android="http://schemas.android.com/apk/res/android"
xmlns:tools="http://schemas.android.com/tools"
android:layout_width="match_parent"
android:layout_height="match_parent"
>
<LinearLayout
android:id="@+id/ll_root"
android:layout_width="match_parent"
android:layout_height="match_parent"
android:background="#ff0000"
android:orientation="horizontal"
/>
</RelativeLayout>
布局中就一个LinearLayout,里面什么内容都没有,
public class MainActivity extends Activity {
private LinearLayout ll_root;
@Override
protected void onCreate(Bundle savedInstanceState) {
super.onCreate(savedInstanceState);
setContentView(R.layout.activity_main);
ll_root = (LinearLayout) findViewById(R.id.ll_root);
ll_root.setOnClickListener(new OnClickListener() {
@Override
public void onClick(View v) {
Toast.makeText(getApplicationContext(), "scrollTo方法演示", 1).show();
ll_root.scrollTo(100, 0);
}
});
}
}
发现点击时候调用了scrollTo()方法并没有滑动,现在我在LienarLayout布局中添加2个子view,
<RelativeLayout xmlns:android="http://schemas.android.com/apk/res/android"
xmlns:tools="http://schemas.android.com/tools"
android:layout_width="match_parent"
android:layout_height="match_parent"
>
<LinearLayout
android:id="@+id/ll_root"
android:layout_width="match_parent"
android:layout_height="match_parent"
android:background="#ff0000"
android:orientation="horizontal"
android:gravity="center"
>
<TextView
android:layout_width="0dp"
android:layout_height="60dp"
android:text="item11111"
android:layout_weight="1"
android:gravity="center"
android:background="#ff00ff"
/>
<TextView
android:layout_width="0dp"
android:layout_height="60dp"
android:text="item22222"
android:layout_weight="1"
android:gravity="center"
android:background="#00ffff"
/>
</LinearLayout>
</RelativeLayout>
MainActivity类中的代码不变,效果:
现在发现点击LinearLayout,里面的textview位置有变化了,这样就得出一个很重要的结论:
当一个view调用scrollTo()时,是里面的内容进行滑动,不是本身view滑动!
现在讨论为什么调用了scrollTo(100,0)它是x轴方法平移了100px,为什么是向左偏移了100px呢?这会涉及到二个问题,一个是参考点问题,一个是方向问题,首先说下参考点问题,相信知道对MotionEvent类都很熟悉,它封装了我们手指在屏幕上移动上一系列的操作,有按下,滑动,抬起等,它提供了getX(),getRawx()方法,那这个方法有什么区别呢?画图:
现在写例子来证明上面结论是否正确,
<RelativeLayout xmlns:android="http://schemas.android.com/apk/res/android"
xmlns:tools="http://schemas.android.com/tools"
android:layout_width="match_parent"
android:layout_height="match_parent"
>
<LinearLayout
android:id="@+id/ll_root"
android:layout_width="match_parent"
android:layout_height="match_parent"
android:background="#ff0000"
android:orientation="horizontal"
android:gravity="center"
android:layout_marginLeft="10px"
>
<TextView
android:id="@+id/tv1"
android:layout_width="0dp"
android:layout_height="60dp"
android:text="item11111"
android:layout_weight="1"
android:gravity="center"
android:background="#ff00ff"
/>
<TextView
android:layout_width="0dp"
android:layout_height="60dp"
android:text="item22222"
android:layout_weight="1"
android:gravity="center"
android:background="#00ffff"
/>
</LinearLayout>
</RelativeLayout>
现在我LinearLayout向左是10px,
tv1.setOnTouchListener(new OnTouchListener() {
@Override
public boolean onTouch(View v, MotionEvent event) {
switch (event.getAction()) {
case MotionEvent.ACTION_DOWN:
float x = event.getX();
float rawX = event.getRawX();
Log.e(TAG,"x="+x+":::rawX="+rawX);
break;
}
return false;
}
});
打印的log日记:
这二者是不是相差就是10个像素了,因为LinearLayout向左是10个px,就是离屏幕为10个px,我们也知道activity中也有个ouTouchEnevt()方法,这个event获取getX()和getRawX()都是以屏幕原点为参考点的,所以getX(),getRawX()方法获取的值是一样的,
@Override
public boolean onTouchEvent(MotionEvent event) {
switch (event.getAction()) {
case MotionEvent.ACTION_DOWN:
float x = event.getX();
float rawX = event.getRawX();
Log.e(TAG,"x="+x+":::rawX="+rawX);
break;
}
return super.onTouchEvent(event);
}
这里打印的log就不贴了,我已经验证了,而scrollTo()它的偏移量是以什么为参考点呢?是以当前调用scrollTo()方法的view的左上角为原点(也就是参考点),这个其实很好验证,你把调用scrollTo()方法的view离屏幕左侧多少个px,发现这个view调用scrollTo()传递的x,y方向偏移量都是一样的,这就证明了它不是以屏幕的左上角为参考点,而是以view左上角为参考点,
现在考虑上面留下的第二个问题就是偏移量问题,为什么ll_root.scrollTo(30, 0);发现它内容是向左移动了30px,我们知道x向右是正方向也就是正值,y轴向下是正方向,
这就要看看scrollTo()源码了,也许从这能找到我们想要的答案,
/**
* Set the scrolled position of your view. This will cause a call to
* {@link #onScrollChanged(int, int, int, int)} and the view will be
* invalidated.
* @param x the x position to scroll to
* @param y the y position to scroll to
*/
public void scrollTo(int x, int y) {
if (mScrollX != x || mScrollY != y) {
int oldX = mScrollX;
int oldY = mScrollY;
mScrollX = x;
mScrollY = y;
invalidateParentCaches();
onScrollChanged(mScrollX, mScrollY, oldX, oldY);
if (!awakenScrollBars()) {
postInvalidateOnAnimation();
}
}
}
从google的注释中意思是设置这个滑动view到某一个点,而不是距离,因为距离你可以累加,比如为什么你多次调用一个view的scrollTo(x,y)如果x,y值不变,发现它没动,现在结合源码解释下,
看到上面的代码有个if条件判断,x,y是我们从外面传递进来的值,mScrollX != x || mScrollY != y 这二个条件是关键,那么mScrollX和mScrollY表示啥意思呢?
/**
* The offset, in pixels, by which the content of this view is scrolled
* horizontally.
* {@hide}
*/
@ViewDebug.ExportedProperty(category = "scrolling")
protected int mScrollX;
/**
* The offset, in pixels, by which the content of this view is scrolled
* vertically.
* {@hide}
*/
@ViewDebug.ExportedProperty(category = "scrolling")
protected int mScrollY;
这是View源码中所定义的2个变量,它的注释意思是这个view滑动内容的偏移的像素,这有二个关键的词,一个是滑动内容,这个也就解释了博客中刚开始LinearLayout什么都没有的时候,调用scrollTo()方法没效果的原因,第二是偏移的像素点,View的源码中给我们提供了一个方法获取这个mScrollX值的方法就是getScrollX,现在我在没有调用view的scrollTo()方法之前调用getScrollX()和view调用scrollTo()后再调用getScrollX()看看这前后获取mScrollX这个值有什么不同,
protected void onCreate(Bundle savedInstanceState) {
super.onCreate(savedInstanceState);
setContentView(R.layout.activity_main);
ll_root = (LinearLayout) findViewById(R.id.ll_root);
tv1 = (TextView) findViewById(R.id.tv1);
Log.e(TAG,"没有调用scrollTo方法前 mScroll的值为"+ll_root.getScrollX());
ll_root.setOnClickListener(new OnClickListener() {
@Override
public void onClick(View v) {
ll_root.scrollTo(-30, 0);
Log.e(TAG,"调用scrollTo方法后 mScroll的值为"+ll_root.getScrollX());
}
});
}
log:
效果图:
发现它死向右滑动了30个像素,关于它为什么是向右滑动等下会解释,发现调用scrollTo(-30,0)之后它的mScrollX的值为-30,我现在对里面的变量简单做了下注释
if (mScrollX != x || mScrollY != y) {
int oldX = mScrollX;//oldX就是记录上次x轴偏移量
int oldY = mScrollY;//oldY就是记录上次y轴偏移量
mScrollX = x;//记录当前x轴偏移量
mScrollY = y;//记录当前y轴偏移量
invalidateParentCaches();
onScrollChanged(mScrollX, mScrollY, oldX, oldY);
if (!awakenScrollBars()) {
postInvalidateOnAnimation();//更新界面 要重新调用draw()方法
}
}
现在知道为什么多次调用同一个scrollTo(x,y)中x,y值没变而没效果的原因,因为你上次的偏移量和当前的偏移量(就是传递进去的x,y)相等,所以它没有调用if里面的postInvalidateOnAnimation()而没去重新绘制界面,我们知道重新绘制界面要调用draw()方法
public void draw(Canvas canvas) {
if (mClipBounds != null) {
canvas.clipRect(mClipBounds);
}
final int privateFlags = mPrivateFlags;
final boolean dirtyOpaque = (privateFlags & PFLAG_DIRTY_MASK) == PFLAG_DIRTY_OPAQUE &&
(mAttachInfo == null || !mAttachInfo.mIgnoreDirtyState);
mPrivateFlags = (privateFlags & ~PFLAG_DIRTY_MASK) | PFLAG_DRAWN;
/*
* Draw traversal performs several drawing steps which must be executed
* in the appropriate order:
*
* 1. Draw the background
* 2. If necessary, save the canvas' layers to prepare for fading
* 3. Draw view's content
* 4. Draw children
* 5. If necessary, draw the fading edges and restore layers
* 6. Draw decorations (scrollbars for instance)
*/
// Step 1, draw the background, if needed
int saveCount;
if (!dirtyOpaque) {
final Drawable background = mBackground;
if (background != null) {
final int scrollX = mScrollX;
final int scrollY = mScrollY;
if (mBackgroundSizeChanged) {
background.setBounds(0, 0, mRight - mLeft, mBottom - mTop);
mBackgroundSizeChanged = false;
}
if ((scrollX | scrollY) == 0) {
background.draw(canvas);
} else {
canvas.translate(scrollX, scrollY);
background.draw(canvas);
canvas.translate(-scrollX, -scrollY);
}
}
}
......................
}
draw()方法代码实在太多,在这就不方便贴,就贴了刚开始一部分,
if (!verticalEdges && !horizontalEdges) {
// Step 3, draw the content
if (!dirtyOpaque) onDraw(canvas);
// Step 4, draw the children
dispatchDraw(canvas);
// Step 6, draw decorations (scrollbars)
onDrawScrollBars(canvas);
if (mOverlay != null && !mOverlay.isEmpty()) {
mOverlay.getOverlayView().dispatchDraw(canvas);
}
// we're done...
return;
}
这里有一个onDrawScrollBars(canvas);方法,在这个方法最后几行代码有一个重新绘制界面的方法
if (invalidate) {
invalidate(left, top, right, bottom);
}
然后跟进去看这个invalidate()方法
public void invalidate(int l, int t, int r, int b) {
if (skipInvalidate()) {
return;
}
if ((mPrivateFlags & (PFLAG_DRAWN | PFLAG_HAS_BOUNDS)) == (PFLAG_DRAWN | PFLAG_HAS_BOUNDS) ||
(mPrivateFlags & PFLAG_DRAWING_CACHE_VALID) == PFLAG_DRAWING_CACHE_VALID ||
(mPrivateFlags & PFLAG_INVALIDATED) != PFLAG_INVALIDATED) {
mPrivateFlags &= ~PFLAG_DRAWING_CACHE_VALID;
mPrivateFlags |= PFLAG_INVALIDATED;
mPrivateFlags |= PFLAG_DIRTY;
final ViewParent p = mParent;
final AttachInfo ai = mAttachInfo;
//noinspection PointlessBooleanExpression,ConstantConditions
if (!HardwareRenderer.RENDER_DIRTY_REGIONS) {
if (p != null && ai != null && ai.mHardwareAccelerated) {
// fast-track for GL-enabled applications; just invalidate the whole hierarchy
// with a null dirty rect, which tells the ViewAncestor to redraw everything
p.invalidateChild(this, null);
return;
}
}
if (p != null && ai != null && l < r && t < b) {
final int scrollX = mScrollX;
final int scrollY = mScrollY;
final Rect tmpr = ai.mTmpInvalRect;
tmpr.set(l - scrollX, t - scrollY, r - scrollX, b - scrollY);
p.invalidateChild(this, tmpr);
}
}
}
看最后一个if条件也就是这几行代码
if (p != null && ai != null && l < r && t < b) {
final int scrollX = mScrollX;
final int scrollY = mScrollY;
final Rect tmpr = ai.mTmpInvalRect;
tmpr.set(l - scrollX, t - scrollY, r - scrollX, b - scrollY);
p.invalidateChild(this, tmpr);
}
我们看到定义了一个矩形tmpr,我们知道如何一个view在屏幕上都是一个矩形所绘制上去的,
tmpr.set(l - scrollX, t - scrollY, r - scrollX, b - scrollY);
这个l其实就是0,scrollX就是-30,这样矩形的 t - scrollY这个是没变的,还是0,现在画图分析:
这就是为什么调用了scrollTo(-30,0)是向左移动了,其实还有个概念问题,比如我LinearLayout调用scrollTo(30,0)而不是-30呢?效果会咋样
你会发现textview1有一部分看不见了,我们知道我们屏幕上所能看见的都是通过draw到Canvas上的,而Canvas是没有宽和高限制的,可以看作是内蒙大草原一样,无边无际,而我们所能看到的内容是有区域的,超过屏幕的宽和高是看不见的,
view还有一个scrollBy()方法,源码如下:
/**
* Move the scrolled position of your view. This will cause a call to
* {@link #onScrollChanged(int, int, int, int)} and the view will be
* invalidated.
* @param x the amount of pixels to scroll by horizontally
* @param y the amount of pixels to scroll by vertically
*/
public void scrollBy(int x, int y) {
scrollTo(mScrollX + x, mScrollY + y);
}
发现scrollBy()方法就是直接调用了scrollTo()方法,现在写个例子使用了scrollBy()方法
直接在activity的onTouchEvent()方法调用
@Override
public boolean onTouchEvent(MotionEvent event) {
ll_root.scrollBy(10, 0);
return super.onTouchEvent(event);
}
效果图:
scrollBy()是在之前的基础上累加x,y
现在另用scrollTo()实现下QQ滑动效果,
布局文件:
<RelativeLayout xmlns:android="http://schemas.android.com/apk/res/android"
xmlns:tools="http://schemas.android.com/tools"
android:layout_width="match_parent"
android:layout_height="match_parent"
>
<LinearLayout
android:id="@+id/ll_root"
android:layout_width="match_parent"
android:layout_height="50dp"
android:background="#ffffff"
android:orientation="horizontal"
>
<TextView
android:id="@+id/tv1"
android:layout_width="match_parent"
android:layout_height="50dp"
android:text="你有未读的消息"
android:gravity="center"
android:background="#ffffff"
/>
<TextView
android:layout_width="90px"
android:layout_height="50dp"
android:text="置顶"
android:gravity="center"
android:background="#e5e5e5"
/>
<TextView
android:layout_width="90px"
android:layout_height="50dp"
android:text="标为已读"
android:gravity="center"
android:background="#ff00ff"
/>
<TextView
android:layout_width="90px"
android:layout_height="50dp"
android:gravity="center"
android:background="#ff0000"
android:text="删除"
/>
</LinearLayout>
</RelativeLayout>
MainActivity中的逻辑
public class MainActivity extends Activity {
private static final String TAG = "MainActivity";
private LinearLayout ll_root;
private TextView tv1;
private float downX = 0;
@Override
protected void onCreate(Bundle savedInstanceState) {
super.onCreate(savedInstanceState);
setContentView(R.layout.activity_main);
ll_root = (LinearLayout) findViewById(R.id.ll_root);
}
@Override
public boolean onTouchEvent(MotionEvent event) {
switch (event.getAction()) {
case MotionEvent.ACTION_DOWN:
downX = event.getX();
break;
case MotionEvent.ACTION_MOVE:
float moveX = event.getX();
int scrollX = ll_root.getScrollX();
int newScrollX = (int) (scrollX+downX-moveX);
ll_root.scrollTo(newScrollX, 0);
downX = moveX;
break;
case MotionEvent.ACTION_UP:
break;
}
return super.onTouchEvent(event);
}
}
效果图:
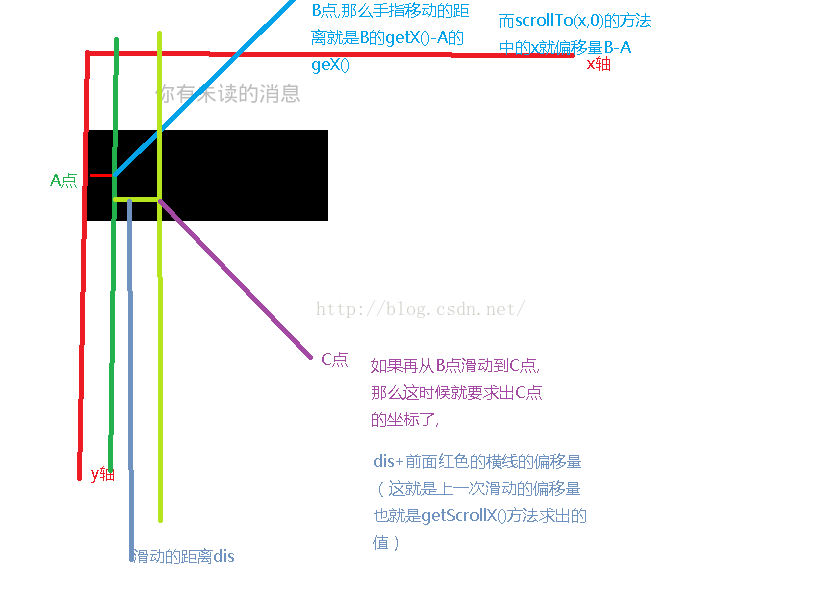
发现是在activity的onTouchEnevt()方法中写滑动的逻辑,先分析下在touch中写的代码,为了分析,我在这个LinearLayout下面画点来记录我手指移动的轨迹,以及打log,
自定义的view
public class CustomPointView extends View {
private static final String TAG = "CustomPointView";
private Paint mPaint;
private float mPointX,mPointY;
private float prePointx,proPoingy;
private float[] pts;
private List<Float> lists;
public CustomPointView(Context context, AttributeSet attrs, int defStyleAttr) {
super(context, attrs, defStyleAttr);
mPaint = new Paint();
mPaint.setStrokeWidth(3);
lists = new ArrayList<Float>();
pts = new float[lists.size()];
}
public CustomPointView(Context context, AttributeSet attrs) {
super(context, attrs);
mPaint = new Paint();
mPaint.setStrokeWidth(3);
lists = new ArrayList<Float>();
pts = new float[lists.size()];
}
public CustomPointView(Context context) {
super(context);
mPaint = new Paint();
mPaint.setStrokeWidth(3);
lists = new ArrayList<Float>();
pts = new float[lists.size()];
}
@Override
protected void onDraw(Canvas canvas) {
mPaint.setColor(Color.RED);
if(lists.size()>0){
for(int i=0;i<lists.size();i++){
canvas.drawPoint(lists.get(i),30, mPaint);
}
}
}
public void setPoints(float x,float y){
this.mPointX = x;
this.mPointY = y;
lists.add(x);
invalidate();
}
}
在down的时候调用一下,在move时候调用一下,动态效果图:
下面的红线就是我画的手指在屏幕上移动的轨迹,分析如图:
好了,写到这里,洗澡睡觉!

相关文章推荐
- java/android 设计模式学习笔记(5)---对象池模式
- Android 手动显示和隐藏软键盘
- Android 资源目录的相关知识
- android轮播图点的布局实现
- Android常用ADB命令
- JAVA和Android的回调机制
- Android群英传读书笔记第四章 (ListView使用技巧)
- geekband android #5 第十三周分享(Btimap优化)
- Android开发学习之路-二维码学习
- android text设置只能输入数字并限制长度
- Android 内存泄漏——检测
- 安卓初识基本控件_AutoCompleteTextView
- android studio 如何导入类库
- Android学习笔记之LayoutInflater的inflate方法中的ViewGroup root 参数理解
- Android中获取系统通讯录联系人并显示在EditText
- Android RelativeLayout 属性详解
- Android 图片压缩之多种压缩方式结合使用
- Android 基础总结:( 十二)Content Provider实例
- Android中的长度单位
- android非线性渐变色,不同区域显示不同的渐变效果