k8s v1.2 web界面——kubernetes-dashboard详解
2016-05-25 14:12
796 查看
摘要: 宣传kubernetes,点赞Google !!!
可以进行增删改查:
增:新建(分填写的和上传json或yaml的),上传的方式,等同于kubectl create -f
删:删除副本(replicationcontrollers)
改:修改副本数
查:查询相关信息,同kubectl get命令
dashboard有了上述功能,在配上web-ui(监控+查看信息),就可以基本脱离kubectl命令,且能很好的管理好整个k8s,good!
Service Account概念的引入是基于这样的使用场景:运行在pod里的进程需要调用Kubernetes API以及非Kubernetes API的其它服务(如image repository/被mount到pod上的NFS volumes中的file等)。我们使用Service Account来为pod提供id。
service account仅在所属的namespace下,才能使用。
gcr.io/google_containers/kubernetes-dashboard-amd64:v1.0.1镜像需要使用serviceaccount。
K8s要支持Service Account,需要以下两步:
1)、事先生成https证书;
2)、在kube-apiserver和kube-controller-manager,添加相关的参数
Service Account的知识,请自行脑补:
http://www.tuicool.com/articles/quU7Nnz
https://segmentfault.com/a/1190000003063933
参考:
http://www.tuicool.com/articles/byUnQn7
相关证书文件,说明如下:
出错页面:

http://www.liuhaihua.cn/archives/146044.html
http://studygolang.com/articles/4461
[b]问题:[/b]
客户端并没有提供可以信赖的根证书来对服务端发过来的证书进行验证
[b]解决办法:[/b]
[b] 利用subjectAltName,添加ip到openssl证书[/b]
注:该ip为,kube的services中的CLUSTER-IP,对应端口是443的ip,可使用下面命令获取:[b]【[/b][b]kubectl get services --all-namespaces |grep 'default'|grep 'kubernetes'|grep '443'|awk '{print $3}'[/b][b]】[/b]
[b] 注:此部分只对比上一节不同的[/b]

[b]①、副本信息操作:[/b]

副本操作,可以分为下面三个部分:

[b]2)、调整副本数:[/b]


版权声明:原创作品,谢绝转载!否则将追究法律责任。
http://my.oschina.net/fufangchun/blog
[b]1、[/b][b]Kube[/b][b]dashboard[/b][b]介绍:[/b]
[b]①、[/b][b]dashboard[/b][b]功能:[/b]
Kube dashboard是kube 1.2版本中新增的,具备与kubelet commandline类似的功能,允许用户通过一种新方式与kubernetes集群交互。可以进行增删改查:
增:新建(分填写的和上传json或yaml的),上传的方式,等同于kubectl create -f
删:删除副本(replicationcontrollers)
改:修改副本数
查:查询相关信息,同kubectl get命令
dashboard有了上述功能,在配上web-ui(监控+查看信息),就可以基本脱离kubectl命令,且能很好的管理好整个k8s,good!
[b]②、kubernetes的serviceaccount:[/b]
serviceaccount就是一个‘账户’的意思,我们的服务有时候需要一些带有隐私信息的东西,token,certification file等等,这些东西我们可以在master上创建,然后在创建pod的时候导入进去。Service Account概念的引入是基于这样的使用场景:运行在pod里的进程需要调用Kubernetes API以及非Kubernetes API的其它服务(如image repository/被mount到pod上的NFS volumes中的file等)。我们使用Service Account来为pod提供id。
service account仅在所属的namespace下,才能使用。
gcr.io/google_containers/kubernetes-dashboard-amd64:v1.0.1镜像需要使用serviceaccount。
| [root@localhost ~]# docker run -it --rm -e KUBERNETES_SERVICE_HOST=192.168.16.100 -e KUBERNETES_SERVICE_PORT=8080 f4ee9421e1ba 2016/04/25 10:34:59 open /var/run/secrets/kubernetes.io/serviceaccount/token: no such file or directory panic: runtime error: invalid memory address or nil pointer dereference |
1)、事先生成https证书;
2)、在kube-apiserver和kube-controller-manager,添加相关的参数
Service Account的知识,请自行脑补:
http://www.tuicool.com/articles/quU7Nnz
https://segmentfault.com/a/1190000003063933
[b]③、kubernetes[/b][b]dashboard镜像获取:[/b]
由于docker官网镜像被墙,可以到[b]https://hub.alauda.cn/[/b]获取相关镜像。| docker pull index.alauda.cn/googlecontainer/kubernetes-dashboard-amd64:v0.1.0 docker tag index.alauda.cn/googlecontainer/kubernetes-dashboard-amd64:v0.1.0 gcr.io/google_containers/kubernetes-dashboard-amd64:v1.0. |
[b]2、[/b][b]dashboard[/b][b]配置测试之[/b][b]证书有问题【失败】:[/b]
此部分,介绍dashboard配置过程中,出现的问题,避免之后还会有人出现。参考:
http://www.tuicool.com/articles/byUnQn7
[b]①、https证书生成:[/b]
基于CSV的基本认证。首先需要创建api server的基本认证文件(文件名可任意):| basic_auth.csv # 格式: 用户名,密码,用户ID |
| [b]#创建api server的基本认证文件[/b] [root@localhost kube-1.2]# echo admin,admin,perofu > /root/kube-1.2/ca_key/basic_auth.csv [b]#创建CA证书[/b] [root@localhost kube-1.2]# mkdir ca_key [root@localhost kube-1.2]# cd ca_key/ [root@localhost ca_key]# openssl genrsa -out ca.key 2048 Generating RSA private key, 2048 bit long modulus ............................................+++ ...........................................................................................................+++ e is 65537 (0x10001) [root@localhost ca_key]# openssl req -x509 -new -nodes -key ca.key -subj "/CN=perofu.com" -days 10000 -out ca.crt [root@localhost ca_key]# openssl genrsa -out server.key 2048 Generating RSA private key, 2048 bit long modulus .........+++ ...................+++ e is 65537 (0x10001) [b]#创建api server证书[/b] [root@localhost ca_key]# openssl req -new -key server.key -subj "/CN=server" -out server.csr [root@localhost ca_key]# openssl x509 -req -in server.csr -CA ca.crt -CAkey ca.key -CAcreateserial -out server.crt -days 10000 Signature ok subject=/CN=server Getting CA Private Key |
| 文件 | 作用 |
| ca.key | 自己生成的CA的私钥,用于模拟一个CA |
| ca.crt | 用自己的私钥自签名的CA证书 |
| server.key | api server的私钥,用于配置api server的https |
| server.csr | api server的证书请求文件,用于请求api server的证书 |
| server.crt | 用自己模拟的CA签发的api server的证书,用于配置api server的https |
[b]②、启动[/b][b]kube 1.2:[/b]
相关证书的使用,请参考下面命令:| [b]#创建ServiceAccount需要的目录(不知道需不需要,反正创建就行)[/b] mkdir -p /var/run/secrets/kubernetes.io/serviceaccount/ [b]#1.2 master ServiceAccount启动[/b] nohup etcd -peer-addr 192.168.16.234:7001 -addr 192.168.16.234:4001 -data-dir /tmp/etcd/ -name kubernetes_master &>> /var/log/kubernetes/kube-etcd.log & nohup /usr/bin/kube-apiserver --address=0.0.0.0 --port=8080 --etcd_servers=http://192.168.16.234:4001 --service-cluster-ip-range=10.1.0.0/16 --allow-privileged=true --logtostderr=true --admission-control=ServiceAccount --tls-cert-file=/root/kube-1.2/ca_key/server.crt --tls-private-key-file=/root/kube-1.2/ca_key/server.key --secure-port=443 --basic-auth-file=/root/kube-1.2/ca_key/basic_auth.csv &>> /var/log/kubernetes/kube-apiserver.log & nohup /usr/bin/kube-scheduler --master=127.0.0.1:8080 --logtostderr=true &>> /var/log/kubernetes/kube-scheduler.log & nohup /usr/bin/kube-controller-manager --master=127.0.0.1:8080 --logtostderr=true --root-ca-file=/root/kube-1.2/ca_key/ca.crt --service-account-private-key-file=/root/kube-1.2/ca_key/server.key &>> /var/log/kubernetes/kube-controller-manager.log & [b]#1.2 node 启动[/b] nohup /usr/bin/kubelet --address=0.0.0.0 --port=10250 --hostname_override=192.168.16.234 --api_servers=http://192.168.16.234:8080 --cluster-dns=192.168.16.234 --cluster-domain=perofu.com --allow-privileged=true --cadvisor-port=4194 &>> /var/log/kubernetes/kubelet.log & nohup /usr/bin/kube-proxy --master=192.168.16.234:8080 --logtostderr=true &>> /var/log/kubernetes/kube-proxy.log & |
[b]③、验证https:[/b]
| curl -k -I -u admin:admin https://127.0.0.1/ curl -k -I -u admin:admin https://127.0.0.1/api/v1 |
| [root@localhost kube-1.2]# curl https://10.1.0.1:443/api/v1/replicationcontrollers -k -u admin:admin|head % Total % Received % Xferd Average Speed Time Time Time Current Dload Upload Total Spent Left Speed 100 2657 0 2657 0 0 15376 0 --:--:-- --:--:-- --:--:-- 15447 { "kind": "ReplicationControllerList", "apiVersion": "v1", "metadata": { "selfLink": "/api/v1/replicationcontrollers", "resourceVersion": "108" }, "items": [ { "metadata": { [root@localhost kube-1.2]# |
[b]④、kubernetes-dashboard相关资源的配置文件:[/b]
[b]1)、namespace配置文件:[/b]
| [root@localhost kube-1.2]# vi kube-system.json { "kind": "Namespace", "apiVersion": "v1", "metadata": { "name": "kube-system" } } |
[b]2)、副本及pod的配置文件:[/b]
| [root@localhost kube-1.2]# vi kube-dashboard-rc.yaml apiVersion: v1 kind: ReplicationController metadata: # Keep the name in sync with image version and # gce/coreos/kube-manifests/addons/dashboard counterparts name: kubernetes-dashboard-v1.0.1 namespace: kube-system labels: k8s-app: kubernetes-dashboard version: v1.0.1 kubernetes.io/cluster-service: "true" spec: replicas: 1 selector: k8s-app: kubernetes-dashboard template: metadata: labels: k8s-app: kubernetes-dashboard version: v1.0.1 kubernetes.io/cluster-service: "true" spec: containers: - name: kubernetes-dashboard image: gcr.io/google_containers/kubernetes-dashboard-amd64:v1.0.1 resources: # keep request = limit to keep this container in guaranteed class limits: cpu: 100m memory: 50Mi requests: cpu: 100m memory: 50Mi ports: - containerPort: 9090 livenessProbe: httpGet: path: / port: 9090 initialDelaySeconds: 30 timeoutSeconds: 30 |
[b]3)、service配置文件:[/b]
| [root@localhost kube-1.2]# vi kube-dashboard-svc.yaml apiVersion: v1 kind: Service metadata: name: kubernetes-dashboard namespace: kube-system labels: k8s-app: kubernetes-dashboard kubernetes.io/cluster-service: "true" spec: selector: k8s-app: kubernetes-dashboard ports: - port: 80 targetPort: 9090 |
[b]⑤、创建kubernetes-dashboard相关资源:[/b]
| [root@localhost ca_key]# kubectl create -f /root/kube-1.2/kube-system.json namespace "kube-system" created [root@localhost ca_key]# [root@localhost ca_key]# kubectl create -f /root/kube-1.2/kube-dashboard-rc.yaml replicationcontroller "kubernetes-dashboard-v1.0.1" created [root@localhost ca_key]# [root@localhost ca_key]# kubectl create -f /root/kube-1.2/kube-dashboard-svc.yaml service "kubernetes-dashboard" created [root@localhost ca_key]# [root@localhost ca_key]# kubectl get pods --all-namespaces NAMESPACE NAME READY STATUS RESTARTS AGE kube-system kubernetes-dashboard-v1.0.1-9xrzd 1/1 Running 0 27s [root@localhost ca_key]# kubectl get node NAME STATUS AGE 192.168.16.234 Ready 1m [root@localhost ca_key]# kubectl get replicationcontrollers --all-namespaces NAMESPACE NAME DESIRED CURRENT AGE kube-system kubernetes-dashboard-v1.0.1 1 1 30s [root@localhost ca_key]# kubectl get services --all-namespaces NAMESPACE NAME CLUSTER-IP EXTERNAL-IP PORT(S) AGE default kubernetes 10.1.0.1 <none> 443/TCP 2m kube-system kubernetes-dashboard 10.1.148.10 <none> 80/TCP 26s |
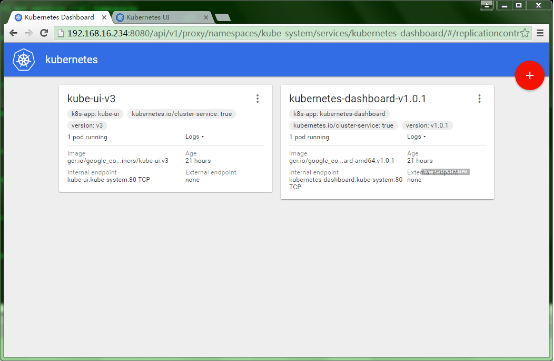
[b]⑥、访问[/b][b]kubernetes dashboard界面:[/b]
http://192.168.16.234:8080/api/v1/proxy/namespaces/kube-system/services/kubernetes-dashboard/出错页面:
[b]⑦、[/b][b]dashboard[/b][b] 500[/b][b]报错信息:[/b]
| [b]【kube-apiserver.log】[/b] I0519 11:12:43.425364 11381 logs.go:41] http: TLS handshake error from 172.22.3.11:37706: remote error: bad certificate I0519 11:13:17.649686 11381 logs.go:41] http: TLS handshake error from 172.22.3.11:37715: remote error: bad certificate [b]#容器日志:[/b] [root@localhost kube-1.2]# kubectl logs kubernetes-dashboard-v1.0.1-ywb2o --namespace=kube-system 2016/05/19 03:05:30 Starting HTTP server on port 9090 2016/05/19 03:05:30 Creating API client for 2016/05/19 03:05:30 Creating Heapster REST client for http://10.1.0.1:443/api/v1/proxy/namespaces/kube-system/services/heapster/api 2016/05/19 03:07:07 Incoming HTTP/1.1 GET /api/replicationcontrollers request from 172.22.3.1:47920 2016/05/19 03:07:07 Getting list of all replication controllers in the cluster 2016/05/19 03:07:08 Get https://10.1.0.1:443/api/v1/replicationcontrollers: x509: cannot validate certificate for 10.1.0.1 because it doesn't contain any IP SANs 2016/05/19 03:07:08 Outcoming response to 172.22.3.1:47920 with 500 status code [root@localhost ~]# kubectl -s https://10.1.0.1:443 --insecure-skip-tls-verify=true --username=admin --password=admin get node NAME STATUS AGE 192.168.16.234 Ready 3h [root@localhost ~]# kubectl -s https://10.1.0.1:443 --username=admin --password=admin get replicationcontrollers Unable to connect to the server: x509: cannot validate certificate for 10.1.0.1 because it doesn't contain any IP SANs |
[b]3、[/b][b]dashboard[/b][b]配置成功[/b][b]:[/b]
根据下面两篇文章,找到解决办法:http://www.liuhaihua.cn/archives/146044.html
http://studygolang.com/articles/4461
[b]问题:[/b]
客户端并没有提供可以信赖的根证书来对服务端发过来的证书进行验证
[b]解决办法:[/b]
[b] 利用subjectAltName,添加ip到openssl证书[/b]
注:该ip为,kube的services中的CLUSTER-IP,对应端口是443的ip,可使用下面命令获取:[b]【[/b][b]kubectl get services --all-namespaces |grep 'default'|grep 'kubernetes'|grep '443'|awk '{print $3}'[/b][b]】[/b]
[b] 注:此部分只对比上一节不同的[/b]
[b]①、https证书生成([/b][b]subjectAltName[/b][b]):[/b]
| [b]#创建api server的基本认证文件[/b] [root@localhost kube-1.2]# echo admin,admin,perofu > /root/kube-1.2/ca_key/basic_auth.csv [b]#创建CA证书[/b] [root@localhost kube-1.2]# mkdir ca_key [root@localhost kube-1.2]# cd ca_key/ [root@localhost ca_key]# openssl genrsa -out ca.key 2048 Generating RSA private key, 2048 bit long modulus ......................................................................................+++ ............................+++ e is 65537 (0x10001) [root@localhost ca_key]# openssl req -x509 -new -nodes -key ca.key -subj "/CN=perofu.com" -days 5000 -out ca.crt [b]#[/b][b]添加ip到openssl证书[/b] [root@localhost ca_key]# kubectl get services --all-namespaces |grep 'default'|grep 'kubernetes'|grep '443'|awk '{print $3}' 10.1.0.1 [root@localhost ca_key]# echo subjectAltName=IP:10.1.0.1 > extfile.cnf [b]#创建api server证书[/b] [root@localhost ca_key]# openssl req -new -key server.key -subj "/CN=server" -out server.csr [root@localhost ca_key]# openssl x509 -req -in server.csr -CA ca.crt -CAkey ca.key -CAcreateserial -extfile extfile.cnf -out server.crt -days 5000 Signature ok subject=/CN=server Getting CA Private Key [root@localhost ca_key]# |
[b]②、访问[/b][b]kubernetes dashboard界面:[/b]
http://192.168.16.234:8080/api/v1/proxy/namespaces/kube-system/services/kubernetes-dashboard/[b]4、kubernetes dashboard界面介绍:[/b]
kubernetes dashboard的界面非常简洁,直入眼帘的是副本(replicationcontrollers)信息,作为第一版的dashboard,虽然能实现的功能不是很多,但kubectl的大部分命令都已实现,当然还是要依靠yaml或json配置文件,期待后续的版本。[b]①、副本信息操作:[/b]
副本操作,可以分为下面三个部分:
[b]1)、查看副本详细信息:[/b]
[b]2)、调整副本数:[/b]
[b]3)、删除副本:[/b]
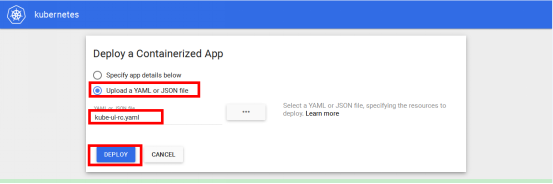
可以删除pod、副本和service[b]②、部署应用:[/b]
最好是上传yaml或json文件,进行部署!!!版权声明:原创作品,谢绝转载!否则将追究法律责任。
http://my.oschina.net/fufangchun/blog

相关文章推荐
- centos6.5上安装docker
- docker容器的网络信息查看
- openstack kilo-with-dokcer
- 在windows下的安装Docker的教程
- 8个你可能不知道的Docker知识
- 在Docker中自动化部署Ruby on Rails的教程
- 搭建基于Docker的PHP开发环境的详细教程
- 利用OpenVSwitch在多台主机上部署Docker的教程
- ubuntu14.04+docker的安装及使用
- Docker 清理命令集锦
- 再Docker中架设完整的WordPress站点全攻略
- 基于 Docker 开发 NodeJS 应用
- 使用Docker来加速构建Android应用的基本部署思路解析
- 在Docker上部署Python的Flask框架的教程
- 在Docker上开始部署Python应用的教程
- 详解在Python和IPython中使用Docker
- python脚本监控docker容器
- 使用IPython来操作Docker容器的入门指引
- Alpine Linux Repository本地镜像制作
- OSX下brew安装docker(boot2docker)