android Popupwindow被弹出软键盘挡住
2016-05-13 23:38
567 查看
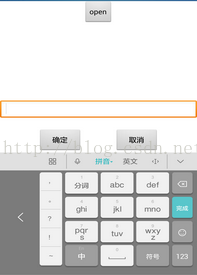
之前做过一个页面包含有PopupWindow,PopupWindow中有EditText输入框,点击EditText输入内容PopupWindow从屏幕底部弹出,软键盘直接把PopupWindow给挡住了,如下图,图1是没有弹出软键盘前,图2是弹出软键盘后,此时PopupWindow完全被弹出软键盘挡住了。
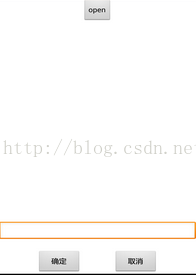

图1图2
当输入内容的时候我们希望软键盘不会把PopupWindow给挡住,不影响用户的正常输入,该怎么办呢,现在说一下方法,在设置PopupWindow的时候加上如下两行代码
popupWindow.setSoftInputMode(PopupWindow.INPUT_METHOD_NEEDED);
popupWindow.setSoftInputMode(WindowManager.LayoutParams.SOFT_INPUT_ADJUST_RESIZE);
这两行代码的先后顺序不能变,否则不能解决问题,是不是很另类,修改后的结果如下图,是不是发现软键盘把PopupWindow整个往上推上去了,完全不影响用户的正常输入
以上示例图片为本人实测的截图,现贴出所有代码,想看具体效果的 同学可以自己测试一下
import android.app.Activity;
import android.graphics.Color;
import android.graphics.drawable.ColorDrawable;
import android.os.Bundle;
import android.view.Gravity;
import android.view.LayoutInflater;
import android.view.View;
import android.view.View.OnClickListener;
import android.view.ViewGroup.LayoutParams;
import android.view.WindowManager;
import android.widget.Button;
import android.widget.PopupWindow;
import com.example.mydemo.R;
public class TestPopWindow extends Activity {
private PopupWindow popview;
private Button btn_open;
@Override
protected void onCreate(Bundle savedInstanceState) {
// TODO Auto-generated method stub
super.onCreate(savedInstanceState);
this.setContentView(R.layout.test_popwindow);
btn_open = (Button) this.findViewById(R.id.btn_open);
btn_open.setOnClickListener(new OnClickListener() {
@Override
public void onClick(View arg0) {
showPopWindow();
}
});
}
private void showPopWindow() {
View view = LayoutInflater.from(this).inflate(R.layout.view_pop, null);
popview = new PopupWindow(view,
android.view.ViewGroup.LayoutParams.MATCH_PARENT,
LayoutParams.WRAP_CONTENT, true);
popview.setBackgroundDrawable(new ColorDrawable(Color.TRANSPARENT));
popview.setFocusable(true);
// 设置点击其他地方就消失
popview.setOutsideTouchable(true);
popview.setSoftInputMode(PopupWindow.INPUT_METHOD_NEEDED);
popview.setSoftInputMode(WindowManager.LayoutParams.SOFT_INPUT_ADJUST_RESIZE);
popview.showAtLocation(findViewById(R.id.btn_open), Gravity.BOTTOM
| Gravity.CENTER_VERTICAL, 0, 0);
}
}
test_popwindow.xml布局文件
view_pop.xml布局文件
<?xml version="1.0" encoding="utf-8"?>
<RelativeLayout xmlns:android="http://schemas.android.com/apk/res/android"
android:layout_width="match_parent"
android:layout_height="wrap_content"
android:orientation="vertical" >
<EditText
android:id="@+id/et_input"
android:layout_width="fill_parent"
android:layout_height="40dip"
android:singleLine="true"
android:textSize="16sp" >
</EditText>
<LinearLayout
android:layout_width="fill_parent"
android:layout_height="wrap_content"
android:layout_below="@+id/et_input"
android:layout_marginTop="20dip"
android:gravity="center_horizontal"
android:orientation="horizontal" >
<Button
android:id="@+id/confirm"
android:layout_width="80dip"
android:layout_height="wrap_content"
android:layout_marginRight="30dip"
android:text="确定" />
<Button
android:id="@+id/cancel"
android:layout_width="80dip"
android:layout_height="wrap_content"
android:layout_marginLeft="30dip"
android:text="取消" />
</LinearLayout>
</RelativeLayout>
图1图2
当输入内容的时候我们希望软键盘不会把PopupWindow给挡住,不影响用户的正常输入,该怎么办呢,现在说一下方法,在设置PopupWindow的时候加上如下两行代码
popupWindow.setSoftInputMode(PopupWindow.INPUT_METHOD_NEEDED);
popupWindow.setSoftInputMode(WindowManager.LayoutParams.SOFT_INPUT_ADJUST_RESIZE);
这两行代码的先后顺序不能变,否则不能解决问题,是不是很另类,修改后的结果如下图,是不是发现软键盘把PopupWindow整个往上推上去了,完全不影响用户的正常输入
以上示例图片为本人实测的截图,现贴出所有代码,想看具体效果的 同学可以自己测试一下
import android.app.Activity;
import android.graphics.Color;
import android.graphics.drawable.ColorDrawable;
import android.os.Bundle;
import android.view.Gravity;
import android.view.LayoutInflater;
import android.view.View;
import android.view.View.OnClickListener;
import android.view.ViewGroup.LayoutParams;
import android.view.WindowManager;
import android.widget.Button;
import android.widget.PopupWindow;
import com.example.mydemo.R;
public class TestPopWindow extends Activity {
private PopupWindow popview;
private Button btn_open;
@Override
protected void onCreate(Bundle savedInstanceState) {
// TODO Auto-generated method stub
super.onCreate(savedInstanceState);
this.setContentView(R.layout.test_popwindow);
btn_open = (Button) this.findViewById(R.id.btn_open);
btn_open.setOnClickListener(new OnClickListener() {
@Override
public void onClick(View arg0) {
showPopWindow();
}
});
}
private void showPopWindow() {
View view = LayoutInflater.from(this).inflate(R.layout.view_pop, null);
popview = new PopupWindow(view,
android.view.ViewGroup.LayoutParams.MATCH_PARENT,
LayoutParams.WRAP_CONTENT, true);
popview.setBackgroundDrawable(new ColorDrawable(Color.TRANSPARENT));
popview.setFocusable(true);
// 设置点击其他地方就消失
popview.setOutsideTouchable(true);
popview.setSoftInputMode(PopupWindow.INPUT_METHOD_NEEDED);
popview.setSoftInputMode(WindowManager.LayoutParams.SOFT_INPUT_ADJUST_RESIZE);
popview.showAtLocation(findViewById(R.id.btn_open), Gravity.BOTTOM
| Gravity.CENTER_VERTICAL, 0, 0);
}
}
test_popwindow.xml布局文件
<?xml version="1.0" encoding="utf-8"?>
<RelativeLayout xmlns:android="http://schemas.android.com/apk/res/android"
android:layout_width="match_parent"
android:layout_height="match_parent"
android:background="#ffffff"
android:orientation="vertical" >

<Button
android:id="@+id/btn_open"
android:layout_width="wrap_content"
android:layout_height="wrap_content"
android:layout_alignParentTop="true"
android:layout_centerHorizontal="true"
android:text="open" />

</RelativeLayout>
view_pop.xml布局文件
<?xml version="1.0" encoding="utf-8"?>
<RelativeLayout xmlns:android="http://schemas.android.com/apk/res/android"
android:layout_width="match_parent"
android:layout_height="wrap_content"
android:orientation="vertical" >
<EditText
android:id="@+id/et_input"
android:layout_width="fill_parent"
android:layout_height="40dip"
android:singleLine="true"
android:textSize="16sp" >
</EditText>
<LinearLayout
android:layout_width="fill_parent"
android:layout_height="wrap_content"
android:layout_below="@+id/et_input"
android:layout_marginTop="20dip"
android:gravity="center_horizontal"
android:orientation="horizontal" >
<Button
android:id="@+id/confirm"
android:layout_width="80dip"
android:layout_height="wrap_content"
android:layout_marginRight="30dip"
android:text="确定" />
<Button
android:id="@+id/cancel"
android:layout_width="80dip"
android:layout_height="wrap_content"
android:layout_marginLeft="30dip"
android:text="取消" />
</LinearLayout>
</RelativeLayout>

相关文章推荐
- 使用C++实现JNI接口需要注意的事项
- Android IPC进程间通讯机制
- Android Manifest 用法
- [转载]Activity中ConfigChanges属性的用法
- Android之获取手机上的图片和视频缩略图thumbnails
- Android之使用Http协议实现文件上传功能
- Android学习笔记(二九):嵌入浏览器
- android string.xml文件中的整型和string型代替
- i-jetty环境搭配与编译
- android之定时器AlarmManager
- android wifi 无线调试
- Android Native 绘图方法
- Android java 与 javascript互访(相互调用)的方法例子
- android 代码实现控件之间的间距
- android FragmentPagerAdapter的“标准”配置
- Android"解决"onTouch和onClick的冲突问题
- android:installLocation简析
- android searchView的关闭事件
- SourceProvider.getJniDirectories