Android的编程初体验--布局管理器
2016-05-12 20:11
477 查看
抛弃XML布局文件,下面是通过代码控制UI界面的代码
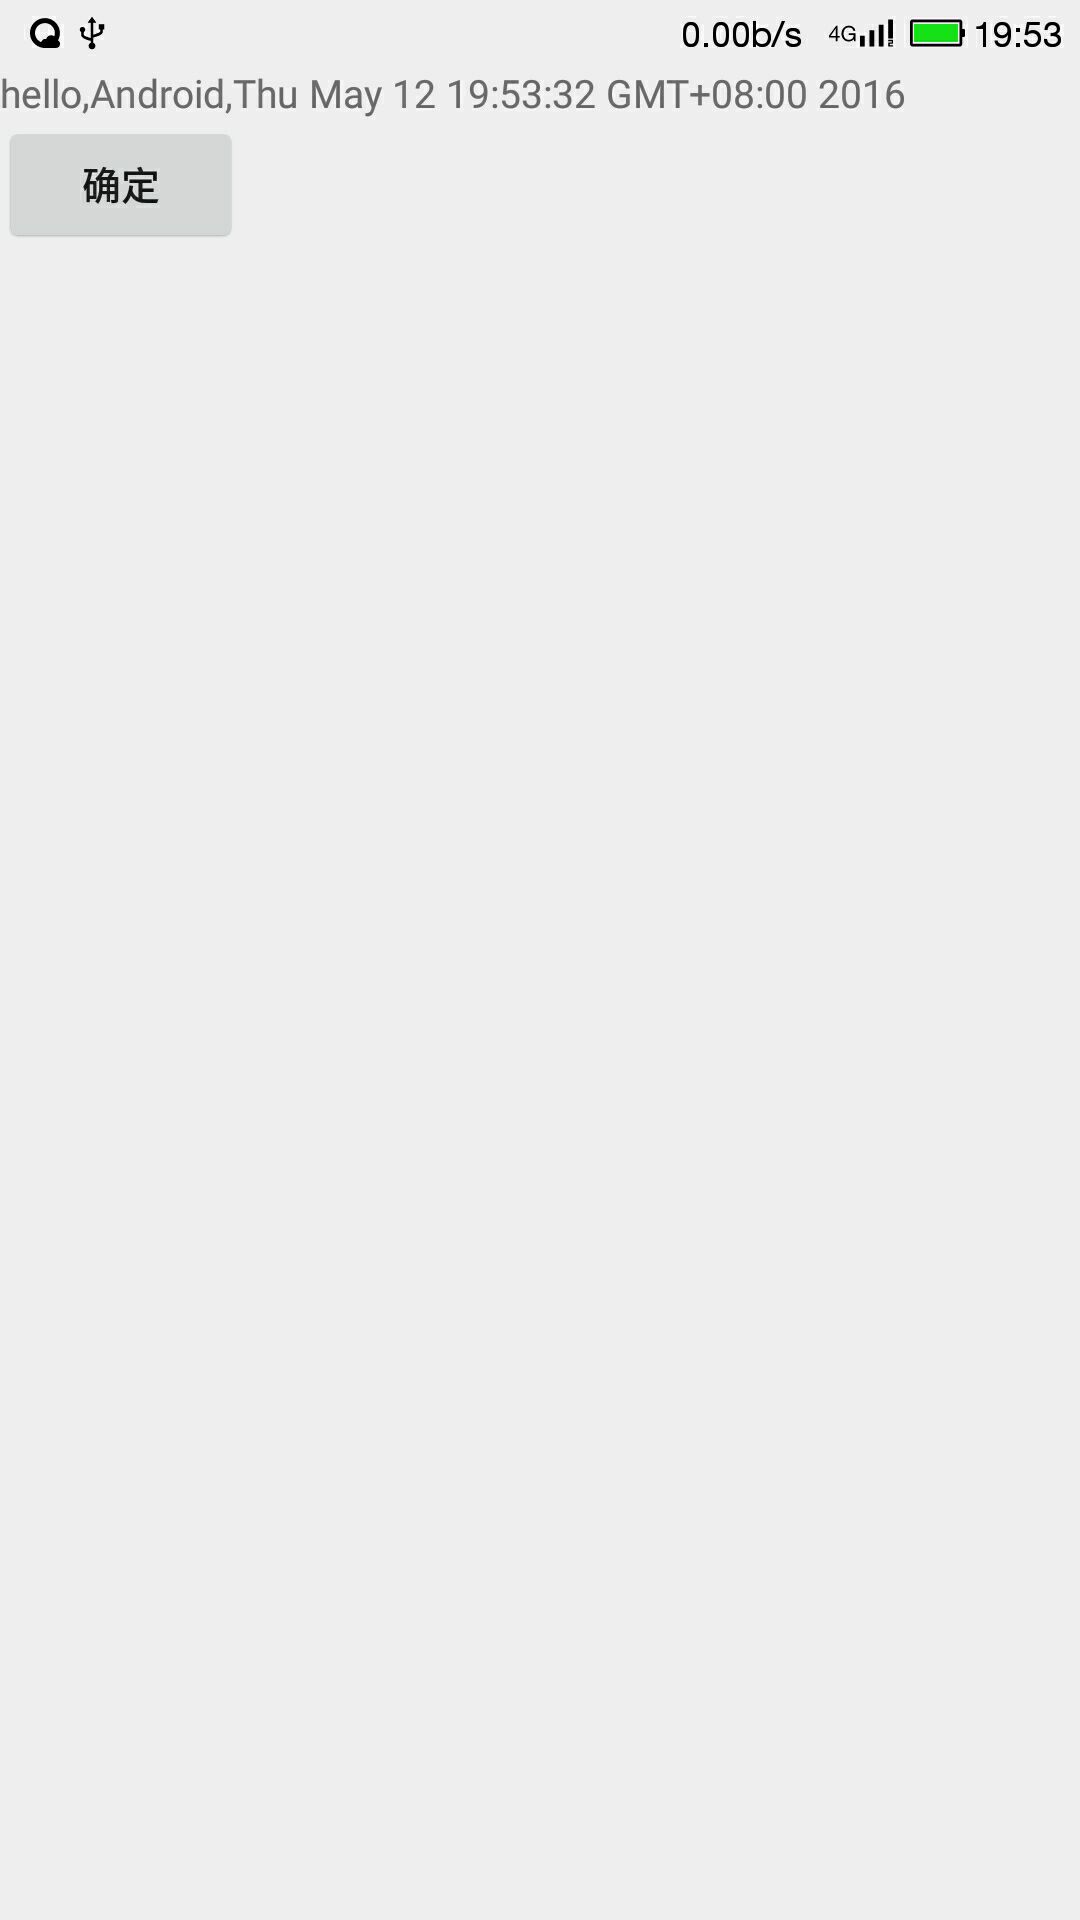
从上面的程序代码中可以看出,完全在代码中控制UI界面不仅不利于高层次的解耦,而且由于通过new关键字来创建UI组件,需要调用方法设置UI组件的行为,因此代码也显得十分的臃肿。
那么通过XML文件来控制UI界面,开发者只需要在XML布局文件中使用标签即可,而且只需要配置简单的属性即可控制UI组件的行为,但是问题来了,各组件在UI界面上是怎样的排版布局的呢?这就需要先来了解学习布局管理器。
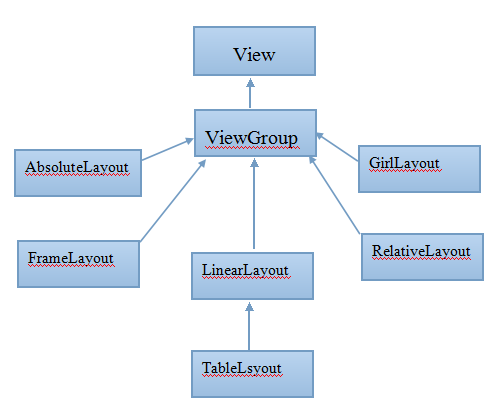
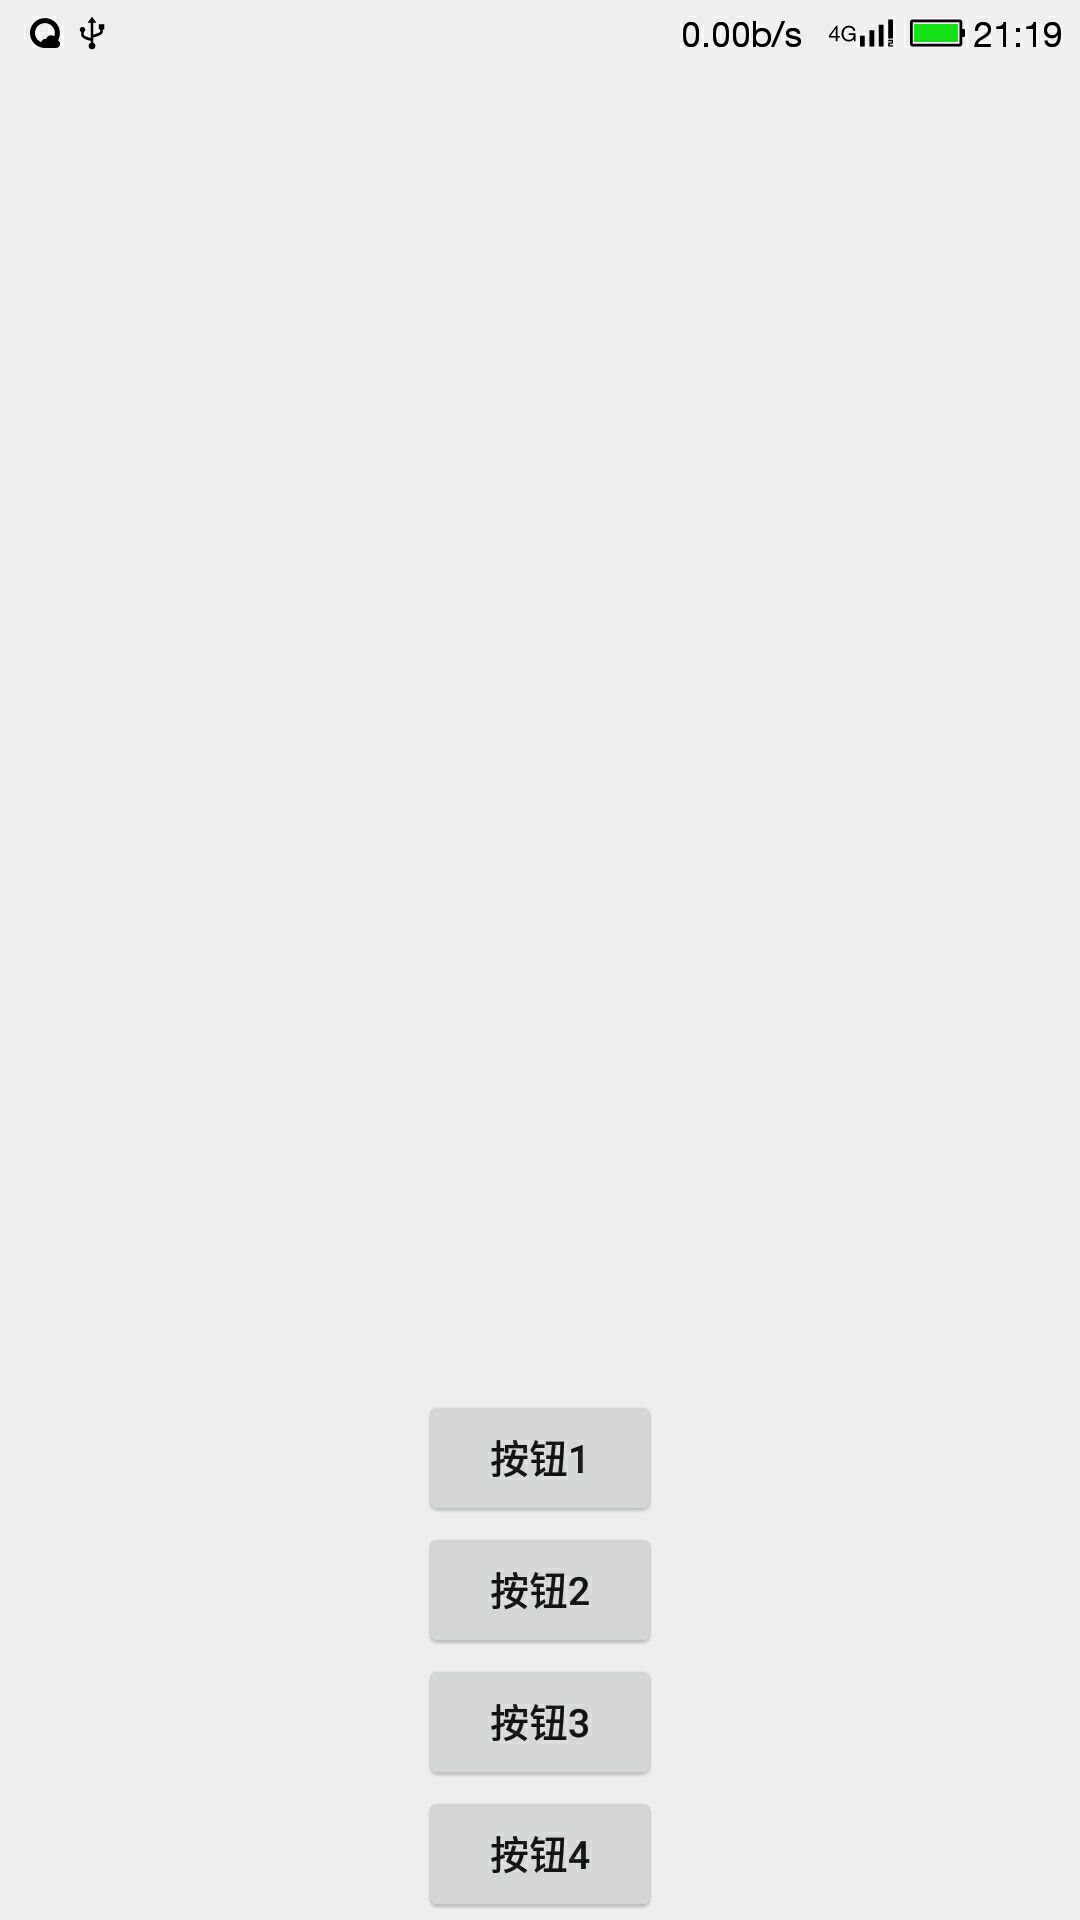
线性布局:
将容器里的组件一个挨着一个的排列起来(横向或纵向)。
常用的属性:
android:gravity设置布局管理器内组件的对齐方式(即在屏幕的上中下左右等)
android:orientation设置布局管理器内组件的排列方式(水平或垂直)
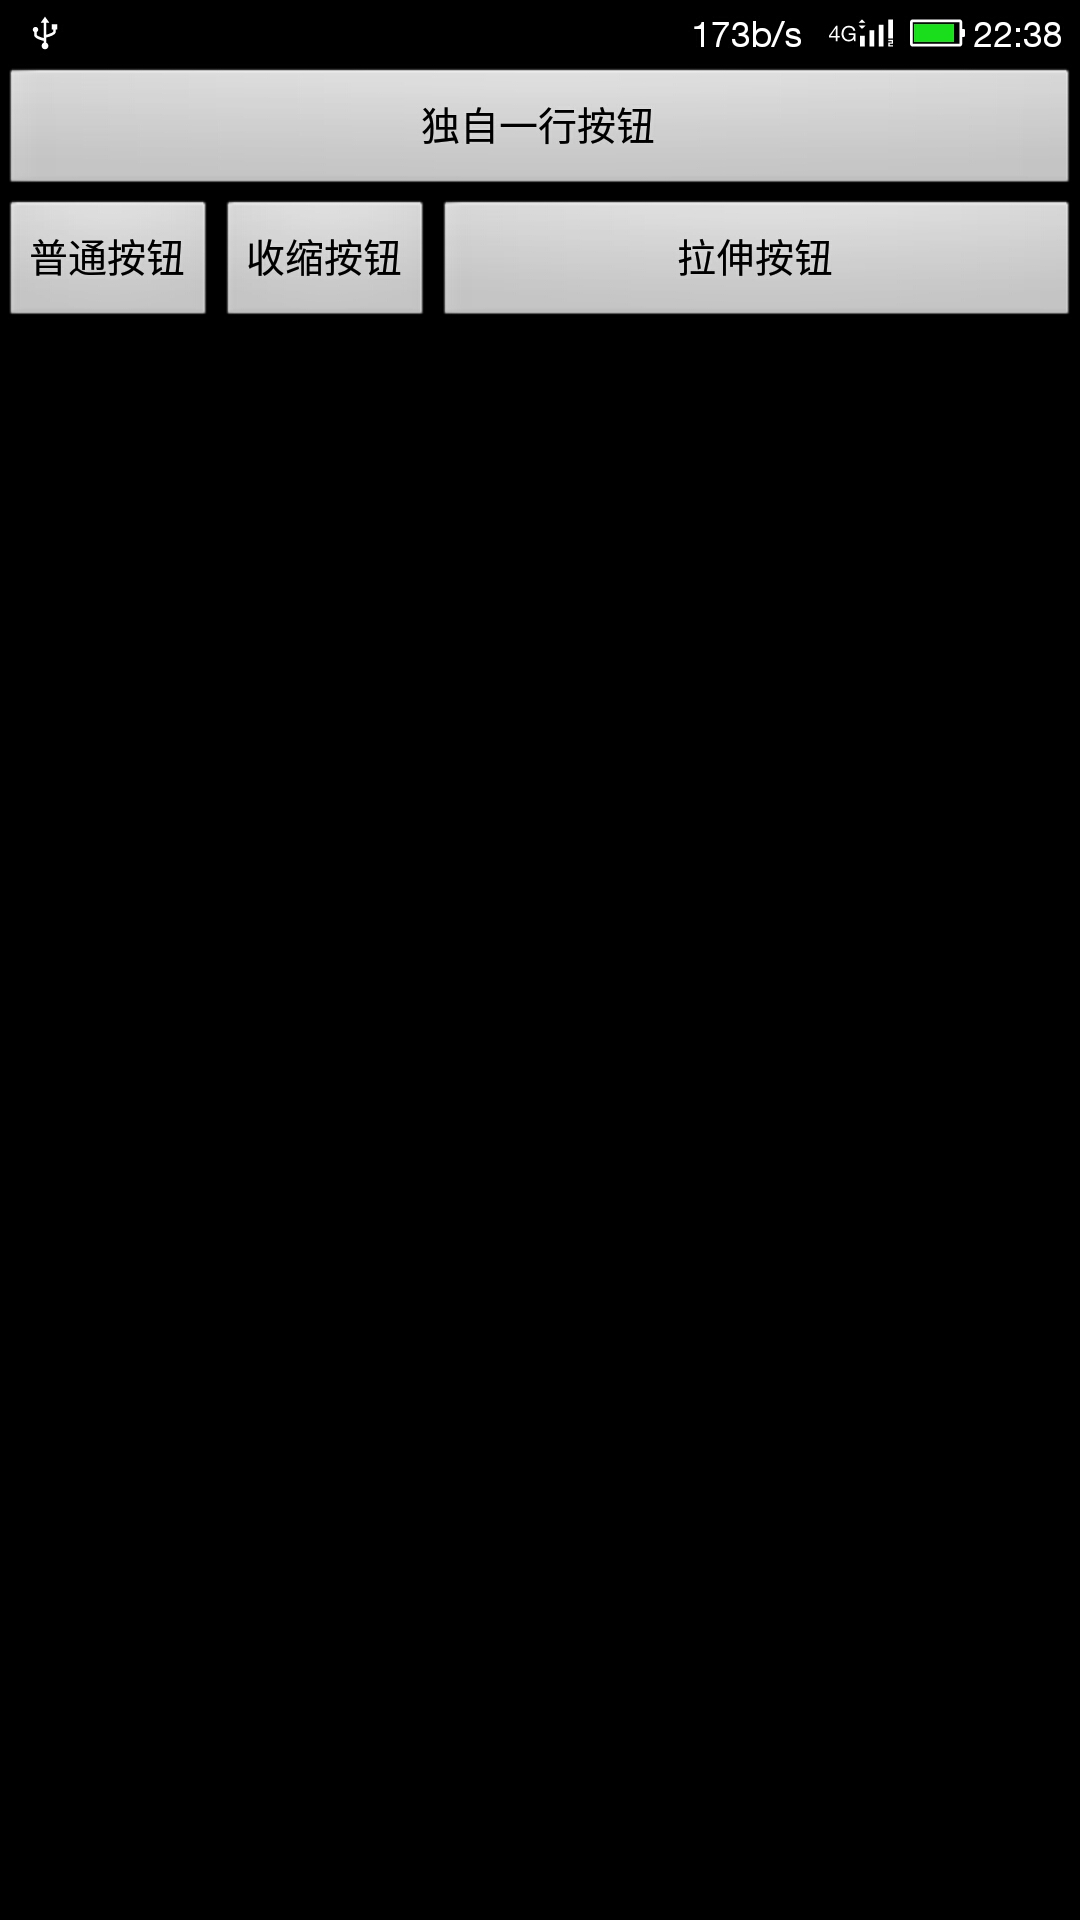
表格布局
TableLayout 并不需要明确申明包含多少行、多少列,而是通过添加TableRow、其他组件来控制表格的行数和列数,添加一个TableRow就是一个表格行,TableRow也是一个容器,在里面每添加一个子组件该表格就增加一列。
常用属性:
android:shrinkColumns设置允许被收缩的列序号
android:strectColumns设置允许被拉伸的列序号
android:collapseColumns设置允许被隐藏的列序号
import android.R;
import android.app.Activity;
import android.os.Bundle;
import android.view.View;
import android.view.View.OnClickListener;
import android.view.ViewGroup;
import android.widget.*;

public class MainActivity extends Activity {
public void  onCreate (Bundle savedInstanceState)
{
super.onCreate(savedInstanceState);

LinearLayout layout = new LinearLayout(this);
super.setContentView(layout);
layout.setOrientation(LinearLayout.VERTICAL);
final TextView show = new TextView(this);
Button bn = new Button(this);

bn.setText(R.string.ok);
bn.setLayoutParams(new ViewGroup.LayoutParams(
ViewGroup.LayoutParams.WRAP_CONTENT,
ViewGroup.LayoutParams.WRAP_CONTENT));
layout.addView(show);
layout.addView(bn);
OnClickListener onClick = new OnClickListener()
{
public void onClick(View v)
{
show.setText("hello,Android,"+new java.util.Date());
}
};
bn.setOnClickListener(onClick);
}
}
从上面的程序代码中可以看出,完全在代码中控制UI界面不仅不利于高层次的解耦,而且由于通过new关键字来创建UI组件,需要调用方法设置UI组件的行为,因此代码也显得十分的臃肿。
那么通过XML文件来控制UI界面,开发者只需要在XML布局文件中使用标签即可,而且只需要配置简单的属性即可控制UI组件的行为,但是问题来了,各组件在UI界面上是怎样的排版布局的呢?这就需要先来了解学习布局管理器。
线性布局:
将容器里的组件一个挨着一个的排列起来(横向或纵向)。
常用的属性:
android:gravity设置布局管理器内组件的对齐方式(即在屏幕的上中下左右等)
android:orientation设置布局管理器内组件的排列方式(水平或垂直)
<?xml version="1.0" encoding="UTF-8"?>
<LinearLayout  xmlns:android="http://schemas.android.com/apk/res/android"
android:orientation="vertical"
android:layout_width="fill_parent"
android:layout_height="fill_parent"
android:gravity="bottom|center_horizontal"
>
<Button
android:id="@+id/bn1"
android:layout_width="wrap_content"
android:layout_height="wrap_content"
android:text="@string/bn1"
/>
<Button
android:id="@+id/bn2"
android:layout_width="wrap_content"
android:layout_height="wrap_content"
android:text="@string/bn2"
/>
<Button
android:id="@+id/bn3"
android:layout_width="wrap_content"
android:layout_height="wrap_content"
android:text="@string/bn3"
/>
<Button
android:id="@+id/bn4"
android:layout_width="wrap_content"
android:layout_height="wrap_content"
android:text="@string/bn4"
/>
</LinearLayout>
表格布局
TableLayout 并不需要明确申明包含多少行、多少列,而是通过添加TableRow、其他组件来控制表格的行数和列数,添加一个TableRow就是一个表格行,TableRow也是一个容器,在里面每添加一个子组件该表格就增加一列。
常用属性:
android:shrinkColumns设置允许被收缩的列序号
android:strectColumns设置允许被拉伸的列序号
android:collapseColumns设置允许被隐藏的列序号
<?xml version="1.0" encoding="UTF-8"?>
<LinearLayout xmlns:android="http://schemas.android.com/apk/res/android"
android:layout_width="fill_parent"
android:layout_height="fill_parent"
android:orientation="vertical" >

<TableLayout android:id="@+id/TableLayout01"
android:layout_height="wrap_content"
android:layout_width="fill_parent"
android:shrinkColumns="1"
android:stretchColumns="3"
android:collapseColumns="2"
>
<Button android:id="@+id/bn1"
android:layout_width="wrap_content"
android:layout_height="wrap_content"
android:text="@string/ok1"
/>
<TableRow>
<Button android:id="@+id/bn2"
android:layout_width="wrap_content"
android:layout_height="wrap_content"
android:text="@string/ok2"
/>
<Button android:id="@+id/bn3"
android:layout_width="wrap_content"
android:layout_height="wrap_content"
android:text="@string/ok3"
/>
<Button android:id="@+id/bn4"
android:layout_width="wrap_content"
android:layout_height="wrap_content"
android:text="@string/ok5"
/>
<Button android:id="@+id/bn5"
android:layout_width="wrap_content"
android:layout_height="wrap_content"
android:text="@string/ok4"
/>
</TableRow>
</TableLayout> "
</LinearLayout>

相关文章推荐
- 使用C++实现JNI接口需要注意的事项
- Android IPC进程间通讯机制
- Android Manifest 用法
- [转载]Activity中ConfigChanges属性的用法
- Android之获取手机上的图片和视频缩略图thumbnails
- Android之使用Http协议实现文件上传功能
- Android学习笔记(二九):嵌入浏览器
- android string.xml文件中的整型和string型代替
- i-jetty环境搭配与编译
- android之定时器AlarmManager
- android wifi 无线调试
- Android Native 绘图方法
- Android java 与 javascript互访(相互调用)的方法例子
- android 代码实现控件之间的间距
- android FragmentPagerAdapter的“标准”配置
- Android"解决"onTouch和onClick的冲突问题
- android:installLocation简析
- android searchView的关闭事件
- SourceProvider.getJniDirectories