用python 10min手写一个简易的实时内存监控系统
2016-05-12 00:00
726 查看
摘要: 用python 10min手写一个简易的实时内存监控系统
第0步,准备工作
第1步,我们需要获取内存信息
其实所有的监控项,包括内存数据,都是从文件中读取的,大家执行以下 cat /proc/meminfo就可以看到关于内存的信息,我们关注的是前四行,总内存,空闲内存,缓冲和缓存大小
计算内存占用量公式:
(总内存-空闲内存-缓冲-缓存)/1024Mb
代码呼之欲出 monitor.py
用with打开文件,可以自动关闭,比直接open优雅那么一丢丢
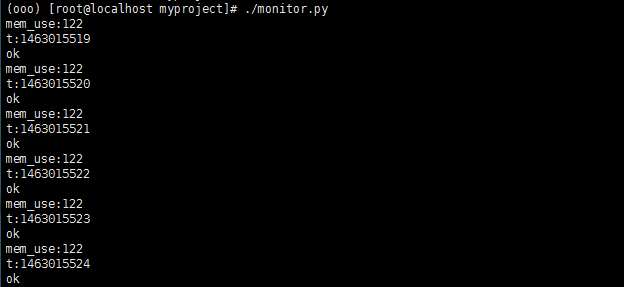
执行文件 python monitor.py,每一秒打印一条内存信息
[woniu@teach memory]$ python mointor.py
2920
2919
2919
2919
2919
我们可以写个很搓的测试代码,占用一点内存,看看数据会不会变
执行下面代码,能看到内存使用量明显多了几M
test.py
获取内存数据done!
第2步,存储数据到数据库
新建表格,我们需要两个字段,内存和时间 sql呼之欲出,简单粗暴
create memory(memory int,time int)
我们的 monitor.py就不能只打印内存信息了,要存储数据库啦,引入mysql模块,代码如下
比之前的多了拼接sql和执行的步骤,具体过程见视频,大家到数据库里执行一下下面的sql,就能看到我们辛辛苦苦获取的内存数据啦
select * from memory
我们的数据库里数据越来越多,怎么展示呢
第3步,数据展示
我们需要flask
我们看下文件结构
flask_web就是我们的web服务代码,template下面的html,就是前端展示的文件,static下面是第三方库
flask_web的代码如下
提供两个路由
根目录渲染文件index.html
/data路由去数据库插数据,返回json,供画图使用
index.html
前端动态添加增量结点数据到图表中
代码呼之欲出
flask_web.py
index.html
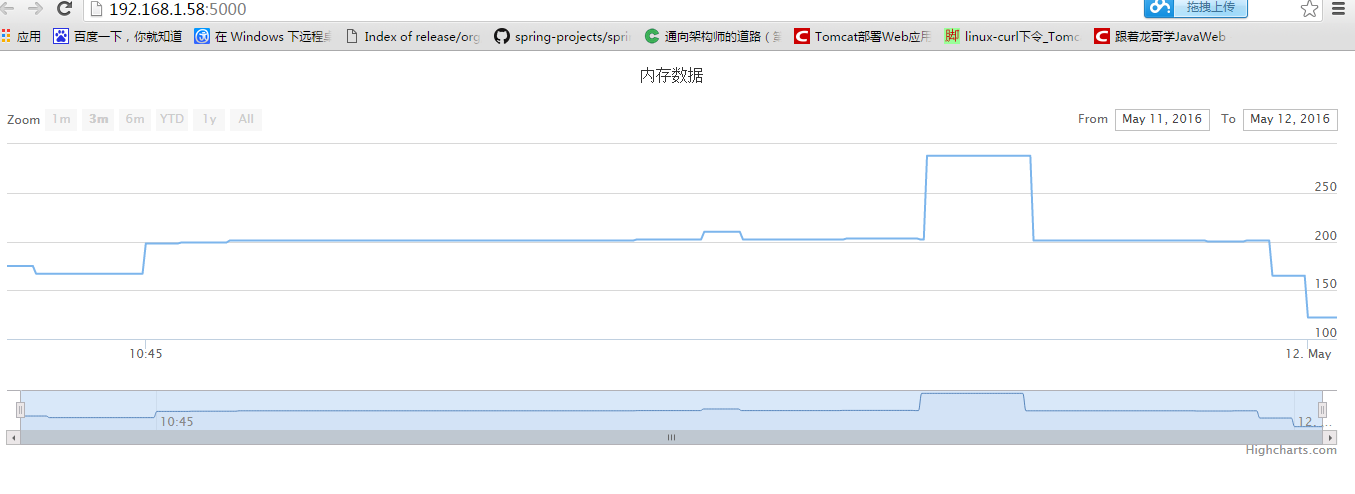
结果如图:
运行程序flask_web.py
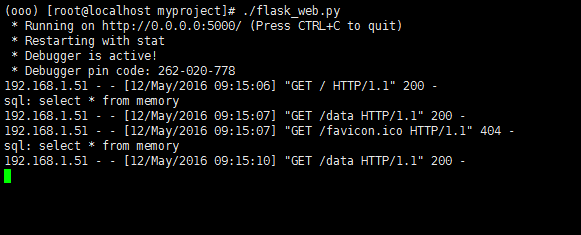
执行monitor.py把数据入库
打开网页查看结果,会3秒自动更新一下。
第0步,准备工作
[code=plain]yum install gcc gcc-c++ libgcc libstdc++ libgcc-devel libstdc++-devel zlib zlib-devel openssl openssl-devel pcre pcre-devel

tar -xvzf Python-3.5.1.tgz
./configure --prefix=/opt/python3
make
make install

pip install virtualenv

mkdir /opt/myproject
cd /opt/myproject
/opt/python3/bin/virtualenv ooo
. ooo/bin/activate

pip install flask
pip install pymysql
第1步,我们需要获取内存信息
其实所有的监控项,包括内存数据,都是从文件中读取的,大家执行以下 cat /proc/meminfo就可以看到关于内存的信息,我们关注的是前四行,总内存,空闲内存,缓冲和缓存大小
计算内存占用量公式:
(总内存-空闲内存-缓冲-缓存)/1024Mb
代码呼之欲出 monitor.py
用with打开文件,可以自动关闭,比直接open优雅那么一丢丢
[code=plain]def getMem():
with open('/proc/meminfo') as f:
total = int(f.readline().split()[1])
free = int(f.readline().split()[1])
buffers = int(f.readline().split()[1])
cache = int(f.readline().split()[1])
mem_use = total-free-buffers-cache
print mem_use/1024
while True:
time.sleep(1)
getMem()
执行文件 python monitor.py,每一秒打印一条内存信息
[woniu@teach memory]$ python mointor.py
2920
2919
2919
2919
2919
我们可以写个很搓的测试代码,占用一点内存,看看数据会不会变
执行下面代码,能看到内存使用量明显多了几M
test.py
[code=plain]#!/bin/env python
#coding:utf-8

s = 'akdsakjhdfdfdfdddddddddddddddddsdfsdfsdfdjkashdjkhasjkdhasjkdhkjashdaskjhfoopnnm,ioqouiew'*1000000
for i in s:
for j in s:
s.count(j)
获取内存数据done!
第2步,存储数据到数据库
新建表格,我们需要两个字段,内存和时间 sql呼之欲出,简单粗暴
create memory(memory int,time int)
我们的 monitor.py就不能只打印内存信息了,要存储数据库啦,引入mysql模块,代码如下
[code=plain]#!/bin/env python
#coding:utf-8
import time
import pymysql

con = pymysql.connect(host="localhost", port=3306, user="root", password="root__", database="meminfo")
con.autocommit(True)
cur = con.cursor()

def getMem():
with open('/proc/meminfo') as f:
total = int(f.readline().split()[1])
free = int(f.readline().split()[1])
buffers = int(f.readline().split()[1])
cache = int(f.readline().split()[1])
mem_use = total-free-buffers-cache
print("mem_use:%s"%(int(mem_use/1024)))
t = int(time.time())
print("t:%s"%(t))
sql = "insert into memory (memory, time) value (%s, %s)"%(int(mem_use/1024),t)
cur.execute(sql)
print("ok")

while True:
time.sleep(1)
getMem()
比之前的多了拼接sql和执行的步骤,具体过程见视频,大家到数据库里执行一下下面的sql,就能看到我们辛辛苦苦获取的内存数据啦
select * from memory
我们的数据库里数据越来越多,怎么展示呢
第3步,数据展示
我们需要flask
我们看下文件结构
[code=plain].
├── flask_web.py web后端代码
├── mointor.py 监控数据获取
├── static 静态文件,第三方图表库
│   ├── exporting.js
│   ├── highstock.js
│   └── jquery.js
├── templates
│   └── index.html 展示前端页面
└── test.py 占用内存的测试代码
flask_web就是我们的web服务代码,template下面的html,就是前端展示的文件,static下面是第三方库
flask_web的代码如下
提供两个路由
根目录渲染文件index.html
/data路由去数据库插数据,返回json,供画图使用
[code=plain]#!/bin/env python
#coding:utf-8

from flask import Flask,render_template,request
import pymysql
import json

con = pymysql.connect(host="localhost", port=3306, user="root", password="root__", database="meminfo")
con.autocommit(True)
cur = con.cursor()

app = Flask(__name__)

@app.route("/")
def index():
return render_template('index.html')

@app.route('/data')
def date():
sql = 'select * from memory'
cur.execute(sql)
arr = []
for i in cur.fetchall():
arr.append( [i[1] * 1000, i[0]] )
return json.dumps(arr)

if __name__ == '__main__':
app.run(host='0.0.0.0', port=5000, debug=True)
index.html
[code=plain]<html>
<head>
<title>lenglingx</title>
</head>

<body>
<div id="container" style="height: 400px; min-width: 310px"></div>
<script src="http://cdn.hcharts.cn/jquery/jquery-1.8.3.min.js"></script>
<script src="http://cdn.hcharts.cn/highstock/highstock.js"></script>

<script>
$(function () {
// 使用当前时区,否则东八区会差八个小时
Highcharts.setOptions({
global: {
useUTC: false
}
});
$.getJSON('/data', function (data) {
// Create the chart
$('#container').highcharts('StockChart', {
rangeSelector : {
selected : 1
},
title : {
text : '内存数据'
},
series : [{
name : '本机内存',
data : data,
tooltip: {
valueDecimals: 2
}
}]
});
});
});
</script>
</body>
</html>
到止,我们已经完成了,不过,我们不能实时看到内存。
第4步:实时展示
我们并不仅限于此,如果想实时的看到内存,应该怎么搞呢
查询数据时候增加一个时间戳当限制条件,再次查询时,只返回两次查询之间的增量数据前端动态添加增量结点数据到图表中
代码呼之欲出
flask_web.py
[code=plain]#!/bin/env python
#coding:utf-8

from flask import Flask,render_template,request
import pymysql
import json

con = pymysql.connect(host="localhost", port=3306, user="root", password="root__", database="meminfo")
con.autocommit(True)
cur = con.cursor()

app = Flask(__name__)

@app.route("/")
def index():
return render_template('index.html')

tmp_time = 0
@app.route('/data')
def date():
global tmp_time
if tmp_time > 0:
sql = 'select * from memory where time>%s'%(tmp_time/1000)
else:
sql = 'select * from memory'
print("sql: %s"%(sql))
cur.execute(sql)
arr = []
for i in cur.fetchall():
arr.append( [i[1] * 1000, i[0]] )
if len(arr)>0:
temp_time = arr[-1][0]
return json.dumps(arr)

if __name__ == '__main__':
app.run(host='0.0.0.0', port=5000, debug=True)
index.html
[code=plain]<html>
<head>
<title>51reboot</title>
</head>

<body>
<div id="container" style="height: 400px; min-width: 310px"></div>
<script src="http://cdn.hcharts.cn/jquery/jquery-1.8.3.min.js"></script>
<script src="http://cdn.hcharts.cn/highstock/highstock.js"></script>

<script>
$(function () {
// 使用当前时区,否则东八区会差八个小时
Highcharts.setOptions({
global: {
useUTC: false
}
});
$.getJSON('/data', function (data) {
// Create the chart
$('#container').highcharts('StockChart', {
chart:{
events:{
load:function(){
var series = this.series[0]
setInterval(function(){
$.getJSON('/data',function(res){
$.each(res,function(i,v){
series.addPoint(v)
})
})
},3000)
}
}
},
rangeSelector : {
selected : 1
},
title : {
text : '内存数据'
},
series : [{
name : '本机内存',
data : data,
tooltip: {
valueDecimals: 2
}
}]
});
});
});
</script>
</body>
</html>
结果如图:
运行程序flask_web.py
执行monitor.py把数据入库
打开网页查看结果,会3秒自动更新一下。

相关文章推荐
- 用Python写一个简单的监控系统
- python3使用logging日志记录
- Python基础(三) 数据类型
- Python学习---day 1
- python_Day1_基础知识开篇
- (Python学习4)List对象
- Python yield coroutine
- Python的安装与文件类型
- Python自省(反射)----inspect module
- python基础(内置函数+文件操作+lambda)
- python2.x和python3.x中raw_input( )和input( )区别
- Python中if __name__ == "__main__"是什么作用
- python ssh_Rcmd
- python 使用百度语音api
- Python中tile函数的用法
- Python 协程与多任务调度
- 《python灰帽子》学习笔记:写一个windos 调试器(一)
- 《python灰帽子》学习笔记:调试器设置
- python的requests初步使用
- Mac OS安装Scrapy