IMUNES on Linux
2016-05-11 15:36
337 查看
http://www.brianlinkletter.com/imunes-on-linux/
August 13, 2015— 2 Comments
The IMUNES open-source network simulator can now be
installed on and run on Linux. Previously, IMUNES was available only for the FreeBSD operating system.
The Linux version of IMUNES is ready to be used and can set up and run network emulation scenarios. It does not yet have all the features offered in the FreeBSD version of IMUNES but the development team intends make add in more features until both versions
support similar capabilities.
In this post, we will show how to install the Linux version of IMUNES on Ubuntu 14.04, look at the tool set used by IMUNES on Linux, and experiment with a simple network simulation scenario.
The IMUNES development team seems to be testing IMUNEs on the latest available Linux distributions. If you are using Linux distributions like Ubuntu 15.04, you can follow the
standard IMUNES install directions. However, if you are using a long-term-supported distribution like Ubuntu 14.04, there are some extra software dependencies that you must install.
IMUNES documentation for the correct minimum versions for each required software package. Do not assume your package manager will install the minimum required version of each package. For example,
IMUNES requires Docker 1.4 while Ubuntu 14.04 offers only Docker 0.9 by default.
If you are using a different Linux distribution, see the
IMUNES README file for the correct lists of dependencies for your distribution.
because it contains an old version of Docker. Use the following procedure
recommended by the Docker development team to ensure your Docker installation is fully up-to-date.
Start the Docker service on your system:
The above procedure is for Ubuntu 14.04 LTS. To install Docker on other Linux distributions, see the
Docker installation guide.
In newer Linux distributions, nsenter is part of the
util-linux package but the version of util-linux in Ubuntu 14.04 is an older version that does not include nsenter. Install nsenter using the following command,
recommended by the Docker blog:
This drops a pre-compiled binary of nsenter into the /usr/local/bin directory on your host computer2.
The IMUNES graphical user interface appears.

IMUNES graphical user interface
and the potential.
IMUNES uses Docker containers to create virtual L3 nodes like routers and PCs, and uses
Open vSwitch to emulate L2 nodes like LAN switches. The IMUNES development team is currently focused on completing functionality of IMUNES on Linux so it matches the functionality available in IMUNES on
FreeBSD. Using Docker and Open vSwitch makes IMUNES on Linux potentially more flexible than its FreeBSD implementation so it will be interesting to see how IMUNES on Linux evolves in the future.
Introduction to Docker in the Docker documentation web page to better understand how Docker works in IMUNES. Also read the
Docker Cheat Sheet to see how to interact with Docker containers.
The L3 nodes in an IMUNES simulation scenario are built on a Docker image provided by the IMUNES project team: the
vroot-linux image. When we ran the
baseimage-docker Docker image so for more information about the vroot-linux image, check both the
baseimage-docker documentation and the
vroot-linux documentation (which discusses changes made to the baseimage-docker image).
to use each node in a more realistic manner without worrying about creating overwriting the host computer’s filesystem and it still enables excellent performance by using the “lightweight” virtualization provided by Linux container technology.
To inspect the Open vSwitch bridges created by IMUNES, open a terminal window and use the
Open vSwitch Cheat Sheet.
il5fc0.n3.e1. This may inject a small amount of protocol traffic from your host computer into your IMUNES simulation while the Network Manager application checks each new interface.
If this becomes an issue for you, install an alternative network manager like WICD and disable Network Manager. See my
post about installing WICD for more information.
back to IMUNES on Linux as more development continues and it will be difficult to keep a list of missing features up-to-date.
I wrote a
review of IMUNES running on FreeBSD in a previous post. Please read that post to learn more about IMUNES.
Configure from the drop-down menu.

Configure network node
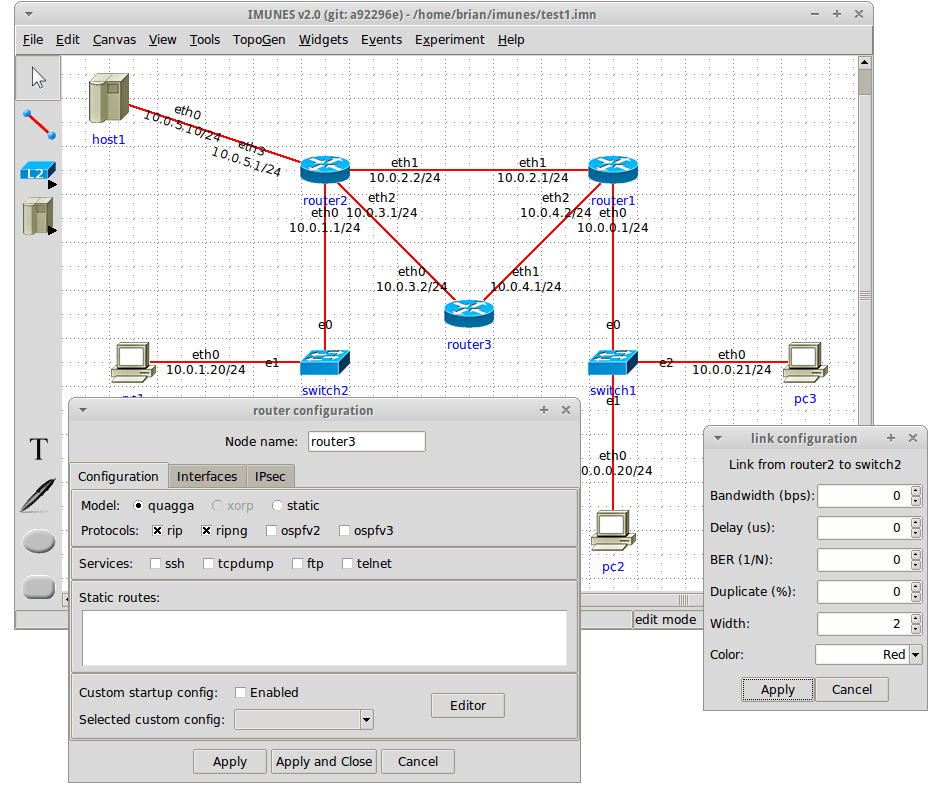
For example, if you are configuring a router, you may select configuration options in the router configuration dialogue box or create a custom configuration script that will run when the router starts. In the example below, we just use the default settings.

Router configuration dialogue box

Create network and start simulation
Using all default settings, IMUNES will set up basic configurations on each emulated node so you should be able open a console on each node and ping any other node in the network.
vtysh and view the running config, we see the router configuration that IMUNES automatically created based on the information we entered in the router’s configuration dialogue box.

console
Users may modify the configuration of any node in the console window using the standard command-line interface. For example, the user may change configurations in quagga or at the Linux command line.
However, these configuration are not saved when the IMUNES project is saved. If you need a specific start-up configuration that cannot be automatically generated by IMUNES, then create and run a custom startup scripts for each node and select the scripts
in each node’s configuration dialogue box.

widgets
For example, if the IPv4 Routing Table widget is chosen, a text box will pop up showing the routing table of a node if you place the mouse point on top of the node.

Routing table widget
IMUNES for Linux is undergoing active development and the IMUNES development team needs users who will test IMUNES on Linux and report any bugs or suggest improvements. If you are interested in trying IMUNES, and if you have any issues or find any bugs,
contact the IMUNES development team using their
Github project page.
If you are using Ubuntu 15.04, which supports Docker 1.5, then you may install Docker from the software repository

NOTE: If you are not comfortable installing nsenter as a binary from someone’s git repository, then download the latest util-linux source and compile it on your system using the
steps outlines in the codecentric blog.
August 13, 2015— 2 Comments
The IMUNES open-source network simulator can now be
installed on and run on Linux. Previously, IMUNES was available only for the FreeBSD operating system.
The Linux version of IMUNES is ready to be used and can set up and run network emulation scenarios. It does not yet have all the features offered in the FreeBSD version of IMUNES but the development team intends make add in more features until both versions
support similar capabilities.
In this post, we will show how to install the Linux version of IMUNES on Ubuntu 14.04, look at the tool set used by IMUNES on Linux, and experiment with a simple network simulation scenario.
Compatibility with Linux versions
IMUNES is compatible with all popular Linux distributions.The IMUNES development team seems to be testing IMUNEs on the latest available Linux distributions. If you are using Linux distributions like Ubuntu 15.04, you can follow the
standard IMUNES install directions. However, if you are using a long-term-supported distribution like Ubuntu 14.04, there are some extra software dependencies that you must install.
Install IMUNES in Ubuntu 14.04
I am using Ubuntu 14.04 LTS as my host operating system. When installing IMUNES on Ubuntu 14.04, we must install some additional software that IMUNES depends upon. Check theIMUNES documentation for the correct minimum versions for each required software package. Do not assume your package manager will install the minimum required version of each package. For example,
IMUNES requires Docker 1.4 while Ubuntu 14.04 offers only Docker 0.9 by default.
Install software dependencies
For Ubuntu 14.04, install the following packages, upon which IMUNES depends. Execute the following command:$ sudo apt-get install openvswitch-switch xterm wireshark ImageMagick tcl tcllib tk user-mode-linux
If you are using a different Linux distribution, see the
IMUNES README file for the correct lists of dependencies for your distribution.
Install current version of Docker
Next, install the latest version of Docker. Do not install Docker from the Ubuntu 14.04 software repository1because it contains an old version of Docker. Use the following procedure
recommended by the Docker development team to ensure your Docker installation is fully up-to-date.
$ wget -qO- https://get.docker.com/ | sh
Start the Docker service on your system:
$ sudo service docker start
The above procedure is for Ubuntu 14.04 LTS. To install Docker on other Linux distributions, see the
Docker installation guide.
Install nsenter (for Ubuntu 14.04)
The nsenter tool provides access to the namespace of another process. IMUNES needs nsenter to communicate with the Docker containers that emulate each node in the network topology.In newer Linux distributions, nsenter is part of the
util-linux package but the version of util-linux in Ubuntu 14.04 is an older version that does not include nsenter. Install nsenter using the following command,
recommended by the Docker blog:
$ sudo docker run -v /usr/local/bin:/target jpetazzo/nsenter
This drops a pre-compiled binary of nsenter into the /usr/local/bin directory on your host computer2.
Install IMUNES
Now, install IMUNES using the following commands:$ sudo git clone https://github.com/imunes/imunes.git $ cd imunes $ sudo make install $ sudo imunes -p
Run IMUNES
Start IMUNES with super-user privileges. IMUNES will not start if you run it with normal user permissions in Ubuntu. You will need to start the Docker service, if it is not already running, before starting IMUNES.$ sudo imunes
The IMUNES graphical user interface appears.
IMUNES graphical user interface
Upgrade IMUNES
IMUNES on Linux is being updated regularly. To upgrade to the latest version of IMUNES, execute the following commands.$ cd imunes $ sudo git pull $ sudo make install $ sudo imunes -p
IMUNES on Linux architecture
IMUNES on Linux uses a fundamentally different tool set compared to IMUNES on FreeBSD. From a user’s perspective, IMUNES on Linux functionality looks the same as IMUNES on FreeBSD. However, when we look into how it works “under the hood” we see the differences,and the potential.
IMUNES uses Docker containers to create virtual L3 nodes like routers and PCs, and uses
Open vSwitch to emulate L2 nodes like LAN switches. The IMUNES development team is currently focused on completing functionality of IMUNES on Linux so it matches the functionality available in IMUNES on
FreeBSD. Using Docker and Open vSwitch makes IMUNES on Linux potentially more flexible than its FreeBSD implementation so it will be interesting to see how IMUNES on Linux evolves in the future.
Docker containers
IMUNES on Linux uses Docker containers to create virtual L3 nodes. Please read theIntroduction to Docker in the Docker documentation web page to better understand how Docker works in IMUNES. Also read the
Docker Cheat Sheet to see how to interact with Docker containers.
The L3 nodes in an IMUNES simulation scenario are built on a Docker image provided by the IMUNES project team: the
vroot-linux image. When we ran the
imunes -pcommand during the install process, IMUNES downloaded the vroot-linux image. This image is based on the
baseimage-docker Docker image so for more information about the vroot-linux image, check both the
baseimage-docker documentation and the
vroot-linux documentation (which discusses changes made to the baseimage-docker image).
Filesystems
Because it uses Docker containers to emulate virtual network nodes, IMUNES offers fully independent filesystems on each node, but each node will use the same Linux kernel as the host computer. This is the “best of both worlds” for users. It allows the userto use each node in a more realistic manner without worrying about creating overwriting the host computer’s filesystem and it still enables excellent performance by using the “lightweight” virtualization provided by Linux container technology.
Open vSwitch
IMUNES on Linux uses Open vSwitch to implement the LAN Switch L2 node.To inspect the Open vSwitch bridges created by IMUNES, open a terminal window and use the
ovs-vsctlcommand. To see an overview of commands that can be used to view and verify operations, read this
Open vSwitch Cheat Sheet.
Conflicts with Network Manager
The Ubuntu Network Manager wants to manage all interfaces on my Ubuntu Linux 14.04 computer. So Network Manager gets confused when IMUNES creates Linux bridge ports with names like:il5fc0.n3.e1. This may inject a small amount of protocol traffic from your host computer into your IMUNES simulation while the Network Manager application checks each new interface.
If this becomes an issue for you, install an alternative network manager like WICD and disable Network Manager. See my
post about installing WICD for more information.
Using IMUNES on Linux
From the user’s point of view, IMUNES on Linux works almost the same as IMUNES on FreeBSD. Some features have not yet been ported to Linux, but many of the main features are available. I will not discuss missing features because they will probably be addedback to IMUNES on Linux as more development continues and it will be difficult to keep a list of missing features up-to-date.
I wrote a
review of IMUNES running on FreeBSD in a previous post. Please read that post to learn more about IMUNES.
Create network scenario
We’ve already started IMUNES. Next, we will add some routers switches and hosts in a simple scenario. You can configure nodes by double-clicking on them or right-clicking on them and selectingConfigure from the drop-down menu.
Configure network node
For example, if you are configuring a router, you may select configuration options in the router configuration dialogue box or create a custom configuration script that will run when the router starts. In the example below, we just use the default settings.
Router configuration dialogue box
Start the experiment
Start the simulation running using the Experiment → Execute menu command, as shown below.Create network and start simulation
Using all default settings, IMUNES will set up basic configurations on each emulated node so you should be able open a console on each node and ping any other node in the network.
Interacting with nodes
When the experiment is running, double-clicking on a node opens he console window, allowing the user to run commands on that node. If we runvtysh and view the running config, we see the router configuration that IMUNES automatically created based on the information we entered in the router’s configuration dialogue box.
console
Users may modify the configuration of any node in the console window using the standard command-line interface. For example, the user may change configurations in quagga or at the Linux command line.
However, these configuration are not saved when the IMUNES project is saved. If you need a specific start-up configuration that cannot be automatically generated by IMUNES, then create and run a custom startup scripts for each node and select the scripts
in each node’s configuration dialogue box.
Inspecting status with widgets
Users may view node status information using Widgets, which show information when the pointer is placed over a node.widgets
For example, if the IPv4 Routing Table widget is chosen, a text box will pop up showing the routing table of a node if you place the mouse point on top of the node.
Routing table widget
Conclusion
By creating a version of IMUNES that runs on Linux, the IMUNES development team is making this simple and effective network emulation tool available to a broader set of users.IMUNES for Linux is undergoing active development and the IMUNES development team needs users who will test IMUNES on Linux and report any bugs or suggest improvements. If you are interested in trying IMUNES, and if you have any issues or find any bugs,
contact the IMUNES development team using their
Github project page.
If you are using Ubuntu 15.04, which supports Docker 1.5, then you may install Docker from the software repository
NOTE: If you are not comfortable installing nsenter as a binary from someone’s git repository, then download the latest util-linux source and compile it on your system using the
steps outlines in the codecentric blog.

相关文章推荐
- libcurl库 windows,linux 编译使用
- Linux内核中的printf实现【转】
- CentOS release (Linux)上无法识别NTFS格式U盘的解决方法
- centos 7,pip安装
- kali linux Python 黑客编程1 开发环境初始化
- linux下php环境配置
- Linux文件系统基本操作(mount挂载,umount卸载)
- sprintf,snprintf的用法(可以作为linux中itoa函数的补充)【转】
- Linux字符串操作函数
- aws linuxbrew GLIBC_PRIVATE not defined in file ld-linux-x86-64.so.2
- centos 6.x sftp配置
- linux内存源码分析 - 零散知识点
- Linux下查看系统版本号信息的方法
- kali linux Python 黑客编程1 开发环境初始化
- Linux查看多线程及多核心CPU使用率
- CentOS 7设置开机启动服务,添加自定义系统服务
- kali linux Python开发环境初始化
- APUE,TLPI读书笔记——linux进程
- Linux的chattr与lsattr命令详解
- xampp for linux