说说Android中的style和theme
2016-05-06 10:34
190 查看
最近在做软件从2.3到4.0的改变的一些工作,其中涉及了一些style和theme相关的东西。上网上查了一些东西,这个一并说说。关于android中style和theme的基本使用,这里就不再赘述了,可以查看Dev Guide上的东东,这里主要说说自己比较困惑的一些部分。
Android platform已经提供了许多的style和theme供开发者使用,可以在R.style类中找到可供使用的style,不过需要把其中的下划线(_)改成点号(.). 如果我们查看R.style类的文档,发现有些style没有描述或者描述的不怎么清楚,还是看看原文件中怎么定义的吧。style和themem的原文件可以在<ANDROID_SDK_HOME>/platforms/android-15/data/res/values/下面找到,其中styles.xml和theme.xml文件就是R.style类的定义文件。可以看到theme.xml中定义了Theme.Holo,
Theme.Holo.Light等theme。
在values文件下还有一个文件就是attrs.xml,这是R.attr和R.styleable类的定义文件。attrs.xml中定义了每个view的可用的属性,例如使用android:textAppearance就是在attrs.xml中定义了<attr name="textAppearance" format="reference" />,那麽这里点format="reference"使什么意思呢?这里解释一下,一些例子来源于网络:
1. reference:参考某一资源ID。
(1)属性定义:
<declare-styleable name = "名称">
<attr name = "background" format = "reference" />
</declare-styleable>
(2)属性使用:
<ImageView
android:layout_width = "42dip"
android:layout_height = "42dip"
android:background = "@drawable/图片ID"
/>
2. color:颜色值
<declare-styleable name = "名称">
<attr name = "textColor" format = "color" />
</declare-styleable>
3. boolean:布尔值
<declare-styleable name = "名称">
<attr name = "focusable" format = "boolean" />
</declare-styleable>
4. dimension:尺寸值。
<declare-styleable name = "名称">
<attr name = "layout_width" format = "dimension" />
</declare-styleable>
5. float:浮点值。
6. integer:整型值。
7. string:字符串
8. fraction:百分数。
9. enum:枚举值
10. flag:位或运算
注意:
属性定义时可以指定多种类型值。
(1)属性定义:
<declare-styleable name = "名称">
<attr name = "background" format = "reference|color" />
</declare-styleable>
(2)属性使用:
<ImageView
android:layout_width = "42dip"
android:layout_height = "42dip"
android:background = "@drawable/图片ID|#00FF00"
/>
ok, 了解完这些,下面说说怎么自定义View和属性,可以参考http://blog.csdn.net/jincf2011/article/details/6344678
在xml 文件里定义控件的属性,我们已经习惯了android:attrs="" ,那么我们能不能定义自己的属性能,比如:test:attrs="" 呢?答案是肯定的.
进入主题。大致以下步骤:
一、 在res/values 文件下定义一个attrs.xml 文件.代码如下:
<?xml version="1.0" encoding="utf-8"?>
<resources>
<declare-styleable name="MyView">
<attr name="textColor" format="color" />
<attr name="textSize" format="dimension" />
</declare-styleable>
</resources>
二、 我们在MyView.java 代码编写如下,其中下面的构造方法是重点,我们获取定义的属性R.sytleable.MyView_textColor, 获取方法中后面通常设定默认值(float textSize = a.getDimension(R.styleable.MyView_textSize, 36 ); ), 防止我们在xml 文件中没有定义.从而使用默认值!
MyView 就是定义在<declare-styleable name="MyView "></declare-styleable> 里的 名字,获取里面属性用 名字_ 属性 连接起来就可以.TypedArray 通常最后调用 .recycle() 方法,为了保持以后使用该属性一致性!
public MyView(Context context,AttributeSet attrs)
{
super(context,attrs);
mPaint = new Paint();
TypedArray a = context.obtainStyledAttributes(attrs,
R.styleable.MyView);
int textColor = a.getColor(R.styleable.MyView_textColor,
0XFFFFFFFF);
float textSize = a.getDimension(R.styleable.MyView_textSize, 36);
mPaint.setTextSize(textSize);
mPaint.setColor(textColor);
a.recycle();
}
MyView.java MyView控件全部代码如下:
package com.android.tutor;
import android.content.Context;
import android.content.res.TypedArray;
import android.graphics.Canvas;
import android.graphics.Color;
import android.graphics.Paint;
import android.graphics.Rect;
import android.graphics.Paint.Style;
import android.util.AttributeSet;
import android.view.View;
public class MyView extends View {
private Paint mPaint;
private Context mContext;
private static final String mString = "Welcome to Mr Wei's blog";
public MyView(Context context) {
super(context);
mPaint = new Paint();
}
public MyView(Context context,AttributeSet attrs)
{
super(context,attrs);
mPaint = new Paint();
TypedArray a = context.obtainStyledAttributes(attrs,
R.styleable.MyView);
int textColor = a.getColor(R.styleable.MyView_textColor,
0XFFFFFFFF);
float textSize = a.getDimension(R.styleable.MyView_textSize, 36);
mPaint.setTextSize(textSize);
mPaint.setColor(textColor);
a.recycle();
}
@Override
protected void onDraw(Canvas canvas) {
// TODO Auto-generated method stub
super.onDraw(canvas);
//设置填充
mPaint.setStyle(Style.FILL);
//画一个矩形,前俩个是矩形左上角坐标,后面俩个是右下角坐标
canvas.drawRect(new Rect(10, 10, 100, 100), mPaint);
mPaint.setColor(Color.BLUE);
//绘制文字
canvas.drawText(mString, 10, 110, mPaint);
}
}
三、将我们自定义的MyView 加入布局main.xml 文件中,并且使用自定义属性,自定义属性必须加上:
" xmlns:test ="http://schemas.android.com/apk/res/com.android.tutor" ,test是自定义属性的前缀, com.android.tutor 是我们包名.
main.xml 全部代码如下:
<?xml
version="1.0" encoding="utf-8"?>
<LinearLayout
xmlns:android="http://schemas.android.com/apk/res/android"
xmlns:test="http://schemas.android.com/apk/res/com.android.tutor"
android:orientation="vertical"
android:layout_width="fill_parent"
android:layout_height="fill_parent"
>
<TextView
android:layout_width="fill_parent"
android:layout_height="wrap_content"
android:text="@string/hello"
/>
<com.android.tutor.MyView
android:layout_width="fill_parent"
android:layout_height="fill_parent"
test:textSize="20px"
test:textColor="#fff"
/>
</LinearLayout>
四、运行之效果如下图:
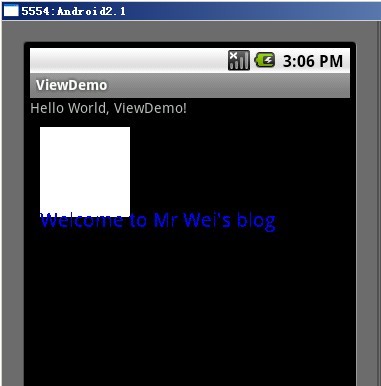
最后:
关于在引用资源时使用@还是?的问题,我们在设置style的时候既可以使用@也可以使用?, 例如android:textAppearance="@andorid:style/TextAppearance.Medium",
android:textAppearance="?android:attr/textAppearanceMedium"
使用@表示使用固定的style,而不会跟随Theme改变,这个style可以在style.xml中找到。
而?表示从Theme中查找引用的资源名,例如上面的textAppearanceMedium,查看themes.xml文件,可以看到在不同的theme中,textAppearanceMedium引用的style是不同的。如在Them.Holo中<item name="textAppearanceMedium">@android:style/TextAppearance.Holo.Medium</item>
,Theme.Holo.Light中为<item name="textAppearanceMedium">@android:style/TextAppearance.Holo.Light.Medium</item>
Android platform已经提供了许多的style和theme供开发者使用,可以在R.style类中找到可供使用的style,不过需要把其中的下划线(_)改成点号(.). 如果我们查看R.style类的文档,发现有些style没有描述或者描述的不怎么清楚,还是看看原文件中怎么定义的吧。style和themem的原文件可以在<ANDROID_SDK_HOME>/platforms/android-15/data/res/values/下面找到,其中styles.xml和theme.xml文件就是R.style类的定义文件。可以看到theme.xml中定义了Theme.Holo,
Theme.Holo.Light等theme。
在values文件下还有一个文件就是attrs.xml,这是R.attr和R.styleable类的定义文件。attrs.xml中定义了每个view的可用的属性,例如使用android:textAppearance就是在attrs.xml中定义了<attr name="textAppearance" format="reference" />,那麽这里点format="reference"使什么意思呢?这里解释一下,一些例子来源于网络:
1. reference:参考某一资源ID。
(1)属性定义:
<declare-styleable name = "名称">
<attr name = "background" format = "reference" />
</declare-styleable>
(2)属性使用:
<ImageView
android:layout_width = "42dip"
android:layout_height = "42dip"
android:background = "@drawable/图片ID"
/>
2. color:颜色值
<declare-styleable name = "名称">
<attr name = "textColor" format = "color" />
</declare-styleable>
3. boolean:布尔值
<declare-styleable name = "名称">
<attr name = "focusable" format = "boolean" />
</declare-styleable>
4. dimension:尺寸值。
<declare-styleable name = "名称">
<attr name = "layout_width" format = "dimension" />
</declare-styleable>
5. float:浮点值。
6. integer:整型值。
7. string:字符串
8. fraction:百分数。
9. enum:枚举值
10. flag:位或运算
注意:
属性定义时可以指定多种类型值。
(1)属性定义:
<declare-styleable name = "名称">
<attr name = "background" format = "reference|color" />
</declare-styleable>
(2)属性使用:
<ImageView
android:layout_width = "42dip"
android:layout_height = "42dip"
android:background = "@drawable/图片ID|#00FF00"
/>
ok, 了解完这些,下面说说怎么自定义View和属性,可以参考http://blog.csdn.net/jincf2011/article/details/6344678
在xml 文件里定义控件的属性,我们已经习惯了android:attrs="" ,那么我们能不能定义自己的属性能,比如:test:attrs="" 呢?答案是肯定的.
进入主题。大致以下步骤:
<?xml version="1.0" encoding="utf-8"?>
<resources>
<declare-styleable name="MyView">
<attr name="textColor" format="color" />
<attr name="textSize" format="dimension" />
</declare-styleable>
</resources>
二、 我们在MyView.java 代码编写如下,其中下面的构造方法是重点,我们获取定义的属性R.sytleable.MyView_textColor, 获取方法中后面通常设定默认值(float textSize = a.getDimension(R.styleable.MyView_textSize, 36 ); ), 防止我们在xml 文件中没有定义.从而使用默认值!
MyView 就是定义在<declare-styleable name="MyView "></declare-styleable> 里的 名字,获取里面属性用 名字_ 属性 连接起来就可以.TypedArray 通常最后调用 .recycle() 方法,为了保持以后使用该属性一致性!
public MyView(Context context,AttributeSet attrs)
{
super(context,attrs);
mPaint = new Paint();
TypedArray a = context.obtainStyledAttributes(attrs,
R.styleable.MyView);
int textColor = a.getColor(R.styleable.MyView_textColor,
0XFFFFFFFF);
float textSize = a.getDimension(R.styleable.MyView_textSize, 36);
mPaint.setTextSize(textSize);
mPaint.setColor(textColor);
a.recycle();
}
MyView.java MyView控件全部代码如下:
package com.android.tutor;
import android.content.Context;
import android.content.res.TypedArray;
import android.graphics.Canvas;
import android.graphics.Color;
import android.graphics.Paint;
import android.graphics.Rect;
import android.graphics.Paint.Style;
import android.util.AttributeSet;
import android.view.View;
public class MyView extends View {
private Paint mPaint;
private Context mContext;
private static final String mString = "Welcome to Mr Wei's blog";
public MyView(Context context) {
super(context);
mPaint = new Paint();
}
public MyView(Context context,AttributeSet attrs)
{
super(context,attrs);
mPaint = new Paint();
TypedArray a = context.obtainStyledAttributes(attrs,
R.styleable.MyView);
int textColor = a.getColor(R.styleable.MyView_textColor,
0XFFFFFFFF);
float textSize = a.getDimension(R.styleable.MyView_textSize, 36);
mPaint.setTextSize(textSize);
mPaint.setColor(textColor);
a.recycle();
}
@Override
protected void onDraw(Canvas canvas) {
// TODO Auto-generated method stub
super.onDraw(canvas);
//设置填充
mPaint.setStyle(Style.FILL);
//画一个矩形,前俩个是矩形左上角坐标,后面俩个是右下角坐标
canvas.drawRect(new Rect(10, 10, 100, 100), mPaint);
mPaint.setColor(Color.BLUE);
//绘制文字
canvas.drawText(mString, 10, 110, mPaint);
}
}
三、将我们自定义的MyView 加入布局main.xml 文件中,并且使用自定义属性,自定义属性必须加上:
" xmlns:test ="http://schemas.android.com/apk/res/com.android.tutor" ,test是自定义属性的前缀, com.android.tutor 是我们包名.
main.xml 全部代码如下:
<?xml
version="1.0" encoding="utf-8"?>
<LinearLayout
xmlns:android="http://schemas.android.com/apk/res/android"
xmlns:test="http://schemas.android.com/apk/res/com.android.tutor"
android:orientation="vertical"
android:layout_width="fill_parent"
android:layout_height="fill_parent"
>
<TextView
android:layout_width="fill_parent"
android:layout_height="wrap_content"
android:text="@string/hello"
/>
<com.android.tutor.MyView
android:layout_width="fill_parent"
android:layout_height="fill_parent"
test:textSize="20px"
test:textColor="#fff"
/>
</LinearLayout>
四、运行之效果如下图:
最后:
关于在引用资源时使用@还是?的问题,我们在设置style的时候既可以使用@也可以使用?, 例如android:textAppearance="@andorid:style/TextAppearance.Medium",
android:textAppearance="?android:attr/textAppearanceMedium"
使用@表示使用固定的style,而不会跟随Theme改变,这个style可以在style.xml中找到。
而?表示从Theme中查找引用的资源名,例如上面的textAppearanceMedium,查看themes.xml文件,可以看到在不同的theme中,textAppearanceMedium引用的style是不同的。如在Them.Holo中<item name="textAppearanceMedium">@android:style/TextAppearance.Holo.Medium</item>
,Theme.Holo.Light中为<item name="textAppearanceMedium">@android:style/TextAppearance.Holo.Light.Medium</item>

相关文章推荐
- Android 给图片、文字、控件、布局添加阴影效果(悬浮效果)
- Android开发记录
- 学习Android Studio开发工具之Activity3(框架3)
- Android 之动态代理
- Android--2048游戏
- Android学习笔记-RxJava备忘
- Android 点赞计数,点赞之后数量加1并且点击无效
- android将 View转为Bitmap图片
- Android 屏幕适配终极解决方案(包含生成程序dp sp与解决方案)
- Android Studio快捷键(MAC版)
- M(6.0)相关的坑(一)
- Android BLE蓝牙通信
- Android 菜单BoomMenu(悬浮按钮弹出菜单)
- Unsupported major.minor version
- Android Studio 代码混淆
- AndroidLinearLayout:添加阴影边界LinearLayout - Android LinearLayout : Add border with shadow around a line
- Android运行的时候请求权限
- android程序---->android五子棋的实现
- Android中的Drawable资源
- android 保存文件的各种目录列表