ViewPager动态变换效果之SCViewPager源码解析
2016-05-03 13:42
375 查看
序言:
我们知道在ViewPager中给我们提供了PageTransformer接口用于ViewPager切换的动画效果实现,一般我们需要实现这个接口里的transformPage方法实现切换的动画效果,这样我们就实现了ViewPager中Item之间切换的效果,例如下面的效果(摘自鸿洋博客图片):
我们发现,这里实现的是Item之间切换的效果,但是每个Item页里面的View并没有动画效果,我们也知道在做App的Guide引导页的时候,通过几个静态的图片展示切换,效果太过平庸,所以这次我们就介绍下SCViewPager这个库如果实现Item的动态变换。效果图来一发:
开源项目地址:https://github.com/sacot41/SCViewPager
1、首先看example的布局文件:
展现的效果:
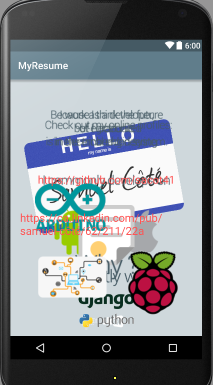
看到这个效果图是不是一脸懵逼,确实,这种布局效果图出来跟上面的动画效果对比确实让人大吃一惊,这个就是他设计的巧妙之处,根据设计的动画效果,首先在RelativeLayout中将View的起始位置设置布局完毕。
上面的代码都是按照一个逻辑处理,首先穿件一个SCViewAnimation对象,然后调用该对象的startToPosition方法指定View的起始位置,然后在创建一个动画类型(SCPositionAnimation)添加到SCViewAnimation中即可。实现也是非常简单,主要是动画的起点、终点位置的确定。通过上面的布局和代码,我们可以看出SCViewPager使用起来是非常简单,方便的。那么我们还需要学习更深入一点,看看它的源码分析实现的原理。
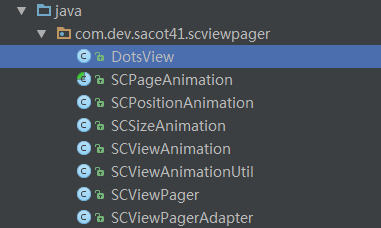
(1)、DotsView:底部原点View,自定义的底部圆点
(2)、SCPageAnimation:抽象类,用于定义View的动画效果实现;
(3)、SCPositionAnimation:平移动画效果,一个SCPageAnimation实现的子类
(4)、SCSizeAnimation:大小改变动画效果,SCPageAnimation的实现子类
(5)、SCViewAnimation:视图动画,提供指定动画起始位置的startToPoSition()、addPageAnimation()和applyAnimation()方法,主要负责动画的管理。
(6)、SCViewAnimationUtil:工具类
(7)、SCViewPager:自定义的ViewPager,重写onPageScrolled()方法,实现滑动切换执行动画。
(8)、SCViewPagerAdapter:FragmentStatePagerAdapter的子类,设置ViewPager的Adapter属性。
上面我们已经简单的说了,效果的实现就是通过监听PageScrolled方法来实现,当然仅仅知道这一点还是不够的,比如这些View控件怎么布局的,动画怎么实现的,这些都是技术点,所以我们就深入到各个类学习源码的实现。
1、SCPageAnimation抽象类
在这个抽象类中定义了一个page成员变量和applyTransformation方法,page变量用于标识动画作用在第几个ViewPager页面,applyTransformation方法用于执行动画
2、SCPositionAnimation类:
类很简短,继承自SCPageAnimation,该类新增了四个成员变量用于记录控件位置。主要是applyTransformation方法中通过positionOffset(该值介于[0,1))计算View的平移位置,通过setTranslationX/Y方法达到实现效果。
3、SCSizeAnimation源码
同样,这个类也是很简短,它新增了startHeight、startWidth两个成员变量,用于记录控件的初始宽高,在applyTransformation方法中通过获取View的LayoutParams属性进行改变控件的大小,以此来实现效果的动态变化。
4、SCViewAnimation类
SCViewAnimation类主要用于管理View的动画,该类包含一个HashMap
工具类,主要有两个方法:
(1)、prepareViewToGetSize(view):调用view的measure()方法测量,获取view的宽高。
(2)、getDisplaySize(activity):获取屏幕显示的大小
6、SCViewPager类:
这里是对ViewPager进行各简单的重写,重写了onPageScrolled方法,该方法包含三个参数,position页面的位置,positionOffset页面滑动的比例,取值范围[0,1),positionOffsetPixels页面滑动的距离,单位px。在这个方法里,遍历所有的SCViewAnimation结合,然后调用applyAnimation方法执行动画。
7、SCViewPagerAdapter类
在SCViewPagerAdapter类中,我们只关注一个成员变量mNumberOfPage,用于设置我们有多少个页面,然后由系统生成相应个数的Fragment,以此达到滑动效果,这里所有的Fragment只显示包含一个LinearLayout的空布局,不包含我们动画展示的View。
至此,我们针对各个类的源码已经介绍完毕,总体的代码量不多,代码也不复杂,主要是一个巧妙。在这里,使用的Fragemnt内容是不关涉到我们的动画View,我们通过将动画View和ViewPager放在同一页面,然后通过startToPosition指定控件的位置,达到控件的隐藏效果,起始他们都是在MainActivity页面,然后将ViewPager的滑动事件绑定到动画的执行,就可以制作出效果。源码看完了,我们在结合example的例子分析下,比如:
首先获取View控件nameTag,然后创建SCViewAnimation类,传入nameTag控件进行绑定,然后添加SCPositionAnimation动画,该动画中指定page=0,dx=0,dy=-size.y/2,最后将该SCViewAnimation添加到ViewPager中的SCViewAnimation集合中。滑动进行动画效果展示。
==========
作者:mr_dsw
博客地址:http://blog.csdn.net/mr_dsw
转载注明出处,谢谢
==========
我们知道在ViewPager中给我们提供了PageTransformer接口用于ViewPager切换的动画效果实现,一般我们需要实现这个接口里的transformPage方法实现切换的动画效果,这样我们就实现了ViewPager中Item之间切换的效果,例如下面的效果(摘自鸿洋博客图片):
我们发现,这里实现的是Item之间切换的效果,但是每个Item页里面的View并没有动画效果,我们也知道在做App的Guide引导页的时候,通过几个静态的图片展示切换,效果太过平庸,所以这次我们就介绍下SCViewPager这个库如果实现Item的动态变换。效果图来一发:
开源项目地址:https://github.com/sacot41/SCViewPager
一:项目原理概述
我们通过上面的效果图发现,SCViewPager给我们提供了一种更棒的切换效果,效果比以前的静态图片切换展示确实强的太多。下面,我们就简要介绍下SCViewPager效果的实现原理。首先,必须要监听ViewPager的PageScrolled事件,当PageScrolled事件触发时,我们就进行动画的执行,这样就实现了效果。其次是效果怎么设计才能正确展示,这里就需要我们探究源码一步步解析才能明白其中的原理,我们可以简单的以SCViewPager提供的example进行研究下实现。1、首先看example的布局文件:
<RelativeLayout xmlns:android="http://schemas.android.com/apk/res/android"
xmlns:tools="http://schemas.android.com/tools"
android:layout_width="fill_parent"
android:layout_height="fill_parent"
android:clipChildren="true"
android:clipToPadding="true"
tools:context=".MainActivity">

<com.dev.sacot41.scviewpager.SCViewPager
android:id="@+id/viewpager_main_activity"
android:layout_width="match_parent"
android:layout_height="match_parent">
</com.dev.sacot41.scviewpager.SCViewPager>

<com.dev.sacot41.scviewpager.DotsView
android:orientation="horizontal"
android:layout_width="wrap_content"
android:layout_height="wrap_content"
android:layout_alignParentBottom="true"
android:layout_centerHorizontal="true"
android:layout_marginBottom="10dp"
android:id="@+id/dotsview_main"
/>

<ImageView
android:id="@+id/imageview_main_activity_name_tag"
android:layout_width="match_parent"
android:layout_height="wrap_content"
android:paddingLeft="40dp"
android:paddingRight="50dp"
android:layout_alignParentTop="true"
android:rotation="-10"
android:src="@drawable/name_tag"/>

<ImageView
android:id="@+id/imageview_main_activity_currently_work"
android:layout_width="match_parent"
android:layout_height="wrap_content"
android:layout_marginTop="225dp"
android:src="@drawable/currently_work"/>

<ImageView
android:id="@+id/imageview_main_activity_at_skex"
android:layout_width="match_parent"
android:layout_height="wrap_content"
android:layout_marginTop="450dp"
android:src="@drawable/at_skex_2"/>

<ImageView
android:id="@+id/imageview_main_activity_commonly"
android:layout_width="wrap_content"
android:layout_height="wrap_content"
android:layout_marginTop="95dp"
android:layout_centerHorizontal="true"
android:src="@drawable/commonly"/>

<ImageView
android:id="@+id/imageview_main_activity_django_python"
android:layout_width="wrap_content"
android:layout_height="wrap_content"
android:layout_marginLeft="75dp"
android:layout_marginTop="400dp"
android:layout_centerHorizontal="true"
android:src="@drawable/django_python"/>

<ImageView
android:id="@+id/imageview_main_activity_mobile"
android:layout_width="wrap_content"
android:layout_height="wrap_content"
android:layout_marginTop="180dp"
android:layout_centerHorizontal="true"
android:src="@drawable/mobile"/>

<ImageView
android:id="@+id/imageview_main_activity_but"
android:layout_width="wrap_content"
android:layout_height="wrap_content"
android:layout_centerHorizontal="true"
android:src="@drawable/but"/>

<ImageView
android:id="@+id/imageview_main_activity_diploma"
android:layout_width="wrap_content"
android:layout_height="wrap_content"
android:layout_marginTop="250dp"
android:layout_centerHorizontal="true"
android:src="@drawable/diploma"/>

<ImageView
android:id="@+id/imageview_main_activity_why"
android:layout_width="wrap_content"
android:layout_height="wrap_content"
android:layout_marginBottom="50dp"
android:layout_alignParentBottom="true"
android:layout_centerHorizontal="true"
android:src="@drawable/why"/>

<ImageView
android:id="@+id/imageview_main_future"
android:layout_width="wrap_content"
android:layout_height="wrap_content"
android:layout_centerHorizontal="true"
android:src="@drawable/future"/>

<ImageView
android:id="@+id/imageview_main_arduino"
android:layout_width="wrap_content"
android:layout_height="wrap_content"
android:layout_below="@id/imageview_main_future"
android:layout_marginTop="20dp"
android:layout_marginLeft="50dp"
android:src="@drawable/arduino"/>

<ImageView
android:id="@+id/imageview_main_raspberry_pi"
android:layout_width="wrap_content"
android:layout_height="wrap_content"
android:layout_below="@id/imageview_main_arduino"
android:layout_marginTop="40dp"
android:layout_alignParentRight="true"
android:layout_marginRight="50dp"
android:src="@drawable/raspberry_pi_logo"/>

<ImageView
android:id="@+id/imageview_main_connected_device"
android:layout_width="wrap_content"
android:layout_height="wrap_content"
android:layout_alignParentBottom="true"
android:layout_marginBottom="75dp"
android:layout_marginLeft="50dp"
android:src="@drawable/connect_device"/>

<ImageView
android:id="@+id/imageview_main_check_out"
android:layout_width="wrap_content"
android:layout_height="wrap_content"
android:layout_centerHorizontal="true"
android:src="@drawable/check_out"/>

<TextView
android:id="@+id/textview_main_github_link"
android:layout_width="wrap_content"
android:layout_height="wrap_content"
android:paddingLeft="20dp"
android:paddingRight="20dp"
android:textColor="@color/theme_700"
android:layout_centerHorizontal="true"
android:layout_below="@id/imageview_main_check_out"
android:autoLink="web"
android:textAppearance="@android:style/TextAppearance.Large"
android:text="https://github.com/sacot41"/>

<TextView
android:id="@+id/textview_main_linkedin_link"
android:layout_width="wrap_content"
android:layout_height="wrap_content"
android:paddingLeft="20dp"
android:paddingRight="20dp"
android:textColor="@color/theme_700"
android:layout_centerHorizontal="true"
android:layout_marginTop="50dp"
android:layout_below="@id/textview_main_github_link"
android:autoLink="web"
android:textAppearance="@android:style/TextAppearance.Large"
android:text="https://ca.linkedin.com/pub/samuel-côté/62/211/22a"/>

</RelativeLayout>
展现的效果:
看到这个效果图是不是一脸懵逼,确实,这种布局效果图出来跟上面的动画效果对比确实让人大吃一惊,这个就是他设计的巧妙之处,根据设计的动画效果,首先在RelativeLayout中将View的起始位置设置布局完毕。
2、接着我们看看MainActivity中怎么实现的:
package com.dev.sacot41.myresume;

import android.graphics.Point;
import android.os.Bundle;
import android.support.v4.app.FragmentActivity;
import android.support.v4.view.ViewPager;
import android.view.View;
import android.view.Window;
import android.view.WindowManager;

import com.dev.sacot41.scviewpager.DotsView;
import com.dev.sacot41.scviewpager.SCPositionAnimation;
import com.dev.sacot41.scviewpager.SCViewAnimation;
import com.dev.sacot41.scviewpager.SCViewAnimationUtil;
import com.dev.sacot41.scviewpager.SCViewPager;
import com.dev.sacot41.scviewpager.SCViewPagerAdapter;

public class MainActivity extends FragmentActivity {

private static final int NUM_PAGES = 5;

private SCViewPager mViewPager;
private SCViewPagerAdapter mPageAdapter;
private DotsView mDotsView;

@Override
protected void onCreate(Bundle savedInstanceState) {
super.onCreate(savedInstanceState);

getWindow().requestFeature(Window.FEATURE_ACTION_BAR);
getWindow().setFlags(WindowManager.LayoutParams.FLAG_FULLSCREEN, WindowManager.LayoutParams.FLAG_FULLSCREEN);
setContentView(R.layout.activity_main);

mViewPager = (SCViewPager) findViewById(R.id.viewpager_main_activity);
mDotsView = (DotsView) findViewById(R.id.dotsview_main);
mDotsView.setDotRessource(R.drawable.dot_selected, R.drawable.dot_unselected);
mDotsView.setNumberOfPage(NUM_PAGES);

mPageAdapter = new SCViewPagerAdapter(getSupportFragmentManager());
mPageAdapter.setNumberOfPage(NUM_PAGES);
mPageAdapter.setFragmentBackgroundColor(R.color.theme_100);
mViewPager.setAdapter(mPageAdapter);

mViewPager.setOnPageChangeListener(new ViewPager.OnPageChangeListener() {
@Override
public void onPageScrolled(int position, float positionOffset, int positionOffsetPixels) {
}

@Override
public void onPageSelected(int position) {
mDotsView.selectDot(position);
}

@Override
public void onPageScrollStateChanged(int state) {
}
});

final Point size = SCViewAnimationUtil.getDisplaySize(this);

View nameTag = findViewById(R.id.imageview_main_activity_name_tag);
SCViewAnimation nameTagAnimation = new SCViewAnimation(nameTag);
nameTagAnimation.addPageAnimation(new SCPositionAnimation(this, 0,0,-size.y/2));
mViewPager.addAnimation(nameTagAnimation);

View currentlyWork = findViewById(R.id.imageview_main_activity_currently_work);
SCViewAnimation currentlyWorkAnimation = new SCViewAnimation(currentlyWork);
currentlyWorkAnimation.addPageAnimation(new SCPositionAnimation(this, 0, -size.x, 0));
mViewPager.addAnimation(currentlyWorkAnimation);

View atSkex = findViewById(R.id.imageview_main_activity_at_skex);
SCViewAnimationUtil.prepareViewToGetSize(atSkex);
SCViewAnimation atSkexAnimation = new SCViewAnimation(atSkex);
atSkexAnimation.addPageAnimation(new SCPositionAnimation(getApplicationContext(), 0, 0, -( size.y - atSkex.getHeight() )));
atSkexAnimation.addPageAnimation(new SCPositionAnimation(getApplicationContext(), 1, -size.x, 0));
mViewPager.addAnimation(atSkexAnimation);

View mobileView = findViewById(R.id.imageview_main_activity_mobile);
SCViewAnimation mobileAnimation = new SCViewAnimation(mobileView);
mobileAnimation.startToPosition((int)(size.x*1.5), null);
mobileAnimation.addPageAnimation(new SCPositionAnimation(this, 0, -(int)(size.x*1.5), 0));
mobileAnimation.addPageAnimation(new SCPositionAnimation(this, 1, -(int)(size.x*1.5), 0));
mViewPager.addAnimation(mobileAnimation);

View djangoView = findViewById(R.id.imageview_main_activity_django_python);
SCViewAnimation djangoAnimation = new SCViewAnimation(djangoView);
djangoAnimation.startToPosition(null, -size.y);
djangoAnimation.addPageAnimation(new SCPositionAnimation(this, 0, 0, size.y));
djangoAnimation.addPageAnimation(new SCPositionAnimation(this, 1, 0, size.y));
mViewPager.addAnimation(djangoAnimation);

View commonlyView = findViewById(R.id.imageview_main_activity_commonly);
SCViewAnimation commonlyAnimation = new SCViewAnimation(commonlyView);
commonlyAnimation.startToPosition(size.x, null);
commonlyAnimation.addPageAnimation(new SCPositionAnimation(this, 0, -size.x, 0));
commonlyAnimation.addPageAnimation(new SCPositionAnimation(this, 1, -size.x, 0));
mViewPager.addAnimation(commonlyAnimation);

View butView = findViewById(R.id.imageview_main_activity_but);
SCViewAnimation butAnimation = new SCViewAnimation(butView);
butAnimation.startToPosition(size.x, null);
butAnimation.addPageAnimation(new SCPositionAnimation(this, 1, -size.x,0));
butAnimation.addPageAnimation(new SCPositionAnimation(this, 2, -size.x,0));
mViewPager.addAnimation(butAnimation);

View diplomeView = findViewById(R.id.imageview_main_activity_diploma);
SCViewAnimation diplomeAnimation = new SCViewAnimation(diplomeView);
diplomeAnimation.startToPosition((size.x *2), null);
diplomeAnimation.addPageAnimation(new SCPositionAnimation(this, 1, -size.x*2,0));
diplomeAnimation.addPageAnimation(new SCPositionAnimation(this, 2, -size.x*2 ,0));
mViewPager.addAnimation(diplomeAnimation);

View whyView = findViewById(R.id.imageview_main_activity_why);
SCViewAnimation whyAnimation = new SCViewAnimation(whyView);
whyAnimation.startToPosition(size.x, null);
whyAnimation.addPageAnimation(new SCPositionAnimation(this, 1, -size.x, 0));
whyAnimation.addPageAnimation(new SCPositionAnimation(this, 2, -size.x, 0));
mViewPager.addAnimation(whyAnimation);

View futureView = findViewById(R.id.imageview_main_future);
SCViewAnimation futureAnimation = new SCViewAnimation(futureView);
futureAnimation.startToPosition(null, -size.y);
futureAnimation.addPageAnimation(new SCPositionAnimation(this, 2, 0, size.y));
futureAnimation.addPageAnimation(new SCPositionAnimation(this, 3, -size.x, 0));
mViewPager.addAnimation(futureAnimation);

View arduinoView = findViewById(R.id.imageview_main_arduino);
SCViewAnimation arduinoAnimation = new SCViewAnimation(arduinoView);
arduinoAnimation.startToPosition(size.x * 2, null);
arduinoAnimation.addPageAnimation(new SCPositionAnimation(this, 2, - size.x *2, 0));
arduinoAnimation.addPageAnimation(new SCPositionAnimation(this, 3, - size.x, 0));
mViewPager.addAnimation(arduinoAnimation);

View raspberryView = findViewById(R.id.imageview_main_raspberry_pi);
SCViewAnimation raspberryAnimation = new SCViewAnimation(raspberryView);
raspberryAnimation.startToPosition(-size.x, null);
raspberryAnimation.addPageAnimation(new SCPositionAnimation(this, 2, size.x, 0));
raspberryAnimation.addPageAnimation(new SCPositionAnimation(this, 3, -size.x, 0));
mViewPager.addAnimation(raspberryAnimation);

View connectedDeviceView = findViewById(R.id.imageview_main_connected_device);
SCViewAnimation connectedDeviceAnimation = new SCViewAnimation(connectedDeviceView);
connectedDeviceAnimation.startToPosition((int)(size.x *1.5), null);
connectedDeviceAnimation.addPageAnimation(new SCPositionAnimation(this, 2, -(int) (size.x * 1.5), 0));
connectedDeviceAnimation.addPageAnimation(new SCPositionAnimation(this, 3,  - size.x, 0));
mViewPager.addAnimation(connectedDeviceAnimation);

View checkOutView = findViewById(R.id.imageview_main_check_out);
SCViewAnimation checkOutAnimation = new SCViewAnimation(checkOutView);
checkOutAnimation.startToPosition(size.x, null);
checkOutAnimation.addPageAnimation(new SCPositionAnimation(this, 3, -size.x, 0));
mViewPager.addAnimation(checkOutAnimation);

View linkedinView = findViewById(R.id.textview_main_linkedin_link);
SCViewAnimation linkedinAnimation = new SCViewAnimation(linkedinView);
linkedinAnimation.startToPosition(size.x, null);
linkedinAnimation.addPageAnimation(new SCPositionAnimation(this, 3, -size.x, 0));
mViewPager.addAnimation(linkedinAnimation);

View githubView = findViewById(R.id.textview_main_github_link);
SCViewAnimation githubAnimation = new SCViewAnimation(githubView);
githubAnimation.startToPosition(size.x, null);
githubAnimation.addPageAnimation(new SCPositionAnimation(this, 3, -size.x, 0));
mViewPager.addAnimation(githubAnimation);
}

}
上面的代码都是按照一个逻辑处理,首先穿件一个SCViewAnimation对象,然后调用该对象的startToPosition方法指定View的起始位置,然后在创建一个动画类型(SCPositionAnimation)添加到SCViewAnimation中即可。实现也是非常简单,主要是动画的起点、终点位置的确定。通过上面的布局和代码,我们可以看出SCViewPager使用起来是非常简单,方便的。那么我们还需要学习更深入一点,看看它的源码分析实现的原理。
二:SCViewPager源码分析
在上面我们简要的看了SCViewPager的使用,现在我们就结合源码分析下实现过程。 首先看看结构图:(1)、DotsView:底部原点View,自定义的底部圆点
(2)、SCPageAnimation:抽象类,用于定义View的动画效果实现;
(3)、SCPositionAnimation:平移动画效果,一个SCPageAnimation实现的子类
(4)、SCSizeAnimation:大小改变动画效果,SCPageAnimation的实现子类
(5)、SCViewAnimation:视图动画,提供指定动画起始位置的startToPoSition()、addPageAnimation()和applyAnimation()方法,主要负责动画的管理。
(6)、SCViewAnimationUtil:工具类
(7)、SCViewPager:自定义的ViewPager,重写onPageScrolled()方法,实现滑动切换执行动画。
(8)、SCViewPagerAdapter:FragmentStatePagerAdapter的子类,设置ViewPager的Adapter属性。
上面我们已经简单的说了,效果的实现就是通过监听PageScrolled方法来实现,当然仅仅知道这一点还是不够的,比如这些View控件怎么布局的,动画怎么实现的,这些都是技术点,所以我们就深入到各个类学习源码的实现。
1、SCPageAnimation抽象类
public abstract class SCPageAnimation {
public int page;
public abstract void applyTransformation(View onView, float positionOffset);
}
在这个抽象类中定义了一个page成员变量和applyTransformation方法,page变量用于标识动画作用在第几个ViewPager页面,applyTransformation方法用于执行动画
2、SCPositionAnimation类:
public class SCPositionAnimation extends SCPageAnimation {

public int xPosition;
public int yPosition;

private float xStartPosition;
private float yStartPosition;

/**
* @param forPage page to apply animation
* @param dx x moving, in dp
* @param dy y moving, in dp
*/

public SCPositionAnimation(Context context, int forPage, int dx, int dy) {
this.page = forPage;
this.xPosition = dx;
this.yPosition = dy;
this.xStartPosition = -1;
this.yStartPosition = -1;
}

public void applyTransformation(View onView, float positionOffset) {
ViewGroup.MarginLayoutParams params = (ViewGroup.MarginLayoutParams) onView.getLayoutParams();

if (positionOffset <= 0.0001) {

xStartPosition = onView.getTranslationX();
yStartPosition = onView.getTranslationY();

return;
}

onView.setTranslationX((int)(xPosition * positionOffset) + xStartPosition);
onView.setTranslationY((int)(yPosition * positionOffset) + yStartPosition);
onView.requestLayout();
}
}
类很简短,继承自SCPageAnimation,该类新增了四个成员变量用于记录控件位置。主要是applyTransformation方法中通过positionOffset(该值介于[0,1))计算View的平移位置,通过setTranslationX/Y方法达到实现效果。
3、SCSizeAnimation源码
public class SCSizeAnimation extends SCPageAnimation {

public float dHeigh;
public float dWidth;

private int startHeigh;
private int startWidth;

/**
*
* @param forPage page to apply animation
* @param dh height variation, in percentage
* @param dw width variation, in percentage
*/
public SCSizeAnimation(int forPage, float dh, float dw) {
this.page = forPage;
this.dHeigh = dh;
this.dWidth = dw;
}

@Override
public void applyTransformation(View onView, float positionOffset) {
ViewGroup.LayoutParams param = onView.getLayoutParams();

if(positionOffset <= 0) {
startHeigh = onView.getMeasuredHeight();
startWidth = onView.getMeasuredWidth();
return;
}

param.height = (int)(dHeigh * startHeigh * positionOffset) + startHeigh;
param.width = (int)(dWidth * startHeigh * positionOffset) + startWidth;
onView.setLayoutParams(param);
}
}
同样,这个类也是很简短,它新增了startHeight、startWidth两个成员变量,用于记录控件的初始宽高,在applyTransformation方法中通过获取View的LayoutParams属性进行改变控件的大小,以此来实现效果的动态变化。
4、SCViewAnimation类
public class SCViewAnimation {

private View view;
private HashMap<Integer, ArrayList<SCPageAnimation>> pageAnimationMap;

public SCViewAnimation(View inView) {
this.view = inView;
this.pageAnimationMap = new HashMap<Integer, ArrayList<SCPageAnimation>>();
}

public void startToPosition(Integer xPosition, Integer yPosition) {
if (xPosition != null) this.view.setX(xPosition);
if (yPosition != null) this.view.setY(yPosition);
this.view.requestLayout();
}

public void addPageAnimation(SCPageAnimation inPageAnimation) {
ArrayList<SCPageAnimation> animationList = pageAnimationMap.get(inPageAnimation.page);
if (animationList == null) animationList = new ArrayList<SCPageAnimation>();
animationList.add(inPageAnimation);
pageAnimationMap.put(inPageAnimation.page, animationList);
}

public void applyAnimation(int page, float positionOffset) {
ArrayList<SCPageAnimation> animationList = pageAnimationMap.get(page);

if (animationList == null) return;

for(SCPageAnimation animation : animationList) {
animation.applyTransformation(this.view, positionOffset);
}
}

}
SCViewAnimation类主要用于管理View的动画,该类包含一个HashMap
public class SCViewAnimationUtil {

public static void prepareViewToGetSize(View view) {
view.measure( View.MeasureSpec.makeMeasureSpec(0, View.MeasureSpec.UNSPECIFIED),  View.MeasureSpec.makeMeasureSpec(0, View.MeasureSpec.UNSPECIFIED));
view.layout(0, 0, view.getMeasuredWidth(), view.getMeasuredHeight());
}

public static Point getDisplaySize(Activity activity) {
Display display = activity.getWindowManager().getDefaultDisplay();
final Point size = new Point();
display.getSize(size);
return size;
}

}
工具类,主要有两个方法:
(1)、prepareViewToGetSize(view):调用view的measure()方法测量,获取view的宽高。
(2)、getDisplaySize(activity):获取屏幕显示的大小
6、SCViewPager类:
public class SCViewPager extends ViewPager {

private ArrayList<SCViewAnimation> mViewAnimation;

public SCViewPager(Context context) {
super(context);
this.mViewAnimation = new ArrayList<SCViewAnimation>();
}

public SCViewPager(Context context, AttributeSet attr) {
super(context, attr);
this.mViewAnimation = new ArrayList<SCViewAnimation>();
}

public void addAnimation(SCViewAnimation inViewAnimation) {
mViewAnimation.add(inViewAnimation);
}

@Override
public void onPageScrolled(int position, float positionOffset, int positionOffsetPixels) {
super.onPageScrolled(position, positionOffset, positionOffsetPixels);

for (int i = 0; i < mViewAnimation.size(); i++) {
mViewAnimation.get(i).applyAnimation(position, positionOffset);
}

}

}
这里是对ViewPager进行各简单的重写,重写了onPageScrolled方法,该方法包含三个参数,position页面的位置,positionOffset页面滑动的比例,取值范围[0,1),positionOffsetPixels页面滑动的距离,单位px。在这个方法里,遍历所有的SCViewAnimation结合,然后调用applyAnimation方法执行动画。
7、SCViewPagerAdapter类
public class SCViewPagerAdapter extends FragmentStatePagerAdapter {

private ArrayList<SCViewPagerFragment> mFragmentList;

private int mNumberOfPage = 0;
private int mBackgroundColor;

public SCViewPagerAdapter(FragmentManager fm) {
super(fm);
mFragmentList = new ArrayList<>();
}

public void setNumberOfPage(int numberOfPage) {
mNumberOfPage = numberOfPage;
}

public void setFragmentBackgroundColor(int colorResource) {
mBackgroundColor = colorResource;
}

@Override
public Fragment getItem(int position) {

SCViewPagerFragment fragment = null;

if (mFragmentList.size()-1 >= position) fragment = mFragmentList.get(position);

if (fragment == null) {
fragment = new SCViewPagerFragment();
fragment.setBackground(mBackgroundColor);
}

return fragment;
}

@Override
public int getCount() {
return mNumberOfPage;
}

public static class SCViewPagerFragment extends Fragment {

private int color;

public SCViewPagerFragment() {
this.color = R.color.white;
}

public void setBackground(int inColor) {
this.color = inColor;
}

@Override
public View onCreateView(LayoutInflater inflater, ViewGroup container, Bundle savedInstanceState) {
LinearLayout view = new LinearLayout(getActivity());
view.setLayoutParams(new LinearLayout.LayoutParams(LinearLayout.LayoutParams.MATCH_PARENT, LinearLayout.LayoutParams.MATCH_PARENT));
view.setOrientation(LinearLayout.VERTICAL);
view.setBackgroundColor(getResources().getColor(this.color));
return view;
}

@Override
public void onActivityCreated(Bundle savedInstanceState) {
super.onActivityCreated(savedInstanceState);
}
}

}
在SCViewPagerAdapter类中,我们只关注一个成员变量mNumberOfPage,用于设置我们有多少个页面,然后由系统生成相应个数的Fragment,以此达到滑动效果,这里所有的Fragment只显示包含一个LinearLayout的空布局,不包含我们动画展示的View。
至此,我们针对各个类的源码已经介绍完毕,总体的代码量不多,代码也不复杂,主要是一个巧妙。在这里,使用的Fragemnt内容是不关涉到我们的动画View,我们通过将动画View和ViewPager放在同一页面,然后通过startToPosition指定控件的位置,达到控件的隐藏效果,起始他们都是在MainActivity页面,然后将ViewPager的滑动事件绑定到动画的执行,就可以制作出效果。源码看完了,我们在结合example的例子分析下,比如:
View nameTag = findViewById(R.id.imageview_main_activity_name_tag);
SCViewAnimation nameTagAnimation = new SCViewAnimation(nameTag);
nameTagAnimation.addPageAnimation(new SCPositionAnimation(this, 0,0,-size.y/2));
mViewPager.addAnimation(nameTagAnimation);
首先获取View控件nameTag,然后创建SCViewAnimation类,传入nameTag控件进行绑定,然后添加SCPositionAnimation动画,该动画中指定page=0,dx=0,dy=-size.y/2,最后将该SCViewAnimation添加到ViewPager中的SCViewAnimation集合中。滑动进行动画效果展示。
==========
作者:mr_dsw
博客地址:http://blog.csdn.net/mr_dsw
转载注明出处,谢谢
==========

相关文章推荐
- 删除Xcode插件
- jsp实现单刷时间显示,刷新显示时间不刷新页面
- OpenGL学习之路(三)
- SQL大圣之路笔记——SQL TRUNCATE,DELETE,DROP
- Android Binder通信机制学习
- Cookie
- [Lesson Learn] LeetCode #2 Add Two Numbers
- 使用Autolayout实现UITableView的Cell动态布局和高度动态改变
- 监听器
- VBA: Cant find project or librar
- 简单粗暴地理解js原型链--js面向对象编程
- 系统调用和库函数及API的区别
- 【HUSTOJ】1012: 分段函数
- TensorFlow教程02:针对机器学习初学者的MNIST实验——Softmax回归
- windows下cmd命令行显示UTF8字符设置(CHCP命令)
- Drawable资源——LevelListDrawable 级列表
- POJ 3294 Life Forms(后缀数组+二分)
- CUDA CUBLAS第一个程序 漂亮的VIM
- 互斥锁,自旋锁与自适应自旋锁
- PickerView添加确定,取消按钮