lamp整合三连发(3)
2016-04-26 18:15
239 查看
LAMP整合方式2
要求:(1) 三者分离于两台或三台主机;
(2) 一个虚拟主机用于提供phpMyAdmin;另一个虚拟主机用于提供wordpress;
(3) xcache
(4) 尝试mpm为非prefork机制;
现有服务器:172.18.29.141CentOS 6.6为httpd(包含php模块)服务器
172.18.29.142CentOS 6.6作为mysql服务器
一、编译安装httpd
一、编译安装apache
1、解决依赖关系
httpd-2.4.9需要较新版本的apr和apr-util,因此需要事先对其进行升级。升级方式有两种,一种是通过源代码编译安装,一种是直接升级rpm包。这里选择使用编译源代码的方式进行。
(1) 编译安装apr
# tar xf apr-1.5.0.tar.bz2
# cd apr-1.5.0
# ./configure --prefix=/usr/local/apr
# make && make install
(2) 编译安装apr-util
# tar xf apr-util-1.5.3.tar.bz2
# cd apr-util-1.5.3
# ./configure --prefix=/usr/local/apr-util --with-apr=/usr/local/apr
# make && make install
(3) httpd-2.4.9编译过程也要依赖于pcre-devel软件包,需要事先安装。
2.编译安装httpd2.4,下载httpd2.4源码安装包
# tar xf httpd-2.4.9.tar.bz2
# cd httpd-2.4.9
# ./configure --prefix=/usr/local/apache --sysconfdir=/etc/httpd24 --enable-so --enable-ssl --enable-cgi --enable-rewrite --with-zlib --with-pcre --with-apr=/usr/local/apr --with-apr-util=/usr/local/apr-util --enable-modules=most --enable-mpms-shared=all --with-mpm=event
# make && make install
3、修改httpd的主配置文件,设置其Pid文件的路径。
4、提供SysV服务脚本/etc/rc.d/init.d/httpd,内容如下:
注意:修改其中的httpd 变量,为适合自己的变量内容
apachectl=/usr/local/apache/bin/apachectl httpd=${HTTPD-/usr/local/apache/bin/httpd} pidfile=${PIDFILE-/var/run/httpd.pid} lockfile=${LOCKFILE-/var/lock/subsys/httpd}
# chmod +x /etc/rc.d/init.d/httpd
加入服务列表:
# chkconfig --add httpd
接下来就可以启动服务进行测试了。
二、安装mariadb
1、准备数据存放的文件系统
新建一个逻辑卷,并将其挂载至特定目录即可。这里不再给出过程。
这里假设其逻辑卷的挂载目录为/mydata,而后需要创建/mydata/data目录做为mysql数据的存放目录。
2、新建用户以安全方式运行进程:
# groupadd -r mysql
# useradd -g mysql -r -s /sbin/nologin -M -d /mydata/data mysql
# chown -R mysql:mysql /mydata/data
3、安装并初始化mariadb
首先下载mariadb二进制安装包至本地。
# tar xf mysql-5.5.33-linux2.6-i686.tar.gz -C /usr/local
# cd /usr/local/
# ln -sv mysql-5.5.33-linux2.6-i686 mysql
# cd mysql
# chown -R mysql:mysql .
# scripts/mysql_install_db --user=mysql --datadir=/mydata/data
# chown -R root .
4、为mysql提供主配置文件:
# cd /usr/local/mysql
# cp support-files/my-large.cnf /etc/my.cnf
并修改此文件中thread_concurrency的值为你的CPU个数乘以2,比如这里使用如下行:
thread_concurrency = 2
另外还需要添加如下行指定mysql数据文件的存放位置:
datadir = /mydata/data
5、为mysql提供sysv服务脚本:
# cd /usr/local/mysql
# cp support-files/mysql.server /etc/rc.d/init.d/mariadbd
# chmod +x /etc/rc.d/init.d/mariadbd
添加至服务列表:
# chkconfig --add mariadbd
# chkconfig mariadbd on
而后就可以启动服务测试使用了。
为了使用mysql的安装符合系统使用规范,并将其开发组件导出给系统使用,这里还需要进行如下步骤:
6、输出mysql的man手册至man命令的查找路径:
编辑/etc/man.config,添加如下行即可:
MANPATH /usr/local/mysql/man
7、输出mysql的头文件至系统头文件路径/usr/include:
这可以通过简单的创建链接实现:
# ln -sv /usr/local/mysql/include /usr/include/mariadb
8、输出mysql的库文件给系统库查找路径:
# echo '/usr/local/mysql/lib' > /etc/ld.so.conf.d/mariadb.conf
而后让系统重新载入系统库:
# ldconfig
9、修改PATH环境变量,让系统可以直接使用mysql的相关命令。具体实现过程这里不再给出。
# PATH=/usr/local/mysql/bin:$PATH
三、编译安装php5
1、解决依赖关系:
请配置好yum源(系统安装源及epel源)后执行如下命令:
# yum -y groupinstall "Desktop Platform Development"
# yum -y install bzip2-devel libmcrypt-devel libxml2-devel
2、编译安装php-5.4.26
首先下载源码包至本地目录,下载位置ftp://172.16.0.1/pub/Sources/new_lamp。
# tar xf php-5.4.26.tar.bz2
# cd php-5.4.26
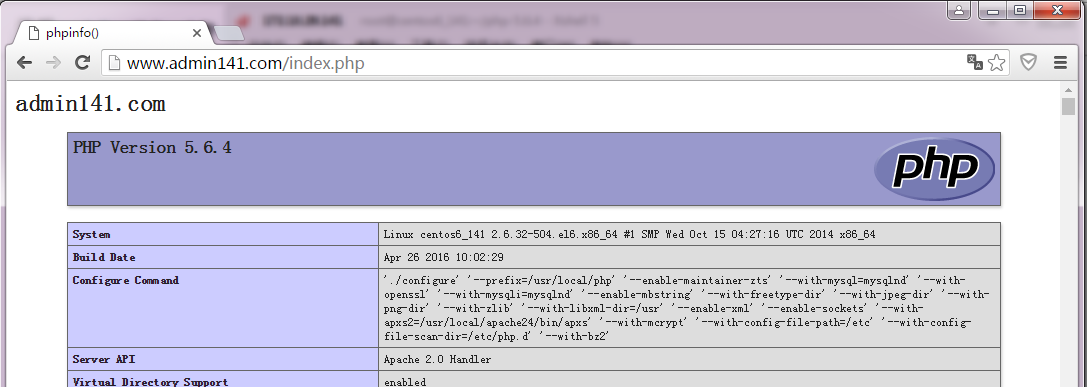
# ./configure --prefix=/usr/local/php --with-mysql=/usr/local/mysql --with-openssl --with-mysqli=/usr/local/mysql/bin/mysql_config --enable-mbstring --with-freetype-dir --with-jpeg-dir --with-png-dir --with-zlib --with-libxml-dir=/usr --enable-xml --enable-sockets --with-apxs2=/usr/local/apache/bin/apxs --with-mcrypt --with-config-file-path=/etc --with-config-file-scan-dir=/etc/php.d --with-bz2 --enable-maintainer-zts
说明:
1、这里为了支持apache的worker或event这两个MPM,编译时使用了--enable-maintainer-zts选项。
2、如果使用PHP5.3以上版本,为了链接MySQL数据库,可以指定mysqlnd,这样在本机就不需要先安装MySQL或MySQL开发包了。mysqlnd从php 5.3开始可用,可以编译时绑定到它(而不用和具体的MySQL客户端库绑定形成依赖),但从PHP 5.4开始它就是默认设置了。
# ./configure --with-mysql=mysqlnd --with-pdo-mysql=mysqlnd --with-mysqli=mysqlnd
这里用:
# ./configure --prefix=/usr/local/php --enable-maintainer-zts --with-mysql=mysqlnd --with-openssl --with-mysqli=mysqlnd --enable-mbstring --with-freetype-dir --with-jpeg-dir --with-png-dir --with-zlib --with-libxml-dir=/usr --enable-xml --enable-sockets --with-apxs2=/usr/local/apache24/bin/apxs --with-mcrypt --with-config-file-path=/etc --with-config-file-scan-dir=/etc/php.d --with-bz2
# make
# make test
# make intall
为php提供配置文件:
# cp php.ini-production /etc/php.ini
3、 编辑apache配置文件httpd.conf,以apache支持php
# vim /etc/httpd/httpd.conf
1、添加如下二行
AddType application/x-httpd-php .php
AddType application/x-httpd-php-source .phps
2、定位至DirectoryIndex index.html
修改为:
DirectoryIndex index.php index.html
而后重新启动httpd,或让其重新载入配置文件即可测试php是否已经可以正常使用。
测试页面index.php示例如下:
<?php
$link = mysql_connect('127.0.0.1','root','mageedu');
if ($link)
echo "Success...";
else
echo "Failure...";
mysql_close();
?>
四、安装xcache,为php加速:
1、安装
# tar xf xcache-3.0.3.tar.gz
# cd xcache-3.0.3
# /usr/local/php/bin/phpize
# ./configure --enable-xcache --with-php-config=/usr/local/php/bin/php-config
# make && make install
安装结束时,会出现类似如下行:
Installing shared extensions: /usr/local/php/lib/php/extensions/no-debug-zts-20131226/
2、编辑php.ini,整合php和xcache:
首先将xcache提供的样例配置导入php.ini
# mkdir /etc/php.d
# cp xcache.ini /etc/php.d
说明:xcache.ini文件在xcache的源码目录中。
接下来编辑/etc/php.d/xcache.ini,找到zend_extension开头的行,修改为如下行:
zend_extension = /usr/local/php/lib/php/extensions/no-debug-zts-20100525/xcache.so
注意:如果php.ini文件中有多条zend_extension指令行,要确保此新增的行排在第一位。
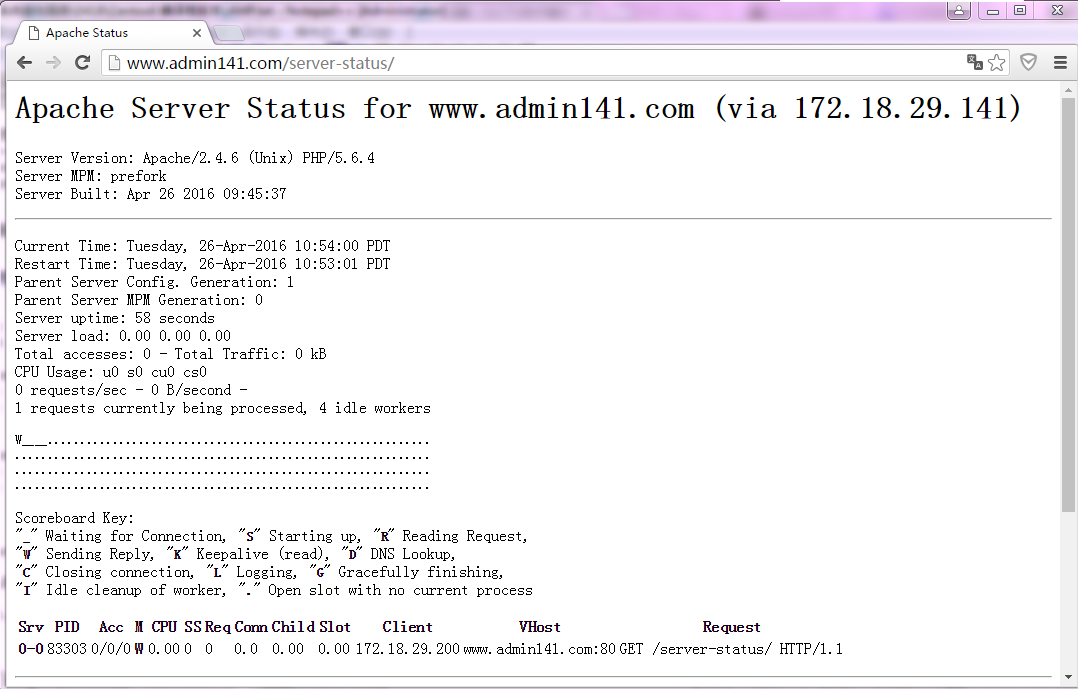
五、启用服务器状态
mod_status模块可以让管理员查看服务器的执行状态,它通过一个HTML页面展示了当前服务器的统计数据。这些数据通常包括但不限于:
(1) 处于工作状态的worker进程数;
(2) 空闲状态的worker进程数;
(3) 每个worker的状态,包括此worker已经响应的请求数,及由此worker发送的内容的字节数;
(4) 当前服务器总共发送的字节数;
(5) 服务器自上次启动或重启以来至当前的时长;
(6) 平均每秒钟响应的请求数、平均每秒钟发送的字节数、平均每个请求所请求内容的字节数;
启用状态页面的方法很简单,只需要在主配置文件中添加如下内容即可:
<Location /server-status>
SetHandler server-status
Require all granted
</Location>
需要提醒的是,这里的状态信息不应该被所有人随意访问,因此,应该限制仅允许某些特定地址的客户端查看。比如使用Require ip 172.16.0.0/16来限制仅允许指定网段的主机查看此页面。
六、ab测试示例:未启用xcache和启用xcache后,对phpMyAdmin的主而面进行请求测试的结果如下所示:
本文出自 “深海鱼” 博客,谢绝转载!
要求:(1) 三者分离于两台或三台主机;
(2) 一个虚拟主机用于提供phpMyAdmin;另一个虚拟主机用于提供wordpress;
(3) xcache
(4) 尝试mpm为非prefork机制;
现有服务器:172.18.29.141CentOS 6.6为httpd(包含php模块)服务器
172.18.29.142CentOS 6.6作为mysql服务器
一、编译安装httpd
一、编译安装apache
1、解决依赖关系
httpd-2.4.9需要较新版本的apr和apr-util,因此需要事先对其进行升级。升级方式有两种,一种是通过源代码编译安装,一种是直接升级rpm包。这里选择使用编译源代码的方式进行。
(1) 编译安装apr
# tar xf apr-1.5.0.tar.bz2
# cd apr-1.5.0
# ./configure --prefix=/usr/local/apr
# make && make install
(2) 编译安装apr-util
# tar xf apr-util-1.5.3.tar.bz2
# cd apr-util-1.5.3
# ./configure --prefix=/usr/local/apr-util --with-apr=/usr/local/apr
# make && make install
(3) httpd-2.4.9编译过程也要依赖于pcre-devel软件包,需要事先安装。
2.编译安装httpd2.4,下载httpd2.4源码安装包
# tar xf httpd-2.4.9.tar.bz2
# cd httpd-2.4.9
# ./configure --prefix=/usr/local/apache --sysconfdir=/etc/httpd24 --enable-so --enable-ssl --enable-cgi --enable-rewrite --with-zlib --with-pcre --with-apr=/usr/local/apr --with-apr-util=/usr/local/apr-util --enable-modules=most --enable-mpms-shared=all --with-mpm=event
# make && make install
3、修改httpd的主配置文件,设置其Pid文件的路径。
4、提供SysV服务脚本/etc/rc.d/init.d/httpd,内容如下:
注意:修改其中的httpd 变量,为适合自己的变量内容
apachectl=/usr/local/apache/bin/apachectl httpd=${HTTPD-/usr/local/apache/bin/httpd} pidfile=${PIDFILE-/var/run/httpd.pid} lockfile=${LOCKFILE-/var/lock/subsys/httpd}
#!/bin/bash
#
# httpd        Startup script for the Apache HTTP Server
#
# chkconfig: - 85 15
# description: Apache is a World Wide Web server.  It is used to serve \
#        HTML files and CGI.
# processname: httpd
# config: /etc/httpd/conf/httpd.conf
# config: /etc/sysconfig/httpd
# pidfile: /var/run/httpd.pid
# Source function library.
. /etc/rc.d/init.d/functions
if [ -f /etc/sysconfig/httpd ]; then
. /etc/sysconfig/httpd
fi
# Start httpd in the C locale by default.
HTTPD_LANG=${HTTPD_LANG-"C"}
# This will prevent initlog from swallowing up a pass-phrase prompt if
# mod_ssl needs a pass-phrase from the user.
INITLOG_ARGS=""
# Set HTTPD=/usr/sbin/httpd.worker in /etc/sysconfig/httpd to use a server
# with the thread-based "worker" MPM; BE WARNED that some modules may not
# work correctly with a thread-based MPM; notably PHP will refuse to start.
# Path to the apachectl script, server binary, and short-form for messages.
apachectl=/usr/local/apache/bin/apachectl
httpd=${HTTPD-/usr/local/apache/bin/httpd}
prog=httpd
pidfile=${PIDFILE-/var/run/httpd.pid}
lockfile=${LOCKFILE-/var/lock/subsys/httpd}
RETVAL=0
start() {
echo -n $"Starting $prog: "
LANG=$HTTPD_LANG daemon --pidfile=${pidfile} $httpd $OPTIONS
RETVAL=$?
echo
[ $RETVAL = 0 ] && touch ${lockfile}
return $RETVAL
}
stop() {
echo -n $"Stopping $prog: "
killproc -p ${pidfile} -d 10 $httpd
RETVAL=$?
echo
[ $RETVAL = 0 ] && rm -f ${lockfile} ${pidfile}
}
reload() {
echo -n $"Reloading $prog: "
if ! LANG=$HTTPD_LANG $httpd $OPTIONS -t >&/dev/null; then
RETVAL=$?
echo $"not reloading due to configuration syntax error"
failure $"not reloading $httpd due to configuration syntax error"
else
killproc -p ${pidfile} $httpd -HUP
RETVAL=$?
fi
echo
}
# See how we were called.
case "$1" in
start)
start
;;
stop)
stop
;;
status)
status -p ${pidfile} $httpd
RETVAL=$?
;;
restart)
stop
start
;;
condrestart)
if [ -f ${pidfile} ] ; then
stop
start
fi
;;
reload)
reload
;;
graceful|help|configtest|fullstatus)
$apachectl $@
RETVAL=$?
;;
*)
echo $"Usage: $prog {start|stop|restart|condrestart|reload|status|fullstatus|graceful|help|configtest}"
exit 1
esac
exit $RETVAL而后为此脚本赋予执行权限:# chmod +x /etc/rc.d/init.d/httpd
加入服务列表:
# chkconfig --add httpd
接下来就可以启动服务进行测试了。
二、安装mariadb
1、准备数据存放的文件系统
新建一个逻辑卷,并将其挂载至特定目录即可。这里不再给出过程。
这里假设其逻辑卷的挂载目录为/mydata,而后需要创建/mydata/data目录做为mysql数据的存放目录。
2、新建用户以安全方式运行进程:
# groupadd -r mysql
# useradd -g mysql -r -s /sbin/nologin -M -d /mydata/data mysql
# chown -R mysql:mysql /mydata/data
3、安装并初始化mariadb
首先下载mariadb二进制安装包至本地。
# tar xf mysql-5.5.33-linux2.6-i686.tar.gz -C /usr/local
# cd /usr/local/
# ln -sv mysql-5.5.33-linux2.6-i686 mysql
# cd mysql
# chown -R mysql:mysql .
# scripts/mysql_install_db --user=mysql --datadir=/mydata/data
# chown -R root .
4、为mysql提供主配置文件:
# cd /usr/local/mysql
# cp support-files/my-large.cnf /etc/my.cnf
并修改此文件中thread_concurrency的值为你的CPU个数乘以2,比如这里使用如下行:
thread_concurrency = 2
另外还需要添加如下行指定mysql数据文件的存放位置:
datadir = /mydata/data
5、为mysql提供sysv服务脚本:
# cd /usr/local/mysql
# cp support-files/mysql.server /etc/rc.d/init.d/mariadbd
# chmod +x /etc/rc.d/init.d/mariadbd
添加至服务列表:
# chkconfig --add mariadbd
# chkconfig mariadbd on
而后就可以启动服务测试使用了。
为了使用mysql的安装符合系统使用规范,并将其开发组件导出给系统使用,这里还需要进行如下步骤:
6、输出mysql的man手册至man命令的查找路径:
编辑/etc/man.config,添加如下行即可:
MANPATH /usr/local/mysql/man
7、输出mysql的头文件至系统头文件路径/usr/include:
这可以通过简单的创建链接实现:
# ln -sv /usr/local/mysql/include /usr/include/mariadb
8、输出mysql的库文件给系统库查找路径:
# echo '/usr/local/mysql/lib' > /etc/ld.so.conf.d/mariadb.conf
而后让系统重新载入系统库:
# ldconfig
9、修改PATH环境变量,让系统可以直接使用mysql的相关命令。具体实现过程这里不再给出。
# PATH=/usr/local/mysql/bin:$PATH
三、编译安装php5
1、解决依赖关系:
请配置好yum源(系统安装源及epel源)后执行如下命令:
# yum -y groupinstall "Desktop Platform Development"
# yum -y install bzip2-devel libmcrypt-devel libxml2-devel
2、编译安装php-5.4.26
首先下载源码包至本地目录,下载位置ftp://172.16.0.1/pub/Sources/new_lamp。
# tar xf php-5.4.26.tar.bz2
# cd php-5.4.26
# ./configure --prefix=/usr/local/php --with-mysql=/usr/local/mysql --with-openssl --with-mysqli=/usr/local/mysql/bin/mysql_config --enable-mbstring --with-freetype-dir --with-jpeg-dir --with-png-dir --with-zlib --with-libxml-dir=/usr --enable-xml --enable-sockets --with-apxs2=/usr/local/apache/bin/apxs --with-mcrypt --with-config-file-path=/etc --with-config-file-scan-dir=/etc/php.d --with-bz2 --enable-maintainer-zts
说明:
1、这里为了支持apache的worker或event这两个MPM,编译时使用了--enable-maintainer-zts选项。
2、如果使用PHP5.3以上版本,为了链接MySQL数据库,可以指定mysqlnd,这样在本机就不需要先安装MySQL或MySQL开发包了。mysqlnd从php 5.3开始可用,可以编译时绑定到它(而不用和具体的MySQL客户端库绑定形成依赖),但从PHP 5.4开始它就是默认设置了。
# ./configure --with-mysql=mysqlnd --with-pdo-mysql=mysqlnd --with-mysqli=mysqlnd
这里用:
# ./configure --prefix=/usr/local/php --enable-maintainer-zts --with-mysql=mysqlnd --with-openssl --with-mysqli=mysqlnd --enable-mbstring --with-freetype-dir --with-jpeg-dir --with-png-dir --with-zlib --with-libxml-dir=/usr --enable-xml --enable-sockets --with-apxs2=/usr/local/apache24/bin/apxs --with-mcrypt --with-config-file-path=/etc --with-config-file-scan-dir=/etc/php.d --with-bz2
# make
# make test
# make intall
为php提供配置文件:
# cp php.ini-production /etc/php.ini
3、 编辑apache配置文件httpd.conf,以apache支持php
# vim /etc/httpd/httpd.conf
1、添加如下二行
AddType application/x-httpd-php .php
AddType application/x-httpd-php-source .phps
2、定位至DirectoryIndex index.html
修改为:
DirectoryIndex index.php index.html
而后重新启动httpd,或让其重新载入配置文件即可测试php是否已经可以正常使用。
测试页面index.php示例如下:
<?php
$link = mysql_connect('127.0.0.1','root','mageedu');
if ($link)
echo "Success...";
else
echo "Failure...";
mysql_close();
?>
四、安装xcache,为php加速:
1、安装
# tar xf xcache-3.0.3.tar.gz
# cd xcache-3.0.3
# /usr/local/php/bin/phpize
# ./configure --enable-xcache --with-php-config=/usr/local/php/bin/php-config
# make && make install
安装结束时,会出现类似如下行:
Installing shared extensions: /usr/local/php/lib/php/extensions/no-debug-zts-20131226/
2、编辑php.ini,整合php和xcache:
首先将xcache提供的样例配置导入php.ini
# mkdir /etc/php.d
# cp xcache.ini /etc/php.d
说明:xcache.ini文件在xcache的源码目录中。
接下来编辑/etc/php.d/xcache.ini,找到zend_extension开头的行,修改为如下行:
zend_extension = /usr/local/php/lib/php/extensions/no-debug-zts-20100525/xcache.so
注意:如果php.ini文件中有多条zend_extension指令行,要确保此新增的行排在第一位。
五、启用服务器状态
mod_status模块可以让管理员查看服务器的执行状态,它通过一个HTML页面展示了当前服务器的统计数据。这些数据通常包括但不限于:
(1) 处于工作状态的worker进程数;
(2) 空闲状态的worker进程数;
(3) 每个worker的状态,包括此worker已经响应的请求数,及由此worker发送的内容的字节数;
(4) 当前服务器总共发送的字节数;
(5) 服务器自上次启动或重启以来至当前的时长;
(6) 平均每秒钟响应的请求数、平均每秒钟发送的字节数、平均每个请求所请求内容的字节数;
启用状态页面的方法很简单,只需要在主配置文件中添加如下内容即可:
<Location /server-status>
SetHandler server-status
Require all granted
</Location>
需要提醒的是,这里的状态信息不应该被所有人随意访问,因此,应该限制仅允许某些特定地址的客户端查看。比如使用Require ip 172.16.0.0/16来限制仅允许指定网段的主机查看此页面。
六、ab测试示例:未启用xcache和启用xcache后,对phpMyAdmin的主而面进行请求测试的结果如下所示:
# ab -n 1000 -c 100 http://172.18.29.141/wordpress/index.php This is ApacheBench, Version 2.3 <$Revision: 655654 $>
Copyright 1996 Adam Twiss, Zeus Technology Ltd, http://www.zeustech.net/ Licensed to The Apache Software Foundation, http://www.apache.org/ Benchmarking 172.18.29.141 (be patient)
Completed 100 requests
Completed 200 requests
Completed 300 requests
Completed 400 requests
Completed 500 requests
Completed 600 requests
Completed 700 requests
Completed 800 requests
Completed 900 requests
Completed 1000 requests
Finished 1000 requests
Server Software:        Apache/2.4.6
Server Hostname:        172.18.29.141
Server Port:            80
Document Path:          /wordpress/index.php
Document Length:        217 bytes
Concurrency Level:      100
Time taken for tests:   0.146 seconds
Complete requests:      1000
Failed requests:        0
Write errors:           0
Non-2xx responses:      1003
Total transferred:      405212 bytes
HTML transferred:       217651 bytes
Requests per second:    6864.97 [#/sec] (mean)
Time per request:       14.567 [ms] (mean)
Time per request:       0.146 [ms] (mean, across all concurrent requests)
Transfer rate:          2716.57 [Kbytes/sec] received
Connection Times (ms)
min  mean[+/-sd] median   max
Connect:        0    1   0.7      1       3
Processing:     3   13   2.6     13      20
Waiting:        0   13   2.6     13      20
Total:          4   14   2.1     14      20
Percentage of the requests served within a certain time (ms)
50%     14
66%     15
75%     15
80%     15
90%     15
95%     18
98%     18
99%     18
100%     20 (longest request)
# ab -n 1000 -c 100 http://172.18.29.141/wordpress/index.php This is ApacheBench, Version 2.3 <$Revision: 655654 $>
Copyright 1996 Adam Twiss, Zeus Technology Ltd, http://www.zeustech.net/ Licensed to The Apache Software Foundation, http://www.apache.org/
Benchmarking 172.18.29.141 (be patient)
Completed 100 requests
Completed 200 requests
Completed 300 requests
Completed 400 requests
Completed 500 requests
Completed 600 requests
Completed 700 requests
Completed 800 requests
Completed 900 requests
Completed 1000 requests
Finished 1000 requests

Server Software:        Apache/2.4.6
Server Hostname:        172.18.29.141
Server Port:            80

Document Path:          /wordpress/index.php
Document Length:        217 bytes

Concurrency Level:      100
Time taken for tests:   0.153 seconds
Complete requests:      1000
Failed requests:        0
Write errors:           0
Non-2xx responses:      1002
Total transferred:      404808 bytes
HTML transferred:       217434 bytes
Requests per second:    6536.33 [#/sec] (mean)
Time per request:       15.299 [ms] (mean)
Time per request:       0.153 [ms] (mean, across all concurrent requests)
Transfer rate:          2583.94 [Kbytes/sec] received

Connection Times (ms)
min  mean[+/-sd] median   max
Connect:        0    1   0.8      1       4
Processing:     4   14   2.2     14      19
Waiting:        1   13   2.2     14      18
Total:          4   15   2.1     15      20

Percentage of the requests served within a certain time (ms)
50%     15
66%     15
75%     16
80%     16
90%     16
95%     18
98%     19
99%     20
100%     20 (longest request)
发现提升并没有很大。
本文出自 “深海鱼” 博客,谢绝转载!

相关文章推荐
- Tyvj_P1018
- LBP特征
- Linux下tmpfs与ramfs的区别
- Android学习路线总结,绝对干货
- The MySQL server is running with the --skip-grant-tables option so it cannot execute this statement
- C++实验4-穷举法解决百钱买百鸡
- 编译安装nginx的参数
- oracle中的条件是rownum=1就取第一个数,那我现在要第2个,要怎么写或者用其他条件拿到第2个,且只要第2个
- 第四次作业
- 关于iOS的App上线,纯自用,mark
- 分析java程序的运行过程
- 【翻译】Xibo官方文档3-Windows Client Installation
- 【创业记】前言
- 【翻译】Xibo官方文档2-CMS Installation
- 【翻译】XIBO官方文档1-Introduction
- 【极光推送】给指定用户发送消息
- 【极光推送】jpush服务端开发详尽过程
- 【转载】极光推送 使用实例 (一)服务端
- 【mysql】函数内字符串连接&char to int转换
- 【mysql】函数样例