Android中常用的5大布局[转]
2016-04-26 18:10
447 查看
Android中常用的5大布局方式有以下几种:线性布局(LinearLayout):按照垂直或者水平方向布局的组件。
帧布局(FrameLayout):组件从屏幕左上方布局组件。
表格布局(TableLayout):按照行列方式布局组件。
相对布局(RelativeLayout):相对其它组件的布局方式。
绝对布局(AbsoluteLayout):按照绝对坐标来布局组件。
1. [/b]线性布局[/b]线性布局是Android开发中最常见的一种布局方式,它是按照垂直或者水平方向来布局,通过“android:orientation”属性可以设置线性布局的方向。属性值有垂直(vertical)和水平(horizontal)两种。常用的属性:android:orientation:可以设置布局的方向
android:gravity:用来控制组件的对齐方式
layout_weight:控制各个组件在布局中的相对大小
第一个实例①效果图:
②核心代码如下:main.xml
②核心代码:mian.xml
② 核心代码:main.xml
android:shrinkColumns:收缩指定的列以适合屏幕,不会挤出屏幕
android:stretchColumns:尽量把指定的列填充空白部分
android:layout_column:控件放在指定的列
android:layout_span:该控件所跨越的列数
[/b]简单的列子:①效果图:

② 核心代码: main.xml
② 核心代码:main.xml
帧布局(FrameLayout):组件从屏幕左上方布局组件。
表格布局(TableLayout):按照行列方式布局组件。
相对布局(RelativeLayout):相对其它组件的布局方式。
绝对布局(AbsoluteLayout):按照绝对坐标来布局组件。
1. [/b]线性布局[/b]线性布局是Android开发中最常见的一种布局方式,它是按照垂直或者水平方向来布局,通过“android:orientation”属性可以设置线性布局的方向。属性值有垂直(vertical)和水平(horizontal)两种。常用的属性:android:orientation:可以设置布局的方向
android:gravity:用来控制组件的对齐方式
layout_weight:控制各个组件在布局中的相对大小
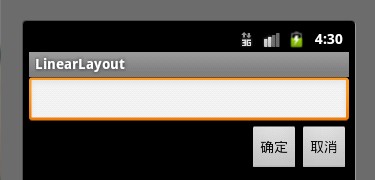
第一个实例①效果图:
②核心代码如下:main.xml
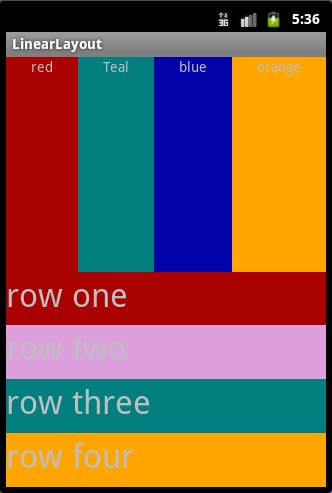
<?xml version="1.0" encoding="utf-8"?>
<LinearLayout xmlns:android="http://schemas.android.com/apk/res/android"
android:orientation="vertical"
android:layout_width="fill_parent"
android:layout_height="fill_parent"
>
<LinearLayout
android:layout_width="fill_parent"
android:layout_height="wrap_content"
android:orientation="vertical"
>
<EditText
android:layout_width="fill_parent"
android:layout_height="wrap_content"
/>
</LinearLayout>
<LinearLayout
android:layout_width="fill_parent"
android:layout_height="wrap_content"
android:orientation="horizontal"
android:gravity="right"
>
<!-- android:gravity="right"表示Button组件向右对齐 -->
<Button
android:layout_height="wrap_content"
android:layout_width="wrap_content"
android:text="确定"
/>
<Button
android:layout_height="wrap_content"
android:layout_width="wrap_content"
android:text="取消"
/>
</LinearLayout>
</LinearLayout>
第二个实例①效果图:
②核心代码:mian.xml
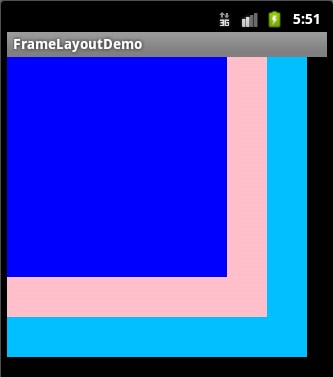
<?xml version="1.0" encoding="utf-8"?>
<LinearLayout xmlns:android="http://schemas.android.com/apk/res/android"
android:orientation="vertical" android:layout_width="fill_parent"
android:layout_height="fill_parent">

<LinearLayout
android:orientation="horizontal"
android:layout_width="fill_parent"
android:layout_height="fill_parent"
android:layout_weight="1">

<TextView
android:text="red"
android:gravity="center_horizontal"
android:background="#aa0000"
android:layout_width="wrap_content"
android:layout_height="fill_parent"
android:layout_weight="1"
/>
<!--android:gravity="center_horizontal"水平居中 -->
<!--layout_weight属性以控制各个控件在布局中的相对大小。layout_weight属性是一个非负整数值。
线性布局会根据该控件layout_weight值与其所处布局中所有控件layout_weight值之和的比值为该控件分配占用的区域。
例如,在水平布局的LinearLayout中有两个Button,这两个Button的layout_weight属性值都为1,
那么这两个按钮都会被拉伸到整个屏幕宽度的一半。如果layout_weight指为0,控件会按原大小显示,不会被拉伸;
对于其余layout_weight属性值大于0的控件,系统将会减去layout_weight属性值为0的控件的宽度或者高度,
再用剩余的宽度或高度按相应的比例来分配每一个控件显示的宽度或高度-->
<TextView
android:text="Teal"
android:gravity="center_horizontal"
android:background="#008080"
android:layout_width="wrap_content"
android:layout_height="fill_parent"
android:layout_weight="1"/>

<TextView
android:text="blue"
android:gravity="center_horizontal"
android:background="#0000aa"
android:layout_width="wrap_content"
android:layout_height="fill_parent"
android:layout_weight="1"
/>

<TextView
android:text="orange"
android:gravity="center_horizontal"
android:background="#FFA500"
android:layout_width="wrap_content"
android:layout_height="fill_parent"
android:layout_weight="1"
/>

</LinearLayout>
<LinearLayout
android:orientation="vertical"
android:layout_width="fill_parent"
android:layout_height="fill_parent"
android:layout_weight="1">

<TextView
android:text="row one"
android:textSize="15pt"
android:background="#aa0000"
android:layout_width="fill_parent"
android:layout_height="wrap_content"
android:layout_weight="1"
/>
<!--  -->
<TextView
android:text="row two"
android:textSize="15pt"
android:background="#DDA0DD"
android:layout_width="fill_parent"
android:layout_height="wrap_content"
android:layout_weight="1"
/>

<TextView
android:text="row three"
android:textSize="15pt"
android:background="#008080"
android:layout_width="fill_parent"
android:layout_height="wrap_content"
android:layout_weight="1"
/>
<TextView
android:text="row four"
android:textSize="15pt"
android:background="#FFA500"
android:layout_width="fill_parent"
android:layout_height="wrap_content"
android:layout_weight="1"
/>
</LinearLayout>
</LinearLayout>
2. 帧布局[/b]帧布局是从屏幕的左上角(0,0)坐标开始布局,多个组件层叠排列,第一个添加的组件放到最底层,最后添加到框架中的视图显示在最上面。上一层的会覆盖下一层的控件。 简单的例子①效果图:
② 核心代码:main.xml
<?xml version="1.0" encoding="utf-8"?>
<FrameLayout xmlns:android="http://schemas.android.com/apk/res/android"
android:layout_width="fill_parent"
android:layout_height="fill_parent"
>
<TextView
android:layout_width="300dp"
android:layout_height="300dp"
android:background="#00BFFF"
/>
<TextView
android:layout_width="260dp"
android:layout_height="260dp"
android:background="#FFC0CB"
/>
<TextView
android:layout_width="220dp"
android:layout_height="220dp"
android:background="#0000FF"
/>
</FrameLayout>
3.表格布局[/b]表格布局是一个ViewGroup以表格显示它的子视图(view)元素,即行和列标识一个视图的位置。表格布局常用的属性如下:android:collapseColumns:隐藏指定的列
android:shrinkColumns:收缩指定的列以适合屏幕,不会挤出屏幕
android:stretchColumns:尽量把指定的列填充空白部分
android:layout_column:控件放在指定的列
android:layout_span:该控件所跨越的列数
[/b]简单的列子:①效果图:
② 核心代码: main.xml
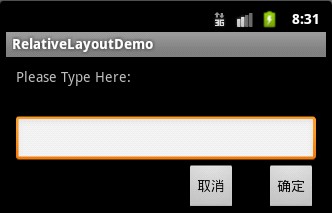
<?xml version="1.0" encoding="utf-8"?> <TableLayout xmlns:android="http://schemas.android.com/apk/res/android" android:layout_width="fill_parent" android:layout_height="fill_parent" > <TableRow> <Button android:text="Button1" /> <Button android:text="Button2" /> <Button android:text="Button3" /> </TableRow> <TableRow> <Button android:text="Button4" /> <Button android:layout_span="2" android:text="Button5" /> </TableRow> </TableLayout>4.相对布局[/b]相对布局是按照组件之间的相对位置来布局,比如在某个组件的左边,右边,上面和下面等。相对布局常用属性请参考我博客的:/article/4386189.html 简单的例子①效果图:
② 核心代码:main.xml
<?xml version="1.0" encoding="utf-8"?>
<RelativeLayout xmlns:android="http://schemas.android.com/apk/res/android"
android:layout_width="fill_parent"
android:layout_height="wrap_content"
android:padding="10px"
>
<TextView
android:id="@+id/tev1"
android:layout_width="wrap_content"
android:layout_height="wrap_content"
android:layout_marginBottom="30dp"
android:text="Please Type Here:"
/>
<EditText
android:id="@+id/tx1"
android:layout_width="match_parent"
android:layout_height="wrap_content"
android:layout_below="@id/tev1"
/>
<Button
android:id="@+id/btn1"
android:layout_height="wrap_content"
android:layout_width="wrap_content"
android:layout_below="@id/tx1"
android:layout_alignParentRight="true"
android:text="确定"
/>
<Button
android:id="@+id/btn2"
android:layout_height="wrap_content"
android:layout_width="wrap_content"
android:layout_below="@id/tx1"
android:layout_toLeftOf="@id/btn1"
android:layout_marginRight="30dp"
android:text="取消"
/>
</RelativeLayout>
5. 绝对布局[/b] 绝对布局通过指定子组件的确切X,Y坐标来确定组件的位置,在Android2.0 API文档中标明该类已经过期,可以使用FrameLayout或者RelativeLayout来代替。所以这里不再详细介绍。 本文出自 “IT的点点滴滴” 博客,请务必保留此出处/article/4132180.html

相关文章推荐
- Android设置颜色的几种方法
- android_ListView条目点击没有效果的解决方案
- Android 布局中调字体的行距和间距
- Android程序的目录结构(转)
- Android实现通用的ActivityGroup(效果类似Android微博客户端主界面),强烈建议不要再使用TabActivity
- android studio 2.0下,通过反射创建数据库失败的问题。
- Android中实现百度地图
- 集成融云Android SDK实现在群聊/讨论组中@人的功能(二)
- PagerSlidingTabStrip制作Android带标签的多界面滑动切换
- AndroidStudio常用设置
- Android使用Handler防止内存泄漏
- Ubuntu下解决Android Studio无法输入中文问题
- Android Service基础详讲
- 集成融云Android SDK实现在群聊/讨论组中@人的功能(一)
- Android_实用技术(3)—— Service简析(Ⅲ)
- Android应用内存泄漏笔记
- Android NDK 编译、使用动态库
- 加快Android编译速度的技巧总结
- Android Audio 分析
- android开发步步为营之74:生成facebook注册应用主页需要的Key Hashes