android自定义View之仿通讯录侧边栏滑动,实现A-Z字母检索
2016-04-24 20:07
579 查看
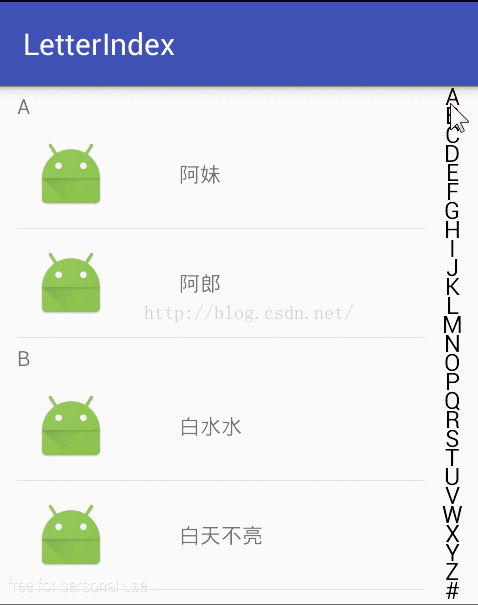
我们的手机通讯录一般都有这样的效果,如下图:
OK,这种效果大家都见得多了,基本上所有的android手机通讯录都有这样的效果。那我们今天就来看看这个效果该怎么实现。
1.页面功能分析
整体上来说,左边是一个ListView,右边是一个自定义View,但是左边的ListView和我们平常使用的ListView还有一点点不同,就是在ListView中我对所有的联系人进行了分组,那么这种效果的实现最常见的就是两种思路:
1.使用ExpandableListView来实现这种分组效果
2.使用普通ListView,在构造Adapter时实现SectionIndexer接口,然后在Adapter中做相应的处理
这两种方式都不难,都属于普通控件的使用,那么这里我们使用第二种方式来实现,第一种方式的实现方法大家可以自行研究,如果你还不熟悉ExpandableListView的使用,可以参考我的另外两篇博客:
1.使用ExpandableListView实现一个时光轴
2.android开发之ExpandableListView的使用,实现类似QQ好友列表
OK,这是我们左边ListView的实现思路,右边这个东东就是我们今天的主角,这里我通过自定义一个View来实现,View中的A、B......#这些字符我都通过canvas的drawText方法绘制上去。然后重写onTouchEvent方法来实现事件监听。
1.左边的ListView对数据进行分组显示
2.当左边ListView滑动的时候,右边滑动控件中的文字颜色能够跟随左边ListView的滑动自动变化
3.当手指在右边的滑动控件上滑动时,手指滑动到的地方的文字颜色应当发生变化,同时在整个页面的正中央有一个TextView显示手指目前按下的文字
4.当手指按下右边的滑动控件时,右边的滑动控件背景变为灰色,手指松开后,右边的滑动控件又变为透明色
首先我需要在布局文件中添加一个ListView,这个很简单,和普通的ListView一模一样,我就不贴代码了,另外,针对ListView中的数据集,我需要自建一个实体类,该实体类如下:
/**
* Created by wangsong on 2016/4/24.
*/
public class User {
private int img;
private String username;
private String pinyin;
private String firstLetter;
public User() {
}
public String getFirstLetter() {
return firstLetter;
}
public void setFirstLetter(String firstLetter) {
this.firstLetter = firstLetter;
}
public int getImg() {
return img;
}
public void setImg(int img) {
this.img = img;
}
public String getPinyin() {
return pinyin;
}
public void setPinyin(String pinyin) {
this.pinyin = pinyin;
}
public String getUsername() {
return username;
}
public void setUsername(String username) {
this.username = username;
}
public User(String firstLetter, int img, String pinyin, String username) {
this.firstLetter = firstLetter;
this.img = img;
this.pinyin = pinyin;
this.username = username;
}
}
username用来存储用户名,img表示用户图像的资源id(这里我没有准备相应的图片,大家有兴趣可以自行添加),pinyin表示用户姓名的拼音,firstLetter表示用户姓名拼音的首字母,OK ,就这么简单的几个属性。至于数据源,我在strings.xml文件中添加了许多数据,这里就不贴出来了,大家可以直接在文末下载源码看。知道了数据源,知道了实体类,我们来看看在MainActivity中怎么样来初始化数据: private void initData() {
list = new ArrayList<>();
String[] allUserNames = getResources().getStringArray(R.array.arrUsernames);
for (String allUserName : allUserNames) {
User user = new User();
user.setUsername(allUserName);
String convert = ChineseToPinyinHelper.getInstance().getPinyin(allUserName).toUpperCase();
user.setPinyin(convert);
String substring = convert.substring(0, 1);
if (substring.matches("[A-Z]")) {
user.setFirstLetter(substring);
}else{
user.setFirstLetter("#");
}
list.add(user);
}
Collections.sort(list, new Comparator<User>() {
@Override
public int compare(User lhs, User rhs) {
if (lhs.getFirstLetter().contains("#")) {
return 1;
} else if (rhs.getFirstLetter().contains("#")) {
return -1;
}else{
return lhs.getFirstLetter().compareTo(rhs.getFirstLetter());
}
}
});
}
首先创建一个List集合用来存放所有的数据,然后从strings.xml文件中读取出来所有的数据,遍历数据然后存储到List集合中,在遍历的过程中,我通过ChineseToPinyinHelper这个工具类来将中文转为拼音,然后截取拼音的第一个字母,如果该字母是A~Z,那么直接设置给user对象的firstLetter属性,否则user对象的firstLetter属性为一个#,这是由于我的数据源中有一些不是以汉字开头的姓名,而是以其他字符开头的姓名,那么我将这些统一归为#这个分组。OK,数据源构造好之后,我还需要对List集合进行一个简单的排序,那么这个排序是Java中的操作,我这里就不再赘述。
构造完数据源之后,接着就该是构造ListView的Adapter了,我们来看看这个怎么做,先来看看源码:
/**
* Created by wangsong on 2016/4/24.
*/
public class MyAdapter extends BaseAdapter implements SectionIndexer {
private List<User> list;
private Context context;
private LayoutInflater inflater;
public MyAdapter(Context context, List<User> list) {
this.context = context;
this.list = list;
inflater = LayoutInflater.from(context);
}
@Override
public int getCount() {
return list.size();
}
@Override
public Object getItem(int position) {
return list.get(position);
}
@Override
public long getItemId(int position) {
return position;
}
@Override
public View getView(int position, View convertView, ViewGroup parent) {
ViewHolder holder;
if (convertView == null) {
convertView = inflater.inflate(R.layout.listview_item, null);
holder = new ViewHolder();
holder.showLetter = (TextView) convertView.findViewById(R.id.show_letter);
holder.username = (TextView) convertView.findViewById(R.id.username);
convertView.setTag(holder);
} else {
holder = (ViewHolder) convertView.getTag();
}
User user = list.get(position);
holder.username.setText(user.getUsername());
//获得当前position是属于哪个分组
int sectionForPosition = getSectionForPosition(position);
//获得该分组第一项的position
int positionForSection = getPositionForSection(sectionForPosition);
//查看当前position是不是当前item所在分组的第一个item
//如果是,则显示showLetter,否则隐藏
if (position == positionForSection) {
holder.showLetter.setVisibility(View.VISIBLE);
holder.showLetter.setText(user.getFirstLetter());
} else {
holder.showLetter.setVisibility(View.GONE);
}
return convertView;
}
@Override
public Object[] getSections() {
return new Object[0];
}
//传入一个分组值[A....Z],获得该分组的第一项的position
@Override
public int getPositionForSection(int sectionIndex) {
for (int i = 0; i < list.size(); i++) {
if (list.get(i).getFirstLetter().charAt(0) == sectionIndex) {
return i;
}
}
return -1;
}
//传入一个position,获得该position所在的分组
@Override
public int getSectionForPosition(int position) {
return list.get(position).getFirstLetter().charAt(0);
}
class ViewHolder {
TextView username, showLetter;
}
}
这个Adapter大部分还是和我们之前的Adapter一样的,只不过这里实现了SectionIndexer接口,实现了这个接口,我们就要实现该接口中的三个方法,分别是getSections(),getPositionForSection(),getSectionForPosition()这三个方法,我们这里用到的主要是后面这两个方法,那我来详细说一下:1.getPositionForSection(int sectionIndex)
这个方法接收一个int类型的参数,该参数实际上就是指我们的分组,我们在这里传入分组的值【A.....Z】,然后我们在方法中通过自己的计算,返回该分组中第一个item的position。
2.getSectionForPosition(int position)
这个方法接收一个int类型的参数,该参数实际上就是我们的ListView即将要显示的item的position,我们通过传入这个position,可以获得该position的item所属的分组,然后再将这个分组的值返回。
说了这么多,大家可能有疑问了,我为什么要实现这个接口呢?大家来看看我的item的布局文件:
<?xml version="1.0" encoding="utf-8"?>
<LinearLayout xmlns:android="http://schemas.android.com/apk/res/android"
android:layout_width="match_parent"
android:layout_height="match_parent"
android:orientation="vertical">
<TextView
android:id="@+id/show_letter"
android:layout_width="match_parent"
android:layout_height="wrap_content"
android:layout_marginTop="3dp"/>
<RelativeLayout
android:layout_width="match_parent"
android:layout_height="wrap_content">
<ImageView
android:id="@+id/userface"
android:layout_width="72dp"
android:layout_height="72dp"
android:padding="12dp"
android:src="@mipmap/ic_launcher"/>
<TextView
android:id="@+id/username"
android:layout_width="wrap_content"
android:layout_height="match_parent"
android:layout_centerVertical="true"
android:layout_marginLeft="36dp"
android:layout_toRightOf="@id/userface"
android:gravity="center"
android:text="username"/>
</RelativeLayout>
</LinearLayout>
在我的item的布局文件中,我所有的item实际上都是一样的,都有一个显示分组数据的TextView,因此我需要在Adapter的getView方法中根据所显示的item的不同来确定是否将显示分组的TextView隐藏掉。所以我们再回过头来看看我的ListView中的getView方法,getView前面的写法没啥好说的,和普通ListView都一样,我们主要来看看这几行://获得当前position是属于哪个分组
int sectionForPosition = getSectionForPosition(position);
//获得该分组第一项的position
int positionForSection = getPositionForSection(sectionForPosition);
//查看当前position是不是当前item所在分组的第一个item
//如果是,则显示showLetter,否则隐藏
if (position == positionForSection) {
holder.showLetter.setVisibility(View.VISIBLE);
holder.showLetter.setText(user.getFirstLetter());
} else {
holder.showLetter.setVisibility(View.GONE);
}
我首先判断当前显示的item是属于哪个分组的,然后获得这个分组中第一个item的位置,最后判断我当前显示的item的position到底是不是它所在分组的第一个item,如果是的话,那么就将showLetter这个TextView显示出来,同时显示出相应的分组信息,否则将这个showLetter隐藏。就是这么简单。做完这些之后,我们在Activity中再来简单的添加两行代码:ListView listView = (ListView) findViewById(R.id.lv);
MyAdapter adapter = new MyAdapter(this, list);
listView.setAdapter(adapter);
这个时候左边的分组ListView就可以显示出来了。就是这么简单。
首先这个自定义控件继承自View,继承自View,需要实现它里边的构造方法,关于这三个构造方法的解释大家可以查看我的另一篇博客android自定义View之钟表诞生记,这里对于构造方法我不再赘述。在这个自定义View中,我需要首先声明5个变量,如下:
//当前手指滑动到的位置
private int choosedPosition = -1;
//画文字的画笔
private Paint paint;
//右边的所有文字
private String[] letters = new String[]{"A", "B", "C", "D", "E", "F", "G", "H", "I", "J", "K", "L",
"M", "N", "O", "P", "Q", "R", "S", "T", "U", "V", "W", "X", "Y", "Z", "#"};
//页面正中央的TextView,用来显示手指当前滑动到的位置的文本
private TextView textViewDialog;
//接口变量,该接口主要用来实现当手指在右边的滑动控件上滑动时ListView能够跟着滚动
private UpdateListView updateListView;
五个变量的作用我在注释中已经说的很详细了。OK,变量声明完成之后,我还要初始化一些变量,变量的初始化当然放在构造方法中来进行了:public LetterIndexView(Context context, AttributeSet attrs, int defStyleAttr) {
super(context, attrs, defStyleAttr);
paint = new Paint();
paint.setAntiAlias(true);
paint.setTextSize(24);
}
OK,这里要初始化的实际上只有paint一个变量。准备工作做完之后,接下来就是onDraw了,代码如下:
@Override
protected void onDraw(Canvas canvas) {
int perTextHeight = getHeight() / letters.length;
for (int i = 0; i < letters.length; i++) {
if (i == choosedPosition) {
paint.setColor(Color.RED);
} else {
paint.setColor(Color.BLACK);
}
canvas.drawText(letters[i], (getWidth() - paint.measureText(letters[i])) / 2, (i + 1) * perTextHeight, paint);
}
}
在绘制的时候,我需要首先获得每一个文字所占空间的大小,每一个文本的可用高度应该是总高度除以文字的总数,然后,通过一个for循环将26个字母全都画出来。在画的时候,如果这个文本所处的位置刚好就是我手指按下的位置,那么该文本的颜色为红色,否则为黑色,最后的drawText不需要我再说了吧。绘制完成之后,就是重写onTouchEvent了,如下:
@Override
public boolean onTouchEvent(MotionEvent event) {
int perTextHeight = getHeight() / letters.length;
float y = event.getY();
int currentPosition = (int) (y / perTextHeight);
String letter = letters[currentPosition];
switch (event.getAction()) {
case MotionEvent.ACTION_UP:
setBackgroundColor(Color.TRANSPARENT);
if (textViewDialog != null) {
textViewDialog.setVisibility(View.GONE);
}
break;
default:
setBackgroundColor(Color.parseColor("#cccccc"));
if (currentPosition > -1 && currentPosition < letters.length) {
if (textViewDialog != null) {
textViewDialog.setVisibility(View.VISIBLE);
textViewDialog.setText(letter);
}
if (updateListView != null) {
updateListView.updateListView(letter);
}
choosedPosition = currentPosition;
}
break;
}
invalidate();
return true;
}
对于右边的滑动控件的事件操作我整体上可以分为两部分,手指抬起分为一类,其他所有的操作归为一类。那么当控件感知到我手指的操作事件之后,它首先需要知道我手指当前所点击的item是什么,那么这个值要怎么获取呢?我可以先获得到手指所在位置的Y坐标,然后除以每一个文字的高度,就知道当前手指点击位置的position,然后从letters数组中读取出相应的值即可。知道了当前点击了哪个字母之后,剩下的工作就很简单了,修改控件的背景颜色,然后将相应的字母显示在TextView上即可,然后把当前的position传给choosedPosition,最后调用invalidate()方法重绘控件。重绘控件时由于choosedPosition的值已经发生了变化,所以相应的文本颜色也会改变。另外,我希望手指在右边控件滑动时,ListView也能跟着滚动,这个毫无疑问使用接口回调,具体大家看代码,简单的东西不赘述。最后,我希望ListView滚动时,右边控件中文本的颜色应该实时更新,那么这个也很简单,在自定义View中公开一个方法即可,如下: public void updateLetterIndexView(int currentChar) {
for (int i = 0; i < letters.length; i++) {
if (currentChar == letters[i].charAt(0)) {
choosedPosition = i;
invalidate();
break;
}
}
}
最后再来看一眼Activity中现在的代码:TextView textView = (TextView) findViewById(R.id.show_letter_in_center);
final LetterIndexView letterIndexView = (LetterIndexView) findViewById(R.id.letter_index_view);
letterIndexView.setTextViewDialog(textView);
letterIndexView.setUpdateListView(new LetterIndexView.UpdateListView() {
@Override
public void updateListView(String currentChar) {
int positionForSection = adapter.getPositionForSection(currentChar.charAt(0));
listView.setSelection(positionForSection);
}
});
listView.setOnScrollListener(new AbsListView.OnScrollListener() {
@Override
public void onScrollStateChanged(AbsListView view, int scrollState) {
}
@Override
public void onScroll(AbsListView view, int firstVisibleItem, int visibleItemCount, int totalItemCount) {
int sectionForPosition = adapter.getSectionForPosition(firstVisibleItem);
letterIndexView.updateLetterIndexView(sectionForPosition);
}
});
就是这么简单。
源码下载http://download.csdn.net/detail/u012702547/9501208
以上。
OK,这种效果大家都见得多了,基本上所有的android手机通讯录都有这样的效果。那我们今天就来看看这个效果该怎么实现。
一.概述
1.页面功能分析
整体上来说,左边是一个ListView,右边是一个自定义View,但是左边的ListView和我们平常使用的ListView还有一点点不同,就是在ListView中我对所有的联系人进行了分组,那么这种效果的实现最常见的就是两种思路:1.使用ExpandableListView来实现这种分组效果
2.使用普通ListView,在构造Adapter时实现SectionIndexer接口,然后在Adapter中做相应的处理
这两种方式都不难,都属于普通控件的使用,那么这里我们使用第二种方式来实现,第一种方式的实现方法大家可以自行研究,如果你还不熟悉ExpandableListView的使用,可以参考我的另外两篇博客:
1.使用ExpandableListView实现一个时光轴
2.android开发之ExpandableListView的使用,实现类似QQ好友列表
OK,这是我们左边ListView的实现思路,右边这个东东就是我们今天的主角,这里我通过自定义一个View来实现,View中的A、B......#这些字符我都通过canvas的drawText方法绘制上去。然后重写onTouchEvent方法来实现事件监听。
2.要实现的效果
要实现的效果如上图所示,但是大家看图片有些地方可能还不太清楚,所以这里我再强调一下:1.左边的ListView对数据进行分组显示
2.当左边ListView滑动的时候,右边滑动控件中的文字颜色能够跟随左边ListView的滑动自动变化
3.当手指在右边的滑动控件上滑动时,手指滑动到的地方的文字颜色应当发生变化,同时在整个页面的正中央有一个TextView显示手指目前按下的文字
4.当手指按下右边的滑动控件时,右边的滑动控件背景变为灰色,手指松开后,右边的滑动控件又变为透明色
二.左边ListView分组效果的实现
无论多大的工程,我们都要将之分解为一个个细小的功能块分步来实现,那么这里我们就先来看看左边的ListView的分组的实现,这个效果实现之后,我们再来看看右边的滑动控件该怎么实现。首先我需要在布局文件中添加一个ListView,这个很简单,和普通的ListView一模一样,我就不贴代码了,另外,针对ListView中的数据集,我需要自建一个实体类,该实体类如下:
/**
* Created by wangsong on 2016/4/24.
*/
public class User {
private int img;
private String username;
private String pinyin;
private String firstLetter;
public User() {
}
public String getFirstLetter() {
return firstLetter;
}
public void setFirstLetter(String firstLetter) {
this.firstLetter = firstLetter;
}
public int getImg() {
return img;
}
public void setImg(int img) {
this.img = img;
}
public String getPinyin() {
return pinyin;
}
public void setPinyin(String pinyin) {
this.pinyin = pinyin;
}
public String getUsername() {
return username;
}
public void setUsername(String username) {
this.username = username;
}
public User(String firstLetter, int img, String pinyin, String username) {
this.firstLetter = firstLetter;
this.img = img;
this.pinyin = pinyin;
this.username = username;
}
}
username用来存储用户名,img表示用户图像的资源id(这里我没有准备相应的图片,大家有兴趣可以自行添加),pinyin表示用户姓名的拼音,firstLetter表示用户姓名拼音的首字母,OK ,就这么简单的几个属性。至于数据源,我在strings.xml文件中添加了许多数据,这里就不贴出来了,大家可以直接在文末下载源码看。知道了数据源,知道了实体类,我们来看看在MainActivity中怎么样来初始化数据: private void initData() {
list = new ArrayList<>();
String[] allUserNames = getResources().getStringArray(R.array.arrUsernames);
for (String allUserName : allUserNames) {
User user = new User();
user.setUsername(allUserName);
String convert = ChineseToPinyinHelper.getInstance().getPinyin(allUserName).toUpperCase();
user.setPinyin(convert);
String substring = convert.substring(0, 1);
if (substring.matches("[A-Z]")) {
user.setFirstLetter(substring);
}else{
user.setFirstLetter("#");
}
list.add(user);
}
Collections.sort(list, new Comparator<User>() {
@Override
public int compare(User lhs, User rhs) {
if (lhs.getFirstLetter().contains("#")) {
return 1;
} else if (rhs.getFirstLetter().contains("#")) {
return -1;
}else{
return lhs.getFirstLetter().compareTo(rhs.getFirstLetter());
}
}
});
}
首先创建一个List集合用来存放所有的数据,然后从strings.xml文件中读取出来所有的数据,遍历数据然后存储到List集合中,在遍历的过程中,我通过ChineseToPinyinHelper这个工具类来将中文转为拼音,然后截取拼音的第一个字母,如果该字母是A~Z,那么直接设置给user对象的firstLetter属性,否则user对象的firstLetter属性为一个#,这是由于我的数据源中有一些不是以汉字开头的姓名,而是以其他字符开头的姓名,那么我将这些统一归为#这个分组。OK,数据源构造好之后,我还需要对List集合进行一个简单的排序,那么这个排序是Java中的操作,我这里就不再赘述。
构造完数据源之后,接着就该是构造ListView的Adapter了,我们来看看这个怎么做,先来看看源码:
/**
* Created by wangsong on 2016/4/24.
*/
public class MyAdapter extends BaseAdapter implements SectionIndexer {
private List<User> list;
private Context context;
private LayoutInflater inflater;
public MyAdapter(Context context, List<User> list) {
this.context = context;
this.list = list;
inflater = LayoutInflater.from(context);
}
@Override
public int getCount() {
return list.size();
}
@Override
public Object getItem(int position) {
return list.get(position);
}
@Override
public long getItemId(int position) {
return position;
}
@Override
public View getView(int position, View convertView, ViewGroup parent) {
ViewHolder holder;
if (convertView == null) {
convertView = inflater.inflate(R.layout.listview_item, null);
holder = new ViewHolder();
holder.showLetter = (TextView) convertView.findViewById(R.id.show_letter);
holder.username = (TextView) convertView.findViewById(R.id.username);
convertView.setTag(holder);
} else {
holder = (ViewHolder) convertView.getTag();
}
User user = list.get(position);
holder.username.setText(user.getUsername());
//获得当前position是属于哪个分组
int sectionForPosition = getSectionForPosition(position);
//获得该分组第一项的position
int positionForSection = getPositionForSection(sectionForPosition);
//查看当前position是不是当前item所在分组的第一个item
//如果是,则显示showLetter,否则隐藏
if (position == positionForSection) {
holder.showLetter.setVisibility(View.VISIBLE);
holder.showLetter.setText(user.getFirstLetter());
} else {
holder.showLetter.setVisibility(View.GONE);
}
return convertView;
}
@Override
public Object[] getSections() {
return new Object[0];
}
//传入一个分组值[A....Z],获得该分组的第一项的position
@Override
public int getPositionForSection(int sectionIndex) {
for (int i = 0; i < list.size(); i++) {
if (list.get(i).getFirstLetter().charAt(0) == sectionIndex) {
return i;
}
}
return -1;
}
//传入一个position,获得该position所在的分组
@Override
public int getSectionForPosition(int position) {
return list.get(position).getFirstLetter().charAt(0);
}
class ViewHolder {
TextView username, showLetter;
}
}
这个Adapter大部分还是和我们之前的Adapter一样的,只不过这里实现了SectionIndexer接口,实现了这个接口,我们就要实现该接口中的三个方法,分别是getSections(),getPositionForSection(),getSectionForPosition()这三个方法,我们这里用到的主要是后面这两个方法,那我来详细说一下:1.getPositionForSection(int sectionIndex)
这个方法接收一个int类型的参数,该参数实际上就是指我们的分组,我们在这里传入分组的值【A.....Z】,然后我们在方法中通过自己的计算,返回该分组中第一个item的position。
2.getSectionForPosition(int position)
这个方法接收一个int类型的参数,该参数实际上就是我们的ListView即将要显示的item的position,我们通过传入这个position,可以获得该position的item所属的分组,然后再将这个分组的值返回。
说了这么多,大家可能有疑问了,我为什么要实现这个接口呢?大家来看看我的item的布局文件:
<?xml version="1.0" encoding="utf-8"?>
<LinearLayout xmlns:android="http://schemas.android.com/apk/res/android"
android:layout_width="match_parent"
android:layout_height="match_parent"
android:orientation="vertical">
<TextView
android:id="@+id/show_letter"
android:layout_width="match_parent"
android:layout_height="wrap_content"
android:layout_marginTop="3dp"/>
<RelativeLayout
android:layout_width="match_parent"
android:layout_height="wrap_content">
<ImageView
android:id="@+id/userface"
android:layout_width="72dp"
android:layout_height="72dp"
android:padding="12dp"
android:src="@mipmap/ic_launcher"/>
<TextView
android:id="@+id/username"
android:layout_width="wrap_content"
android:layout_height="match_parent"
android:layout_centerVertical="true"
android:layout_marginLeft="36dp"
android:layout_toRightOf="@id/userface"
android:gravity="center"
android:text="username"/>
</RelativeLayout>
</LinearLayout>
在我的item的布局文件中,我所有的item实际上都是一样的,都有一个显示分组数据的TextView,因此我需要在Adapter的getView方法中根据所显示的item的不同来确定是否将显示分组的TextView隐藏掉。所以我们再回过头来看看我的ListView中的getView方法,getView前面的写法没啥好说的,和普通ListView都一样,我们主要来看看这几行://获得当前position是属于哪个分组
int sectionForPosition = getSectionForPosition(position);
//获得该分组第一项的position
int positionForSection = getPositionForSection(sectionForPosition);
//查看当前position是不是当前item所在分组的第一个item
//如果是,则显示showLetter,否则隐藏
if (position == positionForSection) {
holder.showLetter.setVisibility(View.VISIBLE);
holder.showLetter.setText(user.getFirstLetter());
} else {
holder.showLetter.setVisibility(View.GONE);
}
我首先判断当前显示的item是属于哪个分组的,然后获得这个分组中第一个item的位置,最后判断我当前显示的item的position到底是不是它所在分组的第一个item,如果是的话,那么就将showLetter这个TextView显示出来,同时显示出相应的分组信息,否则将这个showLetter隐藏。就是这么简单。做完这些之后,我们在Activity中再来简单的添加两行代码:ListView listView = (ListView) findViewById(R.id.lv);
MyAdapter adapter = new MyAdapter(this, list);
listView.setAdapter(adapter);
这个时候左边的分组ListView就可以显示出来了。就是这么简单。
三.右边滑动控件的实现
右边这个东东很明显是一个自定义View,那我们就一起来看看这个自定义View吧。首先这个自定义控件继承自View,继承自View,需要实现它里边的构造方法,关于这三个构造方法的解释大家可以查看我的另一篇博客android自定义View之钟表诞生记,这里对于构造方法我不再赘述。在这个自定义View中,我需要首先声明5个变量,如下:
//当前手指滑动到的位置
private int choosedPosition = -1;
//画文字的画笔
private Paint paint;
//右边的所有文字
private String[] letters = new String[]{"A", "B", "C", "D", "E", "F", "G", "H", "I", "J", "K", "L",
"M", "N", "O", "P", "Q", "R", "S", "T", "U", "V", "W", "X", "Y", "Z", "#"};
//页面正中央的TextView,用来显示手指当前滑动到的位置的文本
private TextView textViewDialog;
//接口变量,该接口主要用来实现当手指在右边的滑动控件上滑动时ListView能够跟着滚动
private UpdateListView updateListView;
五个变量的作用我在注释中已经说的很详细了。OK,变量声明完成之后,我还要初始化一些变量,变量的初始化当然放在构造方法中来进行了:public LetterIndexView(Context context, AttributeSet attrs, int defStyleAttr) {
super(context, attrs, defStyleAttr);
paint = new Paint();
paint.setAntiAlias(true);
paint.setTextSize(24);
}
OK,这里要初始化的实际上只有paint一个变量。准备工作做完之后,接下来就是onDraw了,代码如下:
@Override
protected void onDraw(Canvas canvas) {
int perTextHeight = getHeight() / letters.length;
for (int i = 0; i < letters.length; i++) {
if (i == choosedPosition) {
paint.setColor(Color.RED);
} else {
paint.setColor(Color.BLACK);
}
canvas.drawText(letters[i], (getWidth() - paint.measureText(letters[i])) / 2, (i + 1) * perTextHeight, paint);
}
}
在绘制的时候,我需要首先获得每一个文字所占空间的大小,每一个文本的可用高度应该是总高度除以文字的总数,然后,通过一个for循环将26个字母全都画出来。在画的时候,如果这个文本所处的位置刚好就是我手指按下的位置,那么该文本的颜色为红色,否则为黑色,最后的drawText不需要我再说了吧。绘制完成之后,就是重写onTouchEvent了,如下:
@Override
public boolean onTouchEvent(MotionEvent event) {
int perTextHeight = getHeight() / letters.length;
float y = event.getY();
int currentPosition = (int) (y / perTextHeight);
String letter = letters[currentPosition];
switch (event.getAction()) {
case MotionEvent.ACTION_UP:
setBackgroundColor(Color.TRANSPARENT);
if (textViewDialog != null) {
textViewDialog.setVisibility(View.GONE);
}
break;
default:
setBackgroundColor(Color.parseColor("#cccccc"));
if (currentPosition > -1 && currentPosition < letters.length) {
if (textViewDialog != null) {
textViewDialog.setVisibility(View.VISIBLE);
textViewDialog.setText(letter);
}
if (updateListView != null) {
updateListView.updateListView(letter);
}
choosedPosition = currentPosition;
}
break;
}
invalidate();
return true;
}
对于右边的滑动控件的事件操作我整体上可以分为两部分,手指抬起分为一类,其他所有的操作归为一类。那么当控件感知到我手指的操作事件之后,它首先需要知道我手指当前所点击的item是什么,那么这个值要怎么获取呢?我可以先获得到手指所在位置的Y坐标,然后除以每一个文字的高度,就知道当前手指点击位置的position,然后从letters数组中读取出相应的值即可。知道了当前点击了哪个字母之后,剩下的工作就很简单了,修改控件的背景颜色,然后将相应的字母显示在TextView上即可,然后把当前的position传给choosedPosition,最后调用invalidate()方法重绘控件。重绘控件时由于choosedPosition的值已经发生了变化,所以相应的文本颜色也会改变。另外,我希望手指在右边控件滑动时,ListView也能跟着滚动,这个毫无疑问使用接口回调,具体大家看代码,简单的东西不赘述。最后,我希望ListView滚动时,右边控件中文本的颜色应该实时更新,那么这个也很简单,在自定义View中公开一个方法即可,如下: public void updateLetterIndexView(int currentChar) {
for (int i = 0; i < letters.length; i++) {
if (currentChar == letters[i].charAt(0)) {
choosedPosition = i;
invalidate();
break;
}
}
}
最后再来看一眼Activity中现在的代码:TextView textView = (TextView) findViewById(R.id.show_letter_in_center);
final LetterIndexView letterIndexView = (LetterIndexView) findViewById(R.id.letter_index_view);
letterIndexView.setTextViewDialog(textView);
letterIndexView.setUpdateListView(new LetterIndexView.UpdateListView() {
@Override
public void updateListView(String currentChar) {
int positionForSection = adapter.getPositionForSection(currentChar.charAt(0));
listView.setSelection(positionForSection);
}
});
listView.setOnScrollListener(new AbsListView.OnScrollListener() {
@Override
public void onScrollStateChanged(AbsListView view, int scrollState) {
}
@Override
public void onScroll(AbsListView view, int firstVisibleItem, int visibleItemCount, int totalItemCount) {
int sectionForPosition = adapter.getSectionForPosition(firstVisibleItem);
letterIndexView.updateLetterIndexView(sectionForPosition);
}
});
就是这么简单。
源码下载http://download.csdn.net/detail/u012702547/9501208
以上。

相关文章推荐
- android自定义View之仿通讯录侧边栏滑动,实现A-Z字母检索
- android自定义View之仿通讯录侧边栏滑动,实现A-Z字母检索
- android自定义View之仿通讯录侧边栏滑动,实现A-Z字母检索
- Android ListView 侧滑效果实现(滑动展开、滑动删除)
- Android四大核心组件之Service
- Android四大核心组件之ContentProvider
- Android四大核心组件之BroadCastReceiver
- Android四大组件之Activity
- Android json解析简单示例
- android studio学习----通过gradle来导入jar包
- android 分辨率自适应
- 《每天进步一点点》---android之Fragment
- Android chromium 和 Android Webkit 区别
- Android中WebKit的应用
- Android群英传笔记——第八章:Activity与Activity调用栈分析
- Android群英传笔记——第八章:Activity与Activity调用栈分析
- android studio学习----gradle配置
- Android-操作SQLite数据库
- AndroidStudio第一个项目HelloWorld
- Android常用抓包工具之TcpDump