OpenCV在Windows、Linux、Android、iOS上的安装
2016-04-22 12:55
1101 查看
Installation in Linux
These steps have been tested for Ubuntu 10.04 but should work with other distros.
Required packages
GCC 4.x or later. This can be installed withsudo apt-get install build-essential
CMake 2.6 or higher
Subversion (SVN) client
GTK+2.x or higher, including headers
pkgconfig
libpng, zlib, libjpeg, libtiff, libjasper with development files (e.g. libpjeg-dev)
Python 2.3 or later with developer packages (e.g. python-dev)
SWIG 1.3.30 or later (only for versions prior to OpenCV 2.3)
libavcodec
libdc1394 2.x
All the libraries above can be installed via Terminal or by using Synaptic Manager
Getting OpenCV source code
You can use the latest stable OpenCV version available in sourceforge or you can grab the latest snapshot from theSVNrepository.
Getting the latest stable OpenCV version
Go to http://sourceforge.net/projects/opencvlibraryDownload the source tarball and unpack it
Getting the cutting-edge OpenCV from SourceForge SVN repository
Launch SVN client and checkout eitherthe current OpenCV snapshot from here: https://code.ros.org/svn/opencv/trunk
or the latest tested OpenCV snapshot from here: http://code.ros.org/svn/opencv/tags/latest_tested_snapshot
In Ubuntu it can be done using the following command, e.g.:
cd ~/<my_working _directory>
svn co https://code.ros.org/svn/opencv/trunk
Building OpenCV from source using CMake, using the command line
Create a temporary directory, which we denote as <cmake_binary_dir>, where you want to put the generated Makefiles, project files as well the object filees and output binariesEnter the <cmake_binary_dir> and type
cmake [<some optional parameters>] <path to the OpenCV source directory>
For example
cd ~/opencv
mkdir release
cd release
cmake -D CMAKE_BUILD_TYPE=RELEASE -D CMAKE_INSTALL_PREFIX= /usr/local
Enter the created temporary directory (<cmake_binary_dir>) and proceed with:
make
sudo make install
Note
If the size of the created library is a critical issue (like in case of an Android build) you can use theinstall/strip command
to get the smallest size as possible. The stripped version appears to be twice as small. However, we do not recommend using this unless those extra megabytes do really matter.
Using OpenCV with gcc and CMake
NoteWe assume that you have successfully installed OpenCV in your workstation.
The easiest way of using OpenCV in your code is to use CMake.
A few advantages (taken from the Wiki):
No need to change anything when porting between Linux and Windows
Can easily be combined with other tools by CMake( i.e. Qt, ITK and VTK )
If you are not familiar with CMake, checkout the tutorial on
its website.
Steps
Create a program using OpenCV
Let’s use a simple program such as DisplayImage.cpp shown below.#include <cv.h>
#include <highgui.h>
using namespace cv;
int main( int argc, char** argv )
{
Mat image;
image = imread( argv[1], 1 );
if( argc != 2 || !image.data )
{
printf( "No image data \n" );
return -1;
}
namedWindow( "Display Image", CV_WINDOW_AUTOSIZE );
imshow( "Display Image", image );
waitKey(0);
return 0;
}
Create a CMake file
Now you have to create your CMakeLists.txt file. It should look like this:project( DisplayImage )
find_package( OpenCV REQUIRED )
add_executable( DisplayImage DisplayImage )
target_link_libraries( DisplayImage ${OpenCV_LIBS} )
Generate the executable
This part is easy, just proceed as with any other project using CMake:cd <DisplayImage_directory> cmake . make
Result
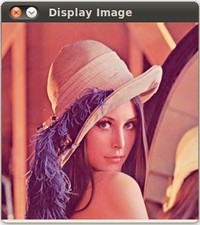
By now you should have an executable (called DisplayImage in this case). You just have to run it giving an image location as an argument, i.e.:./DisplayImage lena.jpg
You should get a nice window as the one shown below:
Using OpenCV with Eclipse (plugin CDT)
NoteTwo ways, one by forming a project directly, and another by CMake
Prerequisites
Having installed Eclipse in your workstation (only the CDT plugin for C/C++is needed). You can follow the following steps:
Go to the Eclipse site
Download Eclipse IDE for
C/C++ Developers . Choose the link according to your workstation.
Having installed OpenCV. If not yet, go here.
Making a project
Start Eclipse. Just run the executable that comes in the folder.Go to File -> New -> C/C++ Project

Choose a name for your project (i.e. DisplayImage). An Empty Project should be okay for this example.
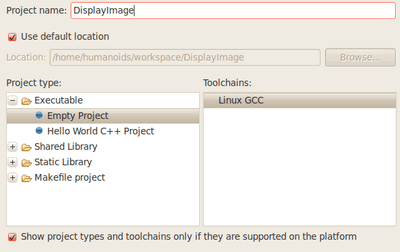
Leave everything else by default. Press Finish.
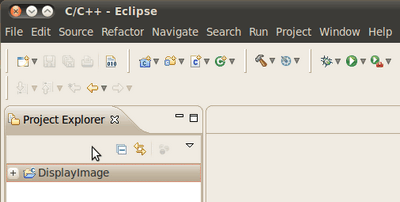
Your project (in this case DisplayImage) should appear in the Project Navigator (usually at the left side of your window).
Now, let’s add a source file using OpenCV:
Right click on DisplayImage (in the Navigator). New -> Folder .
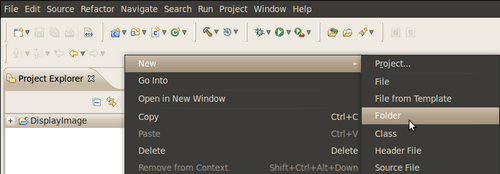
Name your folder src and then hit Finish
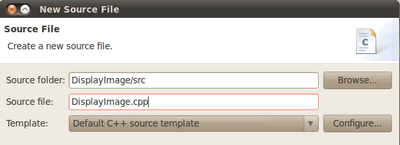
Right click on your newly created src folder. Choose New source file:
Call it DisplayImage.cpp. Hit Finish
So, now you have a project with a empty .cpp file. Let’s fill it with some sample code (in other words, copy and paste the snippet below):
#include <cv.h>
#include <highgui.h>

using namespace cv;

int main( int argc, char** argv )
{
Mat image;
image = imread( argv[1], 1 );

if( argc != 2 || !image.data )
{
printf( "No image data \n" );
return -1;
}

namedWindow( "Display Image", CV_WINDOW_AUTOSIZE );
imshow( "Display Image", image );

waitKey(0);

return 0;
}We are only missing one final step: To tell OpenCV where the OpenCV headers and libraries are. For this, do the following:
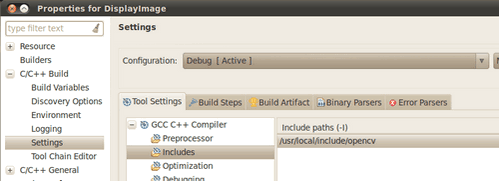
Go to Project–>Properties
In C/C++ Build, click on Settings. At the right, choose the Tool Settings Tab. Here we will enter the headers and libraries info:
In GCC C++ Compiler, go to Includes. In Include paths(-l) you should include the path of the folder where opencv was installed. In our example,
this is /usr/local/include/opencv.
Note
If you do not know where your opencv files are, open the Terminal and type:
pkg-config --cflags opencv
For instance, that command gave me this output:
-I/usr/local/include/opencv -I/usr/local/include
Now go to GCC C++ Linker,there you have to fill two spaces:
First in Library search path (-L) you have to write the path to where the opencv libraries reside, in my case the path is:
/usr/local/lib
Then in Libraries(-l) add the OpenCV libraries that you may need. Usually just the 3 first on the list below are enough (for simple applications) . In my case, I am putting all of them since I plan to use the whole
bunch:
opencv_core opencv_imgproc opencv_highgui opencv_ml opencv_video opencv_features2d opencv_calib3d opencv_objdetect opencv_contrib opencv_legacy opencv_flann

If you don’t know where your libraries are (or you are just psychotic and want to make sure the path is fine), type in Terminal:
pkg-config --libs opencv
My output (in case you want to check) was: .. code-block:: bash
-L/usr/local/lib -lopencv_core -lopencv_imgproc -lopencv_highgui -lopencv_ml -lopencv_video -lopencv_features2d -lopencv_calib3d -lopencv_objdetect -lopencv_contrib -lopencv_legacy -lopencv_flann
Now you are done. Click OK
Your project should be ready to be built. For this, go to Project->Build all
In the Console you should get something like

If you check in your folder, there should be an executable there.
Running the executable
So, now we have an executable ready to run. If we were to use the Terminal, we would probably do something like:cd <DisplayImage_directory> cd src ./DisplayImage ../images/HappyLittleFish.png
Assuming that the image to use as the argument would be located in <DisplayImage_directory>/images/HappyLittleFish.png. We can still do this, but let’s do it from Eclipse:
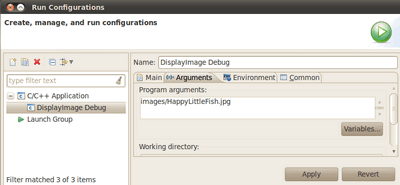
Go to Run->Run Configurations
Under C/C++ Application you will see the name of your executable + Debug (if not, click over C/C++ Application a couple of times). Select the name (in this case DisplayImage Debug).
Now, in the right side of the window, choose the Arguments Tab. Write the path of the image file we want to open (path relative to the workspace/DisplayImage folder). Let’s
use HappyLittleFish.png:
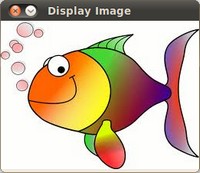
Click on the Apply button and then in Run. An OpenCV window should pop up with the fish image (or whatever you used).
Congratulations! You are ready to have fun with OpenCV using Eclipse.
V2: Using CMake+OpenCV with Eclipse (plugin CDT)
(See the getting started <http://opencv.willowgarage.com/wiki/Getting_started> section of the OpenCV Wiki)Say you have or create a new file, helloworld.cpp in a directory called foo:
#include <cv.h>
#include <highgui.h>
int main ( int argc, char **argv )
{
cvNamedWindow( "My Window", 1 );
IplImage *img = cvCreateImage( cvSize( 640, 480 ), IPL_DEPTH_8U, 1 );
CvFont font;
double hScale = 1.0;
double vScale = 1.0;
int lineWidth = 1;
cvInitFont( &font, CV_FONT_HERSHEY_SIMPLEX | CV_FONT_ITALIC,
hScale, vScale, 0, lineWidth );
cvPutText( img, "Hello World!", cvPoint( 200, 400 ), &font,
cvScalar( 255, 255, 0 ) );
cvShowImage( "My Window", img );
cvWaitKey();
return 0;
}
Create a build directory, say, under foo: mkdir /build.
Then cd build.
Put a CmakeLists.txt file in build:
PROJECT( helloworld_proj )
FIND_PACKAGE( OpenCV REQUIRED )
ADD_EXECUTABLE( helloworld helloworld.cxx )
TARGET_LINK_LIBRARIES( helloworld ${OpenCV_LIBS} )
Run: cmake-gui .. and make sure you fill in where opencv was
built.
Then click configure and then generate.
If it’s OK, quit cmake-gui
Run make -j4 (the ``-j4`` is optional, it just tells the
compiler to build in 4 threads). Make sure it builds.
Start eclipse . Put the workspace in some directory but not in foo or foo\\build
Right click in the Project Explorer section. Select Import And
then open the C/C++ filter. Choose Existing Codeas a Makefile Project``
Name your project, say helloworld. Browse to the Existing Code location foo\\build (where
you ran your cmake-gui from). Select Linux GCC in the “Toolchain for Indexer Settings” and press Finish.
Right click in the Project Explorer section. Select Properties.
Under C/C++ Build, set the build directory:from something like ${workspace_loc:/helloworld} to ${workspace_loc:/helloworld}/build since
that’s where you are building to.
You can also optionally modify the Build command: from make to
something like make VERBOSE=1 -j4which tells the compiler to produce detailed symbol files
for debugging and also to compile in 4 parallel threads.
Done!
Installation in Windows
The description here was tested by the author using the Windows 7 SP1 operating system (OS). Nevertheless, it should also work on any other Windows OS too. If you encounter errors after following the steps describedhere feel free to contact us via our user group and we will try to fix your problem.
Note
To use the OpenCV library you have two options: Installation
by using the pre-built libraries orInstallation
by making your own libraries from the source files. While the first one is easier to complete, it only works if you are coding inside the latest Microsoft Visual Studio integrated development environments
(IDE) and doesn’t takes advantage of the most novel technologies we integrate into our library.
Installation by using the pre-built libraries
Open up a web browser and go to: http://sourceforge.net/projects/opencvlibrary/files/opencv-win/Open the folder for the latest version (currently this is 2.3).
Choose a build you want to use and download it. The naming conventions used will show what kind of support they offer. For example:
vs2010 means the Visual Studio
win32 means that it is for 32 bit applications in the OS
gpu means that it includes the support for using your GPU in order to further increase the performance of the library).
If you downloaded the source files present here see Installation
by making your own libraries from the source files.
Make sure you have admin rights. Start the setup and follow the wizard. Agree to the ” License Agreement ” .
While adding the OpenCV library to the system path is a good decision for a better control of this we will do it manually. Therefore, make sure you do not set this option.
Most of the time it is a good idea to install the source files as this will allow for you to debug into the OpenCV library, if it is necessary. Therefore, just follow the default settings
of the wizard and finish the installation.
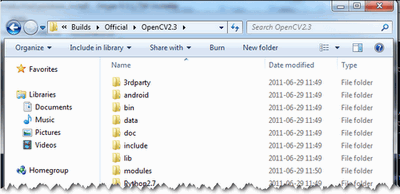
You can check the installation at the chosen path as you can see below.
To finalize the installation go to the Set
the OpenCV enviroment variable and add it to the systems pathsection.
Installation by making your own libraries from the source files
You may find the content of this tutorial also inside the following videos: Part1 and Part 2, hosted on YouTube.
[align=center] [/align]
If you are building your own libraries you can take either the source files from our latest:
stable and tested build - https://code.ros.org/svn/opencv/branches/2.3 (the
number at the end will change with every new realease, so change it to that)
development build - https://code.ros.org/svn/opencv/trunk/
While the later one may contain a couple of new and experimental algorithms, performance increases and interface improvements, be aware, that it may also contain many-many bugs. Using the first one is recommended
in most of the cases. That is unless you are extending the OpenCV library itself or really need to most up to date version of it.
Building the OpenCV library from scratch requires a couple of tools installed beforehand:
An Integrated Developer Enviroment (IDE) preferably, or just a CC++ compiler that will actually make the binary files. Here I will
use the Microsoft Visual Studio. Nevertheless, you can use any other IDE that has a valid C\C++
compiler.
Then CMake is a neat tool that
will make the project files (for your choosen IDE) from the OpenCV source files. It will also allow an easy configuration of the OpenCV build files, in order to make binary files that fits exactly to your needs.
A Subversion Control System (SVN) to acquire the OpenCV source files. A good tool for this is TortoiseSVN.
Alternatively, you can just download an archived version of the source files from the Sourceforge
OpenCV page.
OpenCV may come in multiple flavors. There is a “core” section that will work on its own. Nevertheless, they are a couple of tools, libraries made by other organizations (so called 3rd parties) that offer services
of which the OpenCV may take advantage. These will improve in many ways its capabilities. In order to use any of them, you need to download and install them on your system.
The Python libraries are required to build the Python
interface of OpenCV. For now use the version 2.7.x. This is also a must have if you want to
build the OpenCV documentation.
Numpy is a scientific computing package for Python. Required
for the Python interface.
Intel © Threading Building Blocks
(TBB) is used inside OpenCV for parallel code snippets. Using this will make sure that the OpenCV library will take advantage of all the cores you have in your systems CPU.
Intel © Integrated Performance Primitives
(IPP) may be used to improve the performance of color conversion, Haar training and DFT functions of the OpenCV library. Watch out as this isn’t a free service.
OpenCV offers a somewhat fancier and more useful graphical user interface, than the default one by using the Qt
framework. For a quick overview of what this has to offer look into the documentations highgui module, under the Qt New Functions section. Version 4.6 or later of the framework is required.
Eigen is a C++ template
library for linear algebra.
The latest CUDA Toolkit will allow you
to use the power lying inside your GPU. This will drastically improve performance for some of the algorithms, like the HOG descriptor. Getting to work more and more of our algorithms on the GPUs is a constant effort of the OpenCV team.
OpenEXR source files are required for the
library to work with this high dynamic range (HDR) image file format.
The OpenNI Framework contains a set of open source APIs that
provide support for natural interaction with devices via methods such as voice command recognition, hand gestures and body motion tracking.
Miktex is the best TEX implementation
on the Windows OS. It is required to build the OpenCV documentation.
Sphinx is a python documentation generator and is the tool
that will actually create the OpenCV documentation. This on its own requires a couple of tools installed, I will cover this in depth at the How
to Install Sphinxsection.
Now I will describe the steps to follow for a full build (using all the above frameworks, tools and libraries). If you do not need the support for some of these you can just freely skip those parts.
Building the library
Make sure you have a working IDE with a valid compiler. In case of the Microsoft Visual Studio just install it and make sure it starts up.Install CMake. Simply follow
the wizard, no need to add it to the path. The default install options are great. No need to change them.
Install TortoiseSVN. Choose the 32 or 64
bit version according to the type of OS you work in. Again follow the wizard, default options are good. Restart of your system is required.
Choose a directory in your file system where you will download the OpenCV libraries. I recommend creating a new one that has short path and no special charachters in it, for example D:/OpenCV.
During this tutorial I’ll suppose you’ve done so. If you use a different directory just change this front part of the path in my future examples. Then, Right
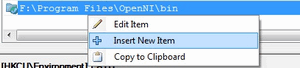
Click ‣ SVN Checkout... in the directory.

A window will appear where you can select from what repository you want to download source files (1) and to which directory (2):
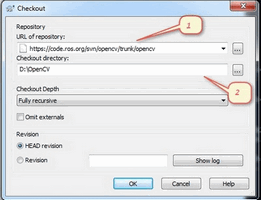
Add here either ones of the versions described above. Then push the OK button and be patient as the repository currently is over 330MB to download. It will take some time until it is finished depending on your Internet connection.
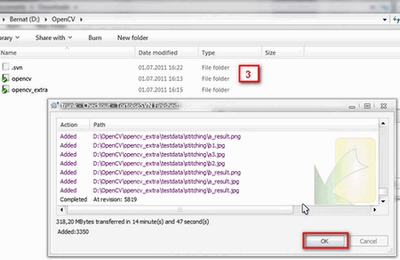
When you are done you should have a opencv and an opencv_extra directory as seen at (3).
In this section I will cover installing the 3rd party libraries.
Download the Python libraries and install it with
the default options. You will need a couple other python extensions. Luckily installing all these may be automated by a nice tool called Setuptools.
Download and install again.
Installing Sphinx is easy once you have installed Setuptools. This contains a little application that will automatically connect to the python databases and download the latest version of many python
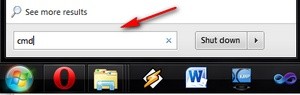
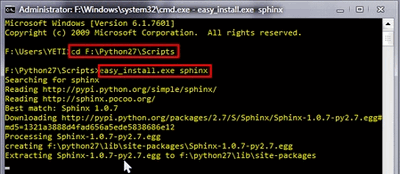
scripts. Start up a command window (enter cmd into the windows start menu and press enter) and use the CD command to navigate to your Python folders Script sub-folder. Here just pass to the easy_install.exe as argument the name of
the program you want to install. Add the sphinx argument.
Note
The CD navigation command works only inside a drive. For example if you are somewhere in the C:drive you cannot use it this to go to another drive (like for example D:). To
do so you first need to change drives letters. For this simply enter the command D:. Then you can use the CD to navigate to specific folder inside the drive. Bonus tip: you can clear the screen by using the CLS command.
This will also install its prerequisites Jinja2 and Pygments.
The easiest way to install Numpy is to just download its
binaries from the sourceforga page. Make sure your download and install exactly the binary for your
python version (so for version 2.7).
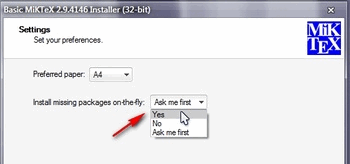
Download the Miktex and install it. Again just follow
the wizard. At the fourth step make sure you select for the “Install missing packages on-the-fly” the Yes option, as you can see on the image below. Again this will take quite some time so be patient.
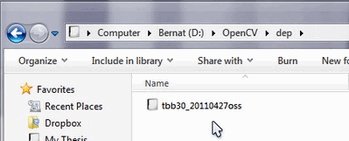
For the Intel © Threading Building
Blocks (TBB) download the source files and extract it inside a directory on your system. For example let there be D:/OpenCV/dep.
For installing the Intel © Integrated Performance Primitives (IPP) the story is the same.
For exctracting the archives I recommend using the 7-Zip application.
In case of the Eigen library
it is again a case of download and extract to the D:/OpenCV/dep directory.
Same as above with OpenEXR.
For the OpenNI Framework you need to install both the development
build and the PrimeSensor Module.
For the CUDA you need again two modules: the latest CUDA
Toolkit and the CUDA Tools SDK. Download and install both of them with a complete option by using the 32 or 64 bit setups according to your OS.
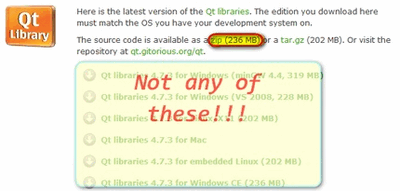
In case of the Qt framework you need to build yourself
the binary files (unless you use the Microsoft Visual Studio 2008 with 32 bit compiler). To do this go to the Qt Downloads page.
Download the source files (not the installers!!!):
Extract it into a nice and short named directory like D:/OpenCV/dep/qt/ . Then you need to build it. Start
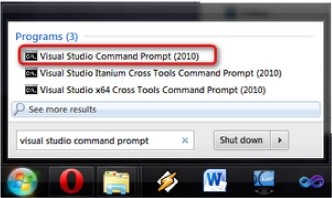
up a Visual Studio Command Prompt (2010) by using the start menu search (or navigate through the start menu All
Programs ‣ Microsoft Visual Studio 2010 ‣ Visual Studio Tools ‣ Visual Studio Command Prompt (2010)).
Now navigate to the extracted folder and enter inside it by using this console window. You should have a folder containing files like Install, Make and so on. Use the dir command to list files inside
your current directory. Once arrived at this directory enter the following command:
configure.exe -release -no-webkit -no-phonon -no-phonon-backend -no-script -no-scripttools
-no-qt3support -no-multimedia -no-ltcg
Completing this will take around 10-20 minutes. Then enter the next command that will take a lot longer (can easily take even more than a full hour):
nmake
After this set the Qt enviroment variables using the following command on Windows 7:
setx -m QTDIR D:/OpenCV/dep/qt/qt-everywhere-opensource-src-4.7.3
Also, add the built binary files path to the system path by using the Path
Editor. In our case this isD:/OpenCV/dep/qt/qt-everywhere-opensource-src-4.7.3/bin.
Note
If you plan on doing Qt application development you can also install at this point the Qt Visual Studio Add-in. After this you can make and build Qt applications without using the Qt Creator.
Everything is nicely integrated into Visual Studio.
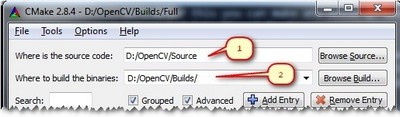
Now start the CMake (cmake-gui). You may again enter it in the start menu search or get it from the All
Programs ‣ CMake 2.8 ‣ CMake (cmake-gui). First, select the directory for the source files of the OpenCV library (1). Then, specify a directory where you will build the binary files for OpenCV (2).
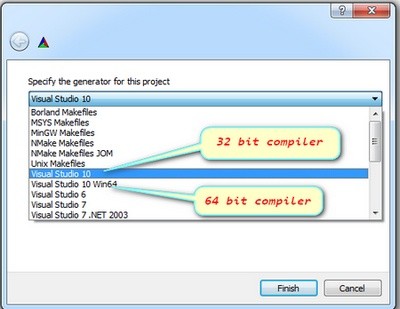
Press the Configure button to specify the compiler (and IDE) you want to use. Note that in case you can choose between different compilers for making either 64 bit or 32 bit libraries. Select the one you use in your application
development.
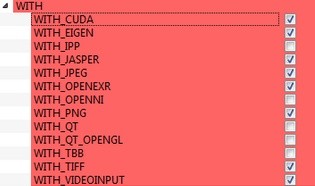
CMake will start out and based on your system variables will try to automatically locate as many packages as possible. You can modify the packages to use for the build in the WITH
‣ WITH_X menu points (where X is the package abbreviation). Here are a list of current packages you can turn on or off:
Select all the packages you want to use and press again the Configure button. For an easier overview of the build options make sure the Grouped option under the binary directory selection is turned on. For some
of the packages CMake may not find all of the required files or directories. In case of these CMake will throw an error in its output window (located at the bottom of the GUI) and set its field values, to not found constants. For example:

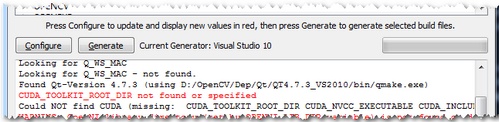
For these you need to manually set the queried directories or files path. After this press again the Configurebutton to see if the value entered by you was accepted or not. Do this until all entries are good and you cannot
see errors in the field/value or the output part of the GUI. Now I want to emphasize an option that you will definitely love: ENABLE
‣ ENABLE_SOLUTION_FOLDERS. OpenCV will create many-many projects and turning this option will make sure that they are categorized inside directories in the Solution Explorer. It is a must have feature, if you ask me.

Furthermore, you need to select what part of OpenCV you want to build.
BUILD_DOCS -> It creates two projects for building the documentation of OpenCV (there will be a separate project for building the HTML and the PDF files). Note that these aren’t built
together with the solution. You need to make an explicit build project command on these to do so.
BUILD_EXAMPLES -> OpenCV comes with many example applications from which you may learn most of the libraries capabilities. This will also come handy to easily try out if OpenCV is
fully functional on your computer.
BUILD_JAVA_SUPPORT -> At the moment this has no real meaning on the Windows platform. Ignore it.
BUILD_NEW_PYTHON_SUPPORT -> Self-explanatory. Create the binaries to use OpenCV from the Python language.
BUILD_PACKAGE -> Prior to version 2.3 with this you could build a project that will build an OpenCV installer. With this you can easily install your OpenCV flavor on other systems.
For the latest source files of OpenCV it generates a new project that simply creates zip archive with OpenCV sources.
BUILD_SHARED_LIBS -> With this you can control to build DLL files (when turned on) or static library files (*.lib) otherwise.
BUILD_TESTS -> Each module of OpenCV has a test project assigned to it. Building these test projects is also a good way to try out, that the modules work just as expected on your
system too.
Press again the Configure button and ensure no errors are reported. If this is the case you can tell CMake to create the project files by pushing the Generate button. Go to the build directory and open the created OpenCVsolution.
Depending on just how much of the above options you have selected the solution may contain quite a lot of projects so be tolerant on the IDE at the startup. Now you need to build both the Release and the Debugbinaries. Use the drop-down menu
on your IDE to change to another of these after building for one of them.

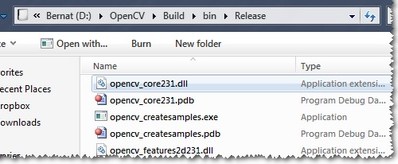
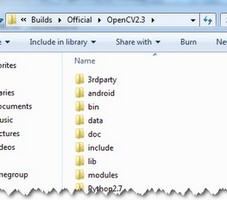
In the end you can observe the built binary files inside the bin directory:
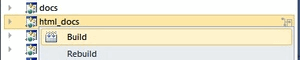
For the documentation you need to explicitly issue the build commands on the doc project for the PDF files and on the doc_html for the HTML ones. Each of these will call Sphinx to do all the hard work.
You can find the generated documentation inside the Build/Doc/_html for the HTML pages and within the Build/Doc the
PDF manuals.
To collect the header and the binary files, that you will use during your own projects, into a separate directory (simillary to how the pre-built binaries ship) you need to explicitely build the Install project.
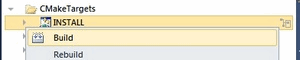
This will create an install directory inside the Build one collecting all the built binaries into a single place. Use this only after you built both the Release and Debug versions.
Note
To create an installer you need to install NSIS. Then just build the Package project
to build the installer into the Build/_CPack_Packages/win32/NSIS folder.
You can then use this to distribute OpenCV with your build settings on other systems.

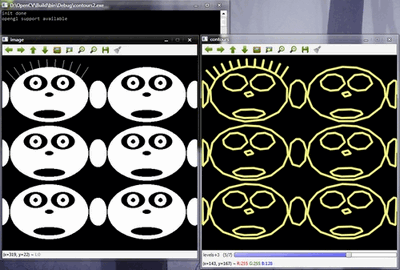
To test your build just go into the Build/bin/Debug or Build/bin/Release directory
and start a couple of applications like the contours.exe. If they run, you are done. Otherwise, something definitely went awfully wrong. In this case you should contact us via our user
group. If everything is okay the contours.exe output should resemble the following image (if built with Qt support):
Note
If you use the GPU module (CUDA libraries) make sure you also upgrade to the latest drivers of your GPU. Error messages containing invalid entries in (or cannot find) the nvcuda.dll are caused mostly
by old video card drivers. For testing the GPU (if built) run the performance_gpu.exe sample application.
Set the OpenCV enviroment variable and add it to the systems path
First we set an enviroment variable to make easier our work. This will hold the install directory of our OpenCV library that we use in our projects. Start up a command window and enter:setx -m OPENCV_DIR D:\OpenCV\Build\Install
Here the directory is where you have your OpenCV binaries (installed or built). Inside this you should have folders like bin and include. The -m should be added if you wish
to make the settings computer wise, instead of user wise.
If you built static libraries then you are done. Otherwise, you need to add the bin folders path to the systems path.This is cause you will use the OpenCV library in form of “Dynamic-link libraries” (also
known as DLL). Inside these are stored all the algorithms and information the OpenCV library contains. The operating system will load them only on demand, during runtime. However, to do this he needs to know where they are. The systems PATH contains
a list of folders where DLLs can be found. Add the OpenCV library path to this and the OS will know where to look if he ever needs the OpenCV binaries. Otherwise, you will need to copy the used DLLs right beside the applications executable file (exe)
for the OS to find it, which is highly unpleasent if you work on many projects. To do this start up again the Path
Editor and add the following new entry (right click in the application to bring up the menu):
%OPENCV_DIR%\bin

Save it to the registry and you are done. If you ever change the location of your install directories or want to try out your applicaton with a different build all you will need to do is to update the OPENCV_DIR
variable via the setxcommand inside a command window.
Now you can continue reading the tutorials with the How
to build applications with OpenCV inside the Microsoft Visual Studio section. There you will find out how to use the OpenCV library in your own projects with the help of the Microsoft Visual Studio IDE.
How to build applications with OpenCV inside the Microsoft Visual Studio
Everything I describe here will apply to the C\C++ interface of OpenCV. I start out from the assumption that you have read and completed with success the Installationin Windows tutorial. Therefore, before you go any further make sure you have an OpenCV directory that contains the OpenCV header files plus binaries and you have set the environment variables as described
here.
The OpenCV libraries, distributed by us, on the Microsoft Windows operating system are in a Dynamic Linked Libraries (DLL). These have the advantage that all the content of the library are loaded only
at runtime, on demand, and that countless programs may use the same library file. This means that if you have ten applications using the OpenCV library, no need to have around a version for each one of them. Of course you need to have the dll of the
OpenCV on all systems where you want to run your application.
Another approach is to use static libraries that have lib extensions. You may build these by using our source files as described in the Installation
in Windows tutorial. When you use this the library will be built-in inside your exefile. So there is no chance that the user deletes them, for some reason. As a drawback your application will be larger one and as, it will take more time to
load it during its startup.
To build an application with OpenCV you need to do two things:
Tell to the compiler how the OpenCV library looks. You do this by showing it the header files.
Tell to the linker from where to get the functions or data structures of OpenCV, when they are needed.
If you use the lib system you must set the path where the library files are and specify in which one of them to look. During the build the linker will look into these libraries and add
the definitions and implementation of all used functions and data structures to the executable file.
If you use the DLL system you must again specify all this, however now for a different reason. This is a Microsoft OS specific stuff. It seems that the linker needs to know that where
in the DLL to search for the data structure or function at the runtime. This information is stored inside lib files. Nevertheless, they aren’t static libraries. They are so called import libraries. This is why when you make some DLLs in Windows
you will also end up with some lib extension libraries. The good part is that at runtime only the DLL is required.
To pass on all this information to the Visual Studio IDE you can either do it globally (so all your future projects will get these information) or locally (so only for you current project). The advantage of the global one is that you only need to do it once;
however, it may be undesirable to clump all your projects all the time with all these information. In case of the global one how you do it depends on the Microsoft Visual Studio you use. There is a 2008 and previous versions and a 2010
way of doing it. Inside the global section of this tutorial I’ll show what the main differences are.
The base item of a project in Visual Studio is a solution. A solution may contain multiple projects. Projects are the building blocks of an application. Every project will realize something and you will have a main project in which you can put together this
project puzzle. In case of the many simple applications (like many of the tutorials will be) you do not need to break down the application into modules. In these cases your main project will be the only existing one. Now go create a new solution inside Visual
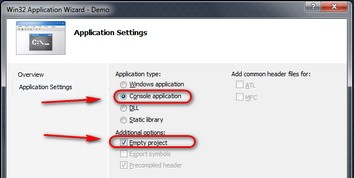
studio by going through the File ‣ New ‣ Project menu selection. Choose Win32 Console Application as type.
Enter its name and select the path where to create it. Then in the upcoming dialog make sure you create an empty project.
The local method
Every project is built separately from the others. Due to this every project has its own rule package. Inside this rule packages are stored all the information the IDE needs to know to build your project.For any application there are at least two build modes: a Release and a Debug one. The Debug has many features that exist so you can find and resolve easier bugs inside your application. In contrast the Release is an optimized
version, where the goal is to make the application run as fast as possible or to be as small as possible. You may figure that these modes also require different rules to use during build. Therefore, there exist different rule packages for each of your build
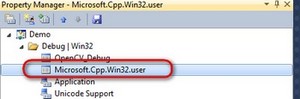
modes. These rule packages are called inside the IDE as project properties and you can view and modify them by using the Property Manger. You can bring up this with View
‣ Property Pages. Expand it and you can see the existing rule packages (called Proporty Sheets).
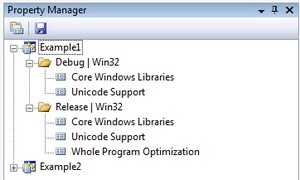
The really useful stuff of these is that you may create a rule package once and you can later just add it to your new projects. Create it once and reuse it later. We want to create a new Property
Sheet that will contain all the rules that the compiler and linker needs to know. Of course we will need a separate one for the Debug and the Release Builds. Start up with the Debug one as shown in the image below:
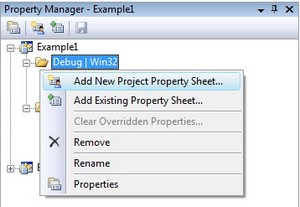
Use for example the OpenCV_Debug name. Then by selecting the sheet Right
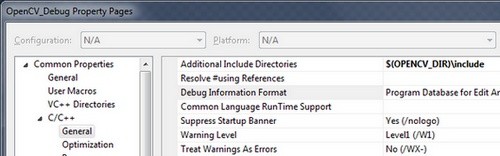
Click ‣ Properties. In the following I will show to set the OpenCV rules locally, as I find unnecessary to pollute projects with custom rules that I do not use it. Go the C++ groups General entry and under the “Additional Include Directories” add
the path to your OpenCV include.
$(OPENCV_DIR)\include
When adding third party libraries settings it is generally a good idea to use the power behind the environment variables. The full location of the OpenCV library may change on each system. Moreover, you may
even end up yourself with moving the install directory for some reason. If you would give explicit paths inside your property sheet your project will end up not working when you pass it further to someone else who has a different OpenCV install path. Moreover,
fixing this would require to manually modifying every explicit path. A more elegant solution is to use the environment variables. Anything that you put inside a parenthesis started with a dollar sign will be replaced at runtime with the current environment
variables value. Here comes in play the environment variable setting we already made in our previous
tutorial.
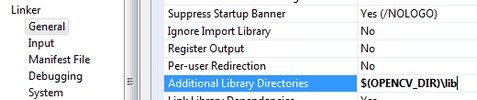
Next go to the Linker ‣ General and under the “Additional Library
Directories” add the libs directory:
$(OPENCV_DIR)\libs
Then you need to specify the libraries in which the linker should look into. To do this go to the Linker
‣ Input and under the “Additional Dependencies” entry add the name of all modules which you want to use:
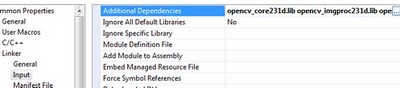
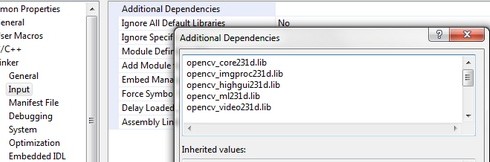
The names of the libraries are as follow:
opencv_(The Name of the module)(The version Number of the library you use)d.lib
A full list, for the currently latest trunk version would contain:
opencv_core231d.lib
opencv_imgproc231d.lib
opencv_highgui231d.lib
opencv_ml231d.lib
opencv_video231d.lib
opencv_features2d231d.lib
opencv_calib3d231d.lib
opencv_objdetect231d.lib
opencv_contrib231d.lib
opencv_legacy231d.lib
opencv_flann231d.lib
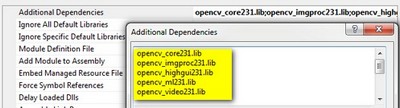
The letter d at the end just indicates that these are the libraries required for the debug. Now click ok to save and do the same with a new property inside the Release rule section. Make sure to omit
the d letters from the library names and to save the property sheets with the save icon above them.
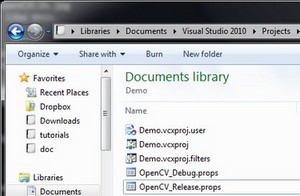
You can find your property sheets inside your projects directory. At this point it is a wise decision to back them up into some special directory, to always have them at hand in the future, whenever you create
an OpenCV project. Note that for Visual Studio 2010 the file extension is props, while for 2008 this is vsprops.
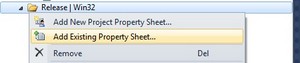
Next time when you make a new OpenCV project just use the “Add Existing Property Sheet...” menu entry inside the Property Manager to easily add the OpenCV build rules.
The global method
In case you find to troublesome to add the property pages to each and every one of your projects you can also add this rules to a “global property page”. However, this applies only to the additionalinclude and library directories. The name of the libraries to use you still need to specify manually by using for instance: a Property page.
In Visual Studio 2008 you can find this under the: Tools ‣ Options ‣ Projects
and Solutions ‣ VC++ Directories.
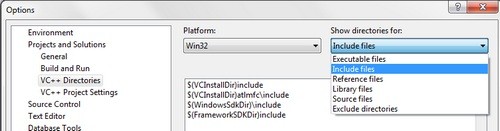
In Visual Studio 2010 this has been moved to a global property sheet which is automatically added to every project you create:
The process is the same as described in case of the local approach. Just add the include directories by using the environment variable OPENCV_DIR.
Test it!
Now to try this out download our little test source code orget it from the sample code folder of the OpenCV sources. Add this to your project and build it. Here’s its content:
1 2 3 4 5 6 7 8 9 10 11 12 13 14 15 16 17 18 19 20 21 22 23 24 25 26 27 28 29 30 31 32 33 34 35 36 37 38 39 40 41 42 43 44 45 46 47 48 49 50 51 52 53 54 55 56 57 58 59 60 61 62 63 64 65 66 67 68 69 70 71 72 73 74 75 76 77 78 79 80 81 82 83 84 85 86 87 88 89 90 91 92 93 94 95 96 97 98 99 100 101 102 103 104 105 106 107 108 109 110 111 112 113 114 115 116 117 118 119 120 121 122 123 124 125 126 127 128 129 130 131 132 133 134 135 136 137 138 139 140 141 142 143 144 145 146 147 148 149 150 151 152 153 154 155 156 157 158 159 160 161 162 163 164 165 166 167 168 169 170 171 172 173 174 175 176 177 178 179 180 181 182 183 184 185 186 187 188 189 190 191 192 193 194 195 196 197 198 199 200 201 202 203 204 205 206 | // Video Image PSNR and SSIM
#include <iostream> // for standard I/O
#include <string> // for strings
#include <iomanip> // for controlling float print precision
#include <sstream> // string to number conversion
#include <opencv2/imgproc/imgproc.hpp> // Gaussian Blur
#include <opencv2/core/core.hpp> // Basic OpenCV structures (cv::Mat, Scalar)
#include <opencv2/highgui/highgui.hpp> // OpenCV window I/O
using namespace std;
using namespace cv;
double getPSNR ( const Mat& I1, const Mat& I2);
Scalar getMSSIM( const Mat& I1, const Mat& I2);
void help()
{
cout
<< "\n--------------------------------------------------------------------------" << endl
<< "This program shows how to read a video file with OpenCV. In addition, it tests the"
<< " similarity of two input videos first with PSNR, and for the frames below a PSNR " << endl
<< "trigger value, also with MSSIM."<< endl
<< "Usage:" << endl
<< "./video-source referenceVideo useCaseTestVideo PSNR_Trigger_Value Wait_Between_Frames " << endl
<< "--------------------------------------------------------------------------" << endl
<< endl;
}
int main(int argc, char *argv[], char *window_name)
{
help();
if (argc != 5)
{
cout << "Not enough parameters" << endl;
return -1;
}
stringstream conv;
const string sourceReference = argv[1],sourceCompareWith = argv[2];
int psnrTriggerValue, delay;
conv << argv[3] << argv[4]; // put in the strings
conv >> psnrTriggerValue >> delay;// take out the numbers
char c;
int frameNum = -1; // Frame counter
VideoCapture captRefrnc(sourceReference),
captUndTst(sourceCompareWith);
if ( !captRefrnc.isOpened())
{
cout << "Could not open reference " << sourceReference << endl;
return -1;
}
if( !captUndTst.isOpened())
{
cout << "Could not open case test " << sourceCompareWith << endl;
return -1;
}
Size refS = Size((int) captRefrnc.get(CV_CAP_PROP_FRAME_WIDTH),
(int) captRefrnc.get(CV_CAP_PROP_FRAME_HEIGHT)),
uTSi = Size((int) captUndTst.get(CV_CAP_PROP_FRAME_WIDTH),
(int) captUndTst.get(CV_CAP_PROP_FRAME_HEIGHT));
if (refS != uTSi)
{
cout << "Inputs have different size!!! Closing." << endl;
return -1;
}
const char* WIN_UT = "Under Test";
const char* WIN_RF = "Reference";
// Windows
namedWindow(WIN_RF, CV_WINDOW_AUTOSIZE );
namedWindow(WIN_UT, CV_WINDOW_AUTOSIZE );
cvMoveWindow(WIN_RF, 400 , 0); //750, 2 (bernat =0)
cvMoveWindow(WIN_UT, refS.width, 0); //1500, 2
cout << "Frame resolution: Width=" << refS.width << " Height=" << refS.height
<< " of nr#: " << captRefrnc.get(CV_CAP_PROP_FRAME_COUNT) << endl;
cout << "PSNR trigger value " <<
setiosflags(ios::fixed) << setprecision(3) << psnrTriggerValue << endl;
Mat frameReference, frameUnderTest;
double psnrV;
Scalar mssimV;
while( true) //Show the image captured in the window and repeat
{
captRefrnc >> frameReference;
captUndTst >> frameUnderTest;
if( frameReference.empty() || frameUnderTest.empty())
{
cout << " < < < Game over! > > > ";
break;
}
++frameNum;
cout <<"Frame:" << frameNum;
///////////////////////////////// PSNR ////////////////////////////////////////////////////
psnrV = getPSNR(frameReference,frameUnderTest); //get PSNR
cout << setiosflags(ios::fixed) << setprecision(3) << psnrV << "dB";
//////////////////////////////////// MSSIM /////////////////////////////////////////////////
if (psnrV < psnrTriggerValue)
{
mssimV = getMSSIM(frameReference,frameUnderTest);
cout << " MSSIM: "
<< "R" << setiosflags(ios::fixed) << setprecision(3) << mssimV.val[2] * 100
<< "G" << setiosflags(ios::fixed) << setprecision(3) << mssimV.val[1] * 100
<< "B" << setiosflags(ios::fixed) << setprecision(3) << mssimV.val[0] * 100;
}
cout << endl;
////////////////////////////////// Show Image /////////////////////////////////////////////
imshow( WIN_RF, frameReference);
imshow( WIN_UT, frameUnderTest);
c = cvWaitKey(delay);
if (c == 27) break;
}
return 0;
}
double getPSNR(const Mat& I1, const Mat& I2)
{
Mat s1;
absdiff(I1, I2, s1); // |I1 - I2|
s1.convertTo(s1, CV_32F); // cannot make a square on 8 bits
s1 = s1.mul(s1); // |I1 - I2|^2
Scalar s = sum(s1); // sum elements per channel
double sse = s.val[0] + s.val[1] + s.val[2]; // sum channels
if( sse <= 1e-10) // for small values return zero
return 0;
else
{
double mse =sse /(double)(I1.channels() * I1.total());
double psnr = 10.0*log10((255*255)/mse);
return psnr;
}
}
Scalar getMSSIM( const Mat& i1, const Mat& i2)
{
const double C1 = 6.5025, C2 = 58.5225;
/***************************** INITS **********************************/
int d = CV_32F;
Mat I1, I2;
i1.convertTo(I1, d); // cannot calculate on one byte large values
i2.convertTo(I2, d);
Mat I2_2 = I2.mul(I2); // I2^2
Mat I1_2 = I1.mul(I1); // I1^2
Mat I1_I2 = I1.mul(I2); // I1 * I2
/*************************** END INITS **********************************/
Mat mu1, mu2; // PRELIMINARY COMPUTING
GaussianBlur(I1, mu1, Size(11, 11), 1.5);
GaussianBlur(I2, mu2, Size(11, 11), 1.5);
Mat mu1_2 = mu1.mul(mu1);
Mat mu2_2 = mu2.mul(mu2);
Mat mu1_mu2 = mu1.mul(mu2);
Mat sigma1_2, sigma2_2, sigma12;
GaussianBlur(I1_2, sigma1_2, Size(11, 11), 1.5);
sigma1_2 -= mu1_2;
GaussianBlur(I2_2, sigma2_2, Size(11, 11), 1.5);
sigma2_2 -= mu2_2;
GaussianBlur(I1_I2, sigma12, Size(11, 11), 1.5);
sigma12 -= mu1_mu2;
///////////////////////////////// FORMULA ////////////////////////////////
Mat t1, t2, t3;
t1 = 2 * mu1_mu2 + C1;
t2 = 2 * sigma12 + C2;
t3 = t1.mul(t2); // t3 = ((2*mu1_mu2 + C1).*(2*sigma12 + C2))
t1 = mu1_2 + mu2_2 + C1;
t2 = sigma1_2 + sigma2_2 + C2;
t1 = t1.mul(t2); // t1 =((mu1_2 + mu2_2 + C1).*(sigma1_2 + sigma2_2 + C2))
Mat ssim_map;
divide(t3, t1, ssim_map); // ssim_map = t3./t1;
Scalar mssim = mean( ssim_map ); // mssim = average of ssim map
return mssim;
} |
or by navigating to your build directory and start the application with a double click. The catch is that these twoaren’t the same. When you start it from the IDE its current working directory is the projects directory, while otherwise
it is the folder where the application file currently is (so usually your build directory). Moreover, in case of starting from the IDE the console window will not close once finished. It will wait for a keystroke of yours.
This is important to remember when you code inside the code open and save commands. You’re resources will be saved ( and queried for at opening!!!) relatively to your working directory. This is unless you give
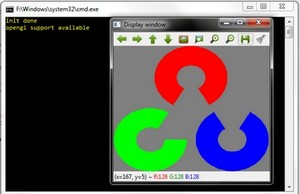
a full, explicit path as parameter for the I/O functions. In the code above we open this OpenCV logo.
Before starting up the application make sure you place the image file in your current working directory. Modify the image file name inside the code to try it out on other images too. Run it and voilá:
Command line arguments with Visual Studio
Throughout some of our future tutorials you’ll see that the programs main input method will be by giving a runtime argument. To do this you can just start up a commmand windows (cmd + Enter inthe start menu), navigate to your executable file and start it with an argument. So for example in case of my upper project this would look like:
1 2 3 | D: CD OpenCV\MySolutionName\Release MySolutionName.exe exampleImage.jpg |
console window on the Microsoft Windows many people come to use it almost never. Besides, adding the same argument again and again while you are testing your application is, somewhat, a cumbersome task. Luckily, in the Visual Studio there is a menu to automate
all this:
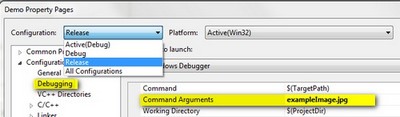
Specify here the name of the inputs and while you start your application from the Visual Studio enviroment you have automatic argument passing. In the next introductionary tutorial you’ll see an in-depth explanation
of the upper source code: Load
and Display an Image.
Using Android binary package with Eclipse
This tutorial was tested using Ubuntu 10.04 and Windows 7 SP1 operating systems. Nevertheless, it should also work on any other OSes supported by Android SDK (including Mac OS X). If you encounter errors after following the steps describedhere, feel free to contact us via android-opencv discussion group https://groups.google.com/group/android-opencv/ and
we will try to help you.
Quick environment setup for Android development
If you are making a clean environment installation then you can try Tegra Android Development Pack (TADP) released by NVIDIA:http://developer.nvidia.com/tegra-android-development-pack
It will cover all of the environment set up automatically and you can go to the next step Get
the OpenCV package for Android development right after automatic setup.
If you are a beginner in Android development then we recommentd you to start with TADP.
Note
NVIDIA‘s Tegra Android Development Pack includes some special features for NVIDIA’s
Tegra platform but it is not just for Tegra devices
You need at least 1.6 Gb free disk space for installation.
TADP will download Android SDK platforms and Android NDK from Google’s server, so you need an Internet connection for the installation.
TADP can ask you to flash your development kit at the end of installation process. Just skip this step if you have no Tegra
Ventana Development Kit.
(UNIX) TADP will ask you for a root in the middle of installation, so you need
to be a member of sudo group.
Manual environment setup for Android Development
You need the following tools to be installed:Sun JDK 6
Visit http://www.oracle.com/technetwork/java/javase/downloads/index.html and
download installer for your OS.
Here is a detailed JDK installation guide for Ubuntu and Mac OS:http://source.android.com/source/initializing.html#installing-the-jdk (only
JDK sections are applicable for OpenCV)
Note
OpenJDK is not usable for Android development because Android SDK supports only Sun JDK. If you use Ubuntu, after installation of Sun JDK you should run the following command to set Sun java environment:
sudo update-java-alternatives --set java-6-sun
Android SDK
Get the latest Android SDK from http://developer.android.com/sdk/index.html
Here is Google’s install guide for SDK http://developer.android.com/sdk/installing.html
Note
If you choose SDK packed into Windows installer, then you should have 32-bit JRE installed. It is not needed for Android development, but installer is x86 application and requires 32-bit Java runtime.
Note
If you are running x64 version of Ubuntu Linux, then you need ia32 shared libraries for use on amd64 and ia64 systems to be installed. You can install them with the following command:
sudo apt-get install ia32-libs
For Red Hat based systems the following command might be helpful:
sudo yum install libXtst.i386
Android SDK components
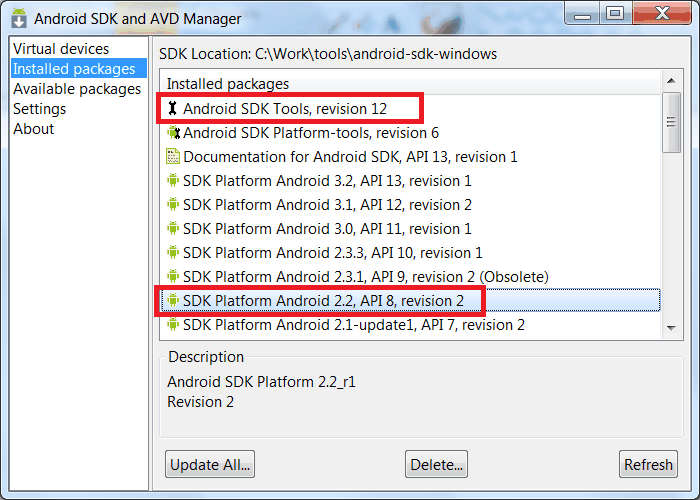
You need the following SDK components to be installed:
Android SDK Tools, revision12 or newer
Older revisions should also work, but they are not recommended.
SDK Platform Android 2.2, API 8, revision 2 (also known as android-8)
This is minimal platform supported by OpenCV Java API. And it is set as default for OpenCV distribution. It is possible to use newer platform with OpenCV package, but it requires to edit OpenCV project settings.
See Adding SDK Components for help with installing/updating SDK
components.
Eclipse IDE
Check the Android SDK System Requirements document for a list of Eclipse
versions that are compatible with the Android SDK. For OpenCV 2.3.1 we recommend Eclipse 3.7 (Indigo) or Eclipse 3.6 (Helios). They work well for OpenCV under both Windows and Linux.
If you have no Eclipse installed, you can download it from this location:
http://www.eclipse.org/downloads/
ADT plugin for Eclipse
This instruction is copied from http://developer.android.com/sdk/eclipse-adt.html#downloading .
Please, visit that page if you have any troubles with ADT plugin installation.
Assuming that you have Eclipse IDE installed, as described above, follow these steps to download and install the ADT plugin:
Start Eclipse, then select Help ‣ Install New Software...
Click Add (in the top-right corner).
In the Add Repository dialog that appears, enter “ADT
Plugin” for the Name and the following URL for the Location:
https://dl-ssl.google.com/android/eclipse/
Click OK
Note
If you have trouble acquiring the plugin, try using “http” in the Location URL, instead of “https” (https is preferred for security reasons).
In the Available Software dialog, select the checkbox
next to Developer Tools and click Next.
In the next window, you’ll see a list of the tools to be downloaded. Click Next.
Read and accept the license agreements, then click Finish.
Note
If you get a security warning saying that the authenticity or validity of the software can’t be established, click OK.
When the installation completes, restart Eclipse.
Get the OpenCV package for Android development
Go to the http://sourceforge.net/projects/opencvlibrary/files/opencv-android/ anddownload the latest available version. Currently it is OpenCV-2.3.1-android-bin.tar.bz2
Create new folder for Android+OpenCV development.
Note
Better to use a path without spaces in it. Otherwise you will probably have problems withndk-build.
Unpack the OpenCV package into that dir.
You can unpack it using any popular archiver (for example with 7-Zip):
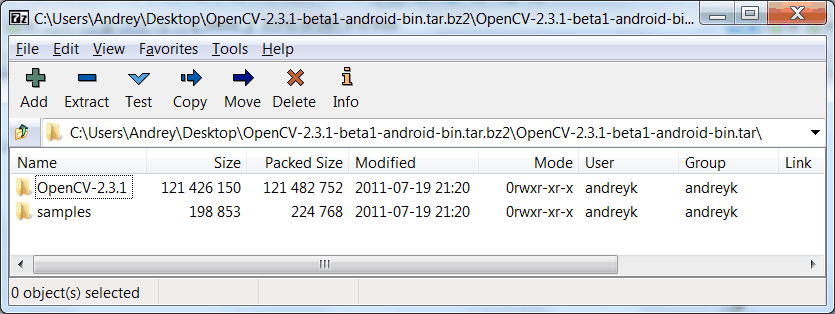
On Unix you can also use the following command:
tar -jxvf ~/Downloads/OpenCV-2.3.1-android-bin.tar.bz2
For this tutorial I have unpacked OpenCV to the C:\Work\android-opencv\ directory.
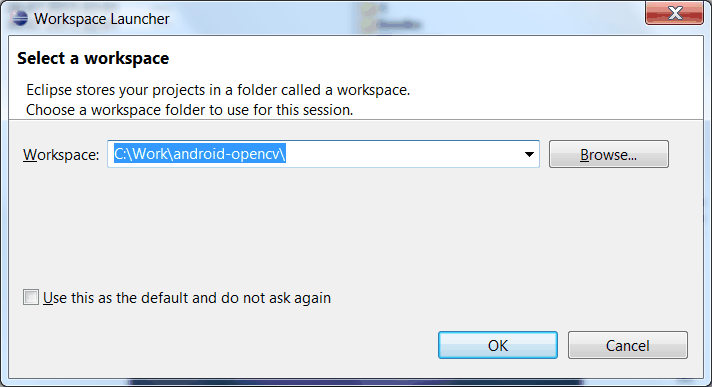
Open OpenCV library and samples in Eclipse
Start the Eclipse and choose your workspace location.I recommend to start familiarizing yourself with OpenCV for Android from a new clean workspace. So I have chosen my OpenCV package directory for the new workspace:
Configure your ADT plugin
Important
ADT plugin settings are workspace-dependent. So you have to repeat this step each time when you create a new workspace.
Once you have created a new workspace, you have to point the ADT plugin to the Android SDK directory. This setting is stored in workspace metadata, as result this step is required each time when you are creating new workspace for
Android development. See Configuring the ADT Plugin document for the original instructions
fromGoogle.
Select Window ‣ Preferences... to open the Preferences
panel (Mac OS X: Eclipse ‣ Preferences):

Select Android from the left panel.
You may see a dialog asking whether you want to send usage statistics to Google. If so, make your choice and click Proceed.
You cannot continue with this procedure until you click Proceed.
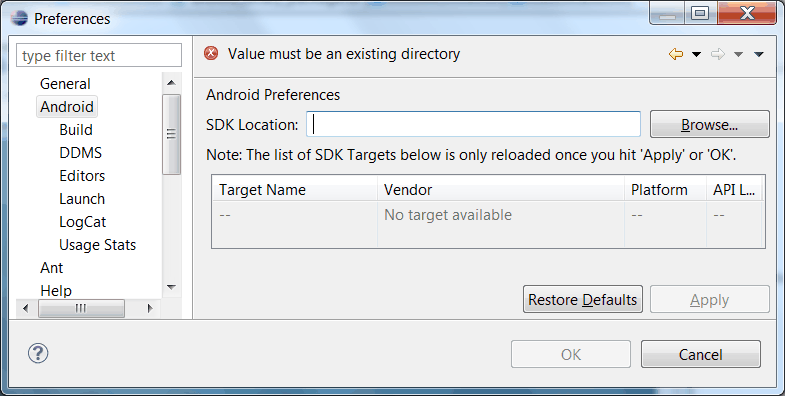
For the SDK Location in the main panel, click Browse... and
locate your Android SDK directory.
Click Apply button at the bottom right corner of main
panel:
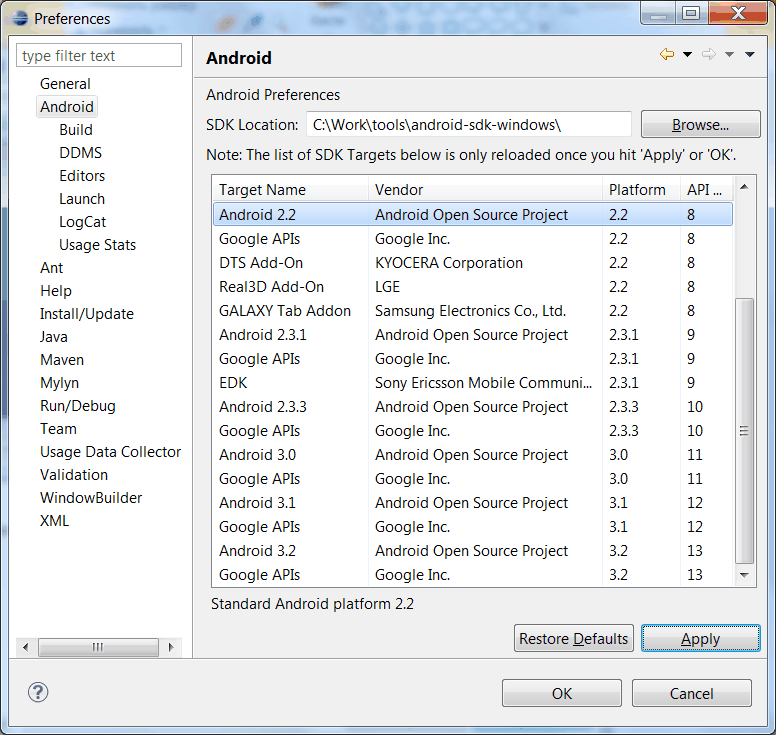
Click OK to close preferences dialog.
Import OpenCV and samples into workspace.
OpenCV library is packed as a ready-for-use Android
Library Project. You can simply reference it in your projects.
Each sample included into OpenCV-2.3.1-android-bin.tar.bz2 is a regular Android project that already references OpenCV library. Follow next steps to import OpenCV and samples into workspace:
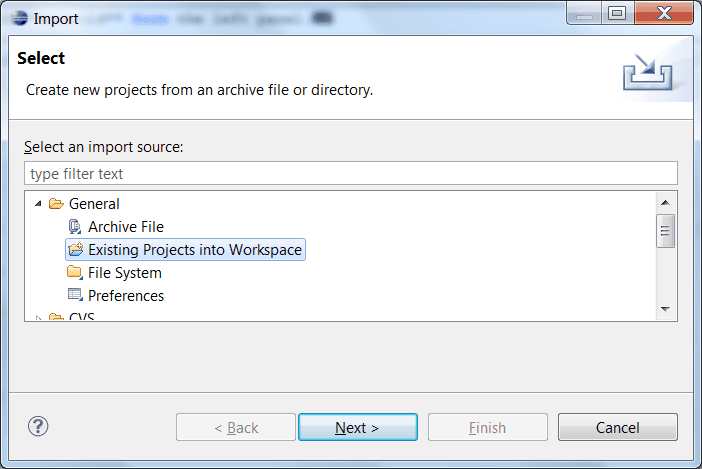
Right click on the Package Explorer window and choose Import... option
from the context menu:

In the main panel select General ‣ Existing Projects
into Workspace and press Next button:
For the Select root directory in the main panel locate
your OpenCV package folder. (If you have created workspace in the package directory, then just click Browse... button and
instantly close directory choosing dialog with OK button!) Eclipse should automatically locate OpenCV library and samples:
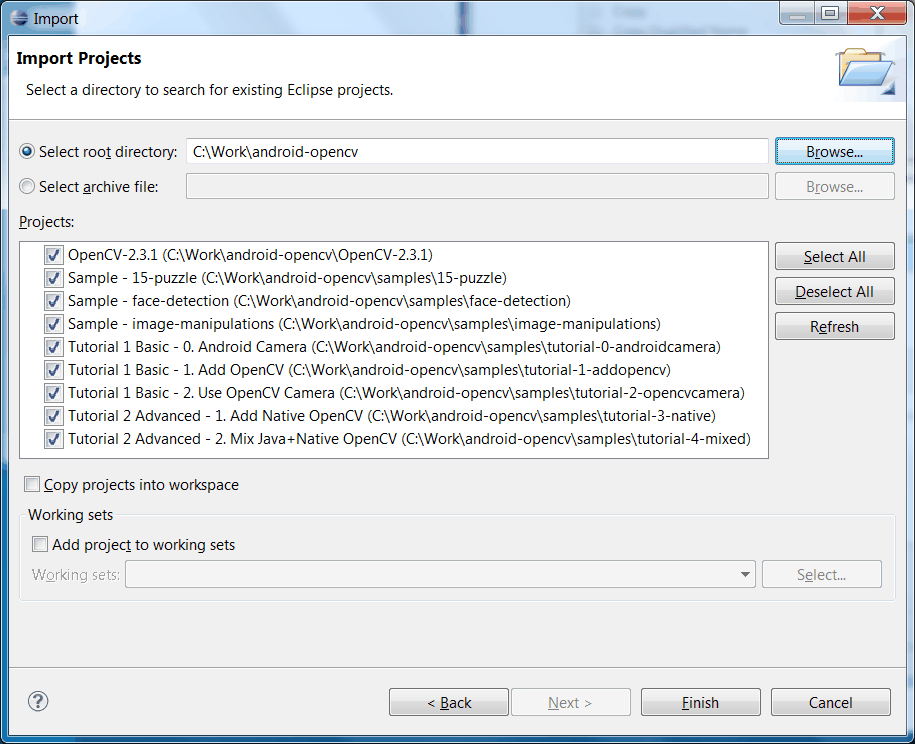
Click Finish button to complete the import operation.
After clicking Finish button Eclipse will load all selected projects into workspace. And...
will indicate numerous errors:
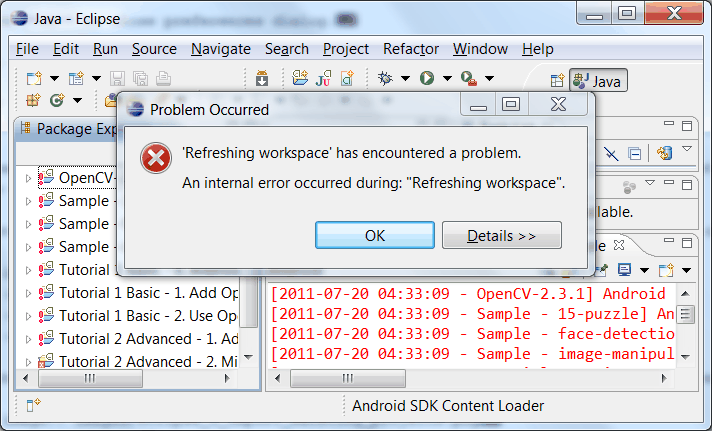
However all these errors are only false-alarms!
To help Eclipse to understand that there are no any errors choose OpenCV library in Package Explorer (left
mouse click) and press F5 button on your keyboard. Then choose any sample (except first samples in Tutorial Base and Tutorial
Advanced) and also press F5.
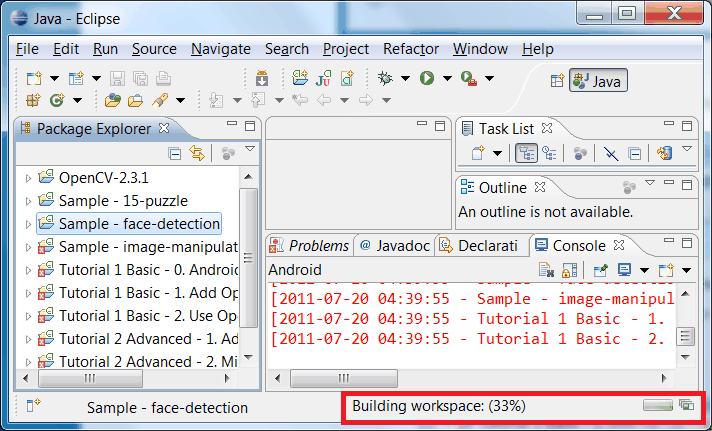
After this manipulation Eclipse will rebuild your workspace and error icons will disappear one after another:
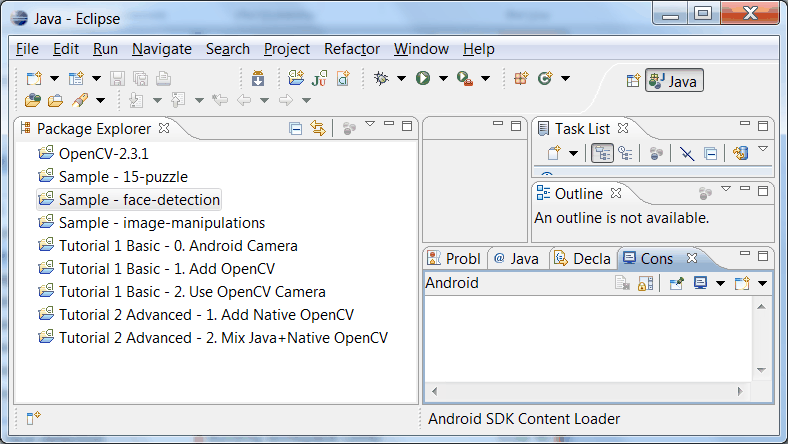
Once Eclipse completes build you will have the clean workspace without any build errors:
Note
If you are importing only OpenCV library without samples then instead of second refresh command (F5)
you might need to make Android Tools ‣ Fix Project Properties from project context menu.
Running OpenCV Samples
At this point you should be able to build and run all samples except two from Advanced tutorial (these samples require Android NDK to build working applications, see the next tutorial UsingC++ OpenCV code with Android binary package to learn how to compile them).
Also I want to note that only Tutorial 1 Basic - 0. Android Camera and Tutorial 1 Basic - 1. Add OpenCV samples
are able to run on Emulator from Android SDK. Other samples are using OpenCV Native Camera which does not work with emulator.
Note
Latest Android SDK tools, revision 12 can run ARM v7 OS images but Google does not provide such images with SDK.
Well, running samples from Eclipse is very simple:
Connect your device with adb tool from Android SDK or create Emulator with camera support.
See Managing Virtual Devices document
for help with Android Emulator.
See Using Hardware Devices for help with
real devices (not emulators).
Select project you want to start in Package Explorer:guilabel: and
just press Ctrl + F11 or select option Run
‣ Run from main menu, or click Run button on the toolbar.
Note
Android Emulator can take several minutes to start. So, please, be patient.
On the first run Eclipse will ask you how to run your application:
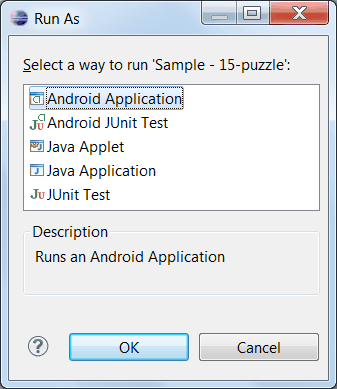
Select the Android Application option and click OK button.
Eclipse will install and run the sample.
Here is Tutorial 1 Basic - 1. Add OpenCV sample
detecting edges using Canny algorithm from OpenCV:

How to use OpenCV library project in your application
If you already have an Android application, you can add a reference to OpenCV and import all its functionality.First of all you need to have both projects (your app and OpenCV) in a single workspace. So, open workspace with your application and import the OpenCV project into your workspace as stated
above.
Add a reference to OpenCV project.
Do the right mouse click on your app in Package Explorer, go to Properties ‣ Android ‣ Library
‣ Add and choose the OpenCV library project.
Whats next?
Read the UsingC++ OpenCV code with Android binary package tutorial to learn how add native OpenCV code to your Android project.
Using C++ OpenCV code with Android binary package
The Android way is writing all your code in Java. But somethimes it is not enough and you need to go to a native level and write part of your application in C/C++. This is important when you already have some computer vision functionality which is written inC++ and uses OpenCV, and you want to use it in your Android application, but do not want to rewrite the C++ code to Java. In this case the only way is to use JNI mechanism. It means, that you should add a class with native methods wrapping your C++ functionality
into the Java part of your Android application.
This tutorial describes a fast way how to create and build Android applications containing OpenCV code written in C++. It shows how to build an application which uses OpenCV inside its JNI calls.
Please note that before starting this tutorial you should fulfill all the steps, described in the tutorial Using
Android binary package with Eclipse.
This tutorial was tested using Ubuntu 10.04 and Windows 7 SP1 operating systems. Nevertheless, it should also work on Mac OS X. If you encounter errors after following the steps described here, feel free to contact us via android-opencv discussion
group https://groups.google.com/group/android-opencv/ and we will try to help you.
Prerequisites: Setup NDK
To compile C++ code for Android platform you need Android Native Development Kit (NDK).You can get the latest version of NDK from the page http://developer.android.com/sdk/ndk/index.html .
To install Android NDK just extract the archive to some folder on your computer. (Here is installation instructions on the NDK home page: http://developer.android.com/sdk/ndk/index.html#installing)
Note
Before start you can read official Android NDK documentation which is in the Android NDK archive, in the folder docs/.
The main article about using Android NDK build system you can read in the file ANDROID-MK.html.
Also some additional useful information you can read in the files APPLICATION-MK.html, NDK-BUILD.html,
and in the files CPU-ARM-NEON.html, CPLUSPLUS-SUPPORT.html, PREBUILTS.html.
Theory: Android application structure
Usually code of an Android application has the following structure:root folder of the project/
jni/
libs/
res/
src/
AndroidManifest.xml
default.properties
... other files ...
where
the src folder contains Java code of the application,
the res folder contains resources of the application (images,
xml files describing UI layout , etc),
the libs folder will contain native libraries after successful
build,
and the jni folder contains C/C++ application source code and
NDK’s build scripts Android.mk andApplication.mk.
These scripts control the C++ build process (they are written in Makefile language).
Also the root folder should contain the following files
AndroidManifest.xml file presents essential information about
application to the Android system (name of the Application, name of main application’s package, components of the application, required permissions, etc)
It can be created using Eclipse wizard or android tool from Android SDK
default.properties is a text file containing information about
target Android platform and other build details.
This file is generated by Eclipse or can be created with android tool from Android SDK
Note
Both files (AndroidManifest.xml and default.properties)
are required to compile the C++ part of the application (NDK build system uses information from these files). If any of these files does not exist, compile the Java part of the project before the C++ part.
Theory: How to build Android application having C++ native part (from command line)
Here is the standard way to compile C++ part of an Android application:Open console and go to the root folder of Android application
cd <root folder of the project>/
Note
Alternatively you can go to the folder jni of Android project but samples
from OpenCV binary package are configured for building from project root level (because of relative path to the OpenCV library).
Run the following command
<path_where_NDK_is_placed>/ndk-build
Note
If you are working in cygwin shell and encounter an error saying that NDK does not find somecygwin‘s path then you might need to define the following environment variable:
export NDK_USE_CYGPATH=1
After executing this command the C++ part of the source code is compiled.
After that the Java part of the application can be (re)compiled (using either Eclipse or ant build tool).
Note
Some parameters can be set for the ndk-build:
Example 1: Verbose compilation
<path_where_NDK_is_placed>/ndk-build V=1
Example 2: Rebuild all
<path_where_NDK_is_placed>/ndk-build -B
Theory: How to build Android application having C++ native part (from Eclipse)
There are several possible ways to integrate compilation of C++ code by Android NDK into Eclipse compilation process. We recommend the approach taken from this site: http://mobilepearls.com/labs/ndk-builder-in-eclipse/Important
This instructions should be applied for each Android project in Eclipse workspace. So if you have 3 projects having C++ part then you need to configure 3 builders.
Below is an adapted version of this guide:
Navigate to Package Explorer window and expand your
project having JNI resources.
If you can not see libs folder under this project then you need to create it manually. (It will be required
on step 7, but you need to create it before you open project properties.)
Right click on your project in Package Explorer window
and select Properties.
In the Properties dialog select Builders menu
and press the New... button:
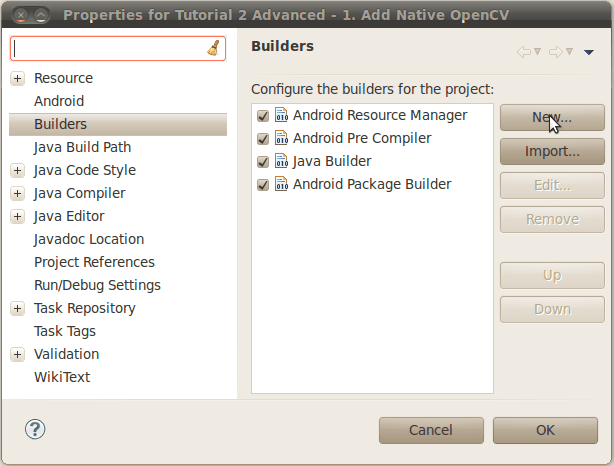
In the resulting dialog select the Program type and
press OK button:

In the Main tab fill the following fields:
Name - any name for your builder. (“Tutorial 2.1 Builder”
in my case.)
Note
This name has to be unique for each project in your workspace.
Location - full path to ndk-build tool.
UNIX
Just put full path to ndk-build into this filed. Also you can add some options to theArguments:guilabel: fied,
for example -B option.
Cygwin
Instead of path to the ndk-build tool you need to put full path to cygwin‘s bash.exelocation.
E.g: C:\cygwin\bin\bash.exe.
Put full path to ndk-build into the Arguments field
E.g. C:\Android\android-ndk-r6\ndk-build.
Go to the Environment tab and define an environment
variable:
PATH -
full path to the cygwin tools. E.g. C:\cygwin\bin

Working Directory - put path to your project into this field. Instead
of hardcoding full path you can click Browse Workspace... button and select your project.

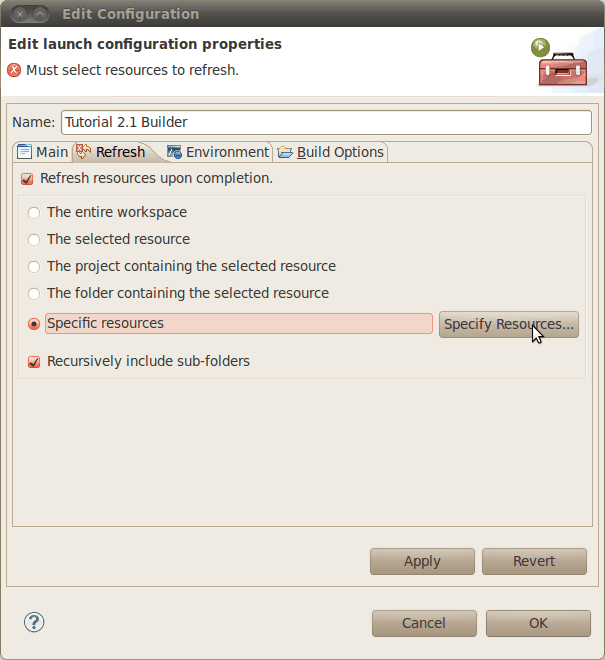
Go to the Refresh tab and select both Refresh
resources upon completion and Recursively include sub-folders.
Next set the Specific resources option and click Specify
resources... button:
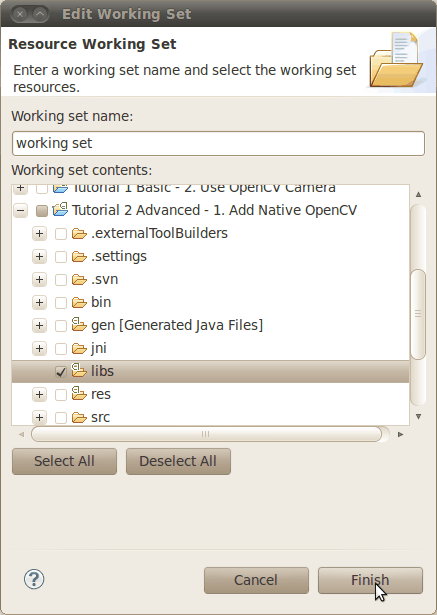
Select libs folder under your project and click Finish:
Go to the last tab Build options. Make sure that all
checkboxes are set as shown on the next screen:

Next, click the Specify resources... button.
Select jni folder of your project and click the Finish button:

Finally press OK in the builder configuration and
project properties dialogs. If you have automatic build turned on then console showing build log should appear:

Theory: The structure of Android.mk and Application.mk scripts
The script Android.mk usually have the following structure:LOCAL_PATH := $(call my-dir) include $(CLEAR_VARS) LOCAL_MODULE := <module_name> LOCAL_SRC_FILES := <list of .c and .cpp project files> <some variable name> := <some variable value> ... <some variable name> := <some variable value> include $(BUILD_SHARED_LIBRARY)
This is the minimal file Android.mk, which builds a C++ source code of an Android
application. Note that the first two lines and the last line are mandatory for any Android.mk.
Usually the file Application.mk is optional, but in case of project using OpenCV,
when STL and exceptions are used in C++, it also should be written. Example of the file Application.mk:
APP_STL := gnustl_static
APP_CPPFLAGS := -frtti -fexceptions
APP_ABI := armeabi-v7a
Practice: Build samples from OpenCV binary package
OpenCV binary package includes two samples having JNI resources:Tutorial 2 Advanced - 1. Add Native OpenCV
This sample illustrate how you can use OpenCV in C++ but without OpenCV Java API.
Tutorial 2 Advanced - 2. Mix Java+Native OpenCV
This sample shows how you can mix OpenCV Java API and native C++ code.
To build these samples you need to:
Fulfill all the steps, described in the tutorial Using
Android binary package with Eclipse.
Setup one builder for “Tutorial 2 Advanced - 1. Add Native OpenCV” project (as described in Theory:
How to build Android application having C++ native part (from Eclipse))
Setup second builder for “Tutorial 2 Advanced - 2. Mix Java+Native OpenCV” project (repeat the steps fromTheory:
How to build Android application having C++ native part (from Eclipse))
Clean these projects (in the main Eclipse menu: Project ‣ Clean...)
Run Eclipse build command (if option Build Automatically is not set)
Practice: Create an Android application, which uses OpenCV
To build your own Android application, which uses OpenCV from native part, the following steps should be done:The archive with OpenCV binary package should be downloaded and extracted to some folder (as example, into the home folder)
We recommend to use an environment variable to specify the location of OpenCV package. Full or relative path hardcoded in jni/Android.mk will
also work.
So, the environment variable OPENCV_PACKAGE_DIR should
be defined. The value of the variable should points to the folder, where the OpenCV package has been extracted.
As an example, on UNIX you can add add the following line into the hidden file .bashrc placed
in your home folder:
export OPENCV_PACKAGE_DIR = <path to the extracted OpenCV package>
Then relogin (or better reboot your computer).
Attention
without rebooting (or logout) this change might not work.
If you are a Windows user, then navigate to:
Windows 7 / Windows Vista
My Computer (Right Click on Icon) ‣ Properties (Link) ‣ Advanced System Settings (Link) ‣ Advanced
(Tab) ‣ Environment Variables (Button) ‣ System variables (Section)
Windows XP
My Computer (Right Click on Icon) ‣ Properties (Link) ‣ Advanced (Tab) ‣ Environment Variables
(Button) ‣ System variables (Section)
Create new variable OPENCV_PACKAGE_DIR and
similarly to UNIX relogin or reboot.
If you are setting NDK builder as described above in Theory:
How to build Android application having C++ native part (from Eclipse), then you can define this variable in builder settings. It can be done on thirdEnvironment tab
of the builder configuration window (we have already added some variables to this tab onWindows but skipped it for other platforms).
The file jni/Android.mk should be written for the current application
using the common rules for the file.
For detailed information see the Android NDK documentation from the Android NDK archive, in the file<path_where_NDK_is_placed>/docs/ANDROID-MK.html
The line
include $(OPENCV_PACKAGE_DIR)/share/OpenCV/OpenCV.mk
should be inserted into the jni/Android.mk file right after the line
include $(CLEAR_VARS)
Note
If your application utilize both native (C++) OpenCV and its Java API you need to put the following line before including OpenCV.mk to
avoid conflict between C++ and Java builders:
OPENCV_CAMERA_MODULES:=off
The file Application.mk should exist and should contain lines
APP_STL := gnustl_static
APP_CPPFLAGS := -frtti -fexceptions
Also the line
APP_ABI := armeabi-v7a
is recommended for the applications targeting modern ARMs
To build the C++ code the Android NDK script ndk-build should be run in the root directory of application. Then the C++ source code using
OpenCV will be built by Android NDK build system. After that the Java part of the application can be rebuild and the application can be installed on an Android device.
Note that this step requires calling the ndk-build script from the console. Instead of this step you can use integration of Android NDK into Eclipse as stated above in the section Theory:
How to build Android application having C++ native part (from Eclipse) .
Additional C++ support in Eclipse
Note that you can install additional C++ plugins in Eclipse:Open Help / Install New Software. This shows the Install dialog.
In the Work with drop-down list choose Helios
- http://download.eclipse.org/releases/helios (or Indigo - http://download.eclipse.org/releases/indigo depending
on your Eclipse version) and wait while the list of available software is loaded.
From the list of available software select Programming Languages ‣ C/C++
Development Tools.
Click Next, click Next again,
accept the agreement, and click the Finish button.
When installation is finished, click Reload
Installation in iOS
Required packages
GCC 4.x or laterCMake 2.8 or higher
Xcode 4.0 or higher
Getting the cutting-edge OpenCV from SourceForge SVN repository
Launch SVN client and checkout eitherthe current OpenCV snapshot from here: https://code.ros.org/svn/opencv/trunk
or the latest tested OpenCV snapshot from here: http://code.ros.org/svn/opencv/tags/latest_tested_snapshot
In MacOS it can be done using the following command in Terminal:
cd ~/<my_working _directory>
svn co https://code.ros.org/svn/opencv/trunk
Building OpenCV from source using CMake, using the command line
Create a temporary directory, which we denote as <cmake_binary_dir>, where you want to put the generated Makefiles, project files as well the object filees and output binariesEnter the <cmake_binary_dir> and type
cmake [<some optional parameters>] <path to the OpenCV source directory>
For example
cd ~/opencv
cd ..
mkdir release
cd release
cmake -GXcode -DCMAKE_TOOLCHAIN_FILE=../opencv/ios/cmake/Toolchains/Toolchain-iPhoneOS_Xcode.cmake -DCMAKE_INSTALL_PREFIX=../OpenCV_iPhoneOS -DCMAKE_BUILD_TYPE=RELEASE ../opencv
Enter the created temporary directory (<cmake_binary_dir>) and proceed with:
xcodebuild -sdk iphoneos -configuration Release -target ALL_BUILD
xcodebuild -sdk iphoneos -configuration Release -target install install
from: http://www.opencv.org.cn/opencvdoc/2.3.2/html/doc/tutorials/introduction/table_of_content_introduction/table_of_content_introduction.html#table-of-content-introduction

相关文章推荐
- linux解压覆盖命令
- Centos 6.5 安装icingaweb1 中文版部署
- VMware和CentOS7安装和配置
- linux下查看java 占用cpu使用情况
- linux软件安装与卸载
- Linux基础入门(1):用户及文件权限管理
- 关于linux上文件无法正确显示中文的情况解决
- rcInsDriver
- Linux安装卸载MySQL以及修改MySQL初始密码
- Linux下OpenSSL客户端中使用req命令来生成证书的教程
- linux下查找包含BOM头的文件和清除BOM头命令
- Centos 日志处理
- linux怎么删除文件夹?Linux删除文件夹命令
- Linux系统下安装rz/sz命令及使用说明
- linux中cron用法
- centos rm -rf 恢复删除的文件
- linux里的backlog详解
- Linux LVM硬盘管理及LVM扩容
- centos6.5安装nodejs
- 转:Linux系统中各个目录的作用