10 个迅速提升你 Git 水平的提示
2016-04-21 16:25
375 查看
from : http://blog.csdn.net/fybon/article/details/51201382
from : http://www.oschina.net/translate/10-tips-git-next-level?cmp
1. Git Auto Completion
1. Git自动补全
2. Ignoring Files in Git
2. 在 Git 中忽略文件
3. Who Messed With My Code?
4. Review History of the Repository
4. 查看仓库历史记录
5. Never Lose Track of a Commit
5. 绝对不要丢失对Commit的跟踪
6. Staging Parts of a Changed File for a Commit
6. 暂存文件的部分改动
7. Squash Multiple Commits
7. 压缩多个Commit
8. Stash Uncommitted Changes
8. Stash未提交的更改
9. Check for Lost Commits
from : http://www.oschina.net/translate/10-tips-git-next-level?cmp
英文原文:10 Tips to Push
Your Git Skills to the Next Level
| Recently we published a couple of tutorials to get you familiar with Git basics and using Git in a team environment. The commands that we discussed were about enough to help a developer survive in the Git world. In this post, we will try to explore how to manage your time effectively and make full use of the features that Git provides. Note: Some commands in this article include part of the command in square brackets (e.g. git add -p [file_name]). In those examples, you would insert the necessary number, identifier, etc. without the square brackets. | 译者信息 最近我们推出了两个教程:熟悉Git的基本功能和让你在开发团队中熟练的使用Git . 我们所讨论的命令足够一个开发者在Git使用方面游刃有余。在这篇文章中,我们试图探索怎样有效的管理你的时间和充分的使用Git提供的功能。 注:本文中,一些命令包含了方括号中的部分内容(例如:git add -p [file_name]).在这些示例中,你将插入必要的数字、标示符等等,如果没有方括号。 |
1. Git Auto Completion
| If you run Git commands through the command line, it’s a tiresome task to type in the commands manually every single time. To help with this, you can enable auto completion of Git commands within a few minutes. To get the script, run the following in a Unix system: cd ~ curl https://raw.github.com/git/git/master/contrib/completion/git-completion.bash -o ~/.git-completion.bash Next, add the following lines to your ~/.bash_profilefile: if [ -f ~/.git-completion.bash ]; then . ~/.git-completion.bash fi Although I have mentioned this earlier, I can not stress it enough: If you want to use the features of Git fully, you should definitely shift to the command line interface! | 译者信息 |
1. Git自动补全
| 假使你使用命令行工具运行Git命令,那么每次手动输入各种命令是一件很令人厌烦的事情。 为了解决这个问题,你可以启用Git的自动补全功能,完成这项工作仅需要几分钟。 为了得到这个脚本,在Unix系统下运行以下命令: cd ~ curl https://raw.github.com/git/git/master/contrib/completion/git-completion.bash -o ~/.git-completion.bash 然后,添加下面几行到你的 ~/.bash_profile 文件中: if [ -f ~/.git-completion.bash ]; then . ~/.git-completion.bash fi 尽管早些时候我们已经提到这个,但是强调的不够充分。如果你想使用git的全部功能特性, 你绝对应该切换到命令行界面! |
2. Ignoring Files in Git
Are you tired of compiled files (like .pyc) appearing in your Git repository? Or are you so fed up that you have added them to Git? Look no further, there is a way through which you can tell Git to ignore certain files and directories altogether. Simply create a file with the name .gitignoreand list the files and directories that you don’t want Git to track. You can make exceptions using the exclamation mark(!). *.pyc *.exe my_db_config/ !main.pyc | 译者信息 |
2. 在 Git 中忽略文件
你是不是很烦那些编译过的文件 (比如 .pyc) 出现在你的 Git 仓库中?或者说你已经受够了已经把它们都加进了 Git 仓库?好了,这有个办法可以让你告诉 Git 忽略掉那些特定的文件和文件夹。只需要创建一个名为 .gitignore 然后列出那些你不希望 Git 跟踪的文件和文件夹。你还可以添加例外,通过使用感叹号(!)。*.pyc *.exe my_db_config/ !main.pyc |
3. Who Messed With My Code?
It’s the natural instinct of human beings to blame others when something goes wrong. If your production server is broke, it’s very easy to find out the culprit — just do a git blame. This command shows you the author of every line in a file, the commit that saw the last change in that line, and the timestamp of the commit. git blame [file_name] 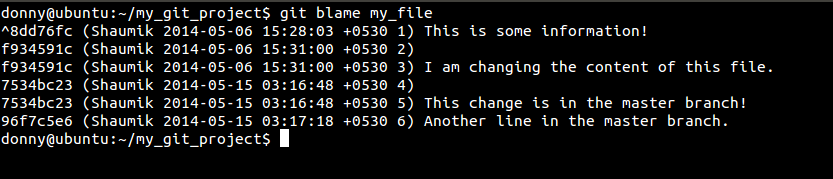 And in the screenshot below, you can see how this command would look on a bigger repository: 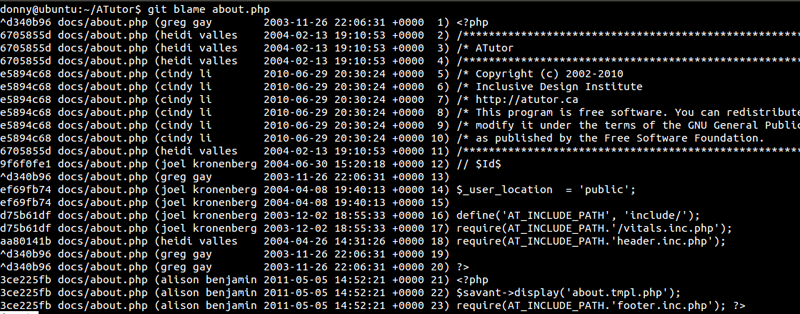 | 译者信息 |
3. 是谁弄乱了我的代码?
当事情出错时,先去指责别人是人类的天性之一。如果你的产品服务器挂了,使用git blame命令可以很容易找出罪魁祸首。这个命令可以将文件中的每一行的作者、最新的变更提交和提交时间展示出来。git blame [file_name] 在下面的截图中你可以看到命令是如何在更大的目录中搜寻。 |
4. Review History of the Repository
We had a look at the use of git login a previous tutorial, however, there are three options that you should know about. --oneline- Compresses the information shown beside each commit to a reduced commit hash and the commit message, all shown in a single line. --graph- This option draws a text-based graphical representation of the history on the left hand side of the output. It’s of no use if you are viewing the history for a single branch. --all- Shows the history of all branches. Here’s what a combination of the options looks like: 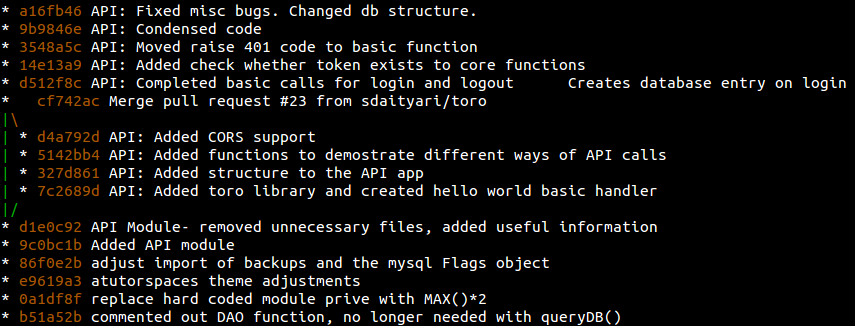 | 译者信息 |
4. 查看仓库历史记录
| 上一节我们已经学习了如何使用 git log ,不过,这里还有三个你应该知道的选项。 --oneline- 压缩模式,在每个提交的旁边显示经过精简的提交哈希码和提交信息,以一行显示。 --graph- 图形模式,使用该选项会在输出的左边绘制一张基于文本格式的历史信息表示图。如果你查看的是单个分支的历史记录的话,该选项无效。 --all- 显示所有分支的历史记录 把这些选项组合起来之后,输出看起来会像这样: |
5. Never Lose Track of a Commit
Let’s say you committed something you didn’t want to and ended up doing a hard reset to come back to your previous state. Later, you realize you lost some other information in the process and want to get it back, or at least view it. This is where git reflogcan help. A simple git logshows you the latest commit, its parent, its parent’s parent, and so on. However, git reflogis a list of commits that the head was pointed to. Remember that it’s local to your system; it’s not a part of your repository and not included in pushes or merges. If I run git log, I get the commits that are a part of my repository: 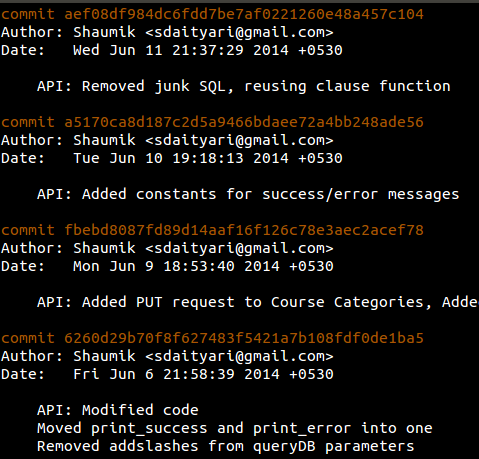 However, a git reflogshows a commit ( b1b0ee9– HEAD@{4}) that was lost when I did a hard reset: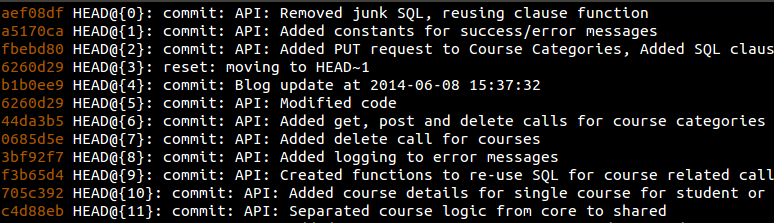 | 译者信息 |
5. 绝对不要丢失对Commit的跟踪
| 假设你不小心提交了些你不想要的东西,不得不做一次强制重置来恢复到之前的状态。然后,你意识到在这一过程中你丢失了其它一些信息并且想要把它们找回来,或者至少瞅一眼。这正是git reflog可以做到的。 一个简单的git log命令可以为你展示最后一次commit,以及它的父亲,还有它父亲的父亲等等。而git reflog则列出了head曾经指向过的一系列commit。要明白它们只存在于你本机中;而不是你的版本仓库的一部分,也不包含在push和merge操作中。 如果我运行git log命令,我可以看到一些commit,它们都是我仓库的一部分: 然而,一个git reflog命令则展示了一次commit (b1b0ee9–HEAD@{4}),它正是我刚才进行强制重置时弄丢的: |
6. Staging Parts of a Changed File for a Commit
| It is generally a good practice to make feature-based commits, that is, each commit must represent a feature or a bug fix. Consider what would happen if you fixed two bugs, or added multiple features without committing the changes. In such a situation situation, you could put the changes in a single commit. But there is a better way: Stage the files individually and commit them separately. Let’s say you’ve made multiple changes to a single file and want them to appear in separate commits. In that case, we add files by prefixing -pto our add commands. git add -p [file_name] Let’s try to demonstrate the same. I have added three new lines to file_nameand I want only the first and third lines to appear in my commit. Let’s see what a git diffshows us. 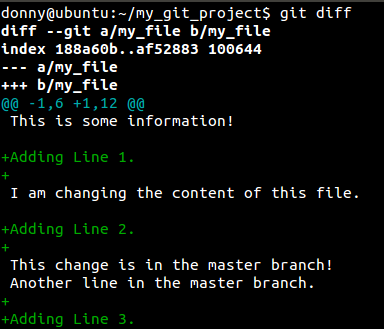 And let’s see what happes when we prefix a -pto our addcommand. 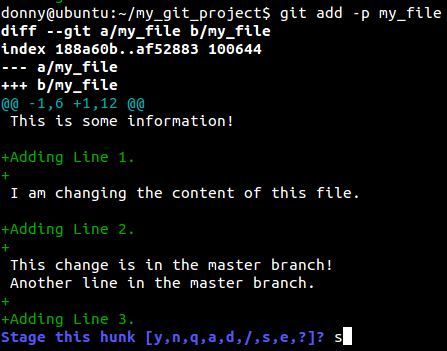 It seems that Git assumed that all the changes were a part of the same idea, thereby grouping it into a single hunk. You have the following options: Enter y to stage that hunk Enter n to not stage that hunk Enter e to manually edit the hunk Enter d to exit or go to the next file. Enter s to split the hunk. In our case, we definitely want to split it into smaller parts to selectively add some and ignore the rest. 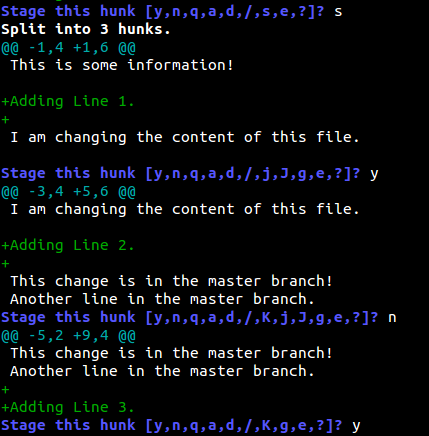 As you can see, we have added the first and third lines and ignored the second. You can then view the status of the repository and make a commit. 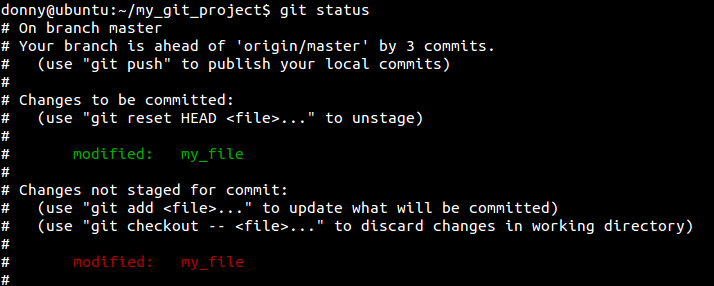 | 译者信息 |
6. 暂存文件的部分改动
| 一般情况下,创建一个基于特性的提交是比较好的做法,意思是每次提交都必须代表一个新特性的产生或者是一个bug的修复。如果你修复了两个bug,或是添加了多个新特性但是却没有提交这些变化会怎样呢?在这种情况下,你可以把这些变化放在一次提交中。但更好的方法是把文件暂存(Stage)然后分别提交。 例如你对一个文件进行了多次修改并且想把他们分别提交。这种情况下,你可以在 add 命令中加上 -p 参数 git add -p [file_name] 我们来演示一下在 file_name 文件中添加了3行文字,但只想提交第一行和第三行。先看一下 git diff 显示的结果: 然后再看看在 add 命令中添加 -p 参数是怎样的? 看上去,Git 假定所有的改变都是针对同一件事情的,因此它把这些都放在了一个块里。你有如下几个选项: 输入 y 来暂存该块 输入 n 不暂存 输入 e 手工编辑该块 输入 d 退出或者转到下一个文件 输入 s 来分割该块 在我们这个例子中,最终是希望分割成更小的部分,然后有选择的添加或者忽略其中一部分。 正如你所看到的,我们添加了第一行和第三行而忽略了第二行。之后你可以查看仓库状态之后并进行提交。 |
7. Squash Multiple Commits
| When you submit your code for review and create a pull request (which happens often in open source projects), you might be asked to make a change to your code before it’s accepted. You make the change, only to be asked to change it yet again in the next review. Before you know it, you have a few extra commits. Ideally, you could squash them into one using the rebasecommand. git rebase -i HEAD~[number_of_commits] If you want to squash the last two commits, the command that you run is the following. git rebase -i HEAD~2 On running this command, you are taken to an interactive interface listing the commits and asking you which ones to squash. Ideally, you pickthe latest commit and squashthe old ones.  You are then asked to provide a commit message to the new commit. This process essentially re-writes your commit history. 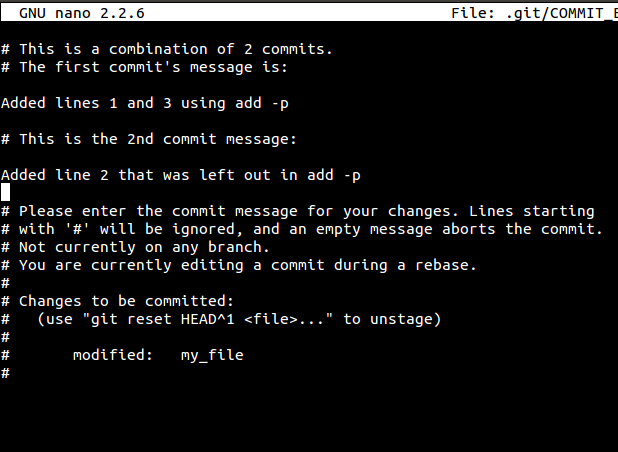 | 译者信息 |
7. 压缩多个Commit
当你提交代码进行代码审查时或者创建一次pull request (这在开源项目中经常发生),你的代码在被接受之前会被要求做一些变更。于是你进行了变更,并且直到下一次审查之前你没有再次被要求进行变更过。在你知道又要进行变更之前,你已经有了一些额外的commit。理想情况下,你可以用rebase命令把多个commit压缩成一个。git rebase -i HEAD~[number_of_commits] 如果你想要压缩最后两个commit,你需要运行下列命令。 git rebase -i HEAD~2 运行该命令时,你会看到一个交互界面,列出了许多commit让你选择哪些需要进行压缩。理想情况下,你选择最后一次commit并把其它老commit都进行压缩。 然后会要求你为新的commit录入提交信息。这一过程本质上重写了你的commit历史。 |
8. Stash Uncommitted Changes
| Let’s say you are working on a certain bug or a feature, and you are suddenly asked to demonstrate your work. Your current work is not complete enough to be committed, and you can’t give a demonstration at this stage (without reverting the changes). In such a situation, git stashcomes to the rescue. Stash essentially takes all your changes and stores them for further use. To stash your changes, you simply run the following- git stash To check the list of stashes, you can run the following: git stash list  If you want to un-stash and recover the uncommitted changes, you apply the stash: git stash apply In the last screenshot, you can see that each stash has an indentifier, a unique number (although we have only one stash in this case). In case you want to apply only selective stashes, you add the specific identifier to the applycommand: git stash apply stash@{2}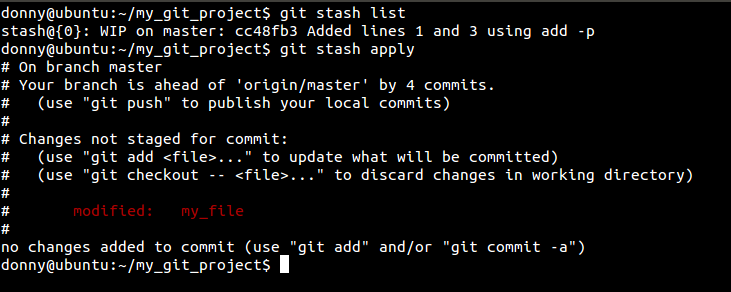 | 译者信息 |
8. Stash未提交的更改
你正在修改某个bug或者某个特性,又突然被要求展示你的工作。而你现在所做的工作还不足以提交,这个阶段你还无法进行展示(不能回到更改之前)。在这种情况下, git stash可以帮助你。stash在本质上会取走所有的变更并存储它们为以备将来使用。stash你的变更,你只需简单地运行下面的命令-git stash 希望检查stash列表,你可以运行下面的命令: git stash list 如果你想要解除stash并且恢复未提交的变更,你可以进行apply stash: git stash apply 在屏幕截图中,你可以看到每个stash都有一个标识符,一个唯一的号码(尽管在这种情况下我们只有一个stash)。如果你只想留有余地进行apply stash,你应该给apply添加特定的标识符: git stash apply stash@{2} |
9. Check for Lost Commits
Although reflogis one way of checking for lost commits, it’s not feasible in large repositories. That is when the fsck(file system check) command comes into play. git fsck --lost-found 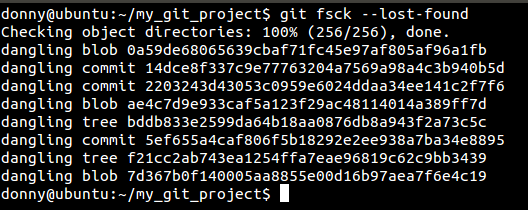 Here you can see a lost commit. You can check the changes in the commit by running git show [commit_hash]or recover it by running git merge [commit_hash]. git fsckhas an advantage over reflog. Let’s say you deleted a remote branch and then cloned the repository. With fsckyou can search for and recover the deleted remote branch. | 译者信息 |
9.检查丢失的提交
尽管 reflog 是唯一检查丢失提交的方式。但它不是适应用于大型的仓库。那就是 fsck(文件系统检测)命令登场的时候了。git fsck --lost-found 这里你可以看到丢掉的提交。你可以通过运行 git show [commit_hash] 查看提交之后的改变或者运行git merge [commit_hash] 来恢复到之前的提交。 git fsck 相对reflog是有优势的。比方说你删除一个远程的分支然后关闭仓库。 用fsck 你可以搜索和恢复已删除的远程分支。 |

相关文章推荐
- MySQL 中对于同一表的两种操作
- 打金字招牌,交世界朋友,做全球市场——轮值CEO郭平2015年年报致辞
- _tprintf输出中文
- Actual practice - search some columns in one table but not that table - 8
- 是个末排序的数字
- 三位数成一位数
- 一位数乘以一位数
- WPF 窗体显示最前端
- C#中Invoke的用法(转)
- Linq查询操作之投影操作
- Java类代码块执行顺序
- maven的pom报plugins缺失的解决方法
- JS拦截方法
- Bzoj:1758:[Wc2010]重建计划:树的点分治
- 【架构】关于RabbitMQ
- java要注意的问题1
- Android天气预报程序(八)
- 在ASP.NET中自动合并小图片并使用CSS Sprite显示出来
- AdaBoost人脸检测原理
- Microsoft.ACE.OLEDB.12.0