Fragment初探
2016-04-16 21:30
246 查看
Fragment是android3.0以上的api,用来解决平板屏幕空间过大等问题。
<LinearLayout xmlns:android="http://schemas.android.com/apk/res/android"
xmlns:tools="http://schemas.android.com/tools"
android:layout_width="match_parent"
android:layout_height="match_parent"
tools:context=".MainActivity"
android:orientation="horizontal"
>
<FrameLayout
android:id="@+id/fl"
android:layout_weight="1"
android:layout_width="0dp"
android:layout_height="match_parent"
></FrameLayout>
<LinearLayout
android:layout_width="wrap_content"
android:layout_height="match_parent"
android:orientation="vertical"
>
<Button
android:layout_width="wrap_content"
android:layout_height="wrap_content"
android:text="fragment01"
android:onClick="click1"
/>
<Button
android:layout_width="wrap_content"
android:layout_height="wrap_content"
android:text="fragment02"
android:onClick="click2"
/>
<Button
android:layout_width="wrap_content"
android:layout_height="wrap_content"
android:text="fragment03"
android:onClick="click3"
/>
</LinearLayout>
</LinearLayout>
2.建立fragment.xml文件
<?xml version="1.0" encoding="utf-8"?>
<LinearLayout xmlns:android="http://schemas.android.com/apk/res/android"
android:layout_width="match_parent"
android:layout_height="match_parent"
android:orientation="vertical"
android:background="#ff0000"
>
<TextView
android:layout_width="wrap_content"
android:layout_height="wrap_content"
android:text="热情的红色"
android:textSize="20sp"
/>
</LinearLayout>
3.创建Fragment类
public class Fragment01 extends Fragment {
//返回的view对象会作为fragment01的内容显示在屏幕上
@Override
public View onCreateView(LayoutInflater inflater, ViewGroup container,
Bundle savedInstanceState) {
// TODO Auto-generated method stub
View v = inflater.inflate(R.layout.fragment01, null);
return v;
}
}
4.在MainActivity中加入Fragment
public class MainActivity extends Activity {
private Fragment03 fg3;
@Override
protected void onCreate(Bundle savedInstanceState) {
super.onCreate(savedInstanceState);
setContentView(R.layout.activity_main);
fg3 = new Fragment03();
//获取fragment管理器
FragmentManager fm = getFragmentManager();
//打开事务
FragmentTransaction ft = fm.beginTransaction();
//把内容显示至帧布局
ft.replace(R.id.fl, fg3);
//提交
ft.commit();
}
public void click1(View v){
//把fragment01的界面显示至帧布局中
//创建fragment对象
Fragment01 fg1 = new Fragment01();
//获取fragment管理器
FragmentManager fm = getFragmentManager();
//打开事务
FragmentTransaction ft = fm.beginTransaction();
//把内容显示至帧布局
ft.replace(R.id.fl, fg1);
//提交
ft.commit();
}
public void click2(View v){
//把fragment01的界面显示至帧布局中
//创建fragment对象
Fragment02 fg2 = new Fragment02();
//获取fragment管理器
FragmentManager fm = getFragmentManager();
//打开事务
FragmentTransaction ft = fm.beginTransaction();
//把内容显示至帧布局
ft.replace(R.id.fl, fg2);
//提交
ft.commit();
}
public void click3(View v){
//把fragment01的界面显示至帧布局中
//获取fragment管理器
FragmentManager fm = getFragmentManager();
//打开事务
FragmentTransaction ft = fm.beginTransaction();
//把内容显示至帧布局
ft.replace(R.id.fl, fg3);
//提交
ft.commit();
}
}
1.Activity需要继承FragmentActivity;
2.获取fragment管理器:FragmentManager fm = getSupportFragmentManager();
2.Fragment生命周期的方法和activity的生命周期是绑定的
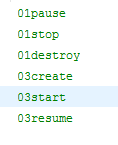
Fragment01切换到Fragment03的生命周期为:
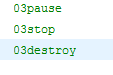
Fragment03按下Back键时的生命周期为:
Fragment01按下Home键时的生命周期为:

在Fragment中通过getActivity()来拿到对应Activity,需要类型转换来调用其方法。
一、Fragment用法:
1.建立activity_main.xml文件<LinearLayout xmlns:android="http://schemas.android.com/apk/res/android"
xmlns:tools="http://schemas.android.com/tools"
android:layout_width="match_parent"
android:layout_height="match_parent"
tools:context=".MainActivity"
android:orientation="horizontal"
>
<FrameLayout
android:id="@+id/fl"
android:layout_weight="1"
android:layout_width="0dp"
android:layout_height="match_parent"
></FrameLayout>
<LinearLayout
android:layout_width="wrap_content"
android:layout_height="match_parent"
android:orientation="vertical"
>
<Button
android:layout_width="wrap_content"
android:layout_height="wrap_content"
android:text="fragment01"
android:onClick="click1"
/>
<Button
android:layout_width="wrap_content"
android:layout_height="wrap_content"
android:text="fragment02"
android:onClick="click2"
/>
<Button
android:layout_width="wrap_content"
android:layout_height="wrap_content"
android:text="fragment03"
android:onClick="click3"
/>
</LinearLayout>
</LinearLayout>
2.建立fragment.xml文件
<?xml version="1.0" encoding="utf-8"?>
<LinearLayout xmlns:android="http://schemas.android.com/apk/res/android"
android:layout_width="match_parent"
android:layout_height="match_parent"
android:orientation="vertical"
android:background="#ff0000"
>
<TextView
android:layout_width="wrap_content"
android:layout_height="wrap_content"
android:text="热情的红色"
android:textSize="20sp"
/>
</LinearLayout>
3.创建Fragment类
public class Fragment01 extends Fragment {
//返回的view对象会作为fragment01的内容显示在屏幕上
@Override
public View onCreateView(LayoutInflater inflater, ViewGroup container,
Bundle savedInstanceState) {
// TODO Auto-generated method stub
View v = inflater.inflate(R.layout.fragment01, null);
return v;
}
}
4.在MainActivity中加入Fragment
public class MainActivity extends Activity {
private Fragment03 fg3;
@Override
protected void onCreate(Bundle savedInstanceState) {
super.onCreate(savedInstanceState);
setContentView(R.layout.activity_main);
fg3 = new Fragment03();
//获取fragment管理器
FragmentManager fm = getFragmentManager();
//打开事务
FragmentTransaction ft = fm.beginTransaction();
//把内容显示至帧布局
ft.replace(R.id.fl, fg3);
//提交
ft.commit();
}
public void click1(View v){
//把fragment01的界面显示至帧布局中
//创建fragment对象
Fragment01 fg1 = new Fragment01();
//获取fragment管理器
FragmentManager fm = getFragmentManager();
//打开事务
FragmentTransaction ft = fm.beginTransaction();
//把内容显示至帧布局
ft.replace(R.id.fl, fg1);
//提交
ft.commit();
}
public void click2(View v){
//把fragment01的界面显示至帧布局中
//创建fragment对象
Fragment02 fg2 = new Fragment02();
//获取fragment管理器
FragmentManager fm = getFragmentManager();
//打开事务
FragmentTransaction ft = fm.beginTransaction();
//把内容显示至帧布局
ft.replace(R.id.fl, fg2);
//提交
ft.commit();
}
public void click3(View v){
//把fragment01的界面显示至帧布局中
//获取fragment管理器
FragmentManager fm = getFragmentManager();
//打开事务
FragmentTransaction ft = fm.beginTransaction();
//把内容显示至帧布局
ft.replace(R.id.fl, fg3);
//提交
ft.commit();
}
}
二、Fragment向下兼容问题
在android3.0以下,只能v4包的Fragment。与上述代码有以下不同:1.Activity需要继承FragmentActivity;
2.获取fragment管理器:FragmentManager fm = getSupportFragmentManager();
三、Fragment生命周期
1.Fragment在切换的时候先销毁旧的在创建新的2.Fragment生命周期的方法和activity的生命周期是绑定的
Fragment01切换到Fragment03的生命周期为:
Fragment03按下Back键时的生命周期为:
Fragment01按下Home键时的生命周期为:
四、Fragment和Activity间传递数据
在Fragment和Activity中设置setXxx()方法,通过分别拿到对应Fragmeng对象和Activity对象来通过setXxx()方法来传递数据。在Fragment中通过getActivity()来拿到对应Activity,需要类型转换来调用其方法。

相关文章推荐
- 使用C++实现JNI接口需要注意的事项
- Android IPC进程间通讯机制
- Android Manifest 用法
- [转载]Activity中ConfigChanges属性的用法
- Android之获取手机上的图片和视频缩略图thumbnails
- Android之使用Http协议实现文件上传功能
- Android学习笔记(二九):嵌入浏览器
- android string.xml文件中的整型和string型代替
- i-jetty环境搭配与编译
- android之定时器AlarmManager
- android wifi 无线调试
- Android Native 绘图方法
- Android java 与 javascript互访(相互调用)的方法例子
- android 代码实现控件之间的间距
- android FragmentPagerAdapter的“标准”配置
- Android"解决"onTouch和onClick的冲突问题
- android:installLocation简析
- android searchView的关闭事件
- SourceProvider.getJniDirectories