CUDA[2] Hello,World
2016-04-14 13:41
381 查看
Section 0:Hello,World
这次我们亲自尝试一下如何用粗(CU)大(DA)写程序
CUDA最新版本是7.5,然而即使是最新版本也不兼容VS2015 。。。推荐使用VS2012
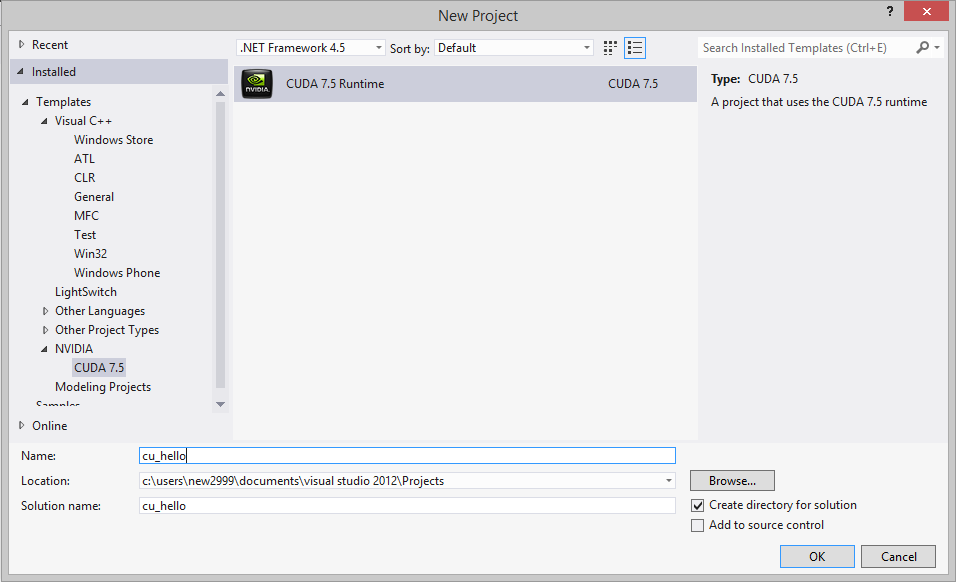
进入VS2012,新建工程,选择NVIDIA--CUDA Runtime
我们来写一个简单的向量加法程序:[Reference]
运行后就会出结果啦~
Section 1:一个好一点的代码风格
虽然刚才的程序已经能运行了,但是讲道理的话把所有的代码都写到cu文件里是很屎的风格。。。
下面再来写一个向量加法的程序:[Ref]
补充:对于一些计算量较大(GPU计算时间较长)的程序,有可能运行很短时间之后就崩溃掉,并出现“显卡驱动已停止”的提示。
这是因为驱动程序默认认为GPU只负责图形计算任务,如果有任务长时间占用GPU就会自动terminate掉。
解决方法如下:[Ref]
进入注册表->HKEY_LOCAL_MACHINE->System->CurrentControlSet->Control->GraphicsDrivers
新建DWORD键TdrLevel,键值为0。保存重启即可。
Section 2:还是要学习一个
下面系统介绍一下粗大里的关键字和规则:
[Ref]
__global__:kernel函数。在device(GPU)里运行。可以在host(CPU处的主程序)调用
__device__:只允许在device运行,在device调用
__constant__:constant memory,表示常量
__shared__:shared memory,block内共享的变量
这次我们亲自尝试一下如何用粗(CU)大(DA)写程序
CUDA最新版本是7.5,然而即使是最新版本也不兼容VS2015 。。。推荐使用VS2012
进入VS2012,新建工程,选择NVIDIA--CUDA Runtime
我们来写一个简单的向量加法程序:[Reference]
#include <stdio.h>

__global__ void saxpy(int n, float a, float *x, float *y)
//__global__关键字,表示是将要在GPU里并行运行的核函数
{
int i = blockIdx.x*blockDim.x + threadIdx.x;
if (i < n)
y[i] = a*x[i] + y[i];
}

int main()
{
int N = 10;
float *x, *y, *d_x, *d_y;             //都是指针,指向数组所在的内存/显存空间
x = (float*)malloc(N*sizeof(float));  //在内存中为x,y分配空间
y = (float*)malloc(N*sizeof(float));

cudaMalloc(&d_x, N*sizeof(float));    //在显存中为d_x,d_y分配空间
cudaMalloc(&d_y, N*sizeof(float));

for (int i = 0; i < N; i++)
{
x[i] = (float)i;
y[i] = 2.0f;
}

cudaMemcpy(d_x, x, N*sizeof(float), cudaMemcpyHostToDevice);
cudaMemcpy(d_y, y, N*sizeof(float), cudaMemcpyHostToDevice);
//将内存中x,y指向的数组空间拷贝到显存中d_x,d_y指向的数组空间

saxpy<<<1,N>>>(N, 10.0f, d_x, d_y);
//1个block,每个block里N个thread

cudaMemcpy(y, d_y, N*sizeof(float), cudaMemcpyDeviceToHost);
//将显存中计算好的d_y指向的数组空间拷贝到内存中y指向的数组空间

for (int i = 0; i < N; i++)
printf("%d  %.3f\n",i,y[i]);

getchar();
}
运行后就会出结果啦~
Section 1:一个好一点的代码风格
虽然刚才的程序已经能运行了,但是讲道理的话把所有的代码都写到cu文件里是很屎的风格。。。
下面再来写一个向量加法的程序:[Ref]
/*  kernel.cu   */
//cuda系函数必须放在cu文件里
#include "cuda_runtime.h"
#include "device_launch_parameters.h"

#include <stdio.h>

__global__ void addKernel(int *c, const int *a, const int *b)
{
int i = threadIdx.x;
c[i] = a[i] + b[i];
}

//cpp中不能直接调用核函数,所以在cu文件中还得写一个接口,负责分配内存等
void addWithCuda(int *c, const int *a, const int *b, unsigned int size)
{
int *dev_a = 0;
int *dev_b = 0;
int *dev_c = 0;

// Choose which GPU to run on, change this on a multi-GPU system.
cudaSetDevice(0);

// Allocate GPU buffers for three vectors (two input, one output)    .
cudaMalloc((void**)&dev_c, size * sizeof(int));
cudaMalloc((void**)&dev_a, size * sizeof(int));
cudaMalloc((void**)&dev_b, size * sizeof(int));

// Copy input vectors from host memory to GPU buffers.
cudaMemcpy(dev_a, a, size * sizeof(int), cudaMemcpyHostToDevice);
cudaMemcpy(dev_b, b, size * sizeof(int), cudaMemcpyHostToDevice);

// Launch a kernel on the GPU with one thread for each element.
addKernel<<<1, size>>>(dev_c, dev_a, dev_b);

// Copy output vector from GPU buffer to host memory.
cudaMemcpy(c, dev_c, size * sizeof(int), cudaMemcpyDeviceToHost);

cudaFree(dev_c);
cudaFree(dev_a);
cudaFree(dev_b);
cudaDeviceReset();
}

//-------------------------------------------------------------------------------
/* Source.cpp  */
#include"cstdio"
#include"cstring"

extern void addWithCuda(int *c, const int *a, const int *b, unsigned int size);
//.cpp是由C编译器来编译的。C编译器里不允许#include一个cu文件(不资词)
//若要引用cu里的函数,在main.cpp里外部extern声明一下,让VS转为NVCC编译器处理。

int main()
{
const int arraySize = 5;
const int a[arraySize] = { 1, 2, 3, 4, 5 };
const int b[arraySize] = { 10, 20, 30, 40, 50 };
int c[arraySize] = { 0 };

addWithCuda(c, a, b, arraySize);

printf("{1,2,3,4,5} + {10,20,30,40,50} = {%d,%d,%d,%d,%d}\n",
c[0], c[1], c[2], c[3], c[4]);

getchar();

return 0;
}
补充:对于一些计算量较大(GPU计算时间较长)的程序,有可能运行很短时间之后就崩溃掉,并出现“显卡驱动已停止”的提示。
这是因为驱动程序默认认为GPU只负责图形计算任务,如果有任务长时间占用GPU就会自动terminate掉。
解决方法如下:[Ref]
进入注册表->HKEY_LOCAL_MACHINE->System->CurrentControlSet->Control->GraphicsDrivers
新建DWORD键TdrLevel,键值为0。保存重启即可。
Section 2:还是要学习一个
下面系统介绍一下粗大里的关键字和规则:
[Ref]
__global__:kernel函数。在device(GPU)里运行。可以在host(CPU处的主程序)调用
__device__:只允许在device运行,在device调用
__constant__:constant memory,表示常量
__shared__:shared memory,block内共享的变量

相关文章推荐
- 优秀的程序员不会觉得累成狗是一种荣耀
- SpringMVC整合Redis 出现 afterPropertiesSet signature: ()V) Incompatible argument to function 解决办法
- NSURLSessionDownloadTask 下载/断点下载
- 基于Redis实现分布式锁-Redisson使用及源码分析
- CUDA[1] Introductory
- 关于Animation动画事件的几项测试
- 数组去重-数组塌陷的解决方法
- iOS新浪微博分享SDK Check List
- js中(function(){…})()立即执行函数写法理解
- lsof命令的用法
- Automatic versionCode generation in Android Gradle
- 全选反选取消选择及删除勾选结算
- iOS开发之设置navigationBar的背景颜色为无色
- hdu1231lis+起始位置和终点位置
- jboss规则引擎KIE Drools 6.3.0 Final 教程(3)
- 【Android】打开第三方App以及系统应用服务
- jboss规则引擎KIE Drools 6.3.0 Final 教程(3)
- 第三次作业
- Android 自定义AlertDialog提交表单
- linux字符cdev和Inode的关系