干货--Redis池化联接和搭建分布式集群
2016-04-10 22:22
429 查看
首先看一下思维导图
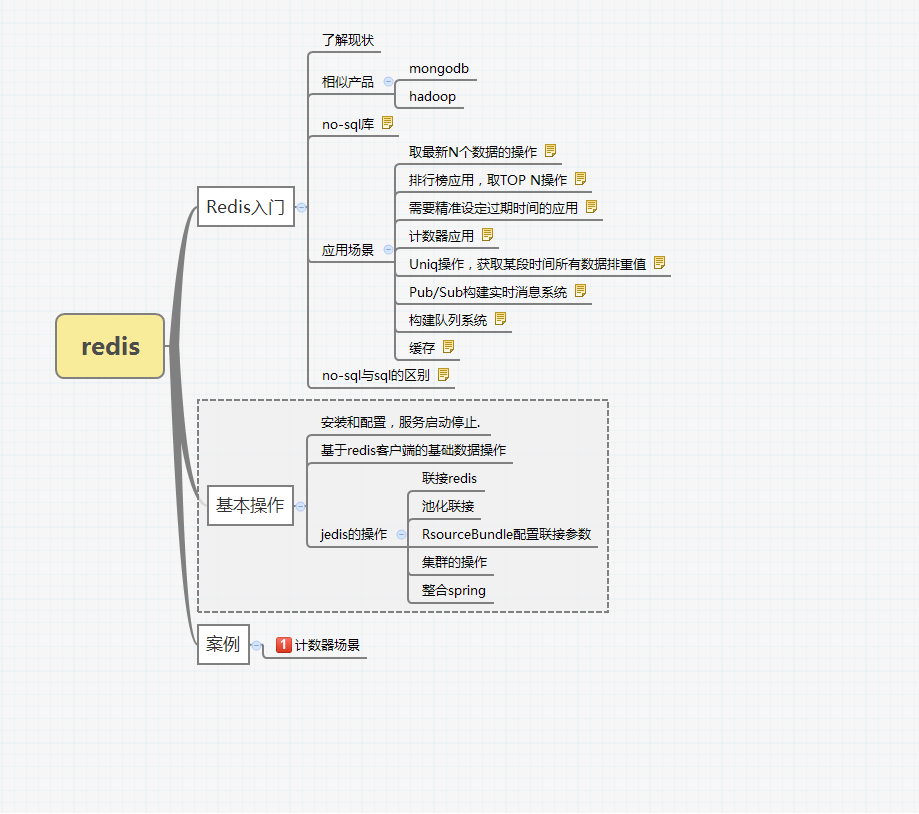
入门可以参看我上篇文章Redis 30分钟快速入门
本文主要内容
1: 联接远程redis服务器
2: 使用MyProperties池化联接
3: 使用ResourceBundle读取配置文件,池化联接
4: 如何释放联接 pool.returnResourceObject(jedis);
5: 集群的配置和使用
6.简单整合Spring
1: 联接远程redis服务器
2: 使用MyProperties池化联接
首先在根目录下穿点一个redis.properties的资源文件
再写一个Myproperties 类
最后池化连接
3: 使用ResourceBundle读取配置文件,池化联接
也可以用java.util.ResourceBundle读取,这样就不需要Myproperties了
4: 如何释放联接 pool.returnResourceObject(jedis);
5.集群的配置和使用
在配置文件里多加几个ip和端口
6.最后还可以整合Spring
加入配置文件
入门可以参看我上篇文章Redis 30分钟快速入门
本文主要内容
1: 联接远程redis服务器
2: 使用MyProperties池化联接
3: 使用ResourceBundle读取配置文件,池化联接
4: 如何释放联接 pool.returnResourceObject(jedis);
5: 集群的配置和使用
6.简单整合Spring
1: 联接远程redis服务器
import redis.clients.jedis.Jedis;

public class Test1 {

public static void main(String[] args) {
// 连接本地的 Redis 服务
Jedis jedis = new Jedis("169.254.173.100");
System.out.println("Connection to server sucessfully");
// 查看服务是否运行
System.out.println("Server is running: " + jedis.ping());
String keys = "name";
jedis.del(keys);
String vaule = jedis.set(keys, "tanggao");
System.out.println(vaule);
}

}
2: 使用MyProperties池化联接
首先在根目录下穿点一个redis.properties的资源文件
redis.pool.maxActive=1024
redis.pool.maxIdle=200
redis.pool.maxWait=1000
redis.pool.testOnBorrow=true
redis.pool.testOnReturn=true
redis.ip=169.254.173.100
redis.port=6379
再写一个Myproperties 类
package com.yc.beans2;

import java.io.IOException;
import java.util.Properties;

public class Myproperties extends Properties {

private static Myproperties mp;

private Myproperties(){
try {
this.load(Myproperties.class.getClassLoader().getResourceAsStream("redis.properties"));
} catch (IOException e) {
e.printStackTrace();
}
}

public static Myproperties getInstance(){
if(mp==null){
mp=new Myproperties();
}
return mp;
}

}
最后池化连接
package com.yc.beans2;

import redis.clients.jedis.Jedis;
import redis.clients.jedis.JedisPool;
import redis.clients.jedis.JedisPoolConfig;

public class Test1 {

private static JedisPool pool;
static {

JedisPoolConfig config = new JedisPoolConfig();
config.setMaxTotal(Integer.valueOf(Myproperties.getInstance().getProperty("redis.pool.maxActive")));
config.setMaxIdle(Integer.valueOf(Myproperties.getInstance().getProperty("redis.pool.maxIdle")));
config.setMaxWaitMillis(Long.valueOf(Myproperties.getInstance().getProperty("redis.pool.maxWait")));
config.setTestOnBorrow(Boolean.valueOf(Myproperties.getInstance().getProperty("redis.pool.testOnBorrow")));
config.setTestOnReturn(Boolean.valueOf(Myproperties.getInstance().getProperty("redis.pool.testOnReturn")));
pool = new JedisPool(config, Myproperties.getInstance().getProperty("redis.ip"),Integer.valueOf(Myproperties.getInstance().getProperty("redis.port")));
}

public static void main(String[] args) {
//连接本地的 Redis 服务
//  Jedis jedis = new Jedis("169.254.173.100");
Jedis jedis = pool.getResource();
String keys="name";
jedis.del(keys);
String vaule=  jedis.set(keys, "tanggao");
System.out.println(vaule);
}

}
3: 使用ResourceBundle读取配置文件,池化联接
也可以用java.util.ResourceBundle读取,这样就不需要Myproperties了
package com.yc.beans3;

import java.util.ResourceBundle;

import redis.clients.jedis.Jedis;
import redis.clients.jedis.JedisPool;
import redis.clients.jedis.JedisPoolConfig;

public class Test1 {

private static JedisPool pool;
static {
ResourceBundle bundle = ResourceBundle.getBundle("redis");
if (bundle == null) {
throw new IllegalArgumentException(
"[redis.properties] is not found!");
}
JedisPoolConfig config = new JedisPoolConfig();
config.setMaxTotal(Integer.valueOf(bundle
.getString("redis.pool.maxActive")));
config.setMaxIdle(Integer.valueOf(bundle
.getString("redis.pool.maxIdle")));
config.setMaxWaitMillis(Long.valueOf(bundle.getString("redis.pool.maxWait")));
config.setTestOnBorrow(Boolean.valueOf(bundle
.getString("redis.pool.testOnBorrow")));
config.setTestOnReturn(Boolean.valueOf(bundle
.getString("redis.pool.testOnReturn")));
pool = new JedisPool(config, bundle.getString("redis.ip"),
Integer.valueOf(bundle.getString("redis.port")));
}

public static void main(String[] args) {
//连接本地的 Redis 服务
//  Jedis jedis = new Jedis("169.254.173.100");
Jedis jedis = pool.getResource();
System.out.println("Connection to server sucessfully");
//查看服务是否运行
System.out.println("Server is running: "+jedis.ping());
String keys="name";
jedis.del(keys);
String vaule=  jedis.set(keys, "tanggao");
System.out.println(vaule);
}

}
4: 如何释放联接 pool.returnResourceObject(jedis);
package com.yc.beans4;

import java.util.LinkedList;
import java.util.List;
import java.util.ResourceBundle;

import redis.clients.jedis.Jedis;
import redis.clients.jedis.JedisPool;
import redis.clients.jedis.JedisPoolConfig;
import redis.clients.jedis.JedisShardInfo;
import redis.clients.jedis.ShardedJedis;
import redis.clients.jedis.ShardedJedisPool;

public class Test1 {

private static JedisPool pool;

static {
ResourceBundle bundle = ResourceBundle.getBundle("redis");
if (bundle == null) {
throw new IllegalArgumentException("[redis.properties] is not found!");
}
JedisPoolConfig config = new JedisPoolConfig();
config.setMaxTotal(Integer.valueOf(bundle.getString("redis.pool.maxActive")));
config.setMaxIdle(Integer.valueOf(bundle.getString("redis.pool.maxIdle")));
config.setMaxWaitMillis(Long.valueOf(bundle.getString("redis.pool.maxWait")));
config.setTestOnBorrow(Boolean.valueOf(bundle.getString("redis.pool.testOnBorrow")));
config.setTestOnReturn(Boolean.valueOf(bundle.getString("redis.pool.testOnReturn")));
pool = new JedisPool(config, bundle.getString("redis.ip"), Integer.valueOf(bundle.getString("redis.port")));
}

public static void main(String[] args) {
// 连接本地的 Redis 服务
// Jedis jedis = new Jedis("169.254.173.100");
Jedis jedis = pool.getResource();
System.out.println("Connection to server sucessfully");
// 查看服务是否运行
System.out.println("Server is running: " + jedis.ping());
String keys = "name";
jedis.del(keys);
String vaule = jedis.set(keys, "tanggao");
System.out.println(vaule);
pool.returnResourceObject(jedis);
}

}
5.集群的配置和使用
在配置文件里多加几个ip和端口
package com.yc.beans5;

import java.util.LinkedList;
import java.util.List;
import java.util.ResourceBundle;

import redis.clients.jedis.Jedis;
import redis.clients.jedis.JedisPool;
import redis.clients.jedis.JedisPoolConfig;
import redis.clients.jedis.JedisShardInfo;
import redis.clients.jedis.ShardedJedis;
import redis.clients.jedis.ShardedJedisPool;

public class Test1 {

private static ShardedJedisPool  pool;

static {
ResourceBundle bundle = ResourceBundle.getBundle("redis");
if (bundle == null) {
throw new IllegalArgumentException("[redis.properties] is not found!");
}
JedisPoolConfig config = new JedisPoolConfig();
config.setMaxTotal(Integer.valueOf(bundle.getString("redis.pool.maxActive")));
config.setMaxIdle(Integer.valueOf(bundle.getString("redis.pool.maxIdle")));
config.setMaxWaitMillis(Long.valueOf(bundle.getString("redis.pool.maxWait")));
config.setTestOnBorrow(Boolean.valueOf(bundle.getString("redis.pool.testOnBorrow")));
config.setTestOnReturn(Boolean.valueOf(bundle.getString("redis.pool.testOnReturn")));

JedisShardInfo jedisShardInfo1 = new JedisShardInfo(bundle.getString("redis.ip"),
Integer.valueOf(bundle.getString("redis.port")));
// JedisShardInfo jedisShardInfo2 = new JedisShardInfo(
// bundle.getString("redis2.ip"),Integer.valueOf(bundle.getString("redis.port")));

List<JedisShardInfo> list = new LinkedList<JedisShardInfo>();
list.add(jedisShardInfo1);
// list.add(jedisShardInfo2);
// pool = new JedisPool(config, bundle.getString("redis.ip"),Integer.valueOf(bundle.getString("redis.port")));
pool = new ShardedJedisPool(config, list);
}

public static void main(String[] args) {
// 连接本地的 Redis 服务
// Jedis jedis = new Jedis("169.254.173.100");
ShardedJedis jedis = pool.getResource();
String keys = "name";
jedis.del(keys);
String vaule = jedis.set(keys, "tanggao");
System.out.println(vaule);

pool.returnResourceObject(jedis);
}

}
6.最后还可以整合Spring
加入配置文件
<?xml version="1.0" encoding="UTF-8"?>
<beans xmlns="http://www.springframework.org/schema/beans"
xmlns:xsi="http://www.w3.org/2001/XMLSchema-instance" xmlns:aop="http://www.springframework.org/schema/aop"
xmlns:context="http://www.springframework.org/schema/context" xmlns:tx="http://www.springframework.org/schema/tx"
xsi:schemaLocation="http://www.springframework.org/schema/beans http://www.springframework.org/schema/beans/spring-beans.xsd http://www.springframework.org/schema/context http://www.springframework.org/schema/context/spring-context.xsd http://www.springframework.org/schema/aop http://www.springframework.org/schema/aop/spring-aop.xsd http://www.springframework.org/schema/tx http://www.springframework.org/schema/tx/spring-tx.xsd">
<!-- 启用注解解析器 -->
<context:annotation-config />
<!-- 因为采用了混合解析方式( 有一部分配置在xml中,有一部分在java类中,所以要让spring的注解解析器去扫描包 -->
<context:component-scan base-package="com.*" />

<context:property-placeholder location="classpath:redis.properties" />
<bean id="jedisPoolConfig" class="redis.clients.jedis.JedisPoolConfig">
<property name="maxTotal" value="${redis.pool.maxActive}" />
<property name="maxIdle" value="${redis.pool.maxIdle}" />
<property name="maxWaitMillis" value="${redis.pool.maxWait}" />
<property name="testOnBorrow" value="${redis.pool.testOnBorrow}" />
</bean>
<bean id="shardedJedisPool" class="redis.clients.jedis.ShardedJedisPool">
<constructor-arg index="0" ref="jedisPoolConfig" />
<constructor-arg index="1">
<list>
<bean class="redis.clients.jedis.JedisShardInfo">
<constructor-arg index="0" value="${redis.ip}" />
<constructor-arg index="1" value="${redis.port}"
type="int" />
</bean>
<!--
<bean class="redis.clients.jedis.JedisShardInfo">
<constructor-arg index="0" value="${redis2.ip}" />
<constructor-arg index="1" value="${redis.port}"
type="int" />
</bean>
-->
</list>
</constructor-arg>
</bean>
</beans>
package com.yc.beans6;

import static org.junit.Assert.*;

import org.junit.Before;
import org.junit.Test;
import org.springframework.context.ApplicationContext;
import org.springframework.context.support.ClassPathXmlApplicationContext;

import redis.clients.jedis.ShardedJedis;
import redis.clients.jedis.ShardedJedisPool;

public class TestSpring {
private ApplicationContext app;
private ShardedJedisPool pool;

@Before
public void before() throws Exception {
app = new ClassPathXmlApplicationContext("applicationContext.xml");
pool = (ShardedJedisPool) app.getBean("shardedJedisPool");
}

@Test
public void test() {

// 从池中获取一个Jedis对象
ShardedJedis jedis = pool.getResource();
String keys = "name1";
String value = "tang";
// 删数据
jedis.del(keys);
// 存数据
jedis.set(keys, value);
// 取数据
String v = jedis.get(keys);

System.out.println(v);

// 释放对象池
pool.returnResource(jedis);

assertEquals(value, v);
}
}

相关文章推荐
- Redis - 安装
- 干货--Redis 30分钟快速入门
- Redis学习一
- Redis入门 – Jedis存储Java对象 - (Java序列化为byte数组方式)
- Redis主从复制
- Redis配置参数说明
- 使用python对redis操作
- Redis中的简单动态字符串
- Redis命令-有序集合-zlexcount
- Linux上安装使用Redis
- Redis的高级应用
- Linux下redis的安装
- Redis学习入门
- Redis解决Tomcat共享Session
- MAMP下安装phpredis扩展(微原创)
- Redis中的字典
- 记录一次Centos7下php无法连接redis
- Redis命令-有序集合-zinterstore
- Mac下安装redis(微原创)
- Redis源码解析:14Redis服务器与客户端间的交互