C++实现队列
2016-04-10 09:50
253 查看
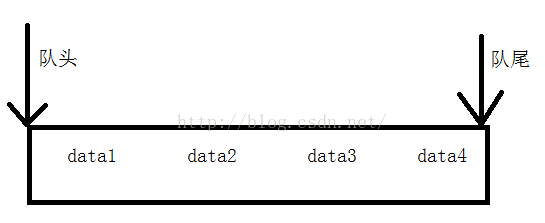
队列:队列具有先进先出的特性。
队列用链表实现较好,因为数据的插入和删除一个在尾上操作,一个在头上操作。用链表较方便。
测试用例:
如有不正确的地方,希望能够指出,一起学习,O(∩_∩)O谢谢了。
队列用链表实现较好,因为数据的插入和删除一个在尾上操作,一个在头上操作。用链表较方便。
<span style="font-family:Microsoft YaHei;font-size:18px;">#pragma once
#include<assert.h>
//队列使用链表进行实现的,这样就可以方便的在头和尾上进行操作,而不用大量的
//挪动数据,增加了效率。
template<class T>
struct ListNode//链表节点
{
T _data;			//数据
ListNode<T>* _next;	//指向下一个节点的指针

ListNode(const T& x)//ListNode的构造函数
:_data(x)
, _next(NULL)
{}
};
template<class T>
class Queue
{
typedef ListNode<T> Node;//typedef一下,方便后面的书写
public:
Queue()//构造函数
:_head(NULL)
{}

//析构函数
~Queue()
{
Clear();
}
//push
void Push(const T& x)
{
if (_head == NULL)//细节注意
_head = _tail= new Node(x);
//最开始时,没有节点,就创造个节点,让头和尾同时指向这个节点。
else
{
Node* tmp = new Node(x);//创造一个节点
_tail->_next = tmp;//然后让tail链上这个节点
_tail = tmp;//tmp变为尾
}
++_size;
}

//pop
void Pop()
{//由于是队列,所以只能先进先出,pop时先pop头结点位置的数据
if (_head == NULL)
{
cout << "NULL" << endl;
return;
}
else
{//让头结点指向下一个,删除头结点
Node* del = _head;
_head = _head->_next;
delete del;  //删除节点,以免造成内存泄露
--_size;
}

}
//empty
bool Empty()
{
return _head == NULL;
}
//size
size_t Size()
{
return _size;
}
//front
//Node* Front()
//{
//	return _head;
//}
T& Front()
{
assert(_head);
return _head->_data;
}
//back
//Node& Back()
//{
//	return _tail;
//}
T& Back()
{
return _tail->_data;
}
void Print()
{
Node* cur = _head;
while (cur)
{
cout << cur->_data << " ";
cur = cur->_next;
}
cout << endl;
}
protected:
void Clear()
{//析构函数中,遍历一遍,一个一个的进行析构。
Node* cur = _head;
while (cur)
{
Node* del = cur;
cur = cur->_next;
delete del;
}
_head = NULL;
}

protected:
Node* _head;//_head指向头,这样方便在头上的操作
Node* _tail;//_tail指向尾,方便在尾上的操作
size_t _size;//方便记录节点的个数

};

void TestQueue()
{
Queue<int> q;
q.Push(1);
q.Push(2);
q.Push(3);
q.Push(4);
q.Print();
cout << "q.Empty():" << q.Empty() << endl;
cout << "q.Size():" << q.Size() << endl;
cout << "q.Front():" << q.Front() << endl;
cout << "q.Back():" << q.Back() << endl;
q.Pop();
q.Print();
q.Pop();
q.Pop();
q.Pop();
q.Pop();
q.Print();
cout << "q.Empty:" << q.Empty() << endl;
cout << "q.Size():" << q.Size() << endl;
}</span>
测试用例:
<span style="font-family:Microsoft YaHei;font-size:18px;">#include<iostream>
using namespace std;
#include"Queue.h"

//test Push
void TestQueuePush()
{
Queue<int >  q1;
q1.Push(1);
q1.Push(2);
q1.Push(3);
q1.Push(4);
q1.Push(5);
while (!q1.Empty())
{
cout << q1.Front() << endl;
q1.Pop();
}
}

//test Pop
void Test2()
{
Queue<int >  q1;
q1.Push(1);
q1.Push(2);
q1.Push(3);
q1.Push(4);
q1.Push(5);
q1.Pop();
cout << q1.Front() << endl;
q1.Pop();
cout << q1.Front() << endl;
q1.Pop();
cout << q1.Front() << endl;
}
//test Empty
void Test3()
{
Queue<int >  q1;
cout<<q1.Empty()<<endl;
q1.Push(1);
cout << q1.Empty() << endl;
q1.Push(2);
cout << q1.Empty() << endl;
}
//test Front
void Test4()
{
Queue<int >  q1;
q1.Push(1);
cout << q1.Front() << endl;
q1.Push(2);
cout << q1.Front() << endl;
q1.Push(3);
cout << q1.Front() << endl;
q1.Push(4);
cout << q1.Front() << endl;
q1.Push(5);
cout<<q1.Front()<<endl;
}
//test Back
void Test5()
{
Queue<int >  q1;
q1.Push(1);
cout << q1.Back() << endl;
q1.Push(2);
cout << q1.Back() << endl;
q1.Push(3);
cout << q1.Back() << endl;
q1.Push(4);
cout << q1.Back() << endl;
q1.Push(5);
cout << q1.Back() << endl;
}

//test size
void Test6()
{

Queue<int >  q1;
cout << q1.size() << endl;
q1.Push(1);
cout << q1.size() << endl;
q1.Push(2);
cout << q1.size() << endl;
q1.Push(3);
cout << q1.size() << endl;
q1.Push(4);
cout << q1.size() << endl;
q1.Push(5);
cout<<q1.size()<<endl;
}
int main()
{
//TestQueuePush();
//Test2();
//Test3();
//Test4();
//Test5();
Test6();
system( "pause");
return 0;
}

</span>
如有不正确的地方,希望能够指出,一起学习,O(∩_∩)O谢谢了。

相关文章推荐
- C++:类的语法错误 error c2533:constructors not allowed a return type(构造函数不允许返回一个类型)
- c++基本应用
- C语言字符串转换为oc
- C++STL容器的基本特性和原理
- C++中类的声明与其成员函数的定义分离--以提高类的复用性
- 扫描线算法填充五角星
- C++作业3
- 取绝对值(in c语言)
- C++作业3
- [LeetCode]259. 3Sum Smaller
- C++ 进阶必备
- 使用stringstream对象简化类型转换
- c++实现栈
- 概览C++之const
- C++之容器
- Head First C 第十章 进程间通信 创建管道
- 深入理解c语言——‘\0’ ,‘0’, “0” ,0之间的区别
- C++之容器(关联容器)
- c++程序设计第一章 开始接触c++
- C 【位运算符 & | ^ ~ << >>】