Android源码-Volley
2016-04-05 17:39
639 查看
前段时间去面试,发现现在的公司还是挺看重对于底层的理解,一般会问下对于HTTP的理解,这里就介绍一下Google官方出的一个HTTP框架volley。
volley的使用网上有很多,比如说http://blog.csdn.net/fenghai22/article/details/44061307
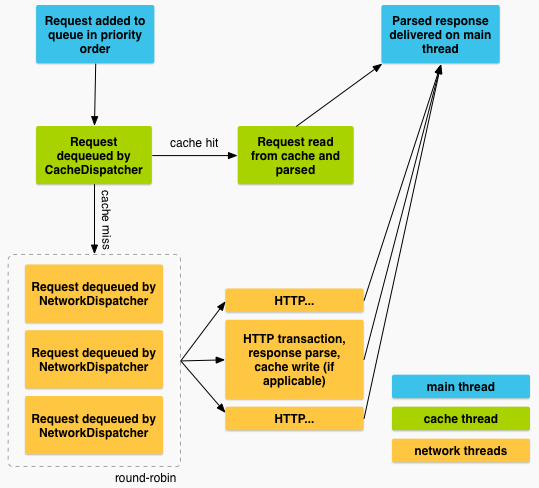
Volley框架最主要的是RequestQueue请求队列,通过Volley.newRequestQueue()方法获取RequestQueue对象。然后往请求队列里面添加各种请求,有缓存队列和网络队列两个队列进行处理,当缓存中有该url请求并且这次请求允许缓存时,会直接从缓存中返回,如果不允许或缓存中不存在这个请求url,就会把本次请求抛到网络队中进行处理,处理成功或出异常再进行回调。
new RequestQueue对象的过程首先指定了cache的存储路径,然后判断Android的版本号,new 不同的HttpStack对象。如果大于9就HurlStack,否则HttpClientStack。这两者的区别就是内部使用HttpURLConnection 和 HttpClient的区别。
使用HttpURLConnection执行HTTP请求的过程是,URL#openConnection()获取HttpURLConnection对象,对它设置一些连接超时,“https”的设置,http请求头的配置,当然还有最重要各种请求的请求参数,post请求参数需要重写Request的getParams()来传递,在这里是通过setConnectionParametersForRequest()中的addBodyIfExists()方法。从getBody()方法中获取map键值对,并转换为byte[]作为OutputStream传入HttpURLConnection。还有一些其他参数的配置,但这里请求差不多构建完成,接下来就是获取response,然后封装成HttpResponse对象返回。
使用HttpClient这种请求方式在Android会越来越少,在Android 6.0中已经不建议使用。这里也是只有Android 9一下的才会使用。现在这个市场份额应该不到1%了吧。
上面介绍了两种请求方式,继续回到RequestQueue,接下来就是把HttpStack封装为BasicNetwork,BasicNetwork的作用其实就是把请求再一次封装,并且把返回结果再封装为NetworkResponse。然后再将DiskBasedCache和BasicNetwork传入,new 出一个RequestQueue对象。这个就是Volley最最关键的请求队列。最后启动这个请求队列。
刚才在volley中已经new 了一个RequestQueue对象,并且调用了start()方法,现在就来看看它启动的时候做了哪些事情。
先暂停所有已经在运行的线程,然后开启一个缓存线程CacheDispatcher和n个网络线程NetworkDispatcher,默认个数是4个。但这里其实volley的初始化工作算是完成了,接下来就要等用户把请求添加进来的时候再进行下一步工作。
在这里首先把请求和队列进行绑定,并且把请求放入mCurrentRequests中,这个set表示的是还未被处理或正在被处理的请求。然后再对request进行编号标记。如果这个request设置为不需要缓存,就直接将它抛入mNetworkQueue网络请求的队列中去。如果需要缓存,就将其抛入mCacheQueue缓存队列中,前面还可以看到mWaitingRequests,这个是用来对请求的去重,相同请求只有第一次请求的时候会加入缓存队列,后面只会加入mWaitingRequests中。这样也就成功把请求放入相应的队列中去了。接下来就看看它在不同的队列中是如何被处理的。
这个网络线程首先把自己的优先级设为最高,然后进入死循环,一直从网络队列中去获取请求,没有请求就阻塞。获取到请求后,先判断它是否已经被取消,如果没有被取消,接下来版本号大于14就对网络请求打tag,这个是为了知道每个网络请求的数据量以及方便优化耗电量等。接下来就是使用Network进行网络请求,并且返回了NetworkResponse对象。如果请求返回重定向或者已经被处理过了,就直接结束。否则,对返回结果进行不同请求类型的解析,然后如果它是需要缓存就将它缓存到cache,再将它比较为已经处理过了,最后再将结果反馈给Request的回调方法。到这里整一个网络请求也就走完了。
缓存线程也是先把优先级设为最高,然后对缓存进行初始化。再进入死循环获取缓存队列里面的请求。这里使用了多个while(true)的嵌套,个人猜想是用来提高这个子线程的存活率。然后也是一样的判断请求是否已经取消,再从cache缓存中根据请求url去获取。如果获取不到缓存或是缓存已过期,就把这个请求抛到网络请求队列mNetworkQueue中去。否则把缓存封装为Response,然后返回Request回调。这里还需要判断这个缓存是否需要刷新,就是说当前这个缓存还是可以用的,但是最好再请求网络刷新一下,所以在回调之后又会请求网络,把缓存数据刷新一下。
好了,到这里缓存线程也走通了,整个缓存加网络请求算是理清楚了。现在来整体梳理一下
首先volley框架最关键的是他有网络请求和缓存两个队列
有缓存就读取缓存,没有缓存就把请求抛到网络请求队列中去。
它有四个(默认情况)网络请求线程在跑,但是没有对大数据进行特殊处理,所以说它比较适合多个请求并发但请求数据量较小的这种情况。
大概就是就是这些了吧,有什么不对,希望大家多多指点。
volley的使用网上有很多,比如说http://blog.csdn.net/fenghai22/article/details/44061307
Volley
Volley框架最主要的是RequestQueue请求队列,通过Volley.newRequestQueue()方法获取RequestQueue对象。然后往请求队列里面添加各种请求,有缓存队列和网络队列两个队列进行处理,当缓存中有该url请求并且这次请求允许缓存时,会直接从缓存中返回,如果不允许或缓存中不存在这个请求url,就会把本次请求抛到网络队中进行处理,处理成功或出异常再进行回调。
public static RequestQueue newRequestQueue(Context context, HttpStack stack, int maxDiskCacheBytes) {
File cacheDir = new File(context.getCacheDir(), "volley");
String userAgent = "volley/0";

try {
String network = context.getPackageName();
PackageInfo queue = context.getPackageManager().getPackageInfo(network, 0);
userAgent = network + "/" + queue.versionCode;
} catch (NameNotFoundException var7) {
;
}

if(stack == null) {
if(VERSION.SDK_INT >= 9) {
stack = new HurlStack();
} else {
stack = new HttpClientStack(AndroidHttpClient.newInstance(userAgent));
}
}

BasicNetwork network1 = new BasicNetwork((HttpStack)stack);
RequestQueue queue1;
if(maxDiskCacheBytes <= -1) {
queue1 = new RequestQueue(new DiskBasedCache(cacheDir), network1);
} else {
queue1 = new RequestQueue(new DiskBasedCache(cacheDir, maxDiskCacheBytes), network1);
}

queue1.start();
return queue1;
}
new RequestQueue对象的过程首先指定了cache的存储路径,然后判断Android的版本号,new 不同的HttpStack对象。如果大于9就HurlStack,否则HttpClientStack。这两者的区别就是内部使用HttpURLConnection 和 HttpClient的区别。
HurlStack
public HttpResponse performRequest(Request<?> request, Map<String, String> additionalHeaders) throws IOException, AuthFailureError {
String url = request.getUrl();
HashMap map = new HashMap();
map.putAll(request.getHeaders());
map.putAll(additionalHeaders);
if(this.mUrlRewriter != null) {
String parsedUrl = this.mUrlRewriter.rewriteUrl(url);
if(parsedUrl == null) {
throw new IOException("URL blocked by rewriter: " + url);
}

url = parsedUrl;
}

URL parsedUrl1 = new URL(url);
HttpURLConnection connection = this.openConnection(parsedUrl1, request);
Iterator responseCode = map.keySet().iterator();

while(responseCode.hasNext()) {
String protocolVersion = (String)responseCode.next();
connection.addRequestProperty(protocolVersion, (String)map.get(protocolVersion));
}

setConnectionParametersForRequest(connection, request);
ProtocolVersion protocolVersion1 = new ProtocolVersion("HTTP", 1, 1);
int responseCode1 = connection.getResponseCode();
if(responseCode1 == -1) {
throw new IOException("Could not retrieve response code from HttpUrlConnection.");
} else {
BasicStatusLine responseStatus = new BasicStatusLine(protocolVersion1, connection.getResponseCode(), connection.getResponseMessage());
BasicHttpResponse response = new BasicHttpResponse(responseStatus);
response.setEntity(entityFromConnection(connection));
Iterator var12 = connection.getHeaderFields().entrySet().iterator();

while(var12.hasNext()) {
Entry header = (Entry)var12.next();
if(header.getKey() != null) {
BasicHeader h = new BasicHeader((String)header.getKey(), (String)((List)header.getValue()).get(0));
response.addHeader(h);
}
}

return response;
}
}
使用HttpURLConnection执行HTTP请求的过程是,URL#openConnection()获取HttpURLConnection对象,对它设置一些连接超时,“https”的设置,http请求头的配置,当然还有最重要各种请求的请求参数,post请求参数需要重写Request的getParams()来传递,在这里是通过setConnectionParametersForRequest()中的addBodyIfExists()方法。从getBody()方法中获取map键值对,并转换为byte[]作为OutputStream传入HttpURLConnection。还有一些其他参数的配置,但这里请求差不多构建完成,接下来就是获取response,然后封装成HttpResponse对象返回。
HttpClientStack
public HttpResponse performRequest(Request<?> request, Map<String, String> additionalHeaders) throws IOException, AuthFailureError {
HttpUriRequest httpRequest = createHttpRequest(request, additionalHeaders);
addHeaders(httpRequest, additionalHeaders);
addHeaders(httpRequest, request.getHeaders());
this.onPrepareRequest(httpRequest);
HttpParams httpParams = httpRequest.getParams();
int timeoutMs = request.getTimeoutMs();
HttpConnectionParams.setConnectionTimeout(httpParams, 5000);
HttpConnectionParams.setSoTimeout(httpParams, timeoutMs);
return this.mClient.execute(httpRequest);
}
使用HttpClient这种请求方式在Android会越来越少,在Android 6.0中已经不建议使用。这里也是只有Android 9一下的才会使用。现在这个市场份额应该不到1%了吧。
上面介绍了两种请求方式,继续回到RequestQueue,接下来就是把HttpStack封装为BasicNetwork,BasicNetwork的作用其实就是把请求再一次封装,并且把返回结果再封装为NetworkResponse。然后再将DiskBasedCache和BasicNetwork传入,new 出一个RequestQueue对象。这个就是Volley最最关键的请求队列。最后启动这个请求队列。
RequestQueue
启动
先来看看RequestQueue最关键的一些参数private AtomicInteger mSequenceGenerator; private final Map<String, Queue<Request<?>>> mWaitingRequests; private final Set<Request<?>> mCurrentRequests; //这个是缓存队列 private final PriorityBlockingQueue<Request<?>> mCacheQueue; //这个是网络请求队列 private final PriorityBlockingQueue<Request<?>> mNetworkQueue; private static final int DEFAULT_NETWORK_THREAD_POOL_SIZE = 4; //缓存 private final Cache mCache; //网络请求 private final Network mNetwork; private final ResponseDelivery mDelivery; //网络请求子线程数组,因为要多个线程同时请求网络 private NetworkDispatcher[] mDispatchers; //缓存子线程 private CacheDispatcher mCacheDispatcher; private List<RequestQueue.RequestFinishedListener> mFinishedListeners;
刚才在volley中已经new 了一个RequestQueue对象,并且调用了start()方法,现在就来看看它启动的时候做了哪些事情。
/**
* Starts the dispatchers in this queue.
*/
public void start() {
stop();  // Make sure any currently running dispatchers are stopped.
// Create the cache dispatcher and start it.
mCacheDispatcher = new CacheDispatcher(mCacheQueue, mNetworkQueue, mCache, mDelivery);
mCacheDispatcher.start();

// Create network dispatchers (and corresponding threads) up to the pool size.
for (int i = 0; i < mDispatchers.length; i++) {
NetworkDispatcher networkDispatcher = new NetworkDispatcher(mNetworkQueue, mNetwork,
mCache, mDelivery);
mDispatchers[i] = networkDispatcher;
networkDispatcher.start();
}
}
先暂停所有已经在运行的线程,然后开启一个缓存线程CacheDispatcher和n个网络线程NetworkDispatcher,默认个数是4个。但这里其实volley的初始化工作算是完成了,接下来就要等用户把请求添加进来的时候再进行下一步工作。
添加请求
/**
* Adds a Request to the dispatch queue.
* @param request The request to service
* @return The passed-in request
*/
public Request add(Request request) {
// Tag the request as belonging to this queue and add it to the set of current requests.
request.setRequestQueue(this);
synchronized (mCurrentRequests) {
mCurrentRequests.add(request);
}

// Process requests in the order they are added.
request.setSequence(getSequenceNumber());
request.addMarker("add-to-queue");

// If the request is uncacheable, skip the cache queue and go straight to the network.
if (!request.shouldCache()) {
mNetworkQueue.add(request);
return request;
}

// Insert request into stage if there's already a request with the same cache key in flight.
synchronized (mWaitingRequests) {
String cacheKey = request.getCacheKey();
if (mWaitingRequests.containsKey(cacheKey)) {
// There is already a request in flight. Queue up.
Queue<Request> stagedRequests = mWaitingRequests.get(cacheKey);
if (stagedRequests == null) {
stagedRequests = new LinkedList<Request>();
}
stagedRequests.add(request);
mWaitingRequests.put(cacheKey, stagedRequests);
if (VolleyLog.DEBUG) {
VolleyLog.v("Request for cacheKey=%s is in flight, putting on hold.", cacheKey);
}
} else {
// Insert 'null' queue for this cacheKey, indicating there is now a request in
// flight.
mWaitingRequests.put(cacheKey, null);
mCacheQueue.add(request);
}
return request;
}
}
在这里首先把请求和队列进行绑定,并且把请求放入mCurrentRequests中,这个set表示的是还未被处理或正在被处理的请求。然后再对request进行编号标记。如果这个request设置为不需要缓存,就直接将它抛入mNetworkQueue网络请求的队列中去。如果需要缓存,就将其抛入mCacheQueue缓存队列中,前面还可以看到mWaitingRequests,这个是用来对请求的去重,相同请求只有第一次请求的时候会加入缓存队列,后面只会加入mWaitingRequests中。这样也就成功把请求放入相应的队列中去了。接下来就看看它在不同的队列中是如何被处理的。
NetworkDispatcher网络线程
先看最简单的也就是不需要缓存,直接进入网络线程。public void run() {
Process.setThreadPriority(10);
while(true) {
Request request;
while(true) {
try {
request = (Request)this.mQueue.take();
break;
} catch (InterruptedException var4) {
if(this.mQuit) {
return;
}
}
}
try {
request.addMarker("network-queue-take");
if(request.isCanceled()) {
request.finish("network-discard-cancelled");
} else {
if(VERSION.SDK_INT >= 14) {
TrafficStats.setThreadStatsTag(request.getTrafficStatsTag());
}
NetworkResponse e = this.mNetwork.performRequest(request);
request.addMarker("network-http-complete");
if(e.notModified && request.hasHadResponseDelivered()) {
request.finish("not-modified");
} else {
Response response = request.parseNetworkResponse(e);
request.addMarker("network-parse-complete");
if(request.shouldCache() && response.cacheEntry != null) {
this.mCache.put(request.getCacheKey(), response.cacheEntry);
request.addMarker("network-cache-written");
}
request.markDelivered();
this.mDelivery.postResponse(request, response);
}
}
} catch (VolleyError var5) {
this.parseAndDeliverNetworkError(request, var5);
} catch (Exception var6) {
VolleyLog.e(var6, "Unhandled exception %s", new Object[]{var6.toString()});
this.mDelivery.postError(request, new VolleyError(var6));
}
}
}这个网络线程首先把自己的优先级设为最高,然后进入死循环,一直从网络队列中去获取请求,没有请求就阻塞。获取到请求后,先判断它是否已经被取消,如果没有被取消,接下来版本号大于14就对网络请求打tag,这个是为了知道每个网络请求的数据量以及方便优化耗电量等。接下来就是使用Network进行网络请求,并且返回了NetworkResponse对象。如果请求返回重定向或者已经被处理过了,就直接结束。否则,对返回结果进行不同请求类型的解析,然后如果它是需要缓存就将它缓存到cache,再将它比较为已经处理过了,最后再将结果反馈给Request的回调方法。到这里整一个网络请求也就走完了。
CacheDispatcher缓存线程
public void run() {
if(DEBUG) {
VolleyLog.v("start new dispatcher", new Object[0]);
}

Process.setThreadPriority(10);
this.mCache.initialize();

while(true) {
while(true) {
while(true) {
while(true) {
try {
while(true) {
final Request e = (Request)this.mCacheQueue.take();
e.addMarker("cache-queue-take");
if(e.isCanceled()) {
e.finish("cache-discard-canceled");
} else {
Entry entry = this.mCache.get(e.getCacheKey());
if(entry == null) {
e.addMarker("cache-miss");
this.mNetworkQueue.put(e);
} else if(entry.isExpired()) {
e.addMarker("cache-hit-expired");
e.setCacheEntry(entry);
this.mNetworkQueue.put(e);
} else {
e.addMarker("cache-hit");
Response response = e.parseNetworkResponse(new NetworkResponse(entry.data, entry.responseHeaders));
e.addMarker("cache-hit-parsed");
if(entry.refreshNeeded()) {
e.addMarker("cache-hit-refresh-needed");
e.setCacheEntry(entry);
response.intermediate = true;
this.mDelivery.postResponse(e, response, new Runnable() {
public void run() {
try {
CacheDispatcher.this.mNetworkQueue.put(e);
} catch (InterruptedException var2) {
;
}

}
});
} else {
this.mDelivery.postResponse(e, response);
}
}
}
}
} catch (InterruptedException var4) {
if(this.mQuit) {
return;
}
}
}
}
}
}
}
缓存线程也是先把优先级设为最高,然后对缓存进行初始化。再进入死循环获取缓存队列里面的请求。这里使用了多个while(true)的嵌套,个人猜想是用来提高这个子线程的存活率。然后也是一样的判断请求是否已经取消,再从cache缓存中根据请求url去获取。如果获取不到缓存或是缓存已过期,就把这个请求抛到网络请求队列mNetworkQueue中去。否则把缓存封装为Response,然后返回Request回调。这里还需要判断这个缓存是否需要刷新,就是说当前这个缓存还是可以用的,但是最好再请求网络刷新一下,所以在回调之后又会请求网络,把缓存数据刷新一下。
好了,到这里缓存线程也走通了,整个缓存加网络请求算是理清楚了。现在来整体梳理一下
首先volley框架最关键的是他有网络请求和缓存两个队列
有缓存就读取缓存,没有缓存就把请求抛到网络请求队列中去。
它有四个(默认情况)网络请求线程在跑,但是没有对大数据进行特殊处理,所以说它比较适合多个请求并发但请求数据量较小的这种情况。
大概就是就是这些了吧,有什么不对,希望大家多多指点。

相关文章推荐
- 使用C++实现JNI接口需要注意的事项
- Android IPC进程间通讯机制
- Android Manifest 用法
- [转载]Activity中ConfigChanges属性的用法
- Android之获取手机上的图片和视频缩略图thumbnails
- Android之使用Http协议实现文件上传功能
- Android学习笔记(二九):嵌入浏览器
- android string.xml文件中的整型和string型代替
- i-jetty环境搭配与编译
- android之定时器AlarmManager
- android wifi 无线调试
- Android Native 绘图方法
- Android java 与 javascript互访(相互调用)的方法例子
- android 代码实现控件之间的间距
- android FragmentPagerAdapter的“标准”配置
- Android"解决"onTouch和onClick的冲突问题
- android:installLocation简析
- android searchView的关闭事件
- SourceProvider.getJniDirectories