Centos7之pacemaker高可用安装配置详解
2016-03-29 00:00
615 查看
| 申明: centos7的pacemaker与之前6使用的方法不一致,即使用centos6.x的方法在centos7.x上面配置pacemaker不能成功。 因此openstack 上面的centos7.1如果使用官方文档直接配置高可用HA也是无法成功的。(吐槽:openstack的liberty出的HA方案官方文档不适用于centos7.x) 关于openstack liberty版本的高可用HA方案请参考下述实验!!! |
centos7配置pacemaker官方文档地址:
https://access.redhat.com/documentation/en-US/Red_Hat_Enterprise_Linux/7/html/High_Availability_Add-On_Administration/ch-startup-HAAA.html
pacemaker使用翻译: http://clusterlabs.org/doc/zh-CN/Pacemaker/1.1/html-single/Clusters_from_Scratch/

| Pacemaker’s key features include: 监测并恢复节点和服务级别的故障 存储无关,并不需要共享存储 资源无关,任何能用脚本控制的资源都可以作为服务 Supports fencing (also referred to as the STONITH acronym, deciphered later on) for ensuring data integrity 支持大型或者小型的集群 Supports both quorate and resource-driven clusters Supports practically any redundancy configuration 自动同步各个节点的配置文件 可以设定集群范围内的ordering, colocation and anti-colocation Support for advanced service types Clones:为那些要在多个节点运行的服务所准备的 Multi-state: for services with multiple modes (e.g. master/slave, primary/secondary) Unified, scriptable cluster management tools |
centos7.1
node31:172.31.2.31
node32 : 172.31.2.32
node31、node32两台机器上面都安装pacemaker,因此下述操作都需要在两天机器上面执行。
1、配置防火墙端口及关闭selinux
systemctl disable firewalld
systemctl stop firewalld
iptables -F
2、配置hostname:
hostnamectl --static --transient set-hostname node31
hostnamectl --static --transient set-hostname node32
vim /etc/hosts

3、时间同步:
yum install ntp -y
ntpdate cn.pool.ntp.org
4、双机互信(本次实验发现,不配置双机互信似乎也不会出现问题):
ssh-keygen -t rsa

复制id_rsa.pub文件:
scp /root/.ssh/id_rsa.pub root@172.31.2.32:/root/.ssh/authorized_keys

注:在node32执行同样的互信操作。
5、安装pacemaker集群相关组件:
yum install pcs pacemaker corosync fence-agents-all -y
6、启动pcsd服务(开机自启动)
systemctl start pcsd . service
systemctl enable pcsd . service
7、创建集群用户:
passwd hacluster(此用户在安装pcs时候会自动创建)

上述所有操作都需要在两个节点上面执行。
8、集群各节点之间进行认证:
pcs cluster auth node31 node32(此处需要输入的用户名必须为pcs自动创建的hacluster,其他用户不能添加成功)

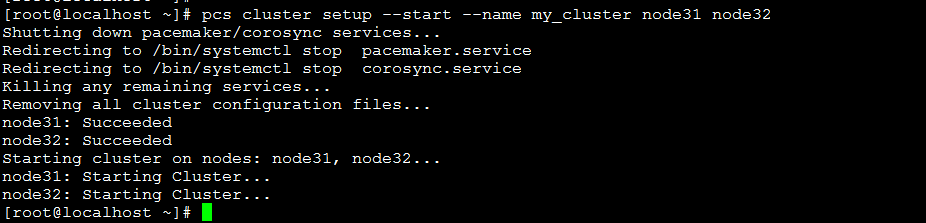
9,创建并启动名为my_cluster的集群,其中node31 node32为集群成员:
pcs cluster setup --start --name my_cluster node31 node32
10、设置集群自启动:
pcs cluster enable --all

11、查看并设置集群属性:
| 查看当前集群状态: pcs cluster status  检查pacemaker服务: ps aux | grep pacemaker  检验Corosync的安装及当前 corosync状态: corosync-cfgtool -s corosync-cmapctl | grep members pcs status corosync 检查配置是否正确(假若没有输出任何则配置正确): crm_verify -L -V 禁用 STONITH: pcs property set stonith-enabled=false 无法仲裁时候,选择忽略: pcs property set no-quorum-policy=ignore  |
| Pacemaker / Corosync 是 Linux 下一组常用的高可用集群系统。Pacemaker 本身已经自带了很多常用应用的管理功能。但是如果要使用 Pacemaker 来管理自己实现的服务或是一些别的没现成的东西可用的服务时,就需要自己实现一个资源了。 其中Pacemaker 自带的资源管理程序都在 /usr/lib/ocf/resource.d 下。其中的 heartbeat 目录中就包含了那些自带的常用服务。那些服务的脚本可以作为我们自己实现时候的参考。 更多关于自定义资源请参考博文: http://blog.csdn.net/tantexian/article/details/50160159 接下来针对一些常用的pcs命令进行简要讲解。 查看pcs resource针对资源操作用法: pcs resource help  查看pcs支持的资源代理标准: pcs resource providers  注: Pacemaker 的资源主要有 ocf、lsb、 service、 systemd、 stonith几大类 。LSB是为了促进 Linux 不同发行版间的兼容性,LSB(Linux Standards Base)开发了一系列标准,使各种软件可以很好地在兼容 LSB 标准的系统上运行, LSB 即 Linux 标准服务,通常就是 /etc/init.d 目录下那些脚本。Pacemaker 可以用这些脚本来启停服务,可以通过 pcs resource list lsb查看 。 另一类 OCF 实际上是对 LSB 服务的扩展,增加了一些高可用集群管理的功能如故障监控等和更多的元信息。可以通过 pcs resource list ocf 看到当前支持的资源。要让 pacemaker 可以很好的对服务进行高可用保障就得实现一个 OCF 资源。 CentOS7 使用systemd替换了SysV。Systemd目的是要取代 Unix 时代以来一直在使用的init系统,兼容SysV和 LSB 的启动脚本,而且够在进程启动过程中更有效地引导加载服务。 查看pacemaker支持资源高可用的列表: pcs resource list 假若想查看httpd(apache)可使用: pcs resource list | grep apache  具体apache用法: pcs resource describe ocf:heartbeat:apache  |

相关文章推荐
- centos6之pacemaker 高可用Web使用详解(转)
- Centos7之pacemaker高可用安装配置详解
- CentOS设置静态IP
- 《linux内核设计与实现》读书笔记第十八章
- Linux入门学习(三)
- 进程间通信之-信号量semaphore--linux内核剖析(十)
- linux下使用python连接Mysql
- linux服务器安装pip
- Linux下清理内存和Cache方法
- 基于UDP的Linux畅聊系统(ncurse库和json库)
- gentoo linux安装过程中出现的错误及解决方案
- linux kernel 中的链表(一)
- CentOS7.2 Linux 内核版本查看简述
- Linux 线程同步的三种方法
- centos7下yum安装mysql与卸载mysql
- Linux开发流程
- linux无法切换到root用户
- Linux线程基础函数
- C语言高级应用---操作linux下V4L2摄像头应用程序
- C语言高级应用---操作linux下V4L2摄像头应用程序