Cobbler全自动批量安装部署Linux系统二
2016-03-24 17:52
453 查看
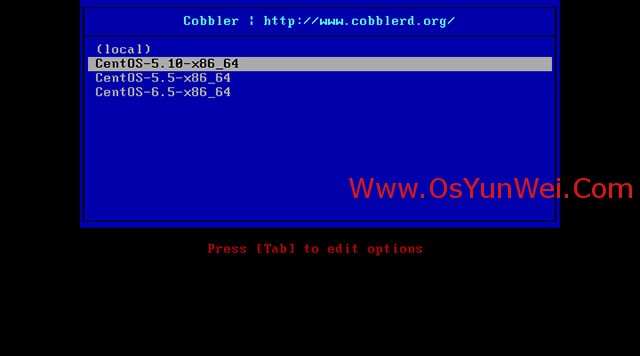
六、创建kickstarts自动安装脚本(这个脚本在centos6.7版本上测的有问题,使用默认的脚本没有问题)cd /var/lib/cobbler/kickstarts #进入默认Kickstart模板目录vi /var/lib/cobbler/kickstarts/CentOS-5.10-x86_64.ks #创建CentOS-5.10-x86_64安装脚本# Kickstart file automatically generated by anaconda.installurl --url=http://192.168.21.128/cobbler/ks_mirror/CentOS-5.10-x86_64-x86_64/lang en_US.UTF-8zerombr yeskey --skipkeyboard usnetwork --device eth0 --bootproto dhcp --onboot on#network --device eth0 --bootproto static --ip 192.168.21.250 --netmask 255.255.255.0 --gateway 192.168.21.2 --nameserver 8.8.8.8 --hostname CentOS5.10rootpw --iscrypted $1$QqobZZ1g$rYnrawi9kYlEeUuq1vcRS/firewall --enabled --port=22:tcpauthconfig --enableshadow --enablemd5selinux --disabledtimezone Asia/Shanghaibootloader --location=mbr --driveorder=sda# The following is the partition information you requested# Note that any partitions you deleted are not expressed# here so unless you clear all partitions first, this is# not guaranteed to work#clearpart --linuxclearpart --all --initlabelpart / --bytes-per-inode=4096 --fstype="ext3" --size=2048part /boot --bytes-per-inode=4096 --fstype="ext3" --size=128part swap --bytes-per-inode=4096 --fstype="swap" --size=500part /data --bytes-per-inode=4096 --fstype="ext3" --grow --size=1reboot%packagesntp@base@core@dialup@editors@text-internetkeyutilstrousersfipscheckdevice-mapper-multipath%post#同步系统时间ntpdate cn.pool.ntp.orghwclock --systohcecho -e "0 1 * * * root /usr/sbin/ntpdate cn.pool.ntp.org > /dev/null" >> /etc/crontabservice crond restart#添加用户组groupadd maintaingroupadd developmkdir -p /home/maintainmkdir -p /home/develop#添加用户useradd -g maintain user01 -d /home/maintain/user01 -mecho "123456"|passwd user01 --stdinuseradd -g maintain user02 -d /home/maintain/user02 -mecho "123456"|passwd user02 --stdinuseradd -g maintain user03 -d /home/maintain/user03 -mecho "123456"|passwd user03 --stdinuseradd -g maintain user04 -d /home/maintain/user04 -mecho "123456"|passwd user04 --stdin#禁止root用户直接登录系统sed -i "s/#PermitRootLogin yes/PermitRootLogin no/g" '/etc/ssh/sshd_config'service sshd restart#禁止开机启动的服务chkconfig acpid offchkconfig atd offchkconfig autofs offchkconfig bluetooth offchkconfig cpuspeed offchkconfig firstboot offchkconfig gpm offchkconfig haldaemon offchkconfig hidd offchkconfig ip6tables offchkconfig isdn offchkconfig messagebus offchkconfig nfslock offchkconfig pcscd offchkconfig portmap offchkconfig rpcgssd offchkconfig rpcidmapd offchkconfig yum-updatesd offchkconfig sendmail off#允许开机启动的服务chkconfig crond onchkconfig kudzu onchkconfig network onchkconfig readahead_early onchkconfig sshd onchkconfig syslog on#禁止使用Ctrl+Alt+Del快捷键重启服务器sed -i "s/ca::ctrlaltdel:\/sbin\/shutdown -t3 -r now/#ca::ctrlaltdel:\/sbin\/shutdown -t3 -r now/g" '/etc/inittab'telinit q#优化系统内核echo -e "ulimit -c unlimited" >> /etc/profileecho -e "ulimit -s unlimited" >> /etc/profileecho -e "ulimit -SHn 65535" >> /etc/profilesource /etc/profilesed -i "s/net.ipv4.ip_forward = 0/net.ipv4.ip_forward = 1/g" '/etc/sysctl.conf'echo -e "net.core.somaxconn = 262144" >> /etc/sysctl.confecho -e "net.core.netdev_max_backlog = 262144" >> /etc/sysctl.confecho -e "net.core.wmem_default = 8388608" >> /etc/sysctl.confecho -e "net.core.rmem_default = 8388608" >> /etc/sysctl.confecho -e "net.core.rmem_max = 16777216" >> /etc/sysctl.confecho -e "net.core.wmem_max = 16777216" >> /etc/sysctl.confecho -e "net.ipv4.netfilter.ip_conntrack_max = 131072" >> /etc/sysctl.confecho -e "net.ipv4.netfilter.ip_conntrack_tcp_timeout_established = 180" >> /etc/sysctl.confecho -e "net.ipv4.route.gc_timeout = 20" >> /etc/sysctl.confecho -e "net.ipv4.ip_conntrack_max = 819200" >> /etc/sysctl.confecho -e "net.ipv4.ip_local_port_range = 10024 65535" >> /etc/sysctl.confecho -e "net.ipv4.tcp_retries2 = 5" >> /etc/sysctl.confecho -e "net.ipv4.tcp_fin_timeout = 30" >> /etc/sysctl.confecho -e "net.ipv4.tcp_syn_retries = 1" >> /etc/sysctl.confecho -e "net.ipv4.tcp_synack_retries = 1" >> /etc/sysctl.confecho -e "net.ipv4.tcp_timestamps = 0" >> /etc/sysctl.confecho -e "net.ipv4.tcp_tw_recycle = 1" >> /etc/sysctl.confecho -e "net.ipv4.tcp_tw_len = 1" >> /etc/sysctl.confecho -e "net.ipv4.tcp_tw_reuse = 1" >> /etc/sysctl.confecho -e "net.ipv4.tcp_keepalive_time = 120" >> /etc/sysctl.confecho -e "net.ipv4.tcp_keepalive_probes = 3" >> /etc/sysctl.confecho -e "net.ipv4.tcp_keepalive_intvl = 15" >> /etc/sysctl.confecho -e "net.ipv4.tcp_max_tw_buckets = 36000" >> /etc/sysctl.confecho -e "net.ipv4.tcp_max_orphans = 3276800" >> /etc/sysctl.confecho -e "net.ipv4.tcp_max_syn_backlog = 262144" >> /etc/sysctl.confecho -e "net.ipv4.tcp_wmem = 8192 131072 16777216" >> /etc/sysctl.confecho -e "net.ipv4.tcp_rmem = 32768 131072 16777216" >> /etc/sysctl.confecho -e "net.ipv4.tcp_mem = 94500000 915000000 927000000" >> /etc/sysctl.conf/sbin/sysctl -p#执行外部脚本cd /rootwget http://192.168.21.128/cobbler/ks_mirror/config/autoip.shsh /root/autoip.sh:wq! #保存退出vi /var/www/cobbler/ks_mirror/config/autoip.sh #创建脚本,自动设置Linux系统静态IP地址、DNS、网关、计算机名称#!/bin/shROUTE=$(route -n|grep "^0.0.0.0"|awk '{print $2}')BROADCAST=$(/sbin/ifconfig eth0|grep -i bcast|awk '{print $3}'|awk -F":" '{print $2}')HWADDR=$(/sbin/ifconfig eth0|grep -i HWaddr|awk '{print $5}')IPADDR=$(/sbin/ifconfig eth0|grep "inet addr"|awk '{print $2}'|awk -F":" '{print $2}')NETMASK=$(/sbin/ifconfig eth0|grep "inet addr"|awk '{print $4}'|awk -F":" '{print $2}')cat >/etc/sysconfig/network-scripts/ifcfg-eth0<<EOFDEVICE=eth0BOOTPROTO=staticBROADCAST=$BROADCASTHWADDR=$HWADDRIPADDR=$IPADDRNETMASK=$NETMASKGATEWAY=$ROUTEONBOOT=yesEOFIPADDR1=$(echo $IPADDR|awk -F"." '{print $4}')cat >/etc/sysconfig/network-scripts/ifcfg-eth1<<EOFDEVICE=eth1BOOTPROTO=staticBROADCAST=10.0.0.255HWADDR=$(/sbin/ifconfig eth1|grep -i HWaddr|awk '{print $5}')IPADDR=10.0.0.$IPADDR1NETMASK=255.255.255.0ONBOOT=yesEOFHOSTNAME=OsYunWei_HZ_$(echo $IPADDR|awk -F"." '{print $4}')cat >/etc/sysconfig/network<<EOFNETWORKING=yesNETWORKING_IPV6=noHOSTNAME=$HOSTNAMEGATEWAY=$ROUTEEOFecho "127.0.0.1 $HOSTNAME" >> /etc/hostshostname=$HOSTNAMEecho "nameserver 8.8.8.8" > /etc/resolv.confecho "nameserver 8.8.4.4" >> /etc/resolv.conf:wq! #保存退出七、导入系统镜像到cobblercobbler import --path=/var/www/html/os/CentOS-5.10-x86_64 --name=CentOS-5.10-x86_64 --arch=x86_64 #导入系统镜像文件,需要一段时间cd /var/www/cobbler/ks_mirror #进入系统镜像导入目录命令格式:cobbler import --path=镜像路径 -- name=安装引导名 --arch=32位或64位重复上面的操作,把其他的系统镜像文件导入到cobbler八、设置profile,按照操作系统版本分别关联系统镜像文件和kickstart自动安装文件在第一次导入系统镜像时,cobbler会给安装镜像指定一个默认的kickstart自动安装文件例如:CentOS-5.10-x86_64版本的kickstart自动安装文件为:/var/lib/cobbler/kickstarts/sample_end.ks,(在centos6上如果使用这个ks文件,客户端能实现自动安装,但是如果用上面CentOS-5.10-x86_64.ks,刚不能完全自动安装。需要修改一下才能实现)cobbler profile report --name CentOS-5.10-x86_64 #查看profile设置cobbler distro report --name CentOS-5.10-x86_64 #查看安装镜像文件信息cobbler profile remove --name=CentOS-5.10-x86_64 #移除profilecobbler profile add --name=CentOS-5.10-x86_64 --distro=CentOS-5.10-x86_64 --kickstart=/var/lib/cobbler/kickstarts/CentOS-5.10-x86_64.ks #添加cobbler profile edit --name=CentOS-5.10-x86_64 --distro=CentOS-5.10-x86_64 --kickstart=/var/lib/cobbler/kickstarts/CentOS-5.10-x86_64.ks #编辑命令:cobbler profile add|edit|remove --name=安装引导名 --distro=系统镜像名 --kickstart=kickstart自动安装文件路径--name:自定义的安装引导名,注意不能重复--distro:系统安装镜像名,用cobbler distro list可以查看--kickstart:与系统镜像文件相关联的kickstart自动安装文件#查看Cobbler列表cobbler listcobbler reportcobbler profile reportcobbler distro list#通过profile查找对应的kickstart自动安装文件文件例如:ksfile=$( cobbler profile report --name CentOS-5.10-x86_64|grep -E '^Kickstart' |head -n 1|cut -d ':' -f 2 );cat $ksfile;重复上面的操作,把其他的系统镜像文件和kickstart自动安装文件关联起来注意:1、kickstart自动安装文件需要预先配置好2、每次修改完配置文件,需要执行一次同步操作:cobbler sync 配置才能生效3、kickstart自动安装文件可以用工具生成(需要用到图形界面操作)yum install system-config-kickstart #安装yum groupinstall "X Window System" #安装X Window图形界面system-config-kickstart #运行kickstart配置service cobbler sync #与cobbler sync作用相同service cobbler restart #重启cobbler第二部分:设置要安装的服务器从网络启动开机之后,如下图所示,根据需要选择相应的系统版本进行安装,安装完成之后,系统会自动重启
系统运维 www.osyunwei.com 温馨提醒:qihang01原创内容版权所有,转载请注明出处及原文链接

重新安装系统:在需要重装系统的服务器上安装koanwget http://dl.fedoraproject.org/pub/epel/5/x86_64/koan-2.4.0-1.el5.noarch.rpm #CentOS 5.Xrpm -ivh koan-2.4.0-1.el5.noarch.rpm #安装koanhttp://dl.fedoraproject.org/pub/epel/6/x86_64/koan-2.4.0-1.el6.noarch.rpm #CentOS 6.Xyum install cobbler debmirror pykickstart python-ctypes cman #安装koan运行依赖包(需要设置epel源)koan --list=profiles --server=192.168.21.128 #查看Cobbler服务器系统镜像列表koan --replace-self --server=192.168.21.128 --profile=CentOS-5.10-x86_64 #选择要重装的系统reboot #重新启动系统进行自动安装扩展阅读:Cobbler目录说明:1、Cobbler配置文件目录:/etc/cobbler/etc/cobbler/settings #cobbler主配置文件/etc/cobbler/dhcp.template #DHCP服务的配置模板/etc/cobbler/tftpd.template #tftp服务的配置模板/etc/cobbler/rsync.template #rsync服务的配置模板/etc/cobbler/iso #iso模板配置文件/etc/cobbler/pxe #pxe模板文件/etc/cobbler/power #电源的配置文件/etc/cobbler/users.conf #Web服务授权配置文件/etc/cobbler/users.digest #用于web访问的用户名密码配置文件/etc/cobbler/dnsmasq.template #DNS服务的配置模板/etc/cobbler/modules.conf #Cobbler模块配置文件2、Cobbler数据目录:/var/lib/cobbler/var/lib/cobbler/config #配置文件/var/lib/cobbler/triggers #Cobbler命令/var/lib/cobbler/kickstarts #默认存放kickstart文件/var/lib/cobbler/loaders #存放的各种引导程序3、系统安装镜像目录:/var/www/cobbler/var/www/cobbler/ks_mirror #导入的系统镜像列表/var/www/cobbler/images #导入的系统镜像启动文件/var/www/cobbler/repo_mirror #yum源存储目录4、日志目录:/var/log/cobbler/var/log/cobbler/install.log #客户端系统安装日志/var/log/cobbler/cobbler.log #cobbler日志至此,Cobbler全自动批量安装部署Linux系统完成。原文地址:http://www.osyunwei.com/archives/7606.html
系统运维 www.osyunwei.com 温馨提醒:qihang01原创内容版权所有,转载请注明出处及原文链接
重新安装系统:在需要重装系统的服务器上安装koanwget http://dl.fedoraproject.org/pub/epel/5/x86_64/koan-2.4.0-1.el5.noarch.rpm #CentOS 5.Xrpm -ivh koan-2.4.0-1.el5.noarch.rpm #安装koanhttp://dl.fedoraproject.org/pub/epel/6/x86_64/koan-2.4.0-1.el6.noarch.rpm #CentOS 6.Xyum install cobbler debmirror pykickstart python-ctypes cman #安装koan运行依赖包(需要设置epel源)koan --list=profiles --server=192.168.21.128 #查看Cobbler服务器系统镜像列表koan --replace-self --server=192.168.21.128 --profile=CentOS-5.10-x86_64 #选择要重装的系统reboot #重新启动系统进行自动安装扩展阅读:Cobbler目录说明:1、Cobbler配置文件目录:/etc/cobbler/etc/cobbler/settings #cobbler主配置文件/etc/cobbler/dhcp.template #DHCP服务的配置模板/etc/cobbler/tftpd.template #tftp服务的配置模板/etc/cobbler/rsync.template #rsync服务的配置模板/etc/cobbler/iso #iso模板配置文件/etc/cobbler/pxe #pxe模板文件/etc/cobbler/power #电源的配置文件/etc/cobbler/users.conf #Web服务授权配置文件/etc/cobbler/users.digest #用于web访问的用户名密码配置文件/etc/cobbler/dnsmasq.template #DNS服务的配置模板/etc/cobbler/modules.conf #Cobbler模块配置文件2、Cobbler数据目录:/var/lib/cobbler/var/lib/cobbler/config #配置文件/var/lib/cobbler/triggers #Cobbler命令/var/lib/cobbler/kickstarts #默认存放kickstart文件/var/lib/cobbler/loaders #存放的各种引导程序3、系统安装镜像目录:/var/www/cobbler/var/www/cobbler/ks_mirror #导入的系统镜像列表/var/www/cobbler/images #导入的系统镜像启动文件/var/www/cobbler/repo_mirror #yum源存储目录4、日志目录:/var/log/cobbler/var/log/cobbler/install.log #客户端系统安装日志/var/log/cobbler/cobbler.log #cobbler日志至此,Cobbler全自动批量安装部署Linux系统完成。原文地址:http://www.osyunwei.com/archives/7606.html

相关文章推荐
- 小心服务器内存居高不下的元凶--WebAPI服务
- 运维入门
- Centos6 编译安装Python
- 硬盘安装CentOS 6.2以及添加GRUB启动菜单
- CentOS 6.2实战部署Nginx+MySQL+PHP
- Linux 运维自动化之Cobbler实战案例
- CentOS 7系统配置上的变化解析
- 利用开源软件打造自己的全功能远程工具
- Linux5.9无人值守安装
- 数据中心和云未来的十二大趋势
- 用vsftp快速搭建ftp服务器
- Linux快速构建apache web服务器
- 服务器监控策略浅谈
- 如何降低服务器采购成本 原理分析
- 建议的服务器分区办法
- 服务器托管六大优势分析
- Erlang实现的一个Web服务器代码实例