[置顶] 自定义控件:onMeasure 方法和测量原理的理解
2016-03-20 10:04
316 查看
前言
众所周知,自定义 ViewGroup 中这几个方法非常重要:onMeasure, onLayout。初学者学习自定义 View 时,想必对 onMeasure 比较困惑,onMeasure 是什么,为什么要测量,怎么测量?网上有很多关于 onMeasure 的文章,诸如《onMeasure 详解xxx》、《onMeasure xxx源码分析》。好像都不能彻底解决心中的疑惑。本文就从“是什么”,“为什么”和“怎么样”这三个角度,根据我自己的理解,带大家了解 Android 的测量原理。
本文示例代码:https://github.com/heshiweij/onMeasureDemo
是什么?
测量的定义:确定实际尺寸。为什么?
Android 中, View 的layout_width
layout_height并不是固定值,它可以设置成
dp、
MATCH_PARENT、
WRAP_CONTENT三种形式。我们试想,如果用户设置了精确值 dp,那就好说,直接给 View 设置成精确的宽度,一旦用户给子 View 设置了
MATCH_PARENT(匹配父窗体),子 View 的宽度应该是父窗体的宽度,而问题是子 View 并不知道父窗体多宽。为了解决这样的矛盾,Android 系统干脆规定:子 View 的宽高必须交给父 View 去测量。在测量时,父 View 会根据自己的尺寸和子 View 的LayoutParams,计算出一个 MeasureSpec(测量规则),也是父 View 对子 View 尺寸的期望。然后遍历调用子 View 的
measure(widthMeasureSpec,heightMeasureHeight)进行实际测量。测量完成,子 View 的宽高就确定了,可以通过
view.getMeasuredWidth()方法获取。整个过程如下图所示。
测量过程
整个测量过程如下图:
测量模式
EXACTLY: 精确模式
用这个模式去测量,并在测量时提供一个值,那么 View 就会以这个值确定自己的实际尺寸。如:
int widthSpec = MeasureSpec.makeMeasureSpec(100, MeasureSpec.EXACTLY);
// 第二个参数为高度的测量规则,写 0  表示省略
// 执行完此方法后,子 View 的宽度就是 100
view.measure(widthSpec, 0);
AT_MOST:最大模式
用这个模式去测量,并在测量时提供一个最大值,那么 View 就先以自己的内容为准,在不超过最大值的前提下,最终确定自己的尺寸如:
int widthSpec = MeasureSpec.makeMeasureSpec(100, MeasureSpec.AT_MOST);
// 第二个参数为高度的测量规则,写 0  表示省略
view.measure(widthSpec, 0);
UNSPECIFIED:不确定模式
用这个模式去测量, View 就会任意确定自己的尺寸,不管你传什么值进去都是没有意义。很少用,为了避免和AT_MOST搞混,暂时将它忽略。
如:
int widthSpec = MeasureSpec.makeMeasureSpec(0, MeasureSpec.UNSPECIFIED);
// 第二个参数为高度的测量规则,写 0  表示省略
view.measure(widthSpec, 0);
测量规则
widthMeasureSpec和
heightMeasureSpec是测量规则,是一个 int 类型,但是它并不是实际的尺寸,而是尺寸和测量模式的合成值。它在 int 类型的 32 位二进制位中,31-30 这两位表示模式,0~29 这三十位表示宽和高的实际值。通过
MeasureSpec类提供的静态方法,我们可以从
widthMeasureSpec和
heightMeasureSpec中提取测量模式和期望尺寸。
代码如下:
int mode = MeasureSpec.getMode(widthMeasureSpec);
int size = MeasureSpec.getSize(widthMeasureSpec);
如何确定的子类的测量模式
上面说了,父类测量子类是调用子 View 的measure(widthMeasureSpec,heightMeasureHeight),这个两个测量
widthMeasureSpec规则是父类根据自己的宽度和子类的
LayoutParams计算出来的。
那么到底怎么计算测量规则,看下面一张图就全明白了(注意相同的颜色)。

我将上述关系转化成代码(以宽度为例):
/**
* 根据父 View 规则和子 View 的 LayoutParams,计算子类的宽度(width)测量规则
* @param widthMeasureSpec
* @param view
*/
private int createChildWidthMeasureSpec(int parentWidthMeasureSpec, View view) {
// 获取父 View 的测量模式
int parentWidthMode = MeasureSpec.getMode(parentWidthMeasureSpec);
// 获取父 View 的测量尺寸
int parentWidthSize = MeasureSpec.getSize(parentWidthMeasureSpec);

// 定义子 View 的测量规则
int childWidthMeasureSpec = 0;

// 获取子 View 的 LayoutParams
LayoutParams layoutParams = (LayoutParams) view.getLayoutParams();

if (parentWidthMode == MeasureSpec.EXACTLY){
/* 这是当父类的模式是 dp 的情况 */
if (layoutParams.width > 0){
childWidthMeasureSpec = MeasureSpec.makeMeasureSpec(layoutParams.width, MeasureSpec.EXACTLY);
} else if(layoutParams.width == LayoutParams.WRAP_CONTENT){
childWidthMeasureSpec = MeasureSpec.makeMeasureSpec(parentWidthSize, MeasureSpec.AT_MOST);
} else if (layoutParams.width == LayoutParams.MATCH_PARENT){
childWidthMeasureSpec = MeasureSpec.makeMeasureSpec(parentWidthSize, MeasureSpec.EXACTLY);
}
} else if (parentWidthMode == MeasureSpec.AT_MOST){
/* 这是当父类的模式是 WRAP_CONTENT 的情况 */
if (layoutParams.width > 0){
childWidthMeasureSpec = MeasureSpec.makeMeasureSpec(layoutParams.width, MeasureSpec.EXACTLY);
} else if(layoutParams.width == LayoutParams.WRAP_CONTENT){
childWidthMeasureSpec = MeasureSpec.makeMeasureSpec(parentWidthSize, MeasureSpec.AT_MOST);
} else if (layoutParams.width == LayoutParams.MATCH_PARENT){
childWidthMeasureSpec = MeasureSpec.makeMeasureSpec(parentWidthSize, MeasureSpec.EXACTLY);
}
} else if (parentWidthMode == MeasureSpec.UNSPECIFIED){
/* 这是当父类的模式是 MATCH_PARENT 的情况 */
if (layoutParams.width > 0){
childWidthMeasureSpec = MeasureSpec.makeMeasureSpec(layoutParams.width, MeasureSpec.EXACTLY);
} else if(layoutParams.width == LayoutParams.WRAP_CONTENT){
childWidthMeasureSpec = MeasureSpec.makeMeasureSpec(0, MeasureSpec.UNSPECIFIED);
} else if (layoutParams.width == LayoutParams.MATCH_PARENT){
childWidthMeasureSpec = MeasureSpec.makeMeasureSpec(0, MeasureSpec.UNSPECIFIED);
}
}

// 返回子 View 的测量规则
return childWidthMeasureSpec;
}
这代码显然是冗余的,我们可以简化成一个公式,但是为了方便理解,还是不简化了。高度的代码也是一样的。
开始测量
现在知道了测量原理和具体的测量代码,就可以模拟 LinearLayout 在 ViewGroup 中对子类,进行测量protected void onMeasure(int widthMeasureSpec, int heightMeasureSpec) {
// 干掉父 View onMeasure 先
// super.onMeasure(widthMeasureSpec, heightMeasureSpec);
// 遍历子 View,测量
for (int i = 0; i < getChildCount(); i++){
View view = getChildAt(i);
// 获取子 View 的宽度测量规则
int createChildWidthMeasureSpec = createChildWidthMeasureSpec(widthMeasureSpec, view);
// 获取子 View 的高度测量规则
int createChildHeightMeasureSpec = createChildHeightMeasureSpec(heightMeasureSpec, view);
// 开始测量
view.measure(createChildWidthMeasureSpec, createChildHeightMeasureSpec);
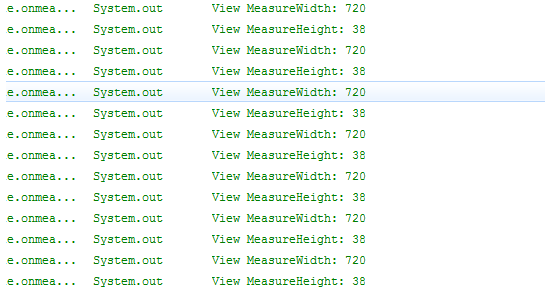
// 输出测量结果
System.out.println("View MeasureWidth: " + view.getMeasuredWidth());
System.out.println("View MeasureHeight: " + view.getMeasuredHeight());
}
// 最终,父 View,根据子 View 的测量结果,才可以设置自己的尺寸
setMeasuredDimension(parentWidth, parentHeight);在父 View 添加了几个 TextView, 测量后输出结果:
示例代码:https://github.com/heshiweij/onMeasureDemo
附录:
Android自定义控件系列七:详解onMeasure()方法中如何测量一个控件尺寸(一)《Android 群英传》3.2 章:控件的测量

相关文章推荐
- Linux命令之touch 、mkdir 、cp
- Qt:Windows10 64bit VMware虚拟机环境,基于Qt 5.6 MinGW,静态编译版本和Android环境
- 第四周项目5:用递归方法求解(2)写出1*3*...*n的递归式
- 【HDU5648 BestCoder Round 76 (div1)C】【打表or数位DP】DZY Loves Math nm范围内i和j i或j的gcd之和
- Android调用系统照相机返回intent为空原因分析
- 列表控件相关函数
- 浏览器 hard refresh
- 利用PBFunc在Powerbuilder中解析Json对象
- 把数组排成最小的数
- 23.获取文件的MIMEType
- Java内存模型 详解
- 软件代码规范之理解
- iOS开发笔记 - 用CocoaPods管理第三方库
- C++中++符号的前置和后置的重载格式
- 数字图像研究方向
- GO1.6语言学习笔记2-安装配置及代码组织
- windows平台安装并使用MongoDB
- ztree回显
- bzoj 1090 [SCOI2003]字符串折叠(区间DP)
- Windows 窗体应用程序设计