JMeter二次开发(2)-编写 JSON Assertion 插件
2016-03-18 15:18
471 查看
本篇文章主要介绍如何对JMeter进行二次开发,添加自己所需的功能。这里以Json验证为例进行说明。在web接口测试过程中,JSON的应用已经非常普遍,但原声的JMeter并没有提供Json及JsonPath的验证,这里以JSON格式验证为例进
4000
行JMeter二次开发简单说明。
准备工作:1)JMeter本地开发环境;2)gson.jar-用于做json数据有效性验证(也可以自己编写验证逻辑)
具体步骤:
1.引用gson.jar
2.添加JSONAssertion及JSONAssertionGui
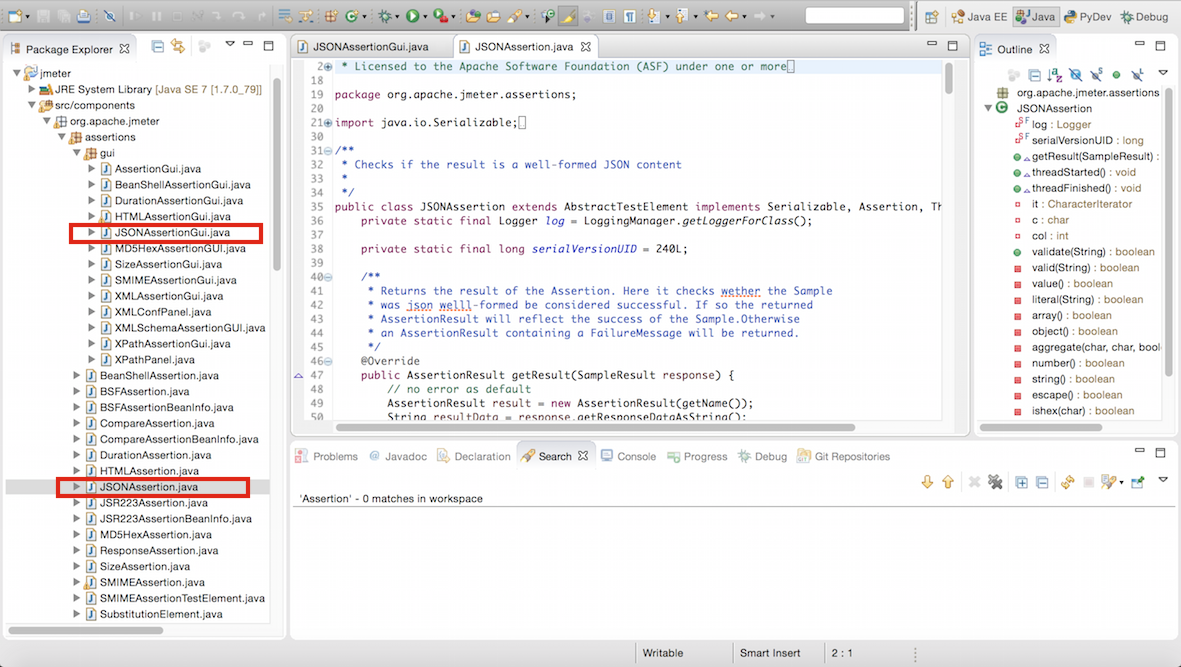
2.1 src/components/org.apache.jmeter.assertions下,新建JSONAssertion
2.2 src/components/org.apache.jmeter.assertions.gui下,新建JSONAssertionGui
3.配置properties文件
在src/core/org/apache/jmeter/resources/下的.properties文件中进行设置

4.Run As Java Application —>[New Driver]
5.JMeter运行后,新建项目进行验证

添加Assertion Listener,查看运行结果

关于新加功能的加载过程:
controllser、samplser、listener、assertion等内容,并不是在代码中new出来的,而是在jmeter启动时,通过扫描工作路径下的class,分析class类型,反射生成到jmeter中的。所以,在写完JSON Assertion的GUI之后,并不需要更改jmeter其他内容。具体的扫描反射过程,在org.apache.jmeter.testbeans.gui.TestBeanGUI中进行。

完整代码地址
https://github.com/buaawp/jmeter/tree/json_assertion
4000
行JMeter二次开发简单说明。
准备工作:1)JMeter本地开发环境;2)gson.jar-用于做json数据有效性验证(也可以自己编写验证逻辑)
具体步骤:
1.引用gson.jar
2.添加JSONAssertion及JSONAssertionGui
2.1 src/components/org.apache.jmeter.assertions下,新建JSONAssertion
public class JSONAssertion extends AbstractTestElement implements Serializable, Assertion, ThreadListener {
private static final Logger log = LoggingManager.getLoggerForClass();

private static final long serialVersionUID = 240L;

/**
* Returns the result of the Assertion. Here it checks wether the Sample
* took to long to be considered successful. If so an AssertionResult
* containing a FailureMessage will be returned. Otherwise the returned
* AssertionResult will reflect the success of the Sample.
*/
@Override
public AssertionResult getResult(SampleResult response) {
// no error as default
AssertionResult result = new AssertionResult(getName());
String resultData = response.getResponseDataAsString();

if (resultData.length()==0) {
return result.setResultForNull();
}else{
Gson gson = new Gson();
if(!gson.toJsonTree(resultData).isJsonObject()){
log.debug("Cannot parse result content"); // may well happen
result.setFailure(true);
result.setFailureMessage("ResultData is not Json");
}
}
return result;

}

@Override
public void threadStarted() {
}

@Override
public void threadFinished() {
}
}
2.2 src/components/org.apache.jmeter.assertions.gui下,新建JSONAssertionGui
public class JSONAssertionGui extends AbstractAssertionGui {

private static final long serialVersionUID = 240L;

/**
* The constructor.
*/
public JSONAssertionGui() {
init();
}

/**
* Returns the label to be shown within the JTree-Component.
*/
@Override
public String getLabelResource() {
return "json_assertion_title"; // $NON-NLS-1$
}

@Override
public TestElement createTestElement() {
JSONAssertion el = new JSONAssertion();
modifyTestElement(el);
return el;
}

/**
* Modifies a given TestElement to mirror the data in the gui components.
*
* @see org.apache.jmeter.gui.JMeterGUIComponent#modifyTestElement(TestElement)
*/
@Override
public void modifyTestElement(TestElement el) {
configureTestElement(el);
}

/**
* Inits the GUI.
*/
private void init() {
setLayout(new VerticalLayout(5, VerticalLayout.BOTH, VerticalLayout.TOP));
setBorder(makeBorder());

add(makeTitlePanel());
}
}
3.配置properties文件
在src/core/org/apache/jmeter/resources/下的.properties文件中进行设置
4.Run As Java Application —>[New Driver]
5.JMeter运行后,新建项目进行验证
添加Assertion Listener,查看运行结果
关于新加功能的加载过程:
controllser、samplser、listener、assertion等内容,并不是在代码中new出来的,而是在jmeter启动时,通过扫描工作路径下的class,分析class类型,反射生成到jmeter中的。所以,在写完JSON Assertion的GUI之后,并不需要更改jmeter其他内容。具体的扫描反射过程,在org.apache.jmeter.testbeans.gui.TestBeanGUI中进行。
完整代码地址
https://github.com/buaawp/jmeter/tree/json_assertion

相关文章推荐
- Android之使用Http协议实现文件上传功能
- mysql集群之MMM简单搭建
- 通晓网络测试常用命令
- Nodejs学习笔记之测试驱动
- 可以测试javascript运行效果的代码
- 使用php测试硬盘写入速度示例
- python 测试实现方法
- 如何测试端口通不通(四种方法)
- 举例详解PHP脚本的测试方法
- 使用Jasmine和Karma对AngularJS页面程序进行测试
- Php-Redis安装测试笔记
- WQL语言简介和WQL测试工具wbemtest.exe使用方法详细介绍
- mysql压力测试脚本实例
- JavaScript 组件之旅(四):测试 JavaScript 组件
- js简单网速测试方法完整实例
- Android触屏测试实例代码
- 解析libcurl在android下的移植、编译与测试
- destoon二次开发入门示例
- 几个比较实用的JavaScript 测试及效验工具
- Java中对AtomicInteger和int值在多线程下递增操作的测试