OpenCV 特征点检测
2016-03-18 15:07
471 查看
特征点检测
目标
在本教程中,我们将涉及:使用 FeatureDetector 接口来发现感兴趣点。特别地:
使用 SurfFeatureDetector 以及它的函数 detect 来实现检测过程
使用函数 drawKeypoints 来绘制检测到的关键点
理论
代码
这个教程的代码如下所示。你还可以从 这个链接下载到源代码#include <stdio.h>
#include <iostream>
#include "opencv2/core/core.hpp"
#include "opencv2/features2d/features2d.hpp"
#include "opencv2/highgui/highgui.hpp"
using namespace cv;
void readme();
/** @function main */
int main( int argc, char** argv )
{
if( argc != 3 )
{ readme(); return -1; }
Mat img_1 = imread( argv[1], CV_LOAD_IMAGE_GRAYSCALE );
Mat img_2 = imread( argv[2], CV_LOAD_IMAGE_GRAYSCALE );
if( !img_1.data || !img_2.data )
{ std::cout<< " --(!) Error reading images " << std::endl; return -1; }
//-- Step 1: Detect the keypoints using SURF Detector
int minHessian = 400;
SurfFeatureDetector detector( minHessian );
std::vector<KeyPoint> keypoints_1, keypoints_2;
detector.detect( img_1, keypoints_1 );
detector.detect( img_2, keypoints_2 );
//-- Draw keypoints
Mat img_keypoints_1; Mat img_keypoints_2;
drawKeypoints( img_1, keypoints_1, img_keypoints_1, Scalar::all(-1), DrawMatchesFlags::DEFAULT );
drawKeypoints( img_2, keypoints_2, img_keypoints_2, Scalar::all(-1), DrawMatchesFlags::DEFAULT );
//-- Show detected (drawn) keypoints
imshow("Keypoints 1", img_keypoints_1 );
imshow("Keypoints 2", img_keypoints_2 );
waitKey(0);
return 0;
}
/** @function readme */
void readme()
{ std::cout << " Usage: ./SURF_detector <img1> <img2>" << std::endl; }
解释
结果
这是第一张图的特征点检测结果: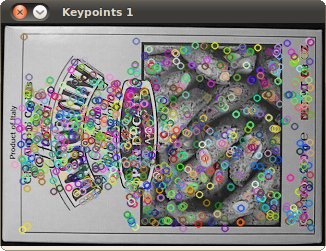
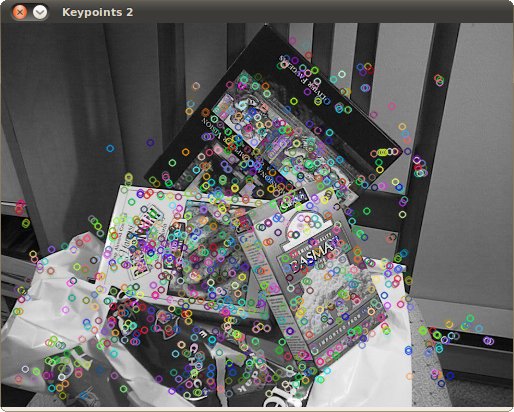
这是第二张图的特征点检测:
翻译者
Shuai Zheng, <kylezheng04@gmail.com>, http://www.cbsr.ia.ac.cn/users/szheng/from: http://www.opencv.org.cn/opencvdoc/2.3.2/html/doc/tutorials/features2d/feature_detection/feature_detection.html#feature-detection

相关文章推荐
- Delphi实现检测并枚举系统安装的打印机的方法
- 详解SQL死锁检测的方法
- C#检测pc光驱里是否插入了光盘的方法
- C#检测远程计算机端口是否打开的方法
- C#实现回文检测的方法
- C#检测DataSet是否为空的方法
- UTF-8 编码中BOM的检测与删除
- C#检测是否有u盘插入的方法
- Lua检测数组(tabble)中是否包含某个值
- PHP检测用户语言的方法
- C#检测是否有危险字符的SQL字符串过滤方法
- C#检测上传文件真正类型的方法
- asp检测是否为中文字符函数
- 浏览器缩放检测的js代码
- 封装好的一个万能检测表单的方法
- shell脚本实现实时检测文件变更
- javascript 密码强弱度检测万能插件
- javascript检测(控制 )上传文件大小
- javascript iframe中打开文件,并检测iframe存在否
- Android安卓中循环录像并检测内存卡容量