Android——Android Bundle类(转)
2016-03-18 09:42
369 查看
今天发现自己连Bundle类都没有搞清楚,于是花时间研究了一下。
根据google官方的文档(http://developer.android.com/reference/android/os/Bundle.html)
Bundle类是一个key-value对,“A mapping from String values to various Parcelable types.”
类继承关系:
java.lang.Object
android.os.Bundle
Bundle类是一个final类:
public final class
Bundle
extends Objectimplements Parcelable Cloneable
两个activity之间的通讯可以通过bundle类来实现,做法就是:
(1)新建一个bundle类
(2)bundle类中加入数据(key -value的形式,另一个activity里面取数据的时候,就要用到key,找出对应的value)
(3)新建一个intent对象,并将该bundle加入这个intent对象
完整代码如下:
android mainfest.xml如下:
两个类如下:intent从TestBundle类发起,到Target类。
类1:TestBundle类:
类2: Target
布局文件:
main.xml
target.xml
String.xml
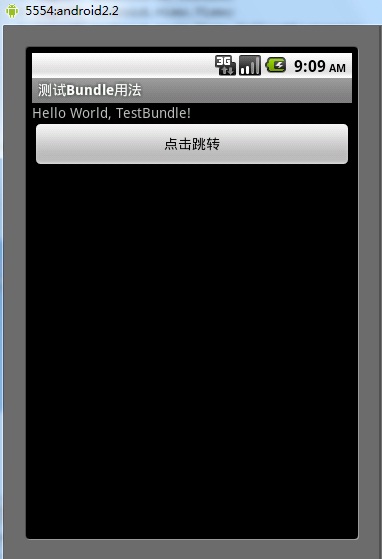
结果:
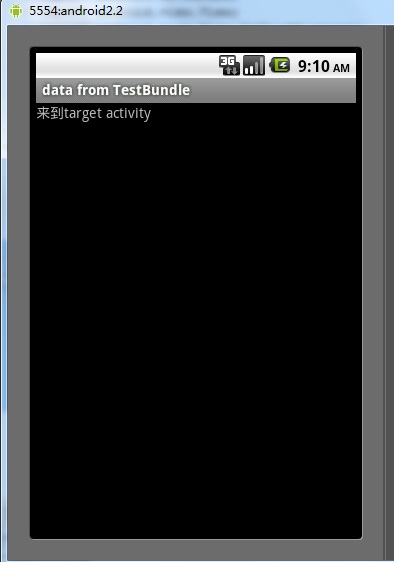
跳转结果:
根据google官方的文档(http://developer.android.com/reference/android/os/Bundle.html)
Bundle类是一个key-value对,“A mapping from String values to various Parcelable types.”
类继承关系:
java.lang.Object
android.os.Bundle
Bundle类是一个final类:
public final class
Bundle
extends Objectimplements Parcelable Cloneable
两个activity之间的通讯可以通过bundle类来实现,做法就是:
(1)新建一个bundle类
Bundle mBundle = new Bundle();
(2)bundle类中加入数据(key -value的形式,另一个activity里面取数据的时候,就要用到key,找出对应的value)
mBundle.putString("Data", "data from TestBundle");(3)新建一个intent对象,并将该bundle加入这个intent对象
Intent intent = new Intent();
intent.setClass(TestBundle.this, Target.class);
intent.putExtras(mBundle);
完整代码如下:
android mainfest.xml如下:
<?xml version="1.0" encoding="utf-8"?>
<manifest xmlns:android="http://schemas.android.com/apk/res/android"
package="com.tencent.test"
android:versionCode="1"
android:versionName="1.0">
<application android:icon="@drawable/icon" android:label="@string/app_name">
<activity android:name=".TestBundle"
android:label="@string/app_name">
<intent-filter>
<action android:name="android.intent.action.MAIN" />
<category android:name="android.intent.category.LAUNCHER" />
</intent-filter>
</activity>
<activity android:name=".Target"></activity>
</application>
<uses-sdk android:minSdkVersion="7" />
</manifest>
两个类如下:intent从TestBundle类发起,到Target类。
类1:TestBundle类:
import android.app.Activity;
import android.content.Intent;
import android.os.Bundle;
import android.view.View;
import android.view.View.OnClickListener;
import android.widget.Button;

public class TestBundle extends Activity {

private Button button1;
private OnClickListener cl;
public void onCreate(Bundle savedInstanceState) {
super.onCreate(savedInstanceState);
setContentView(R.layout.main);

button1 = (Button) findViewById(R.id.button1);
cl = new OnClickListener(){
@Override
public void onClick(View arg0) {
// TODO Auto-generated method stub
Intent intent = new Intent();
intent.setClass(TestBundle.this, Target.class);
Bundle mBundle = new Bundle();
mBundle.putString("Data", "data from TestBundle");//压入数据
intent.putExtras(mBundle);
startActivity(intent);
}
};
button1.setOnClickListener(cl);
}
}
类2: Target
import android.app.Activity;
import android.os.Bundle;

public class Target extends Activity{

public void onCreate(Bundle savedInstanceState) {

super.onCreate(savedInstanceState);
setContentView(R.layout.target);
<span style="color:#ff6600;">Bundle bundle = getIntent().getExtras();   </span> //得到传过来的bundle
String data = bundle.getString("Data");//读出数据
setTitle(data);

}
}
布局文件:
main.xml
<?xml version="1.0" encoding="utf-8"?>
<LinearLayout xmlns:android="http://schemas.android.com/apk/res/android"
android:orientation="vertical"
android:layout_width="fill_parent"
android:layout_height="fill_parent"
>
<TextView
android:layout_width="fill_parent"
android:layout_height="wrap_content"
android:text="@string/hello"
/>
<Button
android:layout_width="fill_parent"
android:layout_height="wrap_content"
android:text="@string/button"
android:id = "@+id/button1"
/>
</LinearLayout>
target.xml
<?xml version="1.0" encoding="utf-8"?>
<LinearLayout xmlns:android="http://schemas.android.com/apk/res/android"
android:orientation="vertical"
android:layout_width="fill_parent"
android:layout_height="fill_parent"
>
<TextView
android:layout_width="fill_parent"
android:layout_height="wrap_content"
android:text="@string/target"
/>
</LinearLayout>
String.xml
<?xml version="1.0" encoding="utf-8"?>
<resources>
<string name="hello">Hello World, TestBundle!</string>
<string name="app_name">测试Bundle用法</string>
<string name="button">点击跳转</string>
<string name="target">来到target activity</string>
</resources>
结果:
跳转结果:

相关文章推荐
- Android 图片缓存 随手笔记
- android 中添加libssl和libcurl
- Handler可能引起的内存泄露及解决方案-android
- Android:adb 启动activity、service,发送broadcast
- android解析JSON数据
- 如何恢复(初始化)android studio所有设置
- android studio运行的时候出现Unable to obtain debug bridge错误的解决办法
- android 各种颜色值 colors.xml
- Android小应用(更新中...)
- Android 5.1高通方案增加GPIO按键
- Android研发-从java基础开始学 (一般三天更新一次)
- 如何让service不被杀死,针对主流机型和android版本
- android 题
- android开发 数组
- android程序更换图标安装后不变解决办法
- Android二级分类列表GirdView
- android Unable to execute dex: Multiple dex files define Landroid/support/v4/accessibilityservice/A
- android图像变换之Matrix
- android intent-filter
- Android 学习笔记(一)