OPENWRT ON ARM-BASED PLATFORM (RASPBERRY PI 2)
2016-03-17 22:11
429 查看
http://dab-embedded.com/en/blogs/openwrt-on-arm-based-platform-raspberry-pi-2/
http://blog.csdn.net/sdvch/article/details/16342875
The OpenWrt project started in January 2004. The first OpenWrt versions were based on LinksysGPL sources
for WRT54G and a buildroot from the uclibc project. This version was known as OpenWrt "stable release" and was widely in use. There are still many OpenWrt applications, like the Freifunk-Firmware or Sip@Home, which are based on this version.
Now we are using Barrier Breaker version 14.07 (started in October 2014).
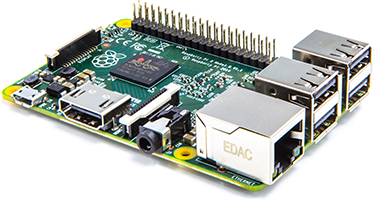
In this article we will show how to start OpenWRT on Raspberry PI 2 (with Broadcom BCM2836, ARM Cortex-A7 Quad
core).
We are using Ubuntu 14.04.2 LTS (64-bit) for building SD card image.
Link to image file for RPI2 below.
Step 1:
Preparing Ubuntu:
sudo apt-get update
sudo apt-get install git-core build-essential libssl-dev
sudo apt-get install subversion mercurial
Step 2:
Download the OpenWRT with git:
git clone git://git.openwrt.org/openwrt.git
this creates a directory 'openwrt', which is the OpenWrt Buildroot build-directory
the OpenWrt toolchain "OpenWrt Buildroot" is included.
Step 3:
Download and install all available "feeds":
cd openwrt
./scripts/feeds update -a
./scripts/feeds install -a
Step 4:
Make OpenWrt Buildroot check for missing packages on your build-system using one of the following commands:
make defconfig
make prereq
make menuconfig
Step 5:
Setup Wi-Fi kernel modules for WiPi USB stick (optional):
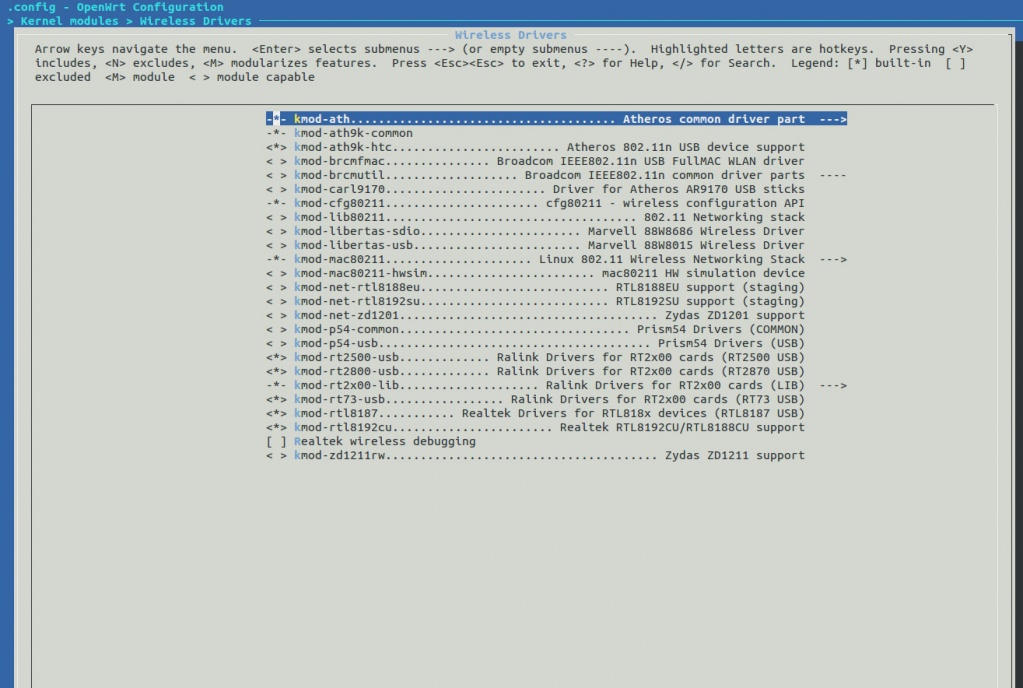
Also do not forget to build wpa_supplicant and wi modules.
Step 6:
If you need to build LuCI Web interface for OpenWRT so please set component in LuCI->Collections. Also possible to install LuCI later with opkg.
Step 7:
Save and exit from menuconfig
Step 8:
Start building process:
make
or the build process can be accelerated by running multiple concurrent job processes using the -j-option ()
make -j 3
Use the standard formula <your number of CPU cores + 1>
If this produces random build errors try compiling again without the -j-option
If for some reason the build fails, the easiest way to spot the error is to do:
make V=s 2>&1 | tee build.log | grep -i error
Step 9:
Go to the openwrt/bin/brcm2708 and you will find openwrt-brcm2708-bcm2709-sdcard-vfat-ext4.img file. Use dd to copy it to SD card:
sudo dd if=openwrt-brcm2708-bcm2709-sdcard-vfat-ext4.img of=/dev/sdX bs=2M conv=fsync
sdX - put your SD card dev (sdb, sdc, ..).
Don't forget to unmount SD partitions with umount and make sync after dd will done.
Step 10:
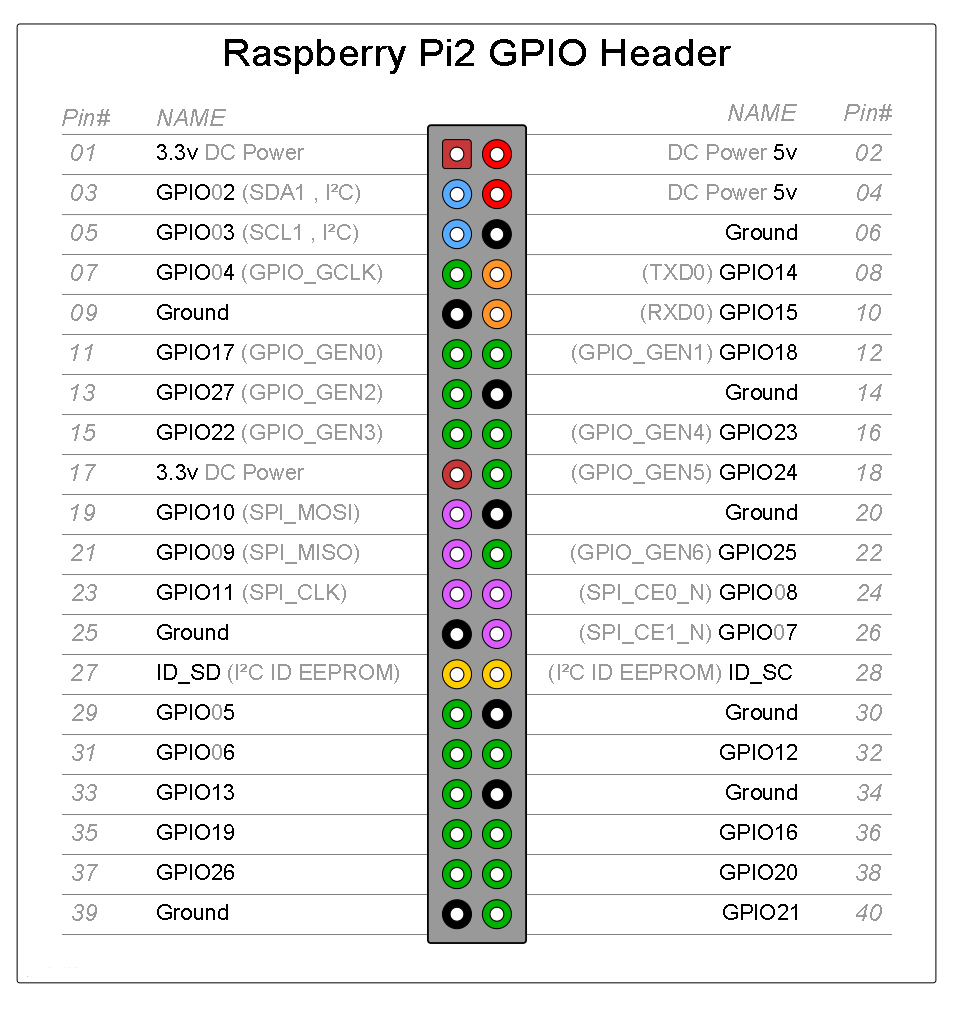
Insert SD to your Raspberry PI 2, connect UART-USB cable, insert WiPi stick (if you need) and connect power.
Raspberry PI 2 GPIO header pinout:
Step 11: First configuration: in UART-USB console write passwd to set a new password for the user root:
passwd
Step 12: Reboot RPI 2:
reboot
Step 13:
If you need to install LuCI (not install from menuconfig):
vi /etc/opkg.conf
fix opkg.conf file with correct link:
http://downloads.openwrt.org/snapshots/trunk/brcm2708/generic/packages/base
opkg update
opkg install luci
opkg install luci-ssl
opkg list | grep luci-i18n-
/etc/init.d/uhttpd start
/etc/init.d/uhttpd enable
Now LuCI will boot each time after RPI 2 will boot.
Open your browser and connect to the router at its default address (usually 192.168.1.1). Login using username
root with root password.
If you need Wi-Fi connection to Access Point:
mkdir /etc/wpa_supplicant
vi /etc/wpa_supplicant/wpa_supplicant.conf
put in /etc/wpa_supplicant/wpa_supplicant.conf file:
update_config=1
network={
ssid="AP name"
psk="your key"
scan_ssid=1
proto=WPA RSN
key_mgmt=WPA-PSK
group=CCMP TKIP
pairwise=CCMP TKIP
priority=5
}
Start Wi-Fi connection in background task:
wpa_supplicant -Dnl80211 -iwlan0 -c/etc/wpa_supplicant/wpa_supplicant.conf &
Put name resolving server in /etc/resolv.conf file:
vi /etc/resolv.conf
nameserver <put your router IP here>
nameserver 8.8.8.8
Save file run:
route add default gw <put your router IP here>
之前编译的openwrt一直都没有界面需要手动安装界面,其实手动安装界面很简单,只需要简单的三个步骤即可:
首先,Telnet进入路由器 Telnet 192.168.1.1. 此时会看到openwrt的欢迎界面
然后,更新下opkg列表,输入: opkg update
最后,安装界面 输入 opkg install luci-admin-full 耐心等待即可。
本文要讲的将luci编译到openwrt中,不需要再手动安装,本文的前提是已安装好编译环境并下载完成openwrt源码
软件环境:
Openwrt: Kamikaze 8.09;
PC OS: Windows XP sp2
VM: VMware workstation 6.5
VM OS: Ubuntu 9.04
硬件: linksys WRT54G V1.1
首先,升级openwrt 进入到源码主目录-》script 在script目录中打开命令行 输入 ./feeds update
其次,安装luci 继续在命令行中输入 ./feeds install -a -p luci
最后,回到源码主目录,命令行输入 make menuconfig 此时你会发现在Administration项下面多出来4个luci的配置选项,此时按照你的需要进行配置即可。
http://blog.csdn.net/sdvch/article/details/16342875
The OpenWrt project started in January 2004. The first OpenWrt versions were based on LinksysGPL sources
for WRT54G and a buildroot from the uclibc project. This version was known as OpenWrt "stable release" and was widely in use. There are still many OpenWrt applications, like the Freifunk-Firmware or Sip@Home, which are based on this version.
Now we are using Barrier Breaker version 14.07 (started in October 2014).
In this article we will show how to start OpenWRT on Raspberry PI 2 (with Broadcom BCM2836, ARM Cortex-A7 Quad
core).
We are using Ubuntu 14.04.2 LTS (64-bit) for building SD card image.
Link to image file for RPI2 below.
Step 1:
Preparing Ubuntu:
sudo apt-get update
sudo apt-get install git-core build-essential libssl-dev
sudo apt-get install subversion mercurial
Step 2:
Download the OpenWRT with git:
git clone git://git.openwrt.org/openwrt.git
this creates a directory 'openwrt', which is the OpenWrt Buildroot build-directory
the OpenWrt toolchain "OpenWrt Buildroot" is included.
Step 3:
Download and install all available "feeds":
cd openwrt
./scripts/feeds update -a
./scripts/feeds install -a
Step 4:
Make OpenWrt Buildroot check for missing packages on your build-system using one of the following commands:
make defconfig
make prereq
make menuconfig
Step 5:
Setup Wi-Fi kernel modules for WiPi USB stick (optional):
Also do not forget to build wpa_supplicant and wi modules.
Step 6:
If you need to build LuCI Web interface for OpenWRT so please set component in LuCI->Collections. Also possible to install LuCI later with opkg.
Step 7:
Save and exit from menuconfig
Step 8:
Start building process:
make
or the build process can be accelerated by running multiple concurrent job processes using the -j-option ()
make -j 3
Use the standard formula <your number of CPU cores + 1>
If this produces random build errors try compiling again without the -j-option
If for some reason the build fails, the easiest way to spot the error is to do:
make V=s 2>&1 | tee build.log | grep -i error
Step 9:
Go to the openwrt/bin/brcm2708 and you will find openwrt-brcm2708-bcm2709-sdcard-vfat-ext4.img file. Use dd to copy it to SD card:
sudo dd if=openwrt-brcm2708-bcm2709-sdcard-vfat-ext4.img of=/dev/sdX bs=2M conv=fsync
sdX - put your SD card dev (sdb, sdc, ..).
Don't forget to unmount SD partitions with umount and make sync after dd will done.
Step 10:
Insert SD to your Raspberry PI 2, connect UART-USB cable, insert WiPi stick (if you need) and connect power.
Raspberry PI 2 GPIO header pinout:
Step 11: First configuration: in UART-USB console write passwd to set a new password for the user root:
passwd
Step 12: Reboot RPI 2:
reboot
Step 13:
If you need to install LuCI (not install from menuconfig):
vi /etc/opkg.conf
fix opkg.conf file with correct link:
http://downloads.openwrt.org/snapshots/trunk/brcm2708/generic/packages/base
opkg update
opkg install luci
opkg install luci-ssl
opkg list | grep luci-i18n-
/etc/init.d/uhttpd start
/etc/init.d/uhttpd enable
Now LuCI will boot each time after RPI 2 will boot.
Open your browser and connect to the router at its default address (usually 192.168.1.1). Login using username
root with root password.
If you need Wi-Fi connection to Access Point:
mkdir /etc/wpa_supplicant
vi /etc/wpa_supplicant/wpa_supplicant.conf
put in /etc/wpa_supplicant/wpa_supplicant.conf file:
update_config=1
network={
ssid="AP name"
psk="your key"
scan_ssid=1
proto=WPA RSN
key_mgmt=WPA-PSK
group=CCMP TKIP
pairwise=CCMP TKIP
priority=5
}
Start Wi-Fi connection in background task:
wpa_supplicant -Dnl80211 -iwlan0 -c/etc/wpa_supplicant/wpa_supplicant.conf &
Put name resolving server in /etc/resolv.conf file:
vi /etc/resolv.conf
nameserver <put your router IP here>
nameserver 8.8.8.8
Save file run:
route add default gw <put your router IP here>
之前编译的openwrt一直都没有界面需要手动安装界面,其实手动安装界面很简单,只需要简单的三个步骤即可:
首先,Telnet进入路由器 Telnet 192.168.1.1. 此时会看到openwrt的欢迎界面
然后,更新下opkg列表,输入: opkg update
最后,安装界面 输入 opkg install luci-admin-full 耐心等待即可。
本文要讲的将luci编译到openwrt中,不需要再手动安装,本文的前提是已安装好编译环境并下载完成openwrt源码
软件环境:
Openwrt: Kamikaze 8.09;
PC OS: Windows XP sp2
VM: VMware workstation 6.5
VM OS: Ubuntu 9.04
硬件: linksys WRT54G V1.1
首先,升级openwrt 进入到源码主目录-》script 在script目录中打开命令行 输入 ./feeds update
其次,安装luci 继续在命令行中输入 ./feeds install -a -p luci
最后,回到源码主目录,命令行输入 make menuconfig 此时你会发现在Administration项下面多出来4个luci的配置选项,此时按照你的需要进行配置即可。

相关文章推荐
- Global文件的作用
- ASP.NET MVC
- Spring AOP(三)——通过@AspectJ注解切面
- ASP.NET网站开发中的配置文件
- .Net用js实现aspx页面删除TextBox输入框的前后空格
- 使用asp.net和wCF4.0开发RESTful服务
- asp.net signalR 专题—— 第三篇 如何从外部线程访问 PersistentConnection
- asp.net获取网站绝对路径示例
- asp.net页面读取配置文件
- 基于@AspectJ配置Spring AOP之一
- CMD命令重新注册 asp.net 4.0
- ASP.NET WebForm的优缺点
- ASP.NET WAB API 2 生命周期管道图
- Asp.net MVC 与 Asp.net Web API 区别
- ASP.Net MVC4排序检索分页的实现
- ASP.NET MVC 缓存使用示例
- ASP.NET页面传值与跳转
- asp.net学习之Repeater控件
- DoingOrder.aspx.cs缓存的使用方法
- 关于asp输出json对象的方法及实例