用LinearLayout和RelativeLayout分别实现简单的登陆界面
2016-03-15 23:38
387 查看
LinearLayout是最简单也是最常用的一种布局方式,它根据orientation 属性值,将包含的所有控件或布局对象排列在同一个方向:水平或垂直,在这种布局中,所有的控件都是依序排列成一条线。在线性布局中的控件允许有自己的margins和gravity属性。
LinearLayout.LayoutParams用来定义针LinearLayout布局的专用属性,它包括以下内容:
1)android:layout_weight用于在LinearLayout中把所有子View排布之后的剩余空间按照它们的layout_weight分配给各个拥有这个属性的View。
2)android:layout_gravity用于设置组件自身在父组件中的对齐方式。
写一个登陆界面吧.超级简单
RelativeLayout的子控件会根据它们所设置的参照控件和参数进行相对布局。参照控件可以是父控件,也可以是其它子控件。
针对父控件的布局属性,如下所示。
android:layout_alignParentTop:为true,将该控件的顶部与其父控件的顶部对齐;
android:layout_alignParentBottom :为true,将该控件的底部与其父控件的底部对齐;
android:layout_alignParentLeft:为true,将该控件的左部与其父控件的左部对齐;
android:layout_alignParentRight:为true,将该控件的右部与其父控件的右部对齐;
android:layout_centerHorizontal: 为true,将该控件的置于水平居中;
android:layout_centerVertical: 为true,将该控件的置于垂直居中;
android:layout_centerInParent: 为true,将该控件的置于父控件的中央;
针对其它控件的属性,如下所示。
android:layout_above: 将该控件的底部置于指定ID的控件之上;
android:layout_below :将该控件的底部置于指定ID的控件之下;
android:layout_toLeftOf:将该控件的右边缘与指定ID的控件左边缘对齐;
android:layout_toRightOf: 将该控件的左边缘与指定ID的控件右边缘对齐;
android:layout_alignBaseline: 将该控件的baseline与指定ID的baseline对齐;
android:layout_alignTop: 将该控件的顶部边缘与指定ID的顶部边缘对齐;
android:layout_alignBottom: 将该控件的底部边缘与指定ID的底部边缘对齐;
android:layout_alignLeft: 将该控件的左边缘与指定ID的左边缘对齐;
android:layout_alignRight:将该控件的右边缘与指定ID的右边缘对齐;
注意,不能在RelativeLayout容器本身和它的子元素之间产生循环依赖,比如说,不能将RelativeLayout的高设置成为WRAP_CONTENT的时候将子元素的高设置成为ALIGN_PARENT_BOTTOM。
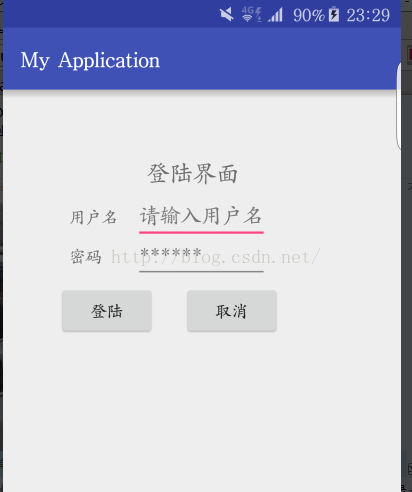
运行截图
LinearLayout.LayoutParams用来定义针LinearLayout布局的专用属性,它包括以下内容:
1)android:layout_weight用于在LinearLayout中把所有子View排布之后的剩余空间按照它们的layout_weight分配给各个拥有这个属性的View。
2)android:layout_gravity用于设置组件自身在父组件中的对齐方式。
写一个登陆界面吧.超级简单
<?xml version="1.0" encoding="utf-8"?>
<LinearLayout xmlns:android="http://schemas.android.com/apk/res/android"
xmlns:tools="http://schemas.android.com/tools"
android:layout_width="match_parent"
android:layout_height="match_parent"
android:orientation="vertical">

<TextView
android:layout_width="match_parent"
android:layout_height="wrap_content"
android:textSize="20sp"
android:layout_marginLeft="130dp"
android:layout_marginTop="50dp"
android:text="登陆界面" />

<LinearLayout
android:layout_width="match_parent"
android:layout_height="wrap_content"
android:orientation="horizontal">

<TextView
android:layout_width="wrap_content"
android:layout_height="wrap_content"
android:layout_marginLeft="60dp"
android:text="用户名"/>

<EditText
android:id="@+id/userNameEtext"
android:layout_width="wrap_content"
android:layout_height="wrap_content"
android:layout_marginLeft="15dp"
android:singleLine="true"
android:hint="请输入账号"/>

</LinearLayout>
<LinearLayout
android:layout_width="match_parent"
android:layout_height="wrap_content"
android:orientation="horizontal">

<TextView
android:layout_width="wrap_content"
android:layout_height="wrap_content"
android:layout_marginLeft="60dp"
android:text="密码"/>

<EditText
android:id="@+id/passwordEtext"
android:layout_width="wrap_content"
android:layout_height="wrap_content"
android:layout_marginLeft="33dp"
android:minWidth="100dp"
android:singleLine="true"
android:hint="******"
/>

</LinearLayout>

<LinearLayout
android:layout_width="match_parent"
android:layout_height="wrap_content"
android:orientation="horizontal">

<Button
android:layout_width="wrap_content"
android:layout_height="wrap_content"
android:layout_marginLeft="60dp"
android:text="登陆"/>

<Button
android:layout_width="wrap_content"
android:layout_height="wrap_content"
android:layout_marginLeft="15dp"
android:hint="取消"/>

</LinearLayout>
</LinearLayout>
RelativeLayout的子控件会根据它们所设置的参照控件和参数进行相对布局。参照控件可以是父控件,也可以是其它子控件。
针对父控件的布局属性,如下所示。
android:layout_alignParentTop:为true,将该控件的顶部与其父控件的顶部对齐;
android:layout_alignParentBottom :为true,将该控件的底部与其父控件的底部对齐;
android:layout_alignParentLeft:为true,将该控件的左部与其父控件的左部对齐;
android:layout_alignParentRight:为true,将该控件的右部与其父控件的右部对齐;
android:layout_centerHorizontal: 为true,将该控件的置于水平居中;
android:layout_centerVertical: 为true,将该控件的置于垂直居中;
android:layout_centerInParent: 为true,将该控件的置于父控件的中央;
针对其它控件的属性,如下所示。
android:layout_above: 将该控件的底部置于指定ID的控件之上;
android:layout_below :将该控件的底部置于指定ID的控件之下;
android:layout_toLeftOf:将该控件的右边缘与指定ID的控件左边缘对齐;
android:layout_toRightOf: 将该控件的左边缘与指定ID的控件右边缘对齐;
android:layout_alignBaseline: 将该控件的baseline与指定ID的baseline对齐;
android:layout_alignTop: 将该控件的顶部边缘与指定ID的顶部边缘对齐;
android:layout_alignBottom: 将该控件的底部边缘与指定ID的底部边缘对齐;
android:layout_alignLeft: 将该控件的左边缘与指定ID的左边缘对齐;
android:layout_alignRight:将该控件的右边缘与指定ID的右边缘对齐;
注意,不能在RelativeLayout容器本身和它的子元素之间产生循环依赖,比如说,不能将RelativeLayout的高设置成为WRAP_CONTENT的时候将子元素的高设置成为ALIGN_PARENT_BOTTOM。
<?xml version="1.0" encoding="utf-8"?>
<RelativeLayout xmlns:android="http://schemas.android.com/apk/res/android"
android:layout_width="match_parent"
android:layout_height="match_parent">

<TextView
android:id="@+id/loginTextView"
android:layout_width="wrap_content"
android:layout_height="wrap_content"
android:textSize="20sp"
android:layout_marginTop="60dp"
android:layout_marginLeft="130dp"
android:text="登陆界面" />
<TextView
android:id="@+id/usernameTtext"
android:layout_width="wrap_content"
android:layout_height="wrap_content"
android:layout_below="@id/loginTextView"
android:layout_marginTop="15dp"
android:layout_marginLeft="60dp"
android:text="用户名" />
<EditText
android:id="@+id/usernameEtext"
android:layout_width="wrap_content"
android:layout_height="wrap_content"
android:layout_below="@id/loginTextView"
android:layout_toRightOf="@id/usernameTtext"
android:layout_alignBaseline="@id/usernameTtext"
android:layout_marginLeft="15dp"
android:singleLine="true"
android:hint="请输入用户名"/>
<TextView
android:layout_width="wrap_content"
android:layout_height="wrap_content"
android:id="@+id/passWordTtext"
android:layout_alignLeft="@id/usernameTtext"
android:layout_below="@id/usernameTtext"
android:layout_marginTop="15dp"
android:text="密码" />
<EditText
android:id="@+id/passWordEtext"
android:layout_width="wrap_content"
android:layout_height="wrap_content"
android:layout_below="@id/usernameEtext"
android:layout_alignLeft="@id/usernameEtext"
android:layout_alignRight="@id/usernameEtext"
android:layout_alignBaseline="@id/passWordTtext"
android:inputType="textPassword"
android:hint="******"/>
<Button
android:id="@+id/loginBtn"
android:layout_width="wrap_content"
android:layout_height="wrap_content"
android:layout_marginTop="15dp"
android:layout_marginLeft="50dp"
android:layout_below="@id/passWordTtext"
android:text="登陆"/>
<Button
android:id="@+id/resetBtn"
android:layout_toRightOf="@id/loginBtn"
android:layout_marginLeft="25dp"
android:layout_alignBaseline="@id/loginBtn"
android:layout_width="wrap_content"
android:layout_height="wrap_content"
android:text="取消"/>
</RelativeLayout>
运行截图

相关文章推荐
- Android布局的小窍门?
- Web布局连载——两栏固定布局(五)
- 交换机升级排障实例
- 样式表CSS布局经验
- 在winform下实现左右布局多窗口界面的方法之续篇
- css网页布局中注意的几个问题小结
- DL.DT.DD实现左右的布局简单例子第1/2页
- 使用CSS框架布局的缺点和优点小结
- div+CSS网页布局的意义与副作用原因小结第1/2页
- 在winform下实现左右布局多窗口界面的方法
- sql2008启动代理未将对象应用到实例解决方案
- Android编程之代码创建布局实例分析
- Android布局之RelativeLayout相对布局
- CSS顶级技巧大放送,div+css布局必知
- winform异型不规则界面设计的实现方法
- Ajax教程实例详解
- 用div实现像table一样的布局方法
- 精彩的Bootstrap案例分享 重点在注释!(选项卡、栅格布局)
- jQuery EasyUi实战教程之布局篇
- jQuery EasyUI 布局之动态添加tabs标签页