LNMP环境部署
2016-03-15 21:32
309 查看
环境:CentOS 6.7 32位 MySQL 5.1 PHP 5.4.37 NGINX 1.6.2
下载地址:
CentOS http://mirrors.163.com/centos/6.7/isos/i386/CentOS-6.7-i386-minimal.iso
MySQL http://mirrors.sohu.com/mysql/MySQL-5.1/mysql-5.1.73-linux-i686-glibc23.tar.gz
PHP http://mirrors.sohu.com/php/php-5.4.37.tar.gz
NGINX http://mirrors.sohu.com/nginx/nginx-1.6.2.tar.gz
一MySQL安装
我们平时安装MySQL都是源码包安装的,但是由于它的编译需要很长的时间,所以建议安装二进制免编译包。
下载MySQL 到/usr/local/src/
cd /usr/local/src/ [root@LNMP src]# wget http://mirrors.sohu.com/mysql/MySQL-5.1/mysql-5.1.73-linux-i686-glibc23.tar.gz[/code]2.解压tar zxvf mysql-5.6.27-linux-glibc2.5-i686.tar.gz3.把解压完的数据移动到/usr/local/mysqlmv mysql-5.6.27-linux-glibc2.5-i686 /usr/local/mysql4.建立MySQL用户useradd -s /sbin/nologin mysql5.初始化数据库1、cd /usr/local/mysql 2、mkdir -p /data/mysql ; chown -R mysql:mysql /data/mysql 3、./scripts/mysql_install_db --user=mysql --datadir=/data/mysql--user定义数据库的所属主,--datadir定义数据库安装到哪里,建议放到大空间的分区上,这个目录需要自行创建。这一步骤很关键,如果你看到两个 “OK” 说明执行正确,否则请仔细查看错误信息。
6.拷贝配置文件cp support-files/my-large.cnf /etc/my.cnf7.拷贝启动脚本文件并修改其属性[root@localhost mysql]# cp support-files/mysql.server /etc/init.d/mysqld [root@localhost mysql]# chmod 755 /etc/init.d/mysqld8.修改启动脚本[root@localhost mysql]# vim /etc/init.d/mysqld需要修改的地方有 “datadir=/data/mysql” (前面初始化数据库时定义的目录)
9.把启动脚本加入系统服务项,并设定开机启动,启动MySQL[root@localhost mysql]# chkconfig --add mysqld [root@localhost mysql]# chkconfig mysqld on [root@localhost mysql]# service mysqld start如果启动不了,请到 /data/mysql/ 下查看错误日志,这个日志通常是主机名.err. 检查mysql是否启动的命令为:[root@localhost mysql]# ps aux |grep mysqld二:安装PHP
这里要先声明一下,针对Nginx的php安装和针对apache的php安装是有区别的,因为Nginx中的php是以fastcgi的方式结合nginx的,可以理解为nginx代理了php的fastcgi,而apache是把php作为自己的模块来调用的。php官方下载地址: http://www.php.net/downloads.php
下载php[root@LAMP src]# wget http://mirrors.sohu.com/php/php-5.4.37.tar.gz[/code]2.解压phptar zxf php-5.4.37.tar.gz3.创建相关账户useradd -s /sbin/nologin php-fpm4.配置PHP编译参数
centos 6+系列环境
安装php前.先安装些软件和库文件yum install -y gcc gcc-c++ make zlib zlib-devel pcre pcre-devel libjpeg libjpeg-devel libpng libpng-devel freetype freetype-devel libxml2 libxml2-devel glibc glibc-devel glib2 glib2-devel bzip2 bzip2-devel ncurses ncurses-devel curl curl-devel e2fsprogs e2fsprogs-devel krb5 krb5-devel openssl openssl-devel openldap openldap-devel nss_ldap openldap-clients openldap-servers如出现以下错误
错误:
configure: error: mcrypt.h not found. Please reinstall libmcrypt.
解决办法:rpm -ivh "http://www.aminglinux.com/bbs/data/attachment/forum/month_1211/epel-release-6-7.noarch.rpm" yum install -y libmcrypt-devel编译参数[root@LNMP src]# cd php-5.4.37 ./configure --prefix=/usr/local/php --with-config-file-path=/usr/local/php/etc --enable-fpm --with-fpm-user=php-fpm --with-fpm-group=php-fpm --with-mysql=/usr/local/mysql --with-mysql-sock=/tmp/mysql.sock --with-libxml-dir --with-gd --with-jpeg-dir --with-png-dir --with-freetype-dir --with-iconv-dir --with-zlib-dir --with-mcrypt --enable-soap --enable-gd-native-ttf --enable-ftp --enable-mbstring --enable-exif --disable-ipv6 --with-curl该过程中,如果出现如下错误
错误信息:configure: error: Please reinstall the libcurl distribution - easy.h should be in <curl-dir>/include/curl/解决办法:yum install -y libcurl-devel5.编译PHP[root@LNMP php-5.4.37]# make (这个过程较长,需要好几分钟)在这一步,你通常会遇到一些错误,没有关系,遇到错误是好事,这样可以增加你处理问题的经验/usr/bin/ld: cannot find -lltdl collect2: ld returned 1 exit status make: *** [sapi/fpm/php-fpm] 错误 1解决办法yum install -y libtool-ltdl-devel6.安装phpmake install以上每一个步骤,如果没有完全执行正确,那么下一步是无法进行的,是否还记得判断执行是否正确的方法? 使用echo $?看结果是否为 “0” , 如果不是,就是没有执行正确。
7.修改配置文件cp php.ini-production /usr/local/php/etc/php.ini拷贝启动脚本[root@LNMP php-5.4.37]# cp sapi/fpm/init.d.php-fpm /etc/init.d/php-fpm [root@LNMP php-5.4.37]# chmod 755 /etc/init.d/php-fpm 给执行权限 [root@LNMP php-5.4.37]# chkconfig --add php-fpm 添加启动文件到服务列表里 [root@LNMP php-5.4.37]# chkconfig php-fpm on 设置成开机自动启动(level 3中) [root@LNMP php-5.4.37]# service php-fpm startStarting php-fpm [29-Jan-2016 22:09:59] ERROR: failed to open configuration file '/usr/local/php/etc/php-fpm.conf' : No such file or directory (2) [29-Jan-2016 22:09:59] ERROR: failed to load configuration file '/usr/local/php/etc/php-fpm.conf' [29-Jan-2016 22:09:59] ERROR: FPM initialization failed failed 此时启动会报错,应为配置文件还是空的[root@LNMP php-5.4.37]# cd /usr/local/php/etc/ [root@LNMP etc]# ls pear.conf php-fpm.conf.default php.ini 目录中php-fpm.conf.default 文件是一个配置文件的样本文件 [root@LNMP etc]# cp php-fpm.conf.default php-fpm.conf [root@LNMP etc]# ls pear.conf php-fpm.conf php-fpm.conf.default php.ini 复制或者重命名成配置文件 [root@LNMP etc]# /usr/local/php/sbin/php-fpm -t 启动前用此命令检查配置文件是否有错误 [29-Jan-2016 22:15:51] NOTICE: configuration file /usr/local/php/etc/php-fpm.conf test is successful [root@LNMP etc]# service php-fpm start 检测没错就可以启动了 Starting php-fpm done 启动成功[root@LNMP etc]# ps aux |grep php-fpm [root@LNMP etc]# netstat -lnp Active Internet connections (only servers) Proto Recv-Q Send-Q Local Address Foreign Address State PID/Program name tcp 0 0 127.0.0.1:9000 0.0.0.0:* LISTEN 5132/php-fpm安装完毕
三.NGINX安装
1、下载文件 1.6.2版本[root@LNMP src]# wget http://mirrors.sohu.com/nginx/nginx-1.6.2.tar.gz[/code]解压[root@LNMP src]# tar zxvf nginx-1.6.2.tar.gz [root@LNMP src]# cd nginx-1.6.22、编译参数[root@LNMP nginx-1.6.2]# ./configure --prefix=/usr/local/nginx --with-pcre 指定安装目录,pcre 正则相关如果报错提示 pcre 不存在 yum install -y pcre-devel 然后再重新编译参数
3、安装[root@LNMP nginx-1.6.2]# make [root@LNMP nginx-1.6.2]# make install [root@LNMP nginx-1.6.2]# cd /usr/local/nginx [root@LNMP nginx]# ls conf html logs sbin [root@LNMP nginx]# ls sbin/nginx 安装完成后生成以上4个目录,启动文件为 sbin/nginx sbin/nginx4、启动nginx[root@LNMP nginx]# /usr/local/nginx/sbin/nginx 启动文件直接回车即可 [root@LNMP nginx]# netstat -lnp |grep nginx 监听80端口 tcp 0 0 0.0.0.0:80 0.0.0.0:* LISTEN 7391/nginx[root@LNMP nginx]# curl -i localhost HTTP/1.1 200 OK 可以访问了 Server: nginx/1.6.2 Date: Fri, 29 Jan 2016 14:37:27 GMT Content-Type: text/html Content-Length: 612 Last-Modified: Fri, 29 Jan 2016 14:31:51 GMT Connection: keep-alive ETag: "56ab77d7-264" Accept-Ranges: bytesapache 是通过调用libphp5.iso 的模块来解析PHP ,调用后在httpd.conf 文件中还是需要进行一些配置
nginx 则是将php文件交由 php-fpm 服务来解析PHP文件。
测试PHP解析
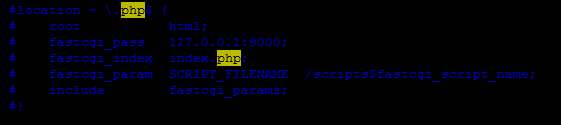
1、编辑nginx 的配置文件,将php相关的设置打开
[root@snale nginx]# vim /usr/local/nginx/conf/nginx.conf
改成
修改配置文件后可以用
/usr/local/nginx/sbin/nginx -t 测试配置文件
/usr/local/nginx/sbin/nginx -s reload 重新加载配置文件
在网站目录文件 /usr/local/nginx/html 中写一个php文件 进行测试[root@snale nginx]# cd /usr/local/nginx/html [root@snale html]# ls 50x.html index.html如果还是出现502错误,那可能是/usr/local/nginx/conf/nginx.conf 配置中的 fastcgi_pass 和 /usr/local/php/etc/php-fpm.conf 中的 "listen "配置不一样导致的
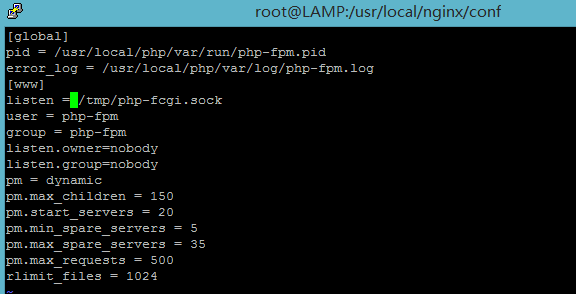
该配置是用于nginx 与php 进行通信的。 要么都为 127.0.0.1:9000 要么为 /tmp/php-fcgi.sock
5、编写NGINX启动脚本,并加入系统服务
nginx 启动、重启比较麻烦,可以编写一个启动脚本,放在 /etc/init.d/ 下
#!/bin/bash
# chkconfig: - 30 21
# description: http service.
# Source Function Library
. /etc/init.d/functions
# Nginx Settings
NGINX_SBIN="/usr/local/nginx/sbin/nginx"
NGINX_CONF="/usr/local/nginx/conf/nginx.conf"
NGINX_PID="/usr/local/nginx/logs/nginx.pid"
RETVAL=0
prog="Nginx"
start() {
echo -n $"Starting $prog: "
mkdir -p /dev/shm/nginx_temp
daemon $NGINX_SBIN -c $NGINX_CONF
RETVAL=$?
echo
return $RETVAL
}
stop() {
echo -n $"Stopping $prog: "
killproc -p $NGINX_PID $NGINX_SBIN -TERM
rm -rf /dev/shm/nginx_temp
RETVAL=$?
echo
return $RETVAL
}
reload(){
echo -n $"Reloading $prog: "
killproc -p $NGINX_PID $NGINX_SBIN -HUP
RETVAL=$?
echo
return $RETVAL
}
restart(){
stop
start
}
configtest(){
$NGINX_SBIN -c $NGINX_CONF -t
return 0
}
case "$1" in
start)
start
;;
stop)
stop
;;
reload)
reload
;;
restart)
restart
;;
configtest)
configtest
;;
*)
echo $"Usage: $0 {start|stop|reload|restart|configtest}"
RETVAL=1
esac
exit $RETVAL
保存后,更改权限:chmod 755 /etc/init.d/nginx chkconfig --add nginx如果想开机启动,请执行:
chkconfig nginx on
本文出自 “mylinux” 博客,转载请与作者联系!


相关文章推荐
- 排序算法
- [leetcode 328] Odd Even Linked List
- DirectX 11游戏编程学习笔记之8: 第6章Drawing in Direct3D(在Direct3D中绘制)(习题解答)
- 如何把自己的MaC本变成一台服务器
- c++中vector的用法
- Chat Server's Outgoing Traffic(求助文)
- 2016SDAU课程练习一1000A
- 重装电脑以后,android studio打不开,提示找不到JVM
- win10中Android模拟器在安装了intelhaxm-android仍无法启动
- Copy和MutableCopy
- boost.asio系列——io_service
- 触发JVM进行Full GC的情况及应对策略
- poj 2387 Til the Cows Come Home
- MySQL 输出添加表头
- C语言中的字符串
- C语言中的结构体
- sql server中count(*),count(col),count(1)的区别
- 第三次作业
- 反射和晚期绑定
- 二叉树输出先序遍历的第k个节点