Android开发小知识-ExpandableListView使用
2016-03-14 19:25
459 查看
ExpandableListView是继承至ListView,是它的一个扩展。ListView的每一个选项可以扩展,保护自己的多条数据,这就形成了ExpandableListView。
先看看运行效果
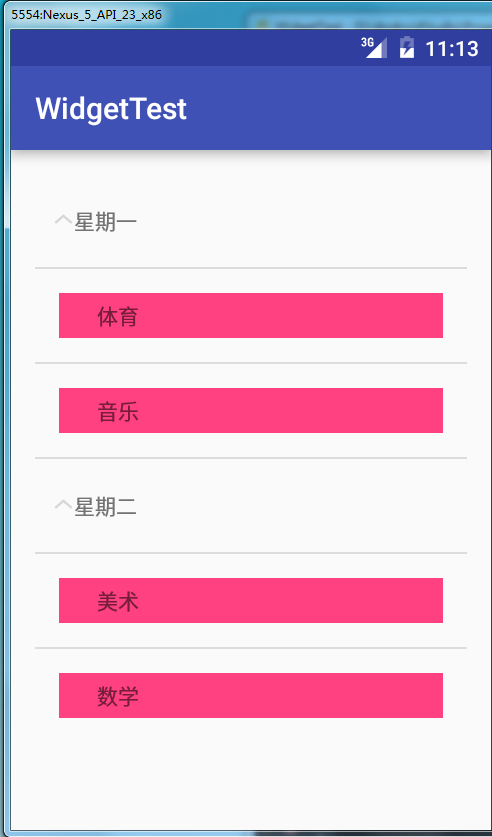
这里的星期一和星期二为一级显示数据,体育和音乐为二级显示数据。
2、准备一级数据的布局界面activity_expandable_list_group.xml
3、准备二级数据布局文件activity_expandable_list_group_item.xml
4、中活动中声明并初始化该控件。
下面是主活动类:
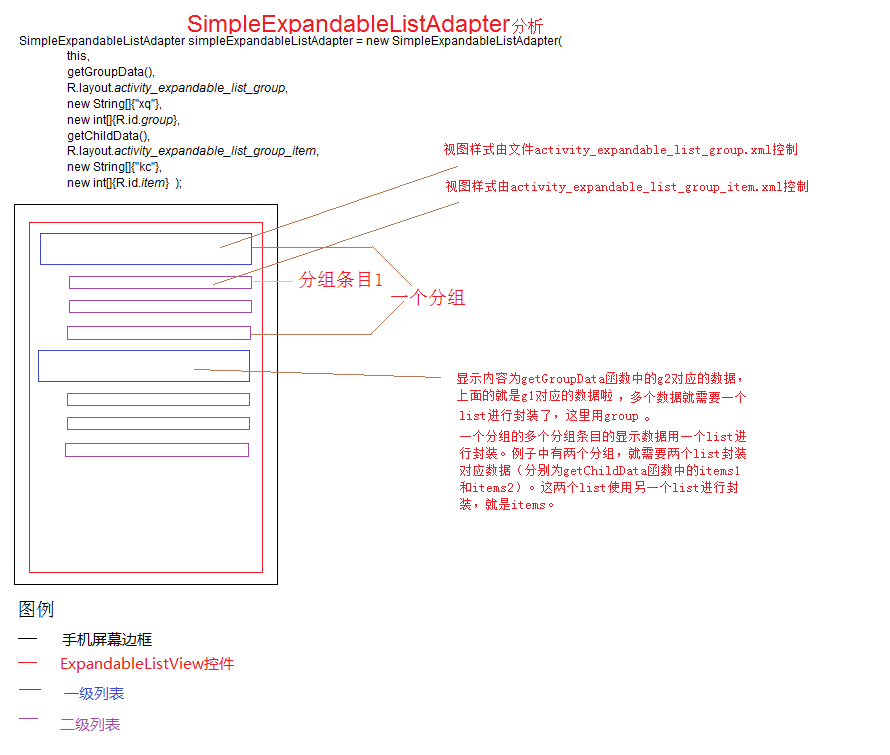
5、适配器详解图
该篇结束,若有不足,望不吝赐教!
先看看运行效果
这里的星期一和星期二为一级显示数据,体育和音乐为二级显示数据。
小例子
1、在活动布局文件中加入一个ExpandableListView。<ExpandableListView android:id="@+id/elv" android:layout_width="match_parent" android:layout_height="wrap_content" android:drawSelectorOnTop="false" ></ExpandableListView>
2、准备一级数据的布局界面activity_expandable_list_group.xml
<?xml version="1.0" encoding="utf-8"?>
<RelativeLayout xmlns:android="http://schemas.android.com/apk/res/android"
xmlns:tools="http://schemas.android.com/tools"
android:layout_width="match_parent"
android:layout_height="match_parent"
android:paddingBottom="@dimen/activity_vertical_margin"
android:paddingLeft="@dimen/activity_horizontal_margin"
android:paddingRight="@dimen/activity_horizontal_margin"
android:paddingTop="@dimen/activity_vertical_margin"
tools:context="com.mindto.widgettest.ExpandableListActivity">
<TextView
android:id="@+id/group"
android:layout_width="match_parent"
android:layout_height="wrap_content"
android:paddingLeft="10dp"
android:paddingTop="5dp"
android:paddingBottom="5dp"/>
</RelativeLayout>
3、准备二级数据布局文件activity_expandable_list_group_item.xml
<?xml version="1.0" encoding="utf-8"?>
<RelativeLayout xmlns:android="http://schemas.android.com/apk/res/android"
xmlns:tools="http://schemas.android.com/tools"
android:layout_width="match_parent"
android:layout_height="match_parent"
android:paddingBottom="@dimen/activity_vertical_margin"
android:paddingLeft="@dimen/activity_horizontal_margin"
android:paddingRight="@dimen/activity_horizontal_margin"
android:paddingTop="@dimen/activity_vertical_margin"
tools:context="com.mindto.widgettest.ExpandableListActivity">
<TextView
android:id="@+id/item"
android:layout_width="match_parent"
android:layout_height="wrap_content"
android:paddingTop="5dp"
android:paddingBottom="5dp"
android:paddingLeft="25dp"
android:background="@color/colorAccent"/>
</RelativeLayout>
4、中活动中声明并初始化该控件。
下面是主活动类:
package com.mindto.widgettest;

import android.os.Bundle;
import android.support.v7.app.AppCompatActivity;
import android.widget.ExpandableListView;
import android.widget.SimpleExpandableListAdapter;

import java.util.ArrayList;
import java.util.HashMap;
import java.util.List;
import java.util.Map;

public class ExpandableListActivity extends AppCompatActivity{
//声明一个ExpandableListView
private ExpandableListView listView;
@Override
protected void onCreate(Bundle savedInstanceState) {
super.onCreate(savedInstanceState);
//设置该活动使用的布局文件
setContentView(R.layout.activity_expandable_list);
//实例化ExpandableListView
listView = (ExpandableListView) findViewById(R.id.elv);
//生成一个SimpleExpandableListAdapter作为ExpandableListView的适配器,详细介绍看文后的解释图
SimpleExpandableListAdapter simpleExpandableListAdapter = new SimpleExpandableListAdapter(this,getGroupData(), R.layout.activity_expandable_list_group, new String[]{"xq"}, new int[]{R.id.group},
getChildData(), R.layout.activity_expandable_list_group_item, new String[]{"kc"}, new int[]{R.id.item});
//设置适配器
listView.setAdapter(simpleExpandableListAdapter);
}
//一级条目数据
private List<Map<String, String>> getGroupData(){
List<Map<String, String>> group = new ArrayList<>();
//一个Map对应一个
Map<String, String> g1 = new HashMap<>();
g1.put("xq","星期一");
Map<String, String> g2 = new HashMap<>();
g2.put("xq","星期二");

group.add(g1);group.add(g2);
return group;
}
//二级条目数据
private List<List<Map<String, String>>> getChildData(){
List<List<Map<String, String>>> items = new ArrayList<>();
//第一个二级条目数据
List<Map<String, String>> items1 = new ArrayList<>();
Map<String, String> items11 = new HashMap<>();
items11.put("kc", "体育");
Map<String, String> items12 = new HashMap<>();
items12.put("kc", "音乐");
items1.add(items11);items1.add(items12);
items.add(items1);
//第二个二级条目数据
List<Map<String, String>> items2 = new ArrayList<>();
Map<String, String> items21 = new HashMap<>();
items21.put("kc", "美术");
Map<String, String> items22 = new HashMap<>();
items22.put("kc", "数学");
items2.add(items21);items2.add(items22);
items.add(items2);

return items;
}
}
5、适配器详解图
该篇结束,若有不足,望不吝赐教!

相关文章推荐
- 使用C++实现JNI接口需要注意的事项
- Android IPC进程间通讯机制
- Android Manifest 用法
- [转载]Activity中ConfigChanges属性的用法
- Android之获取手机上的图片和视频缩略图thumbnails
- Android之使用Http协议实现文件上传功能
- Android学习笔记(二九):嵌入浏览器
- android string.xml文件中的整型和string型代替
- i-jetty环境搭配与编译
- android之定时器AlarmManager
- android wifi 无线调试
- Android Native 绘图方法
- Android java 与 javascript互访(相互调用)的方法例子
- android 代码实现控件之间的间距
- android FragmentPagerAdapter的“标准”配置
- Android"解决"onTouch和onClick的冲突问题
- android:installLocation简析
- android searchView的关闭事件
- SourceProvider.getJniDirectories