Android总结 - Notification 使用
2016-03-11 17:22
507 查看
Design Considerations

创建一个简单的 notification
NotificationCompat.Builder 都是在v4 support包中。Notification.Builder在Android 3.0 (API level 11)才加入。final NotificationCompat.Builder builder = new NotificationCompat.Builder(getActivity());
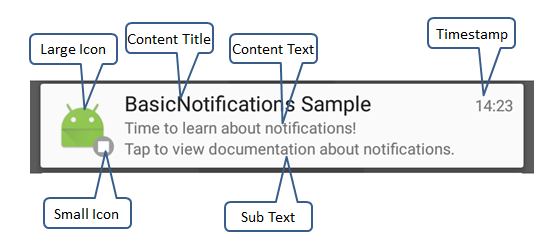
builder.setSmallIcon(R.drawable.ic_stat_notification); // Notification Icon,当同时设置了LargeIcon,这个SmallIcon会显示在LargeIcon的右下角。
builder.setLargeIcon(BitmapFactory.decodeResource(getResources(), R.mipmap.ic_launcher)); //在content view前面添加一个Large icon
builder.setTicker("状态栏上显示");// notification的一个概述, 第一次来的时候,在状态栏上显示,API21之后就不会显示了。
PendingIntent pendingIntent;
builder.setContentTitle("BasicNotifications Sample"); // 下拉后显示的标题
builder.setContentText("Time to learn about notifications!"); // 下拉后显示的主内容
builder.setSubText("Tap to view documentation about notifications.");
// builder.setOngoing(true); // 是否常驻状态栏
Intent intent = new Intent(Intent.ACTION_VIEW, Uri.parse("http://developer.android.com/reference/android/app/Notification.html"));
pendingIntent = PendingIntent.getActivity(getActivity(), 0, intent, 0);
builder.setContentIntent(pendingIntent); // 设置跳转的Action
mNotificationManager.notify(mNotificationId, builder.build());实例效果图:
使用扩展layout创建notification
主要就是给Notification设置了InboxStyle。NotificationCompat.InboxStyle inboxStyle =
new NotificationCompat.InboxStyle();
String[] events = new String[6];
// Sets a title for the Inbox in expanded layout
inboxStyle.setBigContentTitle("Event tracker details:");
...
// Moves events into the expanded layout
for (int i=0; i < events.length; i++) {
inboxStyle.addLine(events[i]);
}
// Moves the expanded layout object into the notification object.
mBuilder.setStyle(inBoxStyle);管理Notifications
更新notifications
更新Notification的个数,展开后显示在右下角。builder.setNumber(arg);
移除notifications
有三种方法:1. builder.setAutoCancel(true); // 点击后就消失 2. mNotificationManager.cancel(ID); // 调用NotificationManager消失指定ID的Notification。 3. mNotificationManager.cancelAll() // 是所有的Notification都消失。
启动 Activity 时保留导航
设置常规 Activity PendingIntent, 可以指定返回到哪个activity
a. 首先要在Manifest中添加activity的父依赖关系,参数“android:parentActivityName”:<activity android:name=".ResultActivity" android:parentActivityName=".MainActivity"> <meta-data android:name="android.support.PARENT_ACTIVITY" android:value=".MainActivity"/> </activity>
b. 处理Activity返回的堆栈
Intent regularIntent = new Intent(getActivity(), ResultActivity.class);
TaskStackBuilder stackBuilder = TaskStackBuilder.create(getActivity());
// Adds the back stack              stackBuilder.addParentStack(ResultActivity.class); // 添加ResultActivity的父Activity到stack中
// Adds the Intent to the top of the stack
stackBuilder.addNextIntent(regularIntent); // 添加点击后跳转的Intent
// Gets a PendingIntent containing the entire back stack
pendingIntent = stackBuilder.getPendingIntent(12345, PendingIntent.FLAG_UPDATE_CURRENT); //12345必须是唯一值
builder.setContentTitle("Setting up a regular activity PendingIntent!");
builder.setAutoCancel(true);
builder.setContentIntent(pendingIntent);
mNotificationManager.notify(ID, builder.build());
设置特殊 Activity PendingIntent
a.在Manifest中设置Activity的launchMode和android:excludeFromRecents的属性<activity android:name=".ResultActivity" ... android:launchMode="singleTask" android:taskAffinity="" android:excludeFromRecents="true"> </activity> ...
b. 设置Intent的Flag,发送Notification。
Intent notifyIntent =
new Intent(this, ResultActivity.class);
// Sets the Activity to start in a new, empty task
notifyIntent.setFlags(Intent.FLAG_ACTIVITY_NEW_TASK
| Intent.FLAG_ACTIVITY_CLEAR_TASK);
// Creates the PendingIntent
PendingIntent notifyPendingIntent =
PendingIntent.getActivity(
this,
0,
notifyIntent,
PendingIntent.FLAG_UPDATE_CURRENT
);

// Puts the PendingIntent into the notification builder
builder.setContentIntent(notifyPendingIntent);
在Notification中显示进度条
Android4.0之后只可以直接调用setProgress(),4.0之前的需要自己通过包含ProgressBar来实现。显示持续时间固定的进度指示器
显示进度//开始进度时调用 // Sets the progress indicator to a max value, the // current completion percentage, and "determinate" // state builder.setProgress(100, i, false); mNotificationManager.notify(ID, builder.build()); //进度完成后调用 builder.setProgress(0, 0, false); mNotificationManager.notify(ID, builder.build());
显示持续 Activity 指示器
不显示进度// Sets an activity indicator for an operation of indeterminate length mBuilder.setProgress(0, 0, true); // Issues the notification mNotifyManager.notify(0, mBuilder.build());
Notification Metadata
Notifications may be sorted according to metadata that you assign with the following NotificationCompat.Builder methods:setCategory() tells the system how to handle your app notifications when the device is in Priority mode (for example, if your notification represents an incoming call, instant message, or alarm).
setPriority() causes notifications with the priority field set to PRIORITY_MAX or PRIORITY_HIGH to appear in a small floating window if the notification also has sound or vibration.
addPerson() allows you to add a list of people to a notification. Your app can use this to signal to the system that it should group together notifications from the specified people, or rank notifications from these people as being more important.
Heads-up Notifications
对于 Android 5.0(API 级别 21),当设备处于活动状态时(即,设备未锁定且其屏幕已打开),通知可以显示在小型浮动窗口中(也称为“浮动通知”)。 这些通知看上去类似于精简版的通知,只是浮动通知还显示操作按钮。 用户可以在不离开当前应用的情况下处理或清除浮动通知。可能触发浮动通知的条件示例包括:
用户的 Activity 处于全屏模式中(应用使用 fullScreenIntent),或者
通知具有较高的优先级并使用铃声或振动
Intent push = new Intent(getActivity(), NotificationsActivity.class);
push.addFlags(Intent.FLAG_ACTIVITY_NEW_TASK);
PendingIntent fullScreenPendingIntent = PendingIntent.getActivity(getActivity(), 0, push, PendingIntent.FLAG_CANCEL_CURRENT);
builder.setContentText("Heads-Up Notification on Android L or above.");
builder.setFullScreenIntent(fullScreenPendingIntent, true); // full screen and high priority
自定义Notification Layouts
主要是给Notification设置了一个RemoteViews,通过RemoteViews做相关的相互。自定义通知布局的可用高度取决于通知视图。普通视图布局限制为 64 dp,扩展视图布局限制为 256 dp。
RemoteViews remoteViews = new RemoteViews(getActivity().getPackageName(), R.layout.notification);  // 创建一个RemoteViews
String time = DateFormat.getTimeInstance().format(new Date());
String text = getResources().getString(R.string.collapsed, time);
remoteViews.setTextViewText(R.id.textView, text); // 给RemoteViews的TextView赋值
builder.setContent(remoteViews); // 给Notification设置RemoteViews, 也可以用notification.contentView = remoteViews;

// Add a big content view to the notification if supported.
// Support for expanded notifications was added in API level 16.
// (The normal contentView is shown when the notification is collapsed, when expanded the
// big content view set here is displayed.)
if (Build.VERSION.SDK_INT >= 16) {
// Inflate and set the layout for the expanded notification view
RemoteViews expandedView = new RemoteViews(getPackageName(), R.layout.notification_expanded);
notification.bigContentView = expandedView;
}
PengdingIntent的Flag
有四个选项:FLAG_ONE_SHOT:表明这里构建的PendingIntent只能使用一次。
FLAG_NO_CREATE:如果所描述的PendingIntent已经不存在了,将不再构建它而是返回一个null。
FLAG_CANCEL_CURRENT:如果构建的PendingIntent已经存在,则取消前一个,重新构建一个。
FLAG_UPDATE_CURRENT:如果构建的PendingIntent已经存在,那么系统将不会重复创建,只是把之前extra data的值替换为最新的。
Android Developer Guide Notification
Android Developer Training Notification
Android Developer Design Notification

相关文章推荐
- 使用C++实现JNI接口需要注意的事项
- Android IPC进程间通讯机制
- Android Manifest 用法
- [转载]Activity中ConfigChanges属性的用法
- Android之获取手机上的图片和视频缩略图thumbnails
- Android之使用Http协议实现文件上传功能
- Android学习笔记(二九):嵌入浏览器
- android string.xml文件中的整型和string型代替
- i-jetty环境搭配与编译
- android之定时器AlarmManager
- android wifi 无线调试
- Android Native 绘图方法
- Android java 与 javascript互访(相互调用)的方法例子
- android 代码实现控件之间的间距
- android FragmentPagerAdapter的“标准”配置
- Android"解决"onTouch和onClick的冲突问题
- android:installLocation简析
- android searchView的关闭事件
- SourceProvider.getJniDirectories