How to create a pure Swift module
2016-03-05 00:00
597 查看
摘要: Basically, we are generating a simple module call Logger that will contain only one method: log.
You need at least three files to form a Swift module, so we should get all of them as an output:
Logger.swiftmodule – public interface/definitions
Logger.swiftdoc – docs (surprisingly)
libLogger.a...
From scratch, Swift is an innovative programming language for iOS, OS X, watchOS, and tvOS apps that form on the best of C and Objective-C, without the constraints of C compatibility. Swift adopts safe programming templates and adds modern features to make programming easier. Moreover, programming with Swift becomes more flexible and fun. Swift’s clean slate, backed by the mature and regularly preferred Cocoa and Cocoa Touch frameworks, is a great chance to reimagine how software development works.
If you are already in touch with Swift, you probably assumed that including third party libraries into your project would be useful. Railsware.com Mobile Developers and Alex Denisov, iOS Engineer and a huge Open Source fan, are ready to talk about it.
Making a custom framework that includes both ObjC and Swift code is very easy because Apple provides a mechanism to distribute code via frameworks (eventually, for iOS too). Next step into proper development is a creation of a pure Swift module, like Apple does with Swift’ std lib and Cocoa/Cocoa Touch bridge.
Basically, we are generating a simple module call
You need at least three files to form a Swift module, so we should get all of them as an output:
We can start with creating an unserviceable
The class just takes some prefix and logs it before actual object:

Now it’s time to make a
The solution is simple: include both flags
The next step is generating
Now that you have a complete module, it is about time to integrate it into a real project. Create a simple Swift project and add the files:

Then setup “Import paths” for Swift:

You can now check out if your project works properly:

Voila!

Dealing with documentation is rather simple, as well. To add documentation to module you need to comment it using ///, e.g.:

You will see documentation on the right after its integration:

Note: to make it work after integrating, you have to restart Xcode.
This approach might not be applied for a regular iOS/OSX developer; it requires creating and supporting Make/CMake file, which complicates the process of generation. However, it may be useful if you want to create a pure module that does not include ObjC at all.
You need at least three files to form a Swift module, so we should get all of them as an output:
Logger.swiftmodule – public interface/definitions
Logger.swiftdoc – docs (surprisingly)
libLogger.a...
From scratch, Swift is an innovative programming language for iOS, OS X, watchOS, and tvOS apps that form on the best of C and Objective-C, without the constraints of C compatibility. Swift adopts safe programming templates and adds modern features to make programming easier. Moreover, programming with Swift becomes more flexible and fun. Swift’s clean slate, backed by the mature and regularly preferred Cocoa and Cocoa Touch frameworks, is a great chance to reimagine how software development works.
If you are already in touch with Swift, you probably assumed that including third party libraries into your project would be useful. Railsware.com Mobile Developers and Alex Denisov, iOS Engineer and a huge Open Source fan, are ready to talk about it.
Making a custom framework that includes both ObjC and Swift code is very easy because Apple provides a mechanism to distribute code via frameworks (eventually, for iOS too). Next step into proper development is a creation of a pure Swift module, like Apple does with Swift’ std lib and Cocoa/Cocoa Touch bridge.
Basically, we are generating a simple module call
Loggerthat will contain only one method:
log.
You need at least three files to form a Swift module, so we should get all of them as an output:
Logger.swiftmodule – public interface/definitions
Logger.swiftdoc– docs (surprisingly)
libLogger.a– built library (there also might be a dylib, it depends on your task)
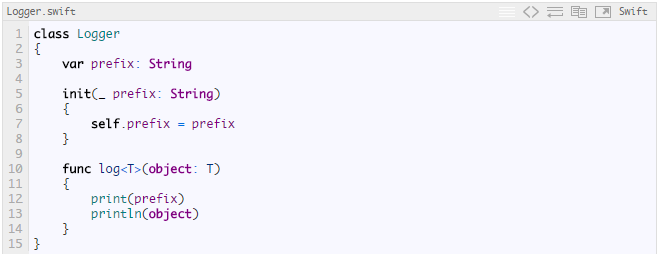
We can start with creating an unserviceable
Loggerlibrary:
The class just takes some prefix and logs it before actual object:
Now it’s time to make a
libLogger.a. The code will look like this:
-emit-librarygenerates dynamically linked shared library, while
-emit-objectgenerates object file and includes the main function, so you will have linker errors due to duplicated symbols.
The solution is simple: include both flags
-emit-objectand
-emit-library, as is depicted above.
The next step is generating
Logger.swiftdocand
Logger.swiftmodule:
xcrun swift -emit-module Logger.swift -sdk $(xcrun --show-sdk-path --sdk macosx) -module-name Logger
Now that you have a complete module, it is about time to integrate it into a real project. Create a simple Swift project and add the files:
Then setup “Import paths” for Swift:
You can now check out if your project works properly:
Voila!
Dealing with documentation is rather simple, as well. To add documentation to module you need to comment it using ///, e.g.:
You will see documentation on the right after its integration:
Note: to make it work after integrating, you have to restart Xcode.
This approach might not be applied for a regular iOS/OSX developer; it requires creating and supporting Make/CMake file, which complicates the process of generation. However, it may be useful if you want to create a pure module that does not include ObjC at all.

相关文章推荐
- Android Native 绘图方法
- Apple Swift学习教程
- 介绍 Fedora 上的 Swift
- PHP Warning: Module 'modulename' already loaded in问题解决办法
- javascript 面向对象编程 function是方法(函数)
- javascript 面向对象编程 function也是类
- IIS下PHP连接数据库提示mysql undefined function mysql_connect()
- 浅谈Javascript中Object与Function对象
- JavaScript通过function定义对象并给对象添加toString()方法实例分析
- IE 当eval遇上function的处理
- JavaScript中Object和Function的关系小结
- Javascript 使用function定义构造函数
- javascript Object与Function使用
- JavaScript中的Function函数
- 使用Function.apply()的参数数组化来提高 JavaScript程序性能的技巧
- javascript下function声明一些小结
- 常用的javascript function代码
- 简单谈谈jQuery(function(){})与(function(){})(jQuery)
- JavaScript的Module模式编程深入分析