SWIG and Android
2016-03-04 23:03
489 查看
SWIG and Android
OverviewAndroid examples
Examples introduction
Simple C example
C++ class example
Other examples
C++ STL
This chapter describes SWIG's support of Android.
18.1 Overview
The Android chapter is fairly short as support for Android is the same as for Java, where the Java Native Interface (JNI) isused to call from Android Java into C or C++ compiled code.Everything in theJava chapter applies to generating code for access from Android Java code.This chapter contains a few Android specific notes and examples.
18.2 Android examples
18.2.1 Examples introduction
The examples require theAndroid SDK and
Android NDK which can be installed as per instructions in the links.The Eclipse version is not required for these examples as just the command line tools are used (shown for Linux as the host, but Windows will be very similar, if not identical in most places).Add
the SDK tools and NDK tools to your path and create a directory somewhere for your Android projects (adjust PATH as necessary to where you installed the tools):
$ export PATH=$HOME/android/android-sdk-linux_x86/tools:$HOME/android/android-sdk-linux_x86/platform-tools:$HOME/android/android-ndk-r6b:$PATH
$ mkdir AndroidApps
$ cd AnrdoidApps
The examples use a target id of 1. This might need changing depending on your setup.After installation of the Android SDK, the available target ids can be viewed by running the command below.Please adjust the id to suit your target device.
$ android list targets
The following examples are shipped with SWIG under the Examples/android directory and include a Makefile to build and install each example.
18.2.2 Simple C example
This simple C example shows how to call a C function as well as read and modify a global variable.First we'll create and build a pure Java Android app. Afterwards the JNI code will be generated by SWIG and built into the app.First create and build an appcalled SwigSimple in a subdirectory called simple using the commands below.Adjust the
--target id as mentioned earlier in the
Examples introduction.Managing Projects from the Command Line on the Android developer's site is a useful reference for these steps.
$ android create project --target 1 --name SwigSimple --path ./simple --activity SwigSimple --package org.swig.simple
$ cd simple
$ ant debug
Modify src/org/swig/simple/SwigSimple.java from the default to:
package org.swig.simple;

import android.app.Activity;
import android.os.Bundle;
import android.view.View;
import android.widget.Button;
import android.widget.TextView;
import android.widget.ScrollView;
import android.text.method.ScrollingMovementMethod;

public class SwigSimple extends Activity
{
TextView outputText = null;
ScrollView scroller = null;

/** Called when the activity is first created. */
@Override
public void onCreate(Bundle savedInstanceState)
{
super.onCreate(savedInstanceState);
setContentView(R.layout.main);

outputText = (TextView)findViewById(R.id.OutputText);
outputText.setText("Press 'Run' to start...\n");
outputText.setMovementMethod(new ScrollingMovementMethod());

scroller = (ScrollView)findViewById(R.id.Scroller);
}

public void onRunButtonClick(View view)
{
outputText.append("Started...\n");
nativeCall();
outputText.append("Finished!\n");

// Ensure scroll to end of text
scroller.post(new Runnable() {
public void run() {
scroller.fullScroll(ScrollView.FOCUS_DOWN);
}
});
}

/** Calls into C/C++ code */
public void nativeCall()
{
// TODO
}
}
The above simply adds a Run button and scrollable text view as the GUI aspects of the program.The associated resources need to be created, modify
res/layout/main.xml as follows:
<?xml version="1.0" encoding="utf-8"?>
<LinearLayout xmlns:android="http://schemas.android.com/apk/res/android"
android:orientation="vertical"
android:layout_width="fill_parent"
android:layout_height="fill_parent"
>
<Button
android:id="@+id/RunButton"
android:layout_width="wrap_content"
android:layout_height="wrap_content"
android:text="Run..."
android:onClick="onRunButtonClick"
/>
<ScrollView
android:id="@+id/Scroller"
android:layout_width="fill_parent"
android:layout_height="fill_parent"
>
<TextView
android:id="@+id/OutputText"
android:layout_width="wrap_content"
android:layout_height="wrap_content"
/>
</ScrollView>
</LinearLayout>
Rebuild the project with your changes:
$ ant debug
Although there are no native function calls in the code, yet, you may want to check that this simple pureJava app runs before adding in the native calls.First, set up your Android device for hardware debugging, see
Using hardware devices on the Android developer's site.When complete your device should be listed in those attached, something like:
$ adb devices
List of devices attached
A32-6DBE0001-9FF80000-015D62C3-02018028	device
This means you are now ready to install the application...
$ adb install bin/SwigSimple-debug.apk
95 KB/s (4834 bytes in 0.049s)
pkg: /data/local/tmp/SwigSimple-debug.apk
Success
The newly installed 'SwigSimple' app will be amongst all your other applications on the home screen. Run the app and it will show a
Run button text box below it.Press the Run button to see the simple text output.
The application can be uninstalled like any other application and in fact must be uninstalled before installing an updated version. Uninstalling is quite easy too from your host computer:
$ adb uninstall org.swig.simple
Success
此时得到的是纯净的Android应用程序,你需要利用SWIG来从原生C代码生成供Android java调用的JNI接口。
First create a jni subdirectory and then create some C source code in
jni/example.c:
/* File : example.c */

/* A global variable */
double Foo = 3.0;

/* Compute the greatest common divisor of positive integers */
int gcd(int x, int y) {
int g;
g = y;
while (x > 0) {
g = x;
x = y % x;
y = g;
}
return g;
}
Create a SWIG interface file for this C code, jni/example.i:
/* File : example.i */
%module example

%inline %{
extern int    gcd(int x, int y);
extern double Foo;
%}
Invoke SWIG as follows:
$ swig -java -package org.swig.simple -outdir src/org/swig/simple -o jni/example_wrap.c jni/example.i
SWIG generates the following files:
src/org/swig/simple/exampleJNI.java
src/org/swig/simple/example.java
jni/example_wrap.c
Next we need to create a standard Android NDK build system file jni/Android.mk:
# File: Android.mk
LOCAL_PATH := $(call my-dir)

include $(CLEAR_VARS)

LOCAL_MODULE    := example
LOCAL_SRC_FILES := example_wrap.c example.c

include $(BUILD_SHARED_LIBRARY)
See the
Android NDK documentation for more on the NDK build system and getting started with the NDK.A simple invocation of ndk-build will compile the .c files and generate a shared object/system library. Output will be similar to:
$ ndk-build
Compile thumb  : example <= example_wrap.c
Compile thumb  : example <= example.c
SharedLibrary  : libexample.so
Install        : libexample.so => libs/armeabi/libexample.so
Now that the C JNI layer has been built, we can write Java code to call into the this layer.Modify the
nativeCall method in src/org/swig/simple/SwigSimple.java to call the JNI code as follows and add the static constructor to load the system library containing the compiled JNI C code:
/** Calls into C/C++ code */
public void nativeCall()
{
// Call our gcd() function
int x = 42;
int y = 105;
int g = example.gcd(x,y);
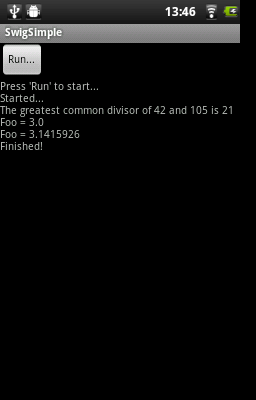
outputText.append("The greatest common divisor of " + x + " and " + y + " is " + g + "\n");
// Manipulate the Foo global variable
// Output its current value
double foo = example.getFoo();
outputText.append("Foo = " + foo + "\n");
// Change its value
example.setFoo(3.1415926);
// See if the change took effect
outputText.append("Foo = " + example.getFoo() + "\n");
// Restore value
example.setFoo(foo);
}
/** static constructor */
static {
System.loadLibrary("example");
}Compile the Java code as usual, uninstall the old version of the app if still installed and re-install the new app:
$ ant debug$ adb uninstall org.swig.simple
$ adb install bin/SwigSimple-debug.apk
Run the app again and this time you will see the output pictured below, showing the result of calls into the C code:
18.2.3 C++ class example
The steps for calling C++ code are almost identical to those in the previous C code example.All the steps required to compile and use a simple hierarchy of classes for shapes are shown in this example.First create an Android project called SwigClass in a subdirectory called
class.The steps below create and build a the JNI C++ app.Adjust the
--target id as mentioned earlier in the
Examples introduction.
$ android create project --target 1 --name SwigClass --path ./class --activity SwigClass --package org.swig.classexample
$ cd class
Now create a jni subdirectory and then create a C++ header file jni/example.h which defines ourhierarchy of shape classes:
/* File : example.h */

class Shape {
public:
Shape() {
nshapes++;
}
virtual ~Shape() {
nshapes--;
};
double  x, y;
void    move(double dx, double dy);
virtual double area(void) = 0;
virtual double perimeter(void) = 0;
static  int nshapes;
};

class Circle : public Shape {
private:
double radius;
public:
Circle(double r) : radius(r) { };
virtual double area(void);
virtual double perimeter(void);
};

class Square : public Shape {
private:
double width;
public:
Square(double w) : width(w) { };
virtual double area(void);
virtual double perimeter(void);
};
and create the implementation in the jni/example.cpp file:
/* File : example.cpp */

#include "example.h"
#define M_PI 3.14159265358979323846

/* Move the shape to a new location */
void Shape::move(double dx, double dy) {
x += dx;
y += dy;
}

int Shape::nshapes = 0;

double Circle::area(void) {
return M_PI*radius*radius;
}

double Circle::perimeter(void) {
return 2*M_PI*radius;
}

double Square::area(void) {
return width*width;
}

double Square::perimeter(void) {
return 4*width;
}
Create a SWIG interface file for this C++ code in jni/example.i:
/* File : example.i */
%module example

%{
#include "example.h"
%}

/* Let's just grab the original header file here */
%include "example.h"
Invoke SWIG as follows, note that the -c++ option is required for C++ code:
$ swig -c++ -java -package org.swig.classexample -outdir src/org/swig/classexample -o jni/example_wrap.cpp jni/example.i
SWIG generates the following files:
src/org/swig/classexample/Square.java
src/org/swig/classexample/exampleJNI.java
src/org/swig/classexample/example.java
src/org/swig/classexample/Circle.java
src/org/swig/classexample/Shape.java
jni/example_wrap.cpp
Next we need to create an Android NDK build system file for compiling the C++ code
jni/Android.mk.The -frtti compiler flag isn't strictly needed for this example, but is needed for any code that uses C++ RTTI:
# File: Android.mk
LOCAL_PATH := $(call my-dir)

include $(CLEAR_VARS)

LOCAL_MODULE    := example
LOCAL_SRC_FILES := example_wrap.cpp example.cpp
LOCAL_CFLAGS    := -frtti

include $(BUILD_SHARED_LIBRARY)
A simple invocation of ndk-build will compile the .cpp files and generate a shared object/system library. Output will be similar to:
$ ndk-build
Compile++ thumb  : example <= example_wrap.cpp
Compile++ thumb  : example <= example.cpp
StaticLibrary  : libstdc++.a
SharedLibrary  : libexample.so
Install        : libexample.so => libs/armeabi/libexample.so
Now that the C JNI layer has been built, we can write Java code to call into this layer.Modify
src/org/swig/classexample/SwigClass.java from the default to:
package org.swig.classexample;
import android.app.Activity;
import android.os.Bundle;
import android.view.View;
import android.widget.Button;
import android.widget.TextView;
import android.widget.ScrollView;
import android.text.method.ScrollingMovementMethod;
public class SwigClass extends Activity
{
TextView outputText = null;
ScrollView scroller = null;
/** Called when the activity is first created. */
@Override
public void onCreate(Bundle savedInstanceState)
{
super.onCreate(savedInstanceState);
setContentView(R.layout.main);
outputText = (TextView)findViewById(R.id.OutputText);
outputText.setText("Press 'Run' to start...\n");
outputText.setMovementMethod(new ScrollingMovementMethod());
scroller = (ScrollView)findViewById(R.id.Scroller);
}
public void onRunButtonClick(View view)
{
outputText.append("Started...\n");
nativeCall();
outputText.append("Finished!\n");
// Ensure scroll to end of text
scroller.post(new Runnable() {
public void run() {
scroller.fullScroll(ScrollView.FOCUS_DOWN);
}
});
}
/** Calls into C/C++ code */
public void nativeCall()
{
// ----- Object creation -----
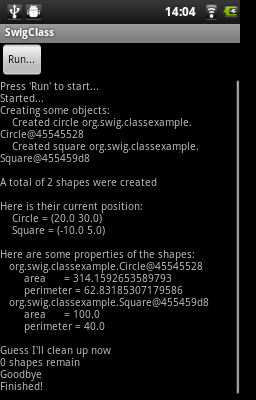
outputText.append( "Creating some objects:\n" );
Circle c = new Circle(10);
outputText.append( " Created circle " + c + "\n");
Square s = new Square(10);
outputText.append( " Created square " + s + "\n");
// ----- Access a static member -----
outputText.append( "\nA total of " + Shape.getNshapes() + " shapes were created\n" );
// ----- Member data access -----
// Notice how we can do this using functions specific to
// the 'Circle' class.
c.setX(20);
c.setY(30);
// Now use the same functions in the base class
Shape shape = s;
shape.setX(-10);
shape.setY(5);
outputText.append( "\nHere is their current position:\n" );
outputText.append( " Circle = (" + c.getX() + " " + c.getY() + ")\n" );
outputText.append( " Square = (" + s.getX() + " " + s.getY() + ")\n" );
// ----- Call some methods -----
outputText.append( "\nHere are some properties of the shapes:\n" );
Shape[] shapes = {c,s};
for (int i=0; i<shapes.length; i++)
{
outputText.append( " " + shapes[i].toString() + "\n" );
outputText.append( " area = " + shapes[i].area() + "\n" );
outputText.append( " perimeter = " + shapes[i].perimeter() + "\n" );
}
// Notice how the area() and perimeter() functions really
// invoke the appropriate virtual method on each object.
// ----- Delete everything -----
outputText.append( "\nGuess I'll clean up now\n" );
// Note: this invokes the virtual destructor
// You could leave this to the garbage collector
c.delete();
s.delete();
outputText.append( Shape.getNshapes() + " shapes remain\n" );
outputText.append( "Goodbye\n" );
}
/** static constructor */
static {
System.loadLibrary("example");
}
}Note the static constructor and the interesting JNI code is in the nativeCall method.The remaining code deals with the GUI aspects which are identical to the previous C simple example. Modify
res/layout/main.xml to contain the xml for the 'Run' button and scrollable text view:
<?xml version="1.0" encoding="utf-8"?>
<LinearLayout xmlns:android="http://schemas.android.com/apk/res/android"
android:orientation="vertical"
android:layout_width="fill_parent"
android:layout_height="fill_parent"
>
<Button
android:id="@+id/RunButton"
android:layout_width="wrap_content"
android:layout_height="wrap_content"
android:text="Run..."
android:onClick="onRunButtonClick"
/>
<ScrollView
android:id="@+id/Scroller"
android:layout_width="fill_parent"
android:layout_height="fill_parent"
>
<TextView
android:id="@+id/OutputText"
android:layout_width="wrap_content"
android:layout_height="wrap_content"
/>
</ScrollView>
</LinearLayout>
Compile the Java code as usual, uninstall the old version of the app if installed and re-install the new app:
$ ant debug$ adb uninstall org.swig.classexample
$ adb install bin/SwigClass-debug.apk
Run the app to see the result of calling the C++ code from Java:
18.2.4 Other examples
The Examples/android directory contains further examples which can be run and installed in a similar manner to the previous two examples.Note that the 'extend' example is demonstrates the directors feature.Normally C++ exception handling and the STL is not available by default in the version of g++ shipped with Android, but this example turns these features on as described in the next section.
18.3 C++ STL
Should the C++ Standard Template Library (STL) be required, an Application.mk file needs to be created in the same directory as theAndroid.mk directory containing information about the STL to use.See the NDK documentation in the $NDKROOT/docs folder especially CPLUSPLUS-SUPPORT.html.Below is an example of the
Application.mk file to make the STLport static library available for use:
# File: Application.mk
APP_STL := gnustl_static

相关文章推荐
- Android 6.0之权限管理
- Android的单选按钮
- 解决Gradle DSL method not found: ‘android()’
- Android获取Manifest中<meta-data>元素的值
- 浅谈 MVP in Android
- 利用Cydia Substrate进行Android JAVA HOOK
- Android内存优化之 LruCache与DiskLruCache
- Android中Intent传递对象的两种方法(Serializable,Parcelable)
- android中shape的属性
- Android Studio Gradle 版本不同报错解决方法
- github自己收藏的Android开源项目(不断更新)
- android 读写sd卡的权限设置
- 自定义View中onMeasure在wrap_content时的处理
- android播放多张图片形成动画 (帧动画)
- 按钮也能随单机变化(ImageButton选择特效)
- AndroidStudio快捷键
- android PopupWindow的简单实用
- Android 常见工具类封装
- Floating Action Button-Android M新控件
- Android开发之轮播效果