FrameLayout和布局优化
2016-03-02 17:22
204 查看
FrameLayout
先来看官方文档的定义:FrameLayout是最简单的一个布局对象。它被定制为你屏幕上的一个空白备用区域,之后你可以在其中填充一个单一对象 — 比如,一张你要发布的图片。所有的子元素将会固定在屏幕的左上角;你不能为FrameLayout中的一个子元素指定一个位置。后一个子元素将会直接在前一个子元素之上进行覆盖填充,把它们部份或全部挡住(除非后一个子元素是透明的)。我的理解是,把FrameLayout当作画布canvas,固定从屏幕的左上角开始填充图片,文字等。看看示例,原来可以利用android:layout_gravity来设置位置的:
<?xml version="1.0" encoding="utf-8"?>
<FrameLayout
xmlns:android="http://schemas.android.com/apk/res/android"
android:layout_width="fill_parent"
android:layout_height="fill_parent" >

<ImageView
android:id="@+id/image"
android:layout_width="fill_parent"
android:layout_height="fill_parent"
android:scaleType="center"
android:src="@drawable/candle"
/>
<TextView
android:id="@+id/text1"
android:layout_width="wrap_content"
android:layout_height="wrap_content"
android:layout_gravity="center"
android:textColor="#00ff00"
android:text="@string/hello"
/>
<Button
android:id="@+id/start"
android:layout_width="wrap_content"
android:layout_height="wrap_content"
android:layout_gravity="bottom"
android:text="Start"
/>
</FrameLayout>

布局优化
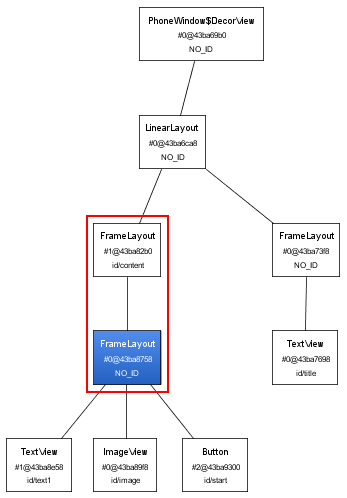
使用tools里面的hierarchyviewer.bat来查看layout的层次。在启动模拟器启动所要分析的程序,再启动hierarchyviewer.bat,选择模拟器以及该程序,点击“Load View Hierarchy”,就会开始分析。可以save as png。 <merge> 减少视图层级结构
从上图可以看到存在两个FrameLayout,红色框住的。如果能在layout文件中把FrameLayout声明去掉就可以进一步优化布局代码了。 但是由于布局代码需要外层容器容纳,如果
直接删除FrameLayout则该文件就不是合法的布局文件。这种情况下就可以使用<merge> 标签了。
修改为如下代码就可以消除多余的FrameLayout了:
[java] view
plain copy
<?xml version="1.0" encoding="utf-8"?>
<merge xmlns:android="http://schemas.android.com/apk/res/android">
<ImageView
android:id="@+id/image"
android:layout_width="fill_parent"
android:layout_height="fill_parent"
android:scaleType="center"
android:src="@drawable/candle"
/>
<TextView
android:id="@+id/text1"
android:layout_width="wrap_content"
android:layout_height="wrap_content"
android:layout_gravity="center"
android:textColor="#00ff00"
android:text="@string/hello"
/>
<Button
android:id="@+id/start"
android:layout_width="wrap_content"
android:layout_height="wrap_content"
android:layout_gravity="bottom"
android:text="Start"
/>
</merge>
<merge>也有一些使用限制:
只能用于xml layout文件的根元素;
在代码中使用LayoutInflater.Inflater()一个以merge为根元素的布局文件时候,需要使用View inflate (int resource, ViewGroup root, boolean attachToRoot)指定一个ViewGroup 作为其容器,并且要设置attachToRoot
为true。
<include> 重用layout代码
如果在某个布局里面需要用到另一个相同的布局设计,可以通过<include> 标签来重用layout代码:
[java] view
plain copy
<?xml version="1.0" encoding="utf-8"?>
<LinearLayout xmlns:android="http://schemas.android.com/apk/res/android"
android:orientation="vertical"
android:layout_width="fill_parent"
android:layout_height="fill_parent">
<include android:id="@+id/layout1" layout="@layout/relative" />
<include android:id="@+id/layout2" layout="@layout/relative" />
<include android:id="@+id/layout3" layout="@layout/relative" />
</LinearLayout>
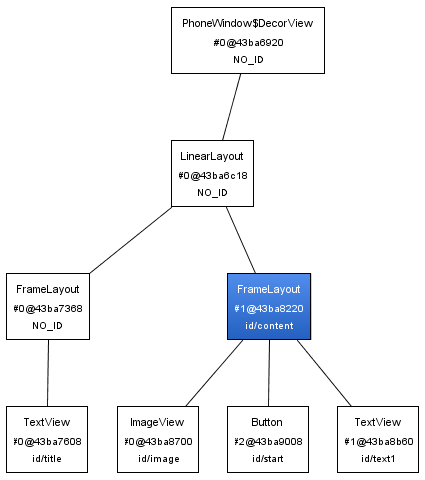
效果图
这里要注意的是,"@layout/relative"不是引用Layout的id,而是引用res/layout/relative.xml,其内容是前面文章介绍RelativeLayout的布局代码。
另外,通过<include>,除了可以覆写id属性值,还可以修改其他属性值,例如android:layout_width,android:height等。
<viewstub> 延迟加载
(转自http://rainhomepage.appspot.com/2010/01/use-viewstub-to-optimize-the-layout-of)
ViewStub 是一个不可见的,大小为0的View,最佳用途就是实现View的延迟加载,在需要的时候再加载View,可Java中常见的性能优化方法延迟加载一样。
当调用ViewStub的setVisibility函数设置为可见或则调用 inflate初始化该View的时候,ViewStub引用的资源开始初始化,然后引用的资源替代ViewStub自己的位置填充在ViewStub的 位置。因此在没有调用setVisibility(int) 或则 inflate()函数之前 ViewStub一种存在组件树层级结构中,但是由于ViewStub非常轻量级,这对性能影响非常小。 可以通过ViewStub的inflatedId属性来重新定义引用的layout id。 例如:
<ViewStub android:id="@+id/stub"
android:inflatedId="@+id/subTree"
android:layout="@layout/mySubTree"
android:layout_width="120dip"
android:layout_height="40dip" />
上面定义的ViewStub ,可以通过id “stub”来找到,在初始化资源“mySubTree”后,stub从父组件中删除,然后"mySubTree"替代stub的位置。初始资源"mySubTree"得到的组件可以通过inflatedId 指定的id "subTree"引用。 然后初始化后的资源被填充到一个120dip宽、40dip高的地方。
推荐使用下面的方式来初始化ViewStub:
ViewStub stub = (ViewStub) findViewById(R.id.stub);
View inflated = stub.inflate();
当调用inflate()函数的时候,ViewStub 被引用的资源替代,并且返回引用的view。 这样程序可以直接得到引用的view而不用再次调用函数 findViewById()来查找了。
ViewStub目前有个缺陷就是还不支持 <merge /> 标签。
layoutopt (Layout Optimization工具)
这工具可以分析所提供的Layout,并提供优化意见。在tools文件夹里面可以找到layoutopt.bat。
用法:
layoutopt <list of xml files or directories>
参数:
一个或多个的Layout xml文件,以空格间隔;或者多个Layout xml文件所在的文件夹路径
例子:
layoutopt G:\StudyAndroid\UIDemo\res\layout\main.xml
layoutopt G:\StudyAndroid\UIDemo\res\layout\main.xml
G:\StudyAndroid\UIDemo\res\layout\relative.xml
layoutopt G:\StudyAndroid\UIDemo\res\layout
如何布好一个局?
关于这点我在开发中总结了一下几点1.熟读API文档!
布局这东西不是比酷的东西,不是比谁的布局越复杂,那个人就越牛叉,以最少的步骤完成,设计图的要求,这应该是每个android开发程序员的宗旨!!案例一:做一个带箭头的返回按钮
经理:那个小与啊,你根据这设计图搞一个按钮

小与:这还不简单三分钟搞定
于是小于程序猿,敲下了如下代码
<RelativeLayout
android:layout_width="wrap_content"
android:layout_height="wrap_content"
android:gravity="center" >

<Button
android:id="@+id/button1"
android:layout_width="wrap_content"
android:layout_height="wrap_content"
android:background="@drawable/btn_headtita"
android:textColor="#ffffff"
android:text="@string/back" />

<ImageView
android:id="@+id/imageView1"
android:layout_width="wrap_content"
android:layout_height="wrap_content"
android:layout_alignParentLeft="true"
android:layout_centerVertical="true"
android:src="@drawable/header_back" />

</RelativeLayout>
看代码多累啊,我们用刚刚介绍的hierarchyviewer来分析一下,这个按钮有什么问题!
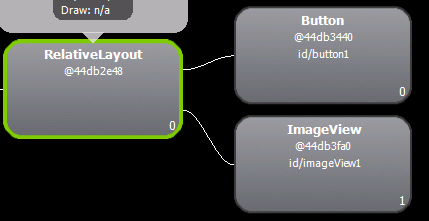
我们从这个图中,我们可以看到,为了这么一个按钮我们用了view的三个节点去完成!假设,我们的一个view 有三个类似的按钮就意味着我们要用9个节点去完成,我们可以简单得出这是一个3N级的复杂度布局,我们可以尝试去优化吗?
技巧一:熟读官方的API文档!
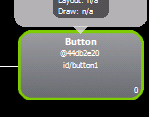
个人建议,常用的Widget的所有参数都尽量了解一遍!在阅读官方文档的时候我们发现了Button,有一个可以把图绘制在左边的参数:android:drawableLeft
于是,我们优化了一下小与的代码
<Button
android:id="@+id/button1"
android:layout_width="wrap_content"
android:layout_height="wrap_content"
android:background="@drawable/btn_headtita"
android:drawableLeft="@drawable/header_back"
android:gravity="center"
android:padding="10dp"
android:text="@string/back"
android:textColor="#ffffff" />
用hierarchyviewer来分析一下
瞬间一个3N级复杂度的布局,变成了一个N级复杂的!所以,我建议各位android开发朋友,在考虑优化的时候先把api文档里面的内容烂熟与心,不然,这样折腾下去,很浪费时间!
有细心的朋友可能会问:android:padding="10dp" 这个用来做什么了?
我先告诉大家,不用这个参数:你将会看到:

用了以后:

这下大家能够明白了吧?
所以,当你在进行布局的时候,如果碰到比较繁琐的时候,你先想想会不会已经API本身就有这样的参数呢?
简单是所有布局开始最重要的原则!
简单意味着不容易出现兼容问题!
简单意味着性能不错!
2.模块化布局

所谓,模块化布局就是要你熟悉使用<include /> 这个标签!
一个经典的Tab类布局由三部分组成,我们可以根据这三部分创建三个可以重用的布局
head_menu.xml
content_showweibo.xml
bottom_menu.xml
然后我们可以很灵活的组合我们要显示的,例如要完成上面的那个weibo布局
<?xml version="1.0" encoding="utf-8"?>
<LinearLayout xmlns:android="http://schemas.android.com/apk/res/android"
android:layout_width="fill_parent"
android:layout_height="fill_parent"
android:orientation="vertical"
>
<include android:id="@+id/head_menu" layout="@layout/head_menu" />
<include android:id="@+id/content" layout="@layout/content_showweibo" />
<include android:id="@+id/bottom_menu" layout="@layout/bottom_menu" />

</LinearLayout>
熟练的使用<include />标签就可以大大的减少我们日后都维护工作!
3.合并没必要的节点
还记得我们一开始的那个项目吗?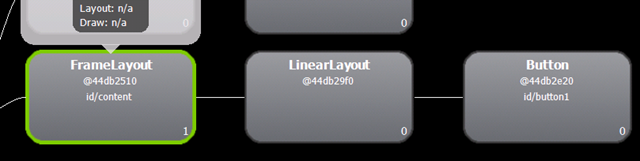
在高效布局里面,有一条准则就是,尽量的减少节点!!!!如图,我们发现,其实LinearLayout其实啥都没干,我们却耗费了那么一点性能去绘制了这么没用的节点!
接下来,我们为了消灭这个节点,我们需要一个这么的标签
<merge ></merge>
修改咱们的代码让它,性能更好!
<?xml version="1.0" encoding="utf-8"?>
<merge xmlns:android="http://schemas.android.com/apk/res/android"
>

<Button
android:id="@+id/button1"
android:layout_width="wrap_content"
android:layout_height="wrap_content"
android:background="@drawable/btn_headtita"
android:drawableLeft="@drawable/header_back"
android:gravity="center"
android:layout_gravity="center_vertical|center_horizontal"
android:padding="10dp"
android:text="@string/back"
android:textColor="#ffffff" />

</merge>
打开hierarchyviewer 一看!

哦也!优化了一个节点!并且显示快了那么一点点...

相关文章推荐
- VS2013 密钥 – 所有版本(转)
- 移动端开发:架构那点事!
- django最佳实践:项目布局
- 字符串和数值的相互转换【java】
- 使用 ZeroClipboard 实现pc端的复制到剪切板功能(需要支持flash)
- 前端随记---文件下载启用浏览器下载和迅雷下载
- WindowManager.LayoutParams 详解
- VC++中窄字节、宽字节、多字节
- 阿狸表情图采集代码示例
- iOS drawRect 和 awakeFromNib
- Recently
- iOS隐藏状态栏
- 第4章 人脉沟通,赢得贵人的支持
- 【uWSGI】实战之Django配置经验
- Java学习笔记之基本语法
- cURL和Sphinx
- 【uWSGI】实战之Django配置经验
- 回调
- Jmeter:使用BeanShell
- jQuery的ready()事件与js中的onload事件的区别