Android app开发中的Fragment入门学习教程
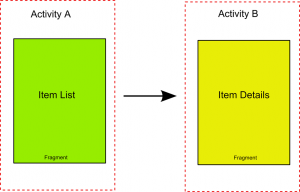
在Android3.0上开始引入了一个新概念叫Fragment。它有自己的布局文件,可以作为组件排布,也可以相互组合去实现不同的布局显示。使用Fragment可以重复利用代码,并且可以满足不同设备尺寸的需求。Fragment不能单独存在,只能存在于Activity中,而一个Activity可以拥有多个Fragment。很重要的一点是,Fragment可以和Activity中的其它组件一起使用,无需重写所有Activity的接口。所以使用Fragment就可以这样来完成上例中“主界面―详细界面”的APP需求。
在手机上是这样显示的:
而在平板上是这样的:
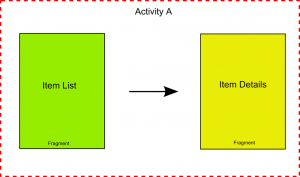
在一个小屏幕的设备上,一个activity通常占据了整个屏幕,同时显示各种UI视图组件。Activity实际上就是视图的容器。然后,当一个activity被显示在一个大屏幕的设备上,例如平板电脑,总会显得有些不适应。因为屏幕太大了,activity中的所有UI组件要充满整个屏幕,这样一来,视图的层次结构就很复杂了。一个更好的办法是使用一种“轻量级”的activity,每个“轻量级”activity包含自己的视图,互不干扰。在运行期间,根据屏幕的方向和尺寸,一个activity可以包含一个或多个“轻量级”activity。在Android3.0以上的版本,这种“轻量级”的activity叫做Fragment.
怎么创建一个Fragment
现在我们了解了Fragment的生命周期了,接着我们就需要知道怎么创建一个Fragment并绑定到Activity中,第一件要做的事就是继承android.app.Fragment来写一个Fragment,假设我们的Fragment叫做Fragment1,创建和定义如下:
public class Fragment1 extends Fragment {
...
}
就像我们上面说的,Fragment只能存在于Activity中,所以我们必须要在某处定义它,有两种方式:
- 直接在xml布局文件中定义;
- 在xml布局文件中定义一个占位符,然后动态地在Activity中操作Fragment;
我们定义Fragment的方式会影响它的生命周期,因为在上述第一种情况下onInflate方法会被调用,而第二种情况下它的生命周期是从onAttach方法开始的。
如果我们在XML文件中定义Fragment的话,我们需要:
<fragment android:id="@+id/f1"
class="com.survivingwithandroid.fragment.Fragment1"
android:layout_width="match_parent"
android:layout_height="20dp"/>
然而如果我们在XML中用占位符的话,需要再做一些工作。
布局框架和Fragment
如果我们在XML布局文件中定义Fragment的话,就不能自由、动态修改Fragment了,还有别的方法可以让我们可以更灵活地操作:使用时需要在XML文件中定义:
<FrameLayout android:id="@+id/fl1"
android:layout_width="match_parent"
android:layout_height="200dp"/>
在Activity里面还需要做一点工作,因为我们必须手动初始化Fragment,然后把它“插入”到FrameLayout中。
public class MainActivity extends Activity {
@Override
protected void onCreate(Bundle savedInstanceState) {
super.onCreate(savedInstanceState);
setContentView(R.layout.activity_main);
Fragment2 f2 = new Fragment2();
FragmentTransaction ft = getFragmentManager().beginTransaction();
ft.replace(R.id.fl1, f2);
ft.commit();
}
例子
可以把Fragment想象成Activity的另外一种形式。你创建fragments去包含UI组件,就像创建activities那样。但是,Fragment总是被嵌在Activity中。
下面来通过一个例子看一下流程:
1.创建一个名为Fragments的工程。
2.在res/layout文件夹下,新建一个叫fragment1.xml的文件。
<?xml version="1.0" encoding="utf-8"?>
<LinearLayout xmlns:android="http://schemas.android.com/apk/res/android"
android:layout_width="fill_parent"
android:layout_height="fill_parent"
android:background="#00FF00"
android:orientation="vertical" >
<TextView
android:id="@+id/lblFragment1"
android:layout_width="fill_parent"
android:layout_height="wrap_content"
android:text="This is fragment #1"
android:textColor="#000000"
android:textSize="25sp" />
</LinearLayout>
3.在res/layout文件夹下,新建一个叫fragment2.xml的文件。
<?xml version="1.0" encoding="utf-8"?>
<LinearLayout xmlns:android="http://schemas.android.com/apk/res/android"
android:layout_width="fill_parent"
android:layout_height="fill_parent"
android:background="#FFFE00"
android:orientation="vertical" >
<TextView
android:layout_width="fill_parent"
android:layout_height="wrap_content"
android:text="This is fragment #2"
android:textColor="#000000"
android:textSize="25sp" />
<Button
android:id="@+id/btnGetText"
android:layout_width="wrap_content"
android:layout_height="wrap_content"
android:onClick="onClick"
android:text="Get text in Fragment #1"
android:textColor="#000000" />
</LinearLayout>
4.main.xml中的代码。
<?xml version="1.0" encoding="utf-8"?>
<LinearLayout xmlns:android="http://schemas.android.com/apk/res/android"
android:layout_width="fill_parent"
android:layout_height="fill_parent"
android:orientation="horizontal" >
<fragment
android:id="@+id/fragment1"
android:name="net.learn2develop.Fragments.Fragment1"
android:layout_width="0px"
android:layout_height="match_parent"
android:layout_weight="1" />
<fragment
android:id="@+id/fragment2"
android:name="net.learn2develop.Fragments.Fragment2"
android:layout_width="0px"
android:layout_height="match_parent"
android:layout_weight="1" />
</LinearLayout>
5.新建两个类:Fragment1.java和Fragment2.java。
6.Fragment1.java中的代码。
package net.learn2develop.Fragments;
import android.app.Activity;
import android.app.Fragment;
import android.os.Bundle;
import android.util.Log;
import android.view.LayoutInflater;
import android.view.View;
import android.view.ViewGroup;
public class Fragment1 extends Fragment {
@Override
public View onCreateView(LayoutInflater inflater, ViewGroup container,
Bundle savedInstanceState) {
Log.d("Fragment 1", "onCreateView");
// ---Inflate the layout for this fragment---
return inflater.inflate(R.layout.fragment1, container, false);
}
}
7.Fragment2.java中的代码。
package net.learn2develop.Fragments;
import android.app.Fragment;
import android.os.Bundle;
import android.view.LayoutInflater;
import android.view.View;
import android.view.ViewGroup;
import android.widget.Button;
import android.widget.TextView;
import android.widget.Toast;
public class Fragment2 extends Fragment {
@Override
public View onCreateView(LayoutInflater inflater, ViewGroup container,
Bundle savedInstanceState) {
// ---Inflate the layout for this fragment---
return inflater.inflate(R.layout.fragment2, container, false);
}
}
您可能感兴趣的文章:
- Android App在ViewPager中使用Fragment的实例讲解
- Android中ViewPager实现滑动指示条及与Fragment的配合
- Android App中使用ViewPager+Fragment实现滑动切换效果
- Android中使用TabHost 与 Fragment 制作页面切换效果
- 浅谈Android App开发中Fragment的创建与生命周期
- Android应用开发中Fragment与Activity间通信示例讲解
- Android应用开发中Fragment间通信的实现教程
- 浅谈Android app开发中Fragment的Transaction操作
- Android的Fragment的生命周期各状态和回调函数使用
- Android App中使用ListFragment的实例教程

- 使用C++实现JNI接口需要注意的事项
- Android IPC进程间通讯机制
- Android Manifest 用法
- [转载]Activity中ConfigChanges属性的用法
- Android之获取手机上的图片和视频缩略图thumbnails
- Android之使用Http协议实现文件上传功能
- Android学习笔记(二九):嵌入浏览器
- android string.xml文件中的整型和string型代替
- i-jetty环境搭配与编译
- android之定时器AlarmManager
- android wifi 无线调试
- Android Native 绘图方法
- Android java 与 javascript互访(相互调用)的方法例子
- android 代码实现控件之间的间距
- android FragmentPagerAdapter的“标准”配置
- Android"解决"onTouch和onClick的冲突问题
- android:installLocation简析
- android searchView的关闭事件
- SourceProvider.getJniDirectories