自己动手做一个--手势解锁
2016-02-24 17:13
507 查看
手势解锁在Android手机上算是很普遍的了,在网上也有很多大牛做的很完美, 但还是想自己琢磨着做一遍~~
首先分析一下:
手势解锁其实就相当于 就是1~9的不同排列方式,根密码差不多,但不同的是,这个密码是数字不重复的,一个数字只能出现一次.
在这里我们暂且就把9个圆形编个号,就横向排列1~9号
分析过小米手势解锁的就会发现:
如图: 如果密码是1-7-4 ,事实上手从1绕过4滑到7上去时,事实上小米的手势解锁已经算作划过了4,出来的密码也就是 1-4-7了, 也就是说,这样的设置你永远都不可能划出1-7-4的密码出来
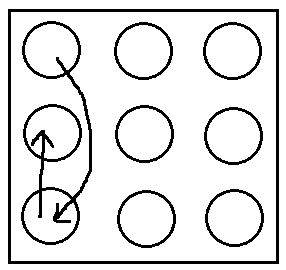
我实现的这个手势解锁没有要求不能出现这种1-7-4的这种密码,没有任何限制的这种,看了其他的一些APP或手机,大部分手势密码也都是没有这种限制的.
好了,既然手势密码分析得差不多了,就该想想怎么实现了~
首先准备好图片资源:
–这是按钮未选中时的样子:
–这是按钮已选中时的样子:
–这是密码输入错误时的样子:
然后写一个CheckBox的选择器:
然后写一个9宫格解锁的那个布局,用RelativeLayout,大概样子就是:
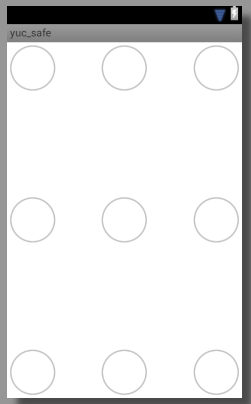
现在看着是挺丑的哈..没关系,因为最终效果并不是这个样子啦,贴上代码:
好了,到此为止好像还差很多啊,任重道远!!!
我先大概说说我的思路:
1.先自己写一个view继承自FrameLayout(其他的Layout也行)
2.然后再把刚才那个9宫格的布局加进去
3.拦截Touch事件
4.根据手指滑动的X,Y值计算出滑到哪个按钮了,然后做相应操作.
好了逻辑这个东西不是三言两语说的清楚的,直接上代码吧,我会在代码中尽量解释清楚:
好了,现在自定义控件做好了,是骡子是马拉出来溜溜吧:
在你想要添加手势控件的地方添加进来:
Activity里面设置相应监听:
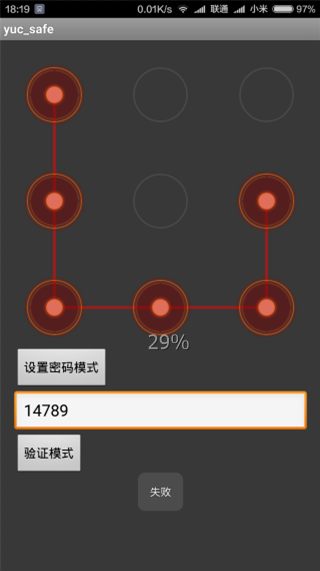
运行起来看看效果吧:
我把正确密码设置为14789,画一个147896的图案,提升失败
附上源码地址:
https://github.com/yuchong123/GestureLock
首先分析一下:
手势解锁其实就相当于 就是1~9的不同排列方式,根密码差不多,但不同的是,这个密码是数字不重复的,一个数字只能出现一次.
在这里我们暂且就把9个圆形编个号,就横向排列1~9号
分析过小米手势解锁的就会发现:
如图: 如果密码是1-7-4 ,事实上手从1绕过4滑到7上去时,事实上小米的手势解锁已经算作划过了4,出来的密码也就是 1-4-7了, 也就是说,这样的设置你永远都不可能划出1-7-4的密码出来
我实现的这个手势解锁没有要求不能出现这种1-7-4的这种密码,没有任何限制的这种,看了其他的一些APP或手机,大部分手势密码也都是没有这种限制的.
好了,既然手势密码分析得差不多了,就该想想怎么实现了~
首先准备好图片资源:
–这是按钮未选中时的样子:
–这是按钮已选中时的样子:
–这是密码输入错误时的样子:
然后写一个CheckBox的选择器:
<?xml version="1.0" encoding="utf-8"?>
<selector xmlns:android="http://schemas.android.com/apk/res/android" >
<item android:state_enabled="true" android:state_checked="false" android:drawable="@drawable/btn_radio_off"></item>
<item android:state_enabled="true" android:state_checked="true" android:drawable="@drawable/btn_radio_on"></item>

<item android:state_enabled="false" android:state_checked="false" android:drawable="@drawable/btn_radio_off"></item>
<item android:state_enabled="false" android:state_checked="true" android:drawable="@drawable/btn_radio_error"></item>

</selector>
然后写一个9宫格解锁的那个布局,用RelativeLayout,大概样子就是:
现在看着是挺丑的哈..没关系,因为最终效果并不是这个样子啦,贴上代码:
<?xml version="1.0" encoding="utf-8"?>
<RelativeLayout xmlns:android="http://schemas.android.com/apk/res/android"
android:layout_width="match_parent"
android:layout_height="match_parent"
>

<CheckBox
android:id="@+id/unlock_cb_0"
android:layout_width="70dp"
android:layout_height="70dp"
android:background="@drawable/radio_btn"
android:button="@null"
/>
<CheckBox
android:id="@+id/unlock_cb_1"
android:layout_width="70dp"
android:layout_height="70dp"
android:background="@drawable/radio_btn"
android:button="@null"
android:layout_centerHorizontal="true"
/>
<CheckBox
android:id="@+id/unlock_cb_2"
android:layout_width="70dp"
android:layout_height="70dp"
android:background="@drawable/radio_btn"
android:button="@null"
android:layout_alignParentRight="true"
/>
<CheckBox
android:id="@+id/unlock_cb_3"
android:layout_width="70dp"
android:layout_height="70dp"
android:background="@drawable/radio_btn"
android:button="@null"
android:layout_centerVertical="true"
/>
<CheckBox
android:id="@+id/unlock_cb_4"
android:layout_width="70dp"
android:layout_height="70dp"
android:background="@drawable/radio_btn"
android:button="@null"
android:layout_centerInParent="true"
/>
<CheckBox
android:id="@+id/unlock_cb_5"
android:layout_width="70dp"
android:layout_height="70dp"
android:background="@drawable/radio_btn"
android:button="@null"
android:layout_centerVertical="true"
android:layout_alignParentRight="true"
/>
<CheckBox
android:id="@+id/unlock_cb_6"
android:layout_width="70dp"
android:layout_height="70dp"
android:background="@drawable/radio_btn"
android:button="@null"
android:layout_alignParentBottom="true"
/>
<CheckBox
android:id="@+id/unlock_cb_7"
android:layout_width="70dp"
android:layout_height="70dp"
android:background="@drawable/radio_btn"
android:button="@null"
android:layout_alignParentBottom="true"
android:layout_centerHorizontal="true"
/>
<CheckBox
android:id="@+id/unlock_cb_8"
android:layout_width="70dp"
android:layout_height="70dp"
android:background="@drawable/radio_btn"
android:button="@null"
android:layout_alignParentBottom="true"
android:layout_alignParentRight="true"
/>

</RelativeLayout>
好了,到此为止好像还差很多啊,任重道远!!!
我先大概说说我的思路:
1.先自己写一个view继承自FrameLayout(其他的Layout也行)
2.然后再把刚才那个9宫格的布局加进去
3.拦截Touch事件
4.根据手指滑动的X,Y值计算出滑到哪个按钮了,然后做相应操作.
好了逻辑这个东西不是三言两语说的清楚的,直接上代码吧,我会在代码中尽量解释清楚:
import java.util.ArrayList;
import java.util.List;

import android.content.Context;
import android.graphics.Canvas;
import android.graphics.Color;
import android.graphics.Paint;
import android.os.Handler;
import android.os.Message;
import android.text.TextUtils;
import android.util.AttributeSet;
import android.view.MotionEvent;
import android.view.View;
import android.widget.CheckBox;
import android.widget.FrameLayout;

import com.yuc.common.R;
/**
* YUC
* @author Administrator
*  2016 - 1 - 23
*/
public class UnlockView extends FrameLayout{

private static String backgroundColor = "01000000";

private int view_width;//整个空间宽度
private int btn_width;//按钮宽度,直径
private int view_height;
//  private ArrayList<int[]> btn_coord_list;
private int[][] btn_coord;
private List<CheckBox> checkBox_btns;

/**
* 密码
*/
private List<Integer> password = new ArrayList<Integer>();
private float x;//当前手指坐标
private float y;

private boolean isError = false;//当前密码是否正确
private boolean isTouch = false;//是否正在操作

/**
* 正确密码.
*  为空时,当前模式为捕捉用户输入(用于设置手势)
*  不为空,当前模式为验证密码模式(用于解锁验证)
*/
private String rightPwd;
private OnUnlockListener onUnlockListener;
private OnGetPwdListener onGetPwdListener;

public void setRightPwd(String rightPwd){
this.rightPwd=rightPwd;
}

public void setOnUnlockListener(OnUnlockListener onUnlockListener) {
this.onUnlockListener = onUnlockListener;
}

public void setOnGetPwdListener(OnGetPwdListener onGetPwdListener) {
this.onGetPwdListener = onGetPwdListener;
}

/**
* 验证模式下,密码验证监听
* @author Administrator
*/
public interface OnUnlockListener{
void onSuccess();
void onError();
}
/**
* 捕捉用户输入模式下,密码获取监听
* @author Administrator
*/
public interface OnGetPwdListener{
void onSetting(String pwd);
}

/**
*  重置9宫格
* @param context
*/
Handler handler = new Handler(){
public void handleMessage(android.os.Message msg) {
switch (msg.what) {
case 1:
if (!isTouch) {
reset();
}
break;
}
}

};

public UnlockView(Context context) {
super(context);
initView();
}

public UnlockView(Context context, AttributeSet attrs) {
this(context, attrs,0);
}

public UnlockView(Context context, AttributeSet attrs, int defStyle) {
super(context, attrs, defStyle);
initView();
}

@Override
protected void onMeasure(int widthMeasureSpec, int heightMeasureSpec) {
// TODO Auto-generated method stub
//高度,和宽度一样,保证view是个正方形
super.onMeasure(widthMeasureSpec, widthMeasureSpec);
}

/**
* 初始化view
*/
private void initView() {
//将9宫格按钮的布局文件加载进来
inflate(getContext(), R.layout.unlock_layout, this);
setBackgroundColor(Color.parseColor(backgroundColor));

CheckBox unlock_cb_0 = (CheckBox) findViewById(R.id.unlock_cb_0);
CheckBox unlock_cb_1 = (CheckBox) findViewById(R.id.unlock_cb_1);
CheckBox unlock_cb_2 = (CheckBox) findViewById(R.id.unlock_cb_2);
CheckBox unlock_cb_3 = (CheckBox) findViewById(R.id.unlock_cb_3);
CheckBox unlock_cb_4 = (CheckBox) findViewById(R.id.unlock_cb_4);
CheckBox unlock_cb_5 = (CheckBox) findViewById(R.id.unlock_cb_5);
CheckBox unlock_cb_6 = (CheckBox) findViewById(R.id.unlock_cb_6);
CheckBox unlock_cb_7 = (CheckBox) findViewById(R.id.unlock_cb_7);
CheckBox unlock_cb_8 = (CheckBox) findViewById(R.id.unlock_cb_8);

checkBox_btns = new ArrayList<CheckBox>();
checkBox_btns.add(unlock_cb_0);
checkBox_btns.add(unlock_cb_1);
checkBox_btns.add(unlock_cb_2);
checkBox_btns.add(unlock_cb_3);
checkBox_btns.add(unlock_cb_4);
checkBox_btns.add(unlock_cb_5);
checkBox_btns.add(unlock_cb_6);
checkBox_btns.add(unlock_cb_7);
checkBox_btns.add(unlock_cb_8);
}

@Override
public boolean onInterceptTouchEvent(MotionEvent ev) {
//在这里获取按钮的尺寸,view的尺寸等
view_width = getWidth();
view_height = getHeight();
View lock_btn = findViewById(R.id.unlock_cb_0);
btn_width = lock_btn.getWidth();

//计算各按钮中点坐标
int[] btn1_coord = {btn_width/2,btn_width/2};
int[] btn2_coord = {view_width/2,btn_width/2};
int[] btn3_coord = {view_width-(btn_width/2),btn_width/2};
int[] btn4_coord = {btn_width/2,view_height/2};
int[] btn5_coord = {view_width/2,view_height/2};
int[] btn6_coord = {view_width-(btn_width/2),view_height/2};
int[] btn7_coord = {btn_width/2,view_height-(btn_width/2)};
int[] btn8_coord = {view_width/2,view_height-(btn_width/2)};
int[] btn9_coord = {view_width-(btn_width/2),view_height-(btn_width/2)};

//保存到一个二维数组中
btn_coord = new int[9][2];
btn_coord[0][0] = btn1_coord[0];
btn_coord[0][1] = btn1_coord[1];

btn_coord[1][0] = btn2_coord[0];
btn_coord[1][1] = btn2_coord[1];

btn_coord[2][0] = btn3_coord[0];
btn_coord[2][1] = btn3_coord[1];

btn_coord[3][0] = btn4_coord[0];
btn_coord[3][1] = btn4_coord[1];

btn_coord[4][0] = btn5_coord[0];
btn_coord[4][1] = btn5_coord[1];

btn_coord[5][0] = btn6_coord[0];
btn_coord[5][1] = btn6_coord[1];

btn_coord[6][0] = btn7_coord[0];
btn_coord[6][1] = btn7_coord[1];

btn_coord[7][0] = btn8_coord[0];
btn_coord[7][1] = btn8_coord[1];

btn_coord[8][0] = btn9_coord[0];
btn_coord[8][1] = btn9_coord[1];

//拦截Touch事件
return true;
}

@Override
protected void onDraw(Canvas canvas) {
//当 当前密码不为空时,说明用户正在绘制手势,现在就要把手势按钮中间的连线画出来
if (password!=null) {
Paint paint=new Paint();
//按钮之间的连接画线
if (isError) {
//输入错误时线的颜色
paint.setColor(Color.RED);
}else{
//正常输入时线的颜色
paint.setColor(Color.YELLOW);
}
paint.setAlpha(125);
paint.setStrokeWidth(10);
//      canvas.drawLine(50, 50, 500, 500, paint);

//绘制按钮间中间连线
for (int i = 0; i < password.size(); i++) {
if (i==password.size()-1) {
//最后一个,只有一个
if (x>0&&y>0) {
canvas.drawLine(btn_coord[password.get(i)-1][0], btn_coord[password.get(i)-1][1], x, y, paint);
}
}else{
//不是第一个,也不是最后一个
canvas.drawLine(btn_coord[password.get(i)-1][0], btn_coord[password.get(i)-1][1], btn_coord[password.get(i+1)-1][0], btn_coord[password.get(i+1)-1][1], paint);
}
}
}

super.onDraw(canvas);

}

/**
* 在这里控制9个checkbox的选中状态
*/
@Override
public boolean onTouchEvent(MotionEvent e) {
//      Log.e("yuc", "X:"+e.getX());

switch (e.getAction()) {
case MotionEvent.ACTION_DOWN:
//手指按下,重置一下9宫格
isTouch=true;
reset();
break;
case MotionEvent.ACTION_MOVE:

x = e.getX();
y = e.getY();

//判断当前位置是否处于某个按钮之中
for (int i = 0; i < btn_coord.length; i++) {
float dx=x-btn_coord[i][0];
float dy=y-btn_coord[i][1];

if ((dx*dx)+(dy*dy)<=((btn_width*btn_width)/2)) {
//                  Log.e("yuc", "选中:"+(i+1));
if (!password.contains(i+1)) {
password.add(i+1);
checkBox_btns.get(i).setChecked(true);
}
}
}

break;
case MotionEvent.ACTION_UP:
isTouch=false;
x=0;
y=0;
StringBuffer sb = new StringBuffer("");
for (Integer i : password) {
sb.append(i);
}
//正确密码为空则不判断
if (TextUtils.isEmpty(rightPwd)) {
reset();
if (onGetPwdListener!=null) {
onGetPwdListener.onSetting(sb.toString());
}
}else{
//错误后,变红
if (sb.toString().equals(rightPwd)) {
isError=false;
}else{
isError=true;
}

if (!isError) {
if (onUnlockListener!=null) {
onUnlockListener.onSuccess();
}
}else{
if (onUnlockListener!=null) {
onUnlockListener.onError();
}
}

for (CheckBox checkBox : checkBox_btns) {
checkBox.setEnabled(false);
}
//          Toast.makeText(getContext(), "密码:"+password, 0).show();
if (isError) {
Message msg=new Message();
msg.what=1;
handler.sendMessageDelayed(msg, 600);
}else{
reset();
}
}

break;
}

invalidate();

return true;
}

private void reset() {
//重置
if (password.size()>0) {
password.clear();
isError=false;
for (CheckBox cb : checkBox_btns) {
cb.setEnabled(true);
cb.setChecked(false);
}
invalidate();
}
}

}
好了,现在自定义控件做好了,是骡子是马拉出来溜溜吧:
在你想要添加手势控件的地方添加进来:
注意:这里的高度设置是没用的,因为在代码里已经控制高度和宽度一样
<com.yuc.common.view.UnlockView
android:id="@+id/unlock"
android:layout_width="match_parent"
android:layout_height="wrap_content"
android:layout_margin="10dp"
/>
Activity里面设置相应监听:
@Override
protected void onCreate(Bundle savedInstanceState) {
super.onCreate(savedInstanceState);
setContentView(R.layout.activity_main);

unlock = (UnlockView) findViewById(R.id.unlock);
et = (EditText) findViewById(R.id.et);

//设置验证密码时的监听
unlock.setOnUnlockListener(new OnUnlockListener() {

@Override
public void onSuccess() {
Toast.makeText(MainActivity.this, "密码正确", 0).show();
}
@Override
public void onError() {
Toast.makeText(MainActivity.this, "密码错误", 0).show();
}
});
//设置捕捉密码时的监听
unlock.setOnGetPwdListener(new OnGetPwdListener() {

@Override
public void onSetting(String pwd) {
Toast.makeText(MainActivity.this, "密码:"+pwd, 0).show();
}
});
}
运行起来看看效果吧:
我把正确密码设置为14789,画一个147896的图案,提升失败
附上源码地址:
https://github.com/yuchong123/GestureLock

相关文章推荐
- 使用C++实现JNI接口需要注意的事项
- Android IPC进程间通讯机制
- Android Manifest 用法
- [转载]Activity中ConfigChanges属性的用法
- Android之获取手机上的图片和视频缩略图thumbnails
- Android之使用Http协议实现文件上传功能
- Android学习笔记(二九):嵌入浏览器
- android string.xml文件中的整型和string型代替
- i-jetty环境搭配与编译
- android之定时器AlarmManager
- android wifi 无线调试
- Android Native 绘图方法
- Android java 与 javascript互访(相互调用)的方法例子
- android 代码实现控件之间的间距
- android FragmentPagerAdapter的“标准”配置
- Android"解决"onTouch和onClick的冲突问题
- android:installLocation简析
- android searchView的关闭事件
- SourceProvider.getJniDirectories