centos搭建pyenv环境以及使用pyenv安装Python和ipython
2016-02-22 23:49
826 查看
1、安装依赖包
[root@localhost ~]# yum groupinstall "Development tools"
[root@localhost ~]# yum install zlib-devel bzip2-devel openssl-devel ncurses-devel sqlite-devel readline-devel tk-devel gdbm-devel db4-devel libpcap-devel xz-devel
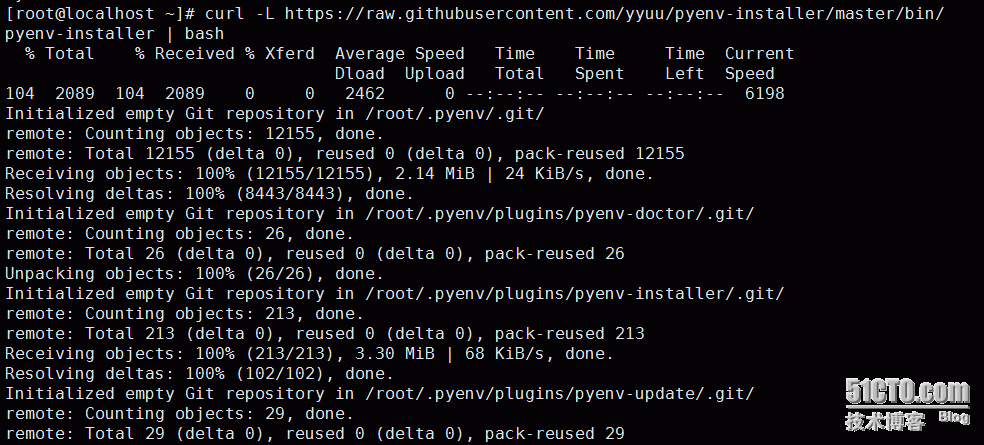
2、安装pyenv
[root@localhost ~]# curl -L https://raw.github.com/yyuu/pyenv-installer/master/bin/pyenv-installer | bash
3、配置环境变量
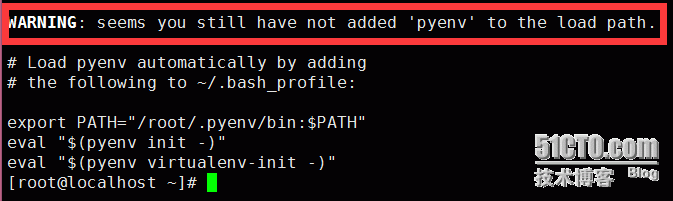
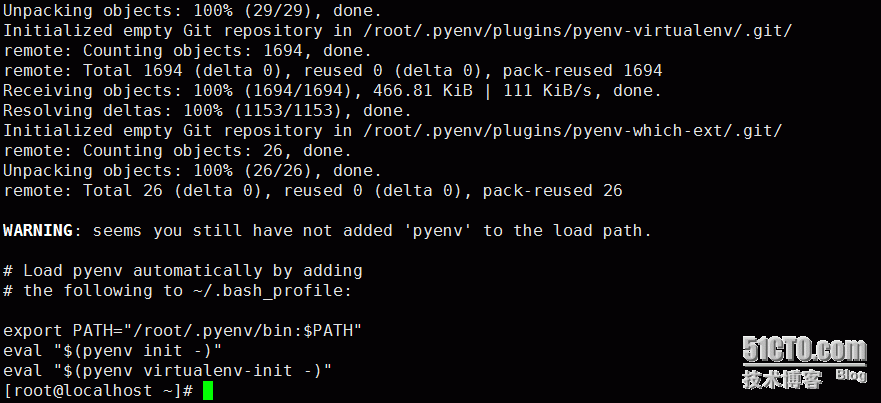
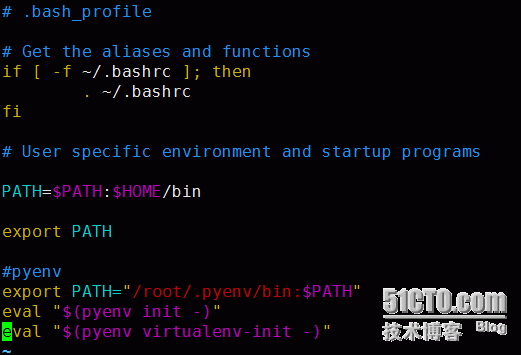
此处提示没有将pyenv的路径添加到全局变量中,因此需要修改配置文件.bash_profile执行下面的命令:
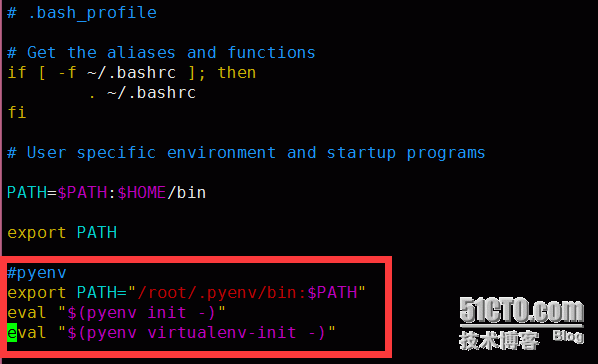
[root@localhost ~]# vim ~/.bash_profile
然后把下面这三行添加到.bash_profile文件中
export PATH="/root/.pyenv/bin:$PATH"
eval "$(pyenv init -)"
eval "$(pyenv virtualenv-init -)"
添加后效果如下图:
退出后需要执行下面的命令使配置文件生效:
[root@localhost ~]# . ~/.bash_profile
4、测试pyenv是否安装成功
[root@localhost ~]# pyenv
pyenv 20160202-10-ga6f1f48
Usage: pyenv <command> [<args>]
Some useful pyenv commands are:
commands List all available pyenv commands
local Set or show the local application-specific Python version
global Set or show the global Python version
shell Set or show the shell-specific Python version
install Install a Python version using python-build
uninstall Uninstall a specific Python version
rehash Rehash pyenv shims (run this after installing executables)
version Show the current Python version and its origin
versions List all Python versions available to pyenv
which Display the full path to an executable
whence List all Python versions that contain the given executable
See `pyenv help <command>' for information on a specific command.
For full documentation, see: https://github.com/yyuu/pyenv#readme
如下图所示---
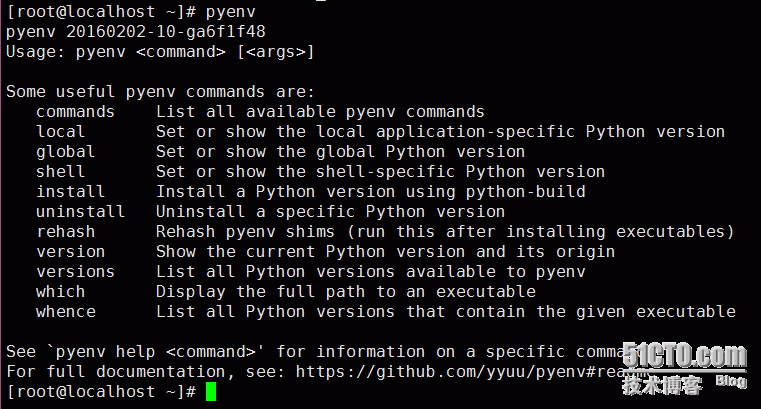
当看到图中所示内容时即表示pyenv安装成功了。
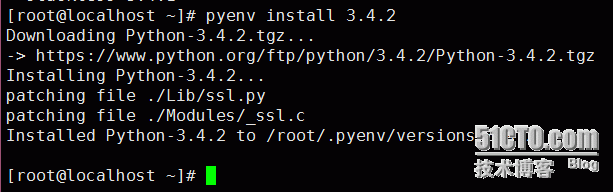
5、用pyenv安装Python3.4.2
[root@localhost ~]# pyenv install 3.4.2
6、用pyenv创建Python虚拟环境
新建一个magedu目录,然后在magedu这个目录下创建pyenv虚拟环境
[root@localhost ~]# pyenv versions
* system (set by /root/.pyenv/version)
3.4.2
[root@localhost ~]# mkdir magedu
[root@localhost ~]# cd magedu
[root@localhost magedu]# pyenv virtualenv 3.4.2 magedu
Ignoring indexes: https://pypi.python.org/simple/ Requirement already satisfied (use --upgrade to upgrade): setuptools in /root/.pyenv/versions/3.4.2/envs/magedu/lib/python3.4/site-packages
Requirement already satisfied (use --upgrade to upgrade): pip in /root/.pyenv/versions/3.4.2/envs/magedu/lib/python3.4/site-packages
Cleaning up...
7、设置当前目录(magedu)使用的Python版本环境为刚才创建的虚拟Python环境--magedu
[root@localhost magedu]# pyenv local magedu
pyenv-virtualenv: deactivate
pyenv-virtualenv: activate magedu
pyenv-virtualenv: prompt changing will be removed from future release. configure `export PYENV_VIRTUALENV_DISABLE_PROMPT=1' to simulate the behavior.
(magedu) [root@localhost magedu]#
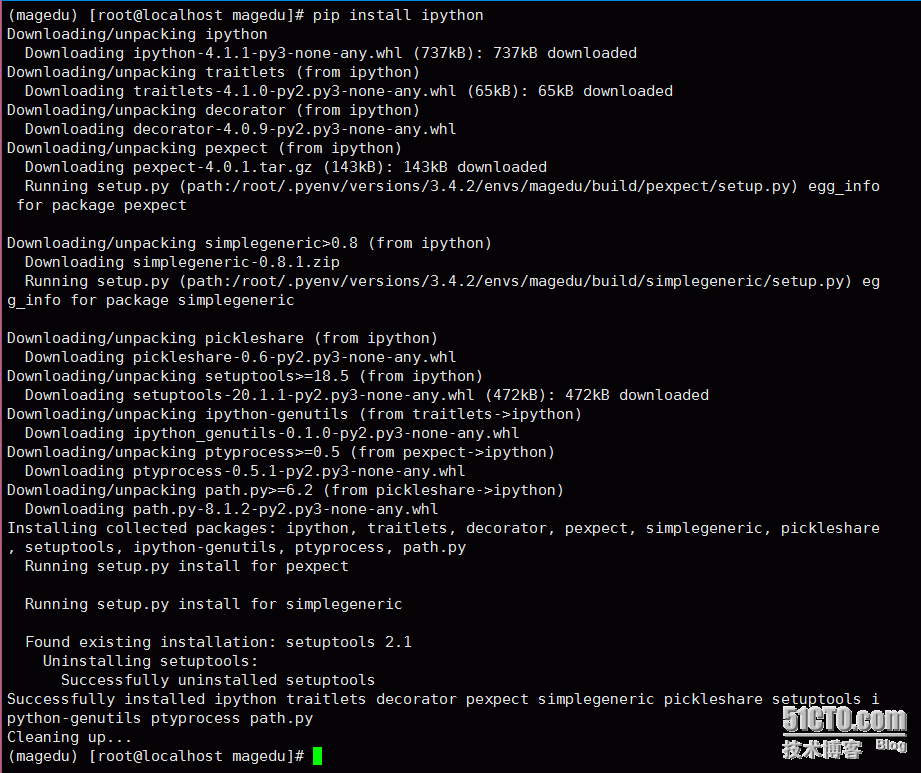
8、安装ipython
使用下面这条命令就可以安装ipython了(magedu) [root@localhost magedu]# pip install ipython
如下图所示:
使用下面的命令可以查看当前环境的Python版本和ipython环境版本
(magedu) [root@localhost magedu]# ipython
结果如下图所示:
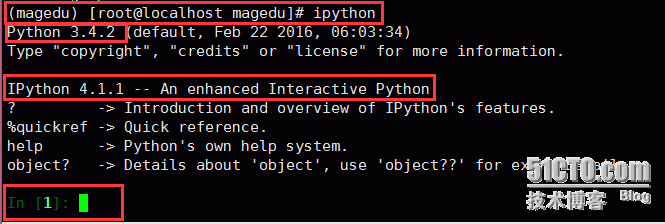
在ipython环境下,如果想退出ipython,可以使用Ctrl+D
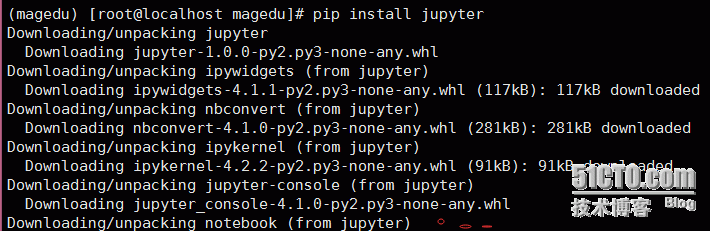
9、安装jupyter
使用下面的命令安装jupyter
(magedu) [root@localhost magedu]# pip install jupyter
安装过程如下图所示:
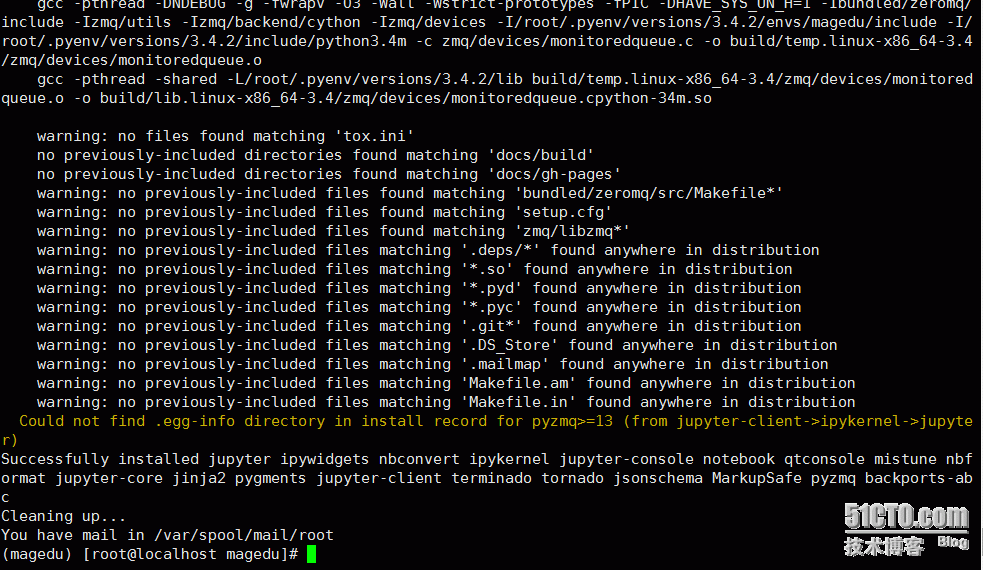
安装完成后如下图所示:
安装完成之后使用jupyter,可以使用下面的命令:
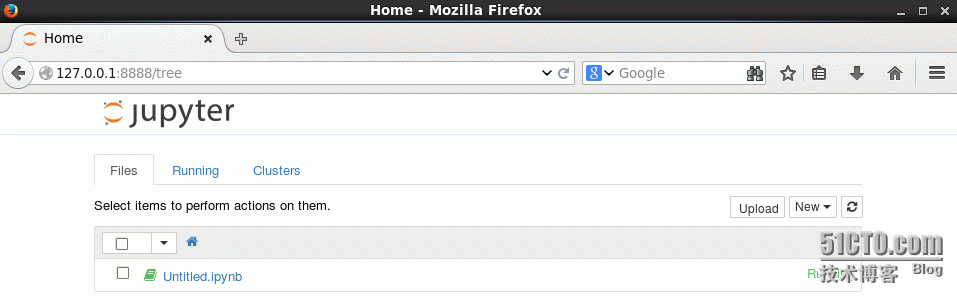
(magedu) [root@localhost magedu]# jupyter notebook
命令执行结果如下图所示:

然后在浏览器输入http://localhost:8888,就会出现下图所示:
注意:如果是远程连接到Linux主机的,需要执行下面这条命令:
(magedu) [root@localhost magedu]# jupyter notebook --ip=0.0.0.0,结果如下图:

然后在浏览器输入http://Linux主机IP地址:8888,就会出现下图所示:

=======================================
注:如果上述两种情况下均不能在浏览器打开jupyter页面,请检查Linux主机的防火墙是否关闭或者8888端口是否放行!
[root@localhost ~]# yum groupinstall "Development tools"
[root@localhost ~]# yum install zlib-devel bzip2-devel openssl-devel ncurses-devel sqlite-devel readline-devel tk-devel gdbm-devel db4-devel libpcap-devel xz-devel
2、安装pyenv
[root@localhost ~]# curl -L https://raw.github.com/yyuu/pyenv-installer/master/bin/pyenv-installer | bash
3、配置环境变量
此处提示没有将pyenv的路径添加到全局变量中,因此需要修改配置文件.bash_profile执行下面的命令:
[root@localhost ~]# vim ~/.bash_profile
然后把下面这三行添加到.bash_profile文件中
export PATH="/root/.pyenv/bin:$PATH"
eval "$(pyenv init -)"
eval "$(pyenv virtualenv-init -)"
添加后效果如下图:
退出后需要执行下面的命令使配置文件生效:
[root@localhost ~]# . ~/.bash_profile
4、测试pyenv是否安装成功
[root@localhost ~]# pyenv
pyenv 20160202-10-ga6f1f48
Usage: pyenv <command> [<args>]
Some useful pyenv commands are:
commands List all available pyenv commands
local Set or show the local application-specific Python version
global Set or show the global Python version
shell Set or show the shell-specific Python version
install Install a Python version using python-build
uninstall Uninstall a specific Python version
rehash Rehash pyenv shims (run this after installing executables)
version Show the current Python version and its origin
versions List all Python versions available to pyenv
which Display the full path to an executable
whence List all Python versions that contain the given executable
See `pyenv help <command>' for information on a specific command.
For full documentation, see: https://github.com/yyuu/pyenv#readme
如下图所示---
当看到图中所示内容时即表示pyenv安装成功了。
5、用pyenv安装Python3.4.2
[root@localhost ~]# pyenv install 3.4.2
6、用pyenv创建Python虚拟环境
新建一个magedu目录,然后在magedu这个目录下创建pyenv虚拟环境
[root@localhost ~]# pyenv versions
* system (set by /root/.pyenv/version)
3.4.2
[root@localhost ~]# mkdir magedu
[root@localhost ~]# cd magedu
[root@localhost magedu]# pyenv virtualenv 3.4.2 magedu
Ignoring indexes: https://pypi.python.org/simple/ Requirement already satisfied (use --upgrade to upgrade): setuptools in /root/.pyenv/versions/3.4.2/envs/magedu/lib/python3.4/site-packages
Requirement already satisfied (use --upgrade to upgrade): pip in /root/.pyenv/versions/3.4.2/envs/magedu/lib/python3.4/site-packages
Cleaning up...
7、设置当前目录(magedu)使用的Python版本环境为刚才创建的虚拟Python环境--magedu
[root@localhost magedu]# pyenv local magedu
pyenv-virtualenv: deactivate
pyenv-virtualenv: activate magedu
pyenv-virtualenv: prompt changing will be removed from future release. configure `export PYENV_VIRTUALENV_DISABLE_PROMPT=1' to simulate the behavior.
(magedu) [root@localhost magedu]#
8、安装ipython
使用下面这条命令就可以安装ipython了(magedu) [root@localhost magedu]# pip install ipython
如下图所示:
使用下面的命令可以查看当前环境的Python版本和ipython环境版本
(magedu) [root@localhost magedu]# ipython
结果如下图所示:
在ipython环境下,如果想退出ipython,可以使用Ctrl+D
9、安装jupyter
使用下面的命令安装jupyter
(magedu) [root@localhost magedu]# pip install jupyter
安装过程如下图所示:
安装完成后如下图所示:
安装完成之后使用jupyter,可以使用下面的命令:
(magedu) [root@localhost magedu]# jupyter notebook
命令执行结果如下图所示:
然后在浏览器输入http://localhost:8888,就会出现下图所示:
注意:如果是远程连接到Linux主机的,需要执行下面这条命令:
(magedu) [root@localhost magedu]# jupyter notebook --ip=0.0.0.0,结果如下图:
然后在浏览器输入http://Linux主机IP地址:8888,就会出现下图所示:
=======================================
注:如果上述两种情况下均不能在浏览器打开jupyter页面,请检查Linux主机的防火墙是否关闭或者8888端口是否放行!

相关文章推荐
- 使用C#实现读取系统配置文件的代码实例讲解
- Powershell Profiles配置文件的存放位置介绍
- PowerShell入门教程之创建和使用配置文件实例
- SERV-U 的配置文件详解
- php.ini 配置文件的深入解析
- redis2.8配置文件中文翻译版
- PHP配置文件php.ini中打开错误报告的设置方法
- C#中读取App.config配置文件代码实例
- c++实现逐行读取配置文件写入内存的示例
- 关于session在PHP5的配置文件中的详细设置参数说明
- MySQL 配置文件my.cnf 例子最详细翻译
- apache 配置文件解说
- Android 读取Properties配置文件的小例子
- PHP 配置文件中open_basedir选项作用
- .net 读取非标准配置文件的小例子
- APACHE 配置文件中文版 httpd.conf FOR Apache 2.2.13
- 读取spring配置文件的方法(spring读取资源文件)
- PHPMyadmin 配置文件详解(配置)
- C# WinForm开发中使用XML配置文件实例
- Apache配置文件中的deny与allow小结