QGis二次开发基础 -- 属性识别工具的实现
2016-02-04 20:31
465 查看
属性识别工具,也就是常用的 identify 工具,它常常与诸如放大、缩小等地图工具放在一起,提供浏览地图要素的一项基本功能。为什么要单独讨论一下这个工具,是因为它与普通的地图浏览工具的实现有一些微小的差异。下面通过源代码的学习,来了解这个工具的实现方法以及掌握属性识别功能的实现机制。
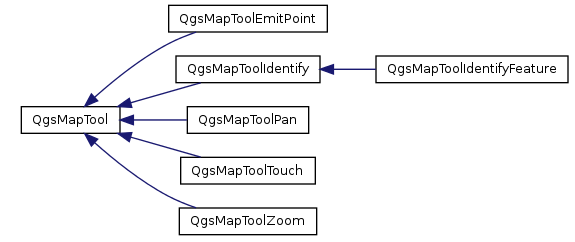
通过上图可以看到几个基本的工具类
漫游工具 – QgsMapToolPan
触摸工具(需要触摸屏的支持) – QgsMapToolTouch
缩放工具 – QgsMapToolZoom (放大和缩小仅仅是缩放系数不同来而已,因此缩放共用一个类)
这些工具的使用非常简单,只需要初始化一个对应工具类的实例,并设置地图画布的 MapTool 为相应的实例就可以了,代码如下:
还有一个 QgsMapToolEmitPoint 类,是用来发出地图上用户选点坐标的,这个工具可以做一些自定义的地图交互功能,在图层文件进行编辑的时候也可以使用。
除了上面说的这些,剩下两个类 QgsMapToolIdentify 和它的派生类 QgsMapToolIdentifyFeature。这两个类就是我们关注的重点了,看名字就知道这两个类负责属性的识别了。
并没有实现代码,因此鼠标事件是不被处理的。
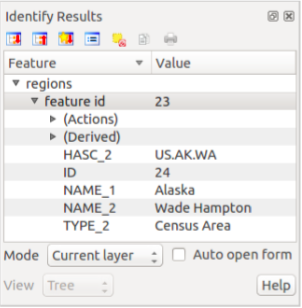
再来关注定义在这个类中的一个结构体,它定义了属性识别的返回结果。
主要关注几个成员字段, 它们定义了识别返回结果的形式。
同时这个类中还有很多方法是属性识别功能的实现。看到这里,我想思路就有了,要实现属性识别的功能,需要继承这个类,并重写鼠标事件的方法来处理识别的返回结果结构体就行了。
可以看到,它的处理事件发射了两个信号,分别将选中的要素和要素的id作为参数传了出去。但是它并没有直接处理。
如果要显示一个类似QGis属性识别的窗口,还需要我们自己定义一个类,然后通过 connect 的形式,将这里发射的 signal 与相应的 slot 方法连接。
这个类在处理结果的时候调用了一个叫 QgsIdentifyResultsDialog 的类,这是QGis属性识别窗口的定义。
若想直接使用 QgsIdentifyResultsDialog 这个窗口,需要将相应的 .ui 文件以及窗口类文件拷贝到自己的工程中,并调用窗口类的初始化以及显示方法。
定义方法接收 QgsMapToolIdentifyFeature 类发射的信号,处理属性识别返回的结果
模仿 QgsMapToolIdentifyAction 类的做法,定义一个类继承自 QgsMapToolIdentify, 并在重写的鼠标事件中处理属性识别返回的结果
第一种方法只能处理矢量图层的识别,第二种方法可以自定义扩展栅格以及其他图层的属性识别。
由于两种方法实际上在处理识别返回结果的地方原理是一样的,因此下面只示例第二种方法的实现。
首先定义一个类,继承自 QgsMapToolIdentify,并重写鼠标释放的事件。
鼠标释放事件的实现代码如下。
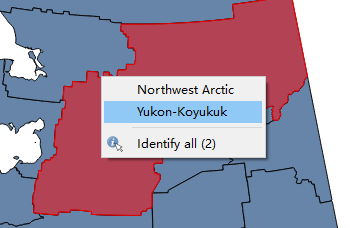
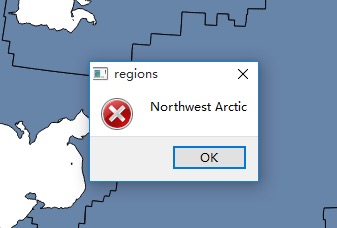
这个代码的效果如下所示:

最后,感谢阅读。
相关类
要实现一个功能,首先自然是找到这个功能相关的类,并查看类之间的一些关系。这里,属性识别也是地图工具,因此,先查看一下地图工具类,也就是 QgsMapTool 类。QgsMapTool 类是一个抽象类,它的子类负责地图浏览功能。通过上图可以看到几个基本的工具类
漫游工具 – QgsMapToolPan
触摸工具(需要触摸屏的支持) – QgsMapToolTouch
缩放工具 – QgsMapToolZoom (放大和缩小仅仅是缩放系数不同来而已,因此缩放共用一个类)
这些工具的使用非常简单,只需要初始化一个对应工具类的实例,并设置地图画布的 MapTool 为相应的实例就可以了,代码如下:
QgsMapToolPan* m_mapToolPan = new QgsMapToolPan( m_mapCanvas );
QgsMapToolZoom* m_mapToolZoomIn = new QgsMapToolZoom( m_mapCanvas, false );
QgsMapToolZoom* m_mapToolZoomOut = new QgsMapToolZoom( m_mapCanvas, true );

m_mapCanvas->setMapTool( m_mapToolPan ); // 工具切换
还有一个 QgsMapToolEmitPoint 类,是用来发出地图上用户选点坐标的,这个工具可以做一些自定义的地图交互功能,在图层文件进行编辑的时候也可以使用。
除了上面说的这些,剩下两个类 QgsMapToolIdentify 和它的派生类 QgsMapToolIdentifyFeature。这两个类就是我们关注的重点了,看名字就知道这两个类负责属性的识别了。
QgsMapToolIdentify
这个类的用法与上面提到的工具有点微小的区别,如果像上面那样设置工具,虽然切换成功后鼠标图标会变成识别工具的样式,但是无论如何点击都不会有任何效果。这是因为,在这个类的实现代码中,鼠标事件的实现部分是下面这样的:void QgsMapToolIdentify::canvasMoveEvent( QMouseEvent * e )
{
Q_UNUSED( e );
}
void QgsMapToolIdentify::canvasPressEvent( QMouseEvent * e )
{
Q_UNUSED( e );
}
void QgsMapToolIdentify::canvasReleaseEvent( QMouseEvent * e )
{
Q_UNUSED( e );
}并没有实现代码,因此鼠标事件是不被处理的。
再来关注定义在这个类中的一个结构体,它定义了属性识别的返回结果。
struct IdentifyResult
{
IdentifyResult() {}

IdentifyResult( QgsMapLayer * layer, QgsFeature feature, QMap< QString, QString > derivedAttributes ):
mLayer( layer ), mFeature( feature ), mDerivedAttributes( derivedAttributes ) {}

IdentifyResult( QgsMapLayer * layer, QString label, QMap< QString, QString > attributes, QMap< QString, QString > derivedAttributes ):
mLayer( layer ), mLabel( label ), mAttributes( attributes ), mDerivedAttributes( derivedAttributes ) {}

IdentifyResult( QgsMapLayer * layer, QString label, QgsFields fields, QgsFeature feature, QMap< QString, QString > derivedAttributes ):
mLayer( layer ), mLabel( label ), mFields( fields ), mFeature( feature ), mDerivedAttributes( derivedAttributes ) {}

QgsMapLayer* mLayer; // 图层
QString mLabel; // 标签
QgsFields mFields; // 属性字段
QgsFeature mFeature; // 选中识别的要素
QMap< QString, QString > mAttributes; // 属性键值对
QMap< QString, QString > mDerivedAttributes; // 派生属性键值对
QMap< QString, QVariant > mParams; // 参数键值对
};
主要关注几个成员字段, 它们定义了识别返回结果的形式。
同时这个类中还有很多方法是属性识别功能的实现。看到这里,我想思路就有了,要实现属性识别的功能,需要继承这个类,并重写鼠标事件的方法来处理识别的返回结果结构体就行了。
QgsMapToolIdentifyFeature
这个类专门为矢量数据的属性识别功能而设计,不能处理栅格图层的属性。实际上,这个类正是体现了上面提到的思路。它继承自 QgsMapTool 类,并且从它的重写的鼠标事件实现代码中,可以看到它处理识别返回结果的方式。void QgsMapToolIdentifyFeature::canvasReleaseEvent( QMouseEvent* e )
{
QgsPoint point = mCanvas->getCoordinateTransform()->toMapCoordinates( e->x(), e->y() );
QList<IdentifyResult> results;
if ( !identifyVectorLayer( &results, mLayer, point ) )
return;
// TODO: display a menu when several features identified
emit featureIdentified( results[0].mFeature );
emit featureIdentified( results[0].mFeature.id() );
}可以看到,它的处理事件发射了两个信号,分别将选中的要素和要素的id作为参数传了出去。但是它并没有直接处理。
如果要显示一个类似QGis属性识别的窗口,还需要我们自己定义一个类,然后通过 connect 的形式,将这里发射的 signal 与相应的 slot 方法连接。
QgsMapToolIdentifyAction
这个类是QGis定义在qgis_app中定义的,并没有直接提供在二次开发API中,原理同 QgsMapToolIdentifyFeature 大致相同,也是继承自 QgsMapToolIdentify 类,并重写鼠标事件处理识别结果。这个类在处理结果的时候调用了一个叫 QgsIdentifyResultsDialog 的类,这是QGis属性识别窗口的定义。
若想直接使用 QgsIdentifyResultsDialog 这个窗口,需要将相应的 .ui 文件以及窗口类文件拷贝到自己的工程中,并调用窗口类的初始化以及显示方法。
实现方法
讲到这里,我们要实现属性识别功能,就有了两种办法了:定义方法接收 QgsMapToolIdentifyFeature 类发射的信号,处理属性识别返回的结果
模仿 QgsMapToolIdentifyAction 类的做法,定义一个类继承自 QgsMapToolIdentify, 并在重写的鼠标事件中处理属性识别返回的结果
第一种方法只能处理矢量图层的识别,第二种方法可以自定义扩展栅格以及其他图层的属性识别。
由于两种方法实际上在处理识别返回结果的地方原理是一样的,因此下面只示例第二种方法的实现。
首先定义一个类,继承自 QgsMapToolIdentify,并重写鼠标释放的事件。
class qgis_devMapToolIdentifyAction : public QgsMapToolIdentify
{
Q_OBJECT
public:
qgis_devMapToolIdentifyAction( QgsMapCanvas * canvas );
~qgis_devMapToolIdentifyAction();

//! 重写鼠标键释放事件
virtual void canvasReleaseEvent( QMouseEvent * e );
};
鼠标释放事件的实现代码如下。
void qgis_devMapToolIdentifyAction::canvasReleaseEvent( QMouseEvent * e )
{
IdentifyMode mode = QgsMapToolIdentify::LayerSelection; // 控制识别模式
QList<IdentifyResult> results = QgsMapToolIdentify::identify( e->x(), e->y(), mode ); // 这句返回识别结果

if ( results.isEmpty() )
{
qgis_dev::instance()->statusBar()->showMessage( tr( "No features at this position found." ) );
}
else
{
// 显示出识别结果,这里仅作示例,结果的展示方式可以自定义,你也可以自己设计一个窗口,在这里接收返回结果并显示出来。
IdentifyResult feature = results.at( 0 );
QString title = feature.mLayer->name();
QString content = feature.mFeature.attribute( 1 ).toString();
// 显示识别窗口
QMessageBox::critical( NULL,
title,
content );
}
}
这个代码的效果如下所示:
最后
这个功能并不复杂,但通过对这个功能的实现方法的探讨,可以帮助我们后期开发的时候更合理的做一些自己想要的功能扩展。例如,你可以接收到属性返回的结果,并根据要素中的某个特殊属性,显示相应的动画。还可以根据属性的值的大小,设计显示不同高度的柱状图,不同比例的柱状图等等。最后,感谢阅读。

相关文章推荐
- QGIS1.8.0的编译
- Qgis开发14-创建矢量元素
- QGis1.8.0编译
- 将sql server中的空间数据导入到qgis中并编辑
- QGIS介绍
- QGIS自带属性对话框调用
- QGIS 自定义坐标系
- QGIS 加载 TMS 地图
- QGIS(PYTHON3.5、QT5.7.1、QGIS3)系列二次开发环境
- QGIS矢量编辑插件
- QGIS3二次开发环境
- QGIS3+vs2015+QT5.6.1编译
- QGIS矢量编辑插件
- 基于高德在线地图及REST API 的 QGIS插件开发
- QGIS如何使用WMS图层
- 智能电表管理
- QGis2.14.4基于Win10+Qt4.8.6+VS2010环境的编译
- QGis C++ 开发之图层分类显示
- QGis C++ 开发之创建临时图层并添加要素
- 在 QGIS 地图中显示 GPS 点、线集