【黑马程序员】第九章:GUI(图形用户界面)
2016-01-21 22:47
435 查看
-------
android培训、java培训、期待与您交流! ----------
GUI全称是Graphical User Interface,即图形用户界面。顾名思义,就是应用程序提供给用户操作的图形界面,包括窗口、惨淡、按钮、工具栏和其他各种图形界面元素。
Java中针对GUI设计提供了丰富的类库,这些类分别位于java.awt和javax.swing包中,简称AWT和Swing。
一、AWT概述
AWT是用于创建图形用户界面的一个工具包,它提供了一系列用于实现图形界面的组件,如窗口、按钮、文本框、对话框等。
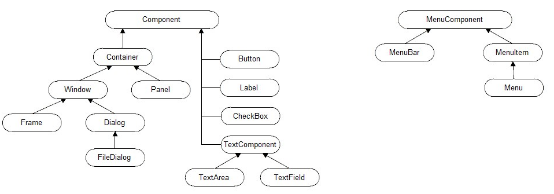
在AWT中组件分为两大类,这两类的积累跟别是Component和MenuComponent。其中MenuComponent是所有与菜单相关组件的父类,Component则是出菜单外其他AWT组件的父类,它表示一个能以图形化方式显示出来,并与用户交互的对象。
Componnet类通常被称为组件,根据Componnet的不同作用,可以将其分为基本组件类和容器类。基本组件类是诸如按钮、文本框之类的图形界面元素,而容器类则是通过Component的子类Container实例化的对象。Container类表示容器,它是一种特殊的组件,可以用来容纳其他组件。Container容器又分为两种类型,风别是Window和Panel。
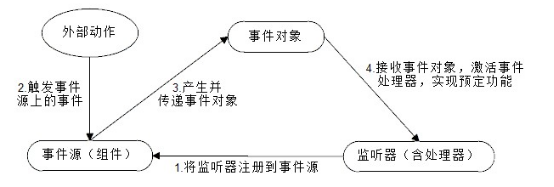
事件对象(Event):封装了GUI组件上发生的特定事件。(通常就是用户的一次操作)
事件源(组件):时间发生的场所,通常就是产生事件的组件。
监听器(Listener):负责监听时间源上发生的事件,并对各种时间做出相应处理的对象(对象中包含时间处理器)。
时间处理器:监听器对象对接收的时间对象进行相应处理的方法。
MouseEvent类中针对鼠标的按键都定义了对应的常量,可以通过MouseEvent对象的getButton()方法获取被操作按键的常量键值,从而判断时哪个按键的操作。另外,鼠标的点击次数也可以通过MouseEvent对象的getClickCount()方法获取到。
在Java中动作事件用ActionEvent类表示,处理ActionEvent 事件的监听器对象需要实现ActionListener接口,但监听器对象在监听动作时,不会像鼠标事件一样处理鼠标个别的移动和单机的细节,而是去处理“按钮按下”这样有意义的事件。
每个容器在创建时都会使用一种默认的布局管理器,在程序中可以通过调用容器对象的setLayout()方法设置布局管理器,通过布局管理器来自动进行组件的布局管理。
FlowLayout的构造方法:

其中,参数align决定组件在每行中相对于容器边界的对齐方式,可以使用该类中提供的常量作为参数传递给构造方法,FlowLayout.LEFT用于表示左对齐,FlowLayout.RIGHT用于表示右对齐,FlowLayout.CENTER用于表示居中对齐,参数hgap和参数vgap分别设定组件之间的水平和垂直间距。
FlowLayout布局管理器的特点就是可以将所有组件想流水一样一次进行排列,不需要用户明确设定,但是在灵活性上相对差了点。
当向BorderLayout布局管理器的容器中添加组件时,需要使用add(Component comp,Object constraints)方法,其中参数contraints是Object类型,在传参时可以使用BorderLayout类提供的5个常量,分别是EAST、SOUTH、WEST、NORTH、CENTER。
BorderLayout的好处就是可以限定各区域的边界,当用户改变容器大小时,各个组件的相对位置不变。但需要注意的是,向BorderLayout的布局管理器添加组件时,如果不指定添加到哪个曲剧,则默认添加到CENTER区域,并且每个区域只能放置一个组件,如果想一个区域中添加多个组件,则后放入的组件会覆盖先放入的组件。
GridLayout的构造方法:
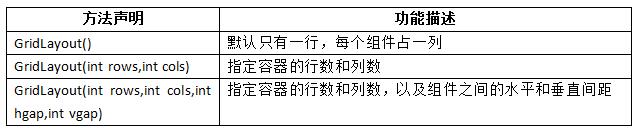
其中,参数rows代表行数,参数cols代表列数,hgap和vgap规定水平和垂直方向的间距。
GridLayout布局管理器的特点就是组件的相对位置不随区域的缩放而改变,但组件的大小会随之改变,组件始终占据网格的整个区域。缺点是总是忽略组件的最佳大小,所有组件的宽高相同。
使用GridBagLayout布局管理器的步骤如下:
创建GridBagLayout布局管理器,并使容器采用该布局管理器
创建GridBagContaints对象(布局约束条件),并设置该对象的相关属性
调用GridBagLayout对象的setConstraints()方法建立GridBagConstraints对象和受控组件之间的关联
向容器中添加组件
使用GridBagLayout布局管理器的关键在于GridBagConstraints对象,它才是控制容器中灭个组件布局的核心类,在GridBagConstraints中有许多约束的属性,下面介绍一些常用属性:
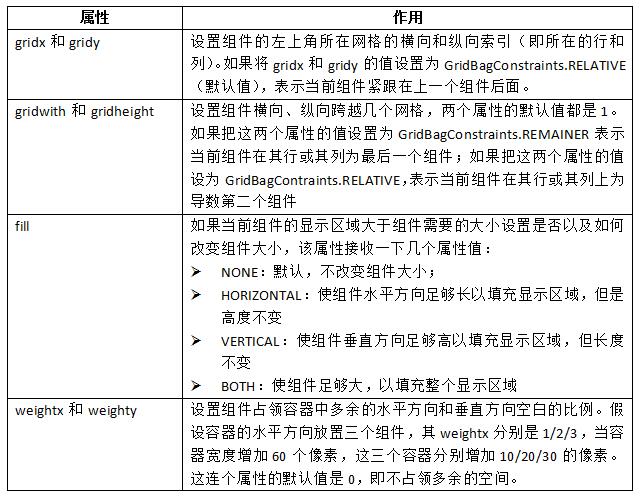
需要注意的是,如果希望组件的大小随容器的增大而增大,必须同时设置GridBagContraints对象的fill属性和weightx、weighty属性。
CardLayout的常用方法:

如果不希望通过布局管理器对容器进行布局,也可以调用容器的setLayout(null)方法,将布局管理器取消。这时候,程序必须调用容器中米格组件的setSize()和SetLoction()方法或者是setBounds()方法来为这个组件定位。
Graphics类常用方法:
为了更好的理解和使用它们,下面对这些方法进行说明:
Ø setColor():用于指定上下文颜色,方法中接收一个Color类型的参数,Color类嗲表颜色,其中定义了许多代表个中颜色的常量,比如Color.RED、Color.BLUE等都是Color类型。
Ø setFont():用于指定上下文字体,方法中接收一个Font类型的参数,Font类型嗲表字体,可以使用new关键字创建Font对象。Font的构造方法中接收三个参数,第一个是String类型,表示字体名称,例如宋体、微软雅黑等;第二个参数是int类型,表示字体的样式,接收Font类的三个常量Font.PLAINT、Font.ITALIC和 Font.BOLD;第三个参数为int类型,表示字体大小。
Ø drawRect()和drawOval():用于绘制矩形和椭圆形的边框,fillRect()和fillOval()用于使用当前的 颜色填充绘制的矩形和椭圆形。
Ø drawString():用于绘制一段文本,第一个参数str表示绘制的文本内容,第二个和第三个参数x、y为绘制文本的左下角坐标。
e850
跨平台运行。通常来讲我们把以来与本地平台的SWT组件称为重量级组件,而把不依赖本地平台的Swing组件称为轻量级组件。
JFrame类和Frame类最大的区别在于,JFrame类提供了关闭窗口的功能,在程序汇总不需要添加窗体监听器,秩序调用setDefaulCloseOperation()方法,然后将常量JFrame.EXIT_ON_CLOSE作为参数传入即可。
JDialog的构造方法:
3、中间容器
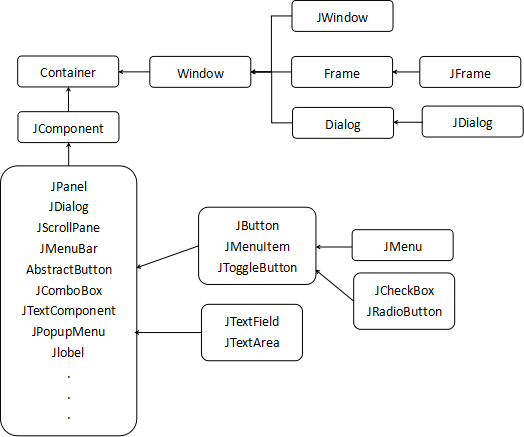
Swing 组件不仅具有 JFrame 和 JDialog 这样的顶级窗口,还提供了一些中间容器,这些容器不能单独存在,只能放置在顶级窗口汇总。其中最常见的中间容器有两种:JPanel 和 JScrollPane。
JPanel:JPanel 和 AWT 中的 Panel 组件使用方法基本一致,它是一个无边框,不能被移动、放大、缩小和关闭的面板,它的默认布局管理器是 FlowLayout。当然也可以使用 JPanel 带参数的构造函数 JPanel(LayoutManager layout) 或者它的 setLayout() 方法为其指定布局管理器。
JScrollPane:与 JPanel 不同的是,JScrollPanel 是一个带滚动条的面板容器,而且这个面板只能添加一个组件,如果想往 JScrollPane 面板中添加多个组件,应该先将组件添加到JPanel 中,然后将 JPanel 添加到 JScrollPane 中。
JScrollPane 的构造函数:
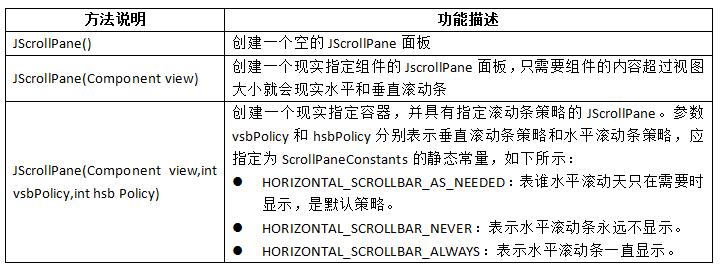
JScrollPane 的方法:

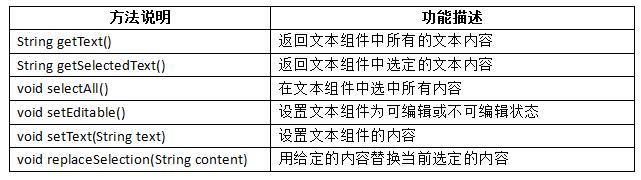
4、文本组件
文本组件用于接收用户输入的信息或向用户展示信息,其中包括文本框(JTextField)、文本域(JTextArea)等,他们有一个共同的父类 JTextComponent,JComponent 是一个抽象类,它提供了文本组件常用的方法:

JTextField 有一个子类JPassWordText,它表示一个密码框们只能接收用户的单行输入,但是在此框中不显示用户输入的真实信息,而是通过显示指定的回显字符作为占位符。新创建的密码框默认的回显字符为 * 。
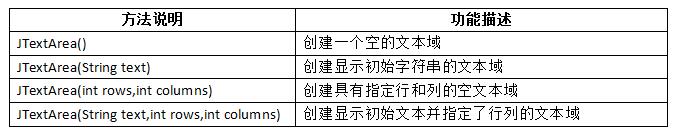
2)、JTextArea
JTextArea 称为文本域,它能接受多行文本的输入,使用 JTextArea 构造方法创建对象时们可以设定区域的行数、列数,JTextArea 常用的构造方法如下:
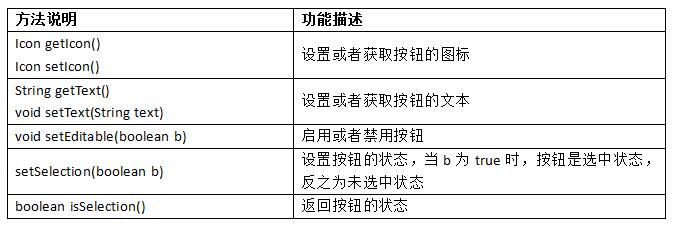
5、按钮事件
在 Swing 中常见的按钮组件有 JButton、JCheckBox、JRadioButton 等,他们都是抽象类 AbstractButton 类的直接或间接子类,在 AbstractButton 类中提供了按钮组件通用的一些方法:
1)、JCheckBox
JCheckBox 组件被称为复选框,它有选中/未选中两种状态,如果用户向接收的输入只有“是”和“非”,则可以通过复选框来切换切换状态,如果复选框有多个,则用户可以选中其中一个或者多个。

2)、JRadioButton
JRadioButton 组件被称为单选按钮,与 JCheckBox 复选框不同的是,单选按钮只能选中一个。由于 JRadioButton 组件本身不具备这种功能,因此若想实现 JRadioButton 按钮之间的排斥,需要使用 javax.swing.ButtonGroup 类,它是一个不可见的组件,不需要将其增加到容器中显示,只是在逻辑上表示一个单选按钮,将多个 JRadioButton 按钮添加到同一个单选按钮组对象中就能实现按钮的单选功能。
JRadioButton 的构造方法:

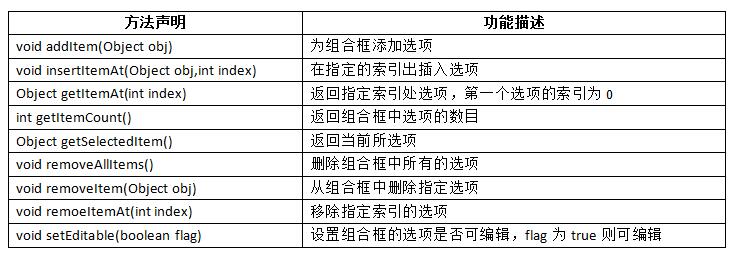
JComboBox 组合框组件分为可编辑和不可编辑两种形式,对于不可编辑的组合框,用户只能在现有的选项列表中选择,而对于可编辑的组合框,用户既可以在现有的选项中选择,也可以自己输入新的内容。需要注意的是,自己输入的内容只能作为当前项显示,并不会添加到组合框的选择类表中。
JComboBox 的构造方法:

JComboBox 的常用方法:
7、菜单组件
在 GUI 程序中,菜单式很常见的组件,李咏 Swing 提供的菜单组件可以创建多种样式的菜单。
1)、下拉式菜单
创建下拉式菜单需要使用三个组件:JMenuBar(菜单栏)、JMenu(菜单) 和 JMenuItem(菜单项)。
JMenuBar:表示一个水平的菜单栏,它用来管理菜单,不参与同用户的交互式操作。菜单栏可以放在容器的任何位置,但通常情况下会使用顶级窗口的 setJMenuBar(JMenuBar bar) 方法将它放置在顶级窗口的顶部。JMenuBar 有一个午餐构造函数,创建爱你菜单栏时,只需要使用 new 关键字创建 JMenuBar 对象即可。创建完菜单栏对象后,可以调用它的 add(JMenu menu) 方法为其添加 JMenu 菜单。
JMenu:表示一个菜单,它用来整合管理菜单项。菜单可以是单一层次的结构,也可以是多层次的结构。大多数情况下,使用 JMenu(String text) 构造函数创建 JMenu 菜单,参数 text 表示菜单上的文本。JMenu 还有一些常用的方法:
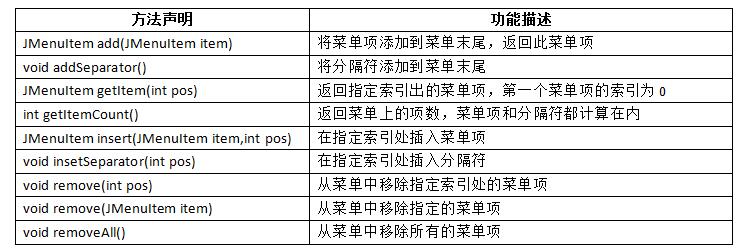
JMenuItem:表示一个菜单项,它是菜单系统中最基本的组件。和 JMenu 一样,在创建 JMenuItem 菜单项时,通常会使用 JMenuItem(String text) 这个构造方法为菜单项指定文本内容。
JMenuItem 继承自 AbstractButton 类的,因此可以把它看成是一个按钮,如果使用无参的构造方法创建一个菜单项,则可以调用从 AbstractButton 类中继承的 setText(String tet) 方法和 setIcon() 方法为其设置文本和图标。
2)、弹出式菜单
JPopupMenu 弹出式菜单和下拉式菜单一样都通过调用 add() 方法添加 JMenuItem 菜单项,但它默认是不可见的,如果想要显示出来,则必须调用它的 show(Component invoker,int x,int y) 方法,该方法中参数 invoker 表示 JPopupMenu 菜单显示位置的参考组件,x 和 y 表示 invoker 组件坐标空间中的一个坐标,显示的是 JPopupMenu 菜单的左上角坐标。
android培训、java培训、期待与您交流! ----------
GUI全称是Graphical User Interface,即图形用户界面。顾名思义,就是应用程序提供给用户操作的图形界面,包括窗口、惨淡、按钮、工具栏和其他各种图形界面元素。
Java中针对GUI设计提供了丰富的类库,这些类分别位于java.awt和javax.swing包中,简称AWT和Swing。
一、AWT概述
AWT是用于创建图形用户界面的一个工具包,它提供了一系列用于实现图形界面的组件,如窗口、按钮、文本框、对话框等。在AWT中组件分为两大类,这两类的积累跟别是Component和MenuComponent。其中MenuComponent是所有与菜单相关组件的父类,Component则是出菜单外其他AWT组件的父类,它表示一个能以图形化方式显示出来,并与用户交互的对象。
Componnet类通常被称为组件,根据Componnet的不同作用,可以将其分为基本组件类和容器类。基本组件类是诸如按钮、文本框之类的图形界面元素,而容器类则是通过Component的子类Container实例化的对象。Container类表示容器,它是一种特殊的组件,可以用来容纳其他组件。Container容器又分为两种类型,风别是Window和Panel。
1、Window
Window类是不依赖其他容器而独立存在的容器,它有两个子类,分别是Frame类和Dialog类。Frame类用于创建一个具有标题栏的框剪窗口,作为程序的主界面。Dialog类用于创建一个对话框,实现与用户的信息交互。2、Panel
Panel也是一个容器,但是它不能单独存在,只能存在其他容器(Window或其子类)中,一个Panel嗲表了一个长方形的区域,在这个区域中可以容纳其他组件。在程序中通常会使用Panel来实现一些特殊的布局。class PanelDemo{
public static void main(String[] args){
Frame f = new Frame("我的窗体");
f.setSize(400,300);
f.setLocation(300,300);
f.setVisible(true);
}
}二、AWT事件处理
1、事件处理机制
时间处理机制专门用于响应用户的操作,比如点击鼠标、按下键盘等操作,就需要使用AWT的时间处理机制。事件对象(Event):封装了GUI组件上发生的特定事件。(通常就是用户的一次操作)
事件源(组件):时间发生的场所,通常就是产生事件的组件。
监听器(Listener):负责监听时间源上发生的事件,并对各种时间做出相应处理的对象(对象中包含时间处理器)。
时间处理器:监听器对象对接收的时间对象进行相应处理的方法。
import java.awt.*;
import java.awt.event.*;
class AWTDemo{
public static void main(String[] args){
//创建窗体
Frame f = new Frame("我的电脑");
//设置窗体大小
f.setSize(500,300);
//设置窗体出现的位置
f.setLocation(300,300);
//设置窗体可见
f.setVisible(true);
//为窗体组件添加监听器
f.addWindowListener(new WindowListener(){
//对时间做出处理
public void windowClosing(WindowEvent e){
Window window = e.getWindow();
window.setVisible(false);
//释放窗口
window.dispose();
}
public void windowActivated(WindowEvent e){}
public void windowClosed(WindowEvent e){}
public void windowDeactivated(WindowEvent e){}
public void windowDeiconified(WindowEvent e){}
public void windowIconified(WindowEvent e){}
public void windowOpened(WindowEvent e){}
});
}
}
2、事件适配器
为了实现WindowListener接口,需要实现接口中定义的7个方法,然而只需要用到windowClosing()方法,其他6个方法都是空实现。针对这样的问题,JDK提供了一些适配类,他们是监听器接口的默认实现类,这些实现类中实现了接口的所有方法,但方法中没有任何代码。class WindowAdapterDemo{
public static void main(String[] args){
Frame f = new Frame("我的电脑");
f.setSize(500,300);
f.setLocation(300,300);
f.setVisible(true);
f.addWindowListener(new WindowAdapter(){
public void windowClosing(WindowEvent e){
Window window = (Window)e.getCompenent();
window.dispose();
}
});
}
}三、常用事件分类
在AWT中提供了丰富的时间,大致可以分为窗体事件(WindowEvent)、鼠标事件(MouseEvent)、键盘事件(KeyEvent)、动作事件(ActionEvent)等。1、窗体事件
大部分GUI应用程序都需要使用Window窗体事件对象作为外层的容器,可以说窗体对象是所有GUI应用程序的基础,应用程序中通常都是讲其他组件直接或间接地置于窗体中。在应用程序中,当对窗体时间进行处理时,首先需要定义一个类实现WindowListener接口作为窗体监听器,然后通过addWindowListener()方法将窗体对象与监听器绑定。class WindowEventDemo{
public static void main(String[] args){
Frame f = new Frame("我的电脑");
f.setSize(500,300);
f.setLocation(300,300);
f.setVisible(true);
f.addWindowListener(new WindowListener(){
public void windowOpened(WindowEvent e){
System.out.println("WindowOpened-->窗体打开事件");
}
public void windowIconified(WindowEvent e){
System.out.println("WindowIconified-->窗体图标化事件");
}
public void WindowDeiconified(WindowEvent e){
System.out.println("WindowDeiconified-->窗体取消图标化事件");
}
public void windowDeactivated(WindowEvent e){
System.out.println("windowDeactivated-->窗体停用事件");
}
public void windowActivated(WindowEvent e){
System.out.println("windowActivated-->窗体激活事件");
}
public void windowClosing(WindowEvent e){
System.out.println("windowClosing-->窗体正在关闭事件");
}
public void windowClosed(WindowEvent e){
System.out.println("windowClosed-->窗体关闭事件");
}
});
}
}2、鼠标事件
在图形用户界面中,用户会经常通过鼠标来进行选择、切换界面等操作,这些操作被定义为鼠标事件,起哄包括鼠标按下、鼠标松开、鼠标单击等。JDK中提供了一个MouseEvent类用于表示鼠标事件,几乎所有的组件都可以产生鼠标事件,处理鼠标事件需要先实现MouseListener接口定义监听器,也可以通过继承适配器MouseAdapter类来实现,燃豆调用addMouseListener()方法将监听器绑定到事件源对象。class WindowEve
4000
ntDemo{
public static void main(String[] args){
Frame f = new Frame("我的电脑");
f.setLayout(new FlowLayout());
f.setSize(500,300);
f.setLocation(300,300);
f.setVisible(true);
Button b = new Button("按钮");
f.add(b);
b.addMouseListener(new MouseListener(){
public void mouseEntered(MouseEvent e){
System.out.println("mouseEntered-->鼠标进入区域");
}
public void mouseExited(MouseEvent e){
System.out.println("mouseExited-->鼠标移出区域");
}
public void mousePressed(MouseEvent e){
System.out.println("mousePressed-->鼠标按下");
}
public void mouseReleased(MouseEvent e){
System.out.println("mouseReleased-->鼠标放开");
}
public void mouseClicked(MouseEvent e){
System.out.println("mouseClicked-->鼠标完成点击");
}
});
}
}MouseEvent类中针对鼠标的按键都定义了对应的常量,可以通过MouseEvent对象的getButton()方法获取被操作按键的常量键值,从而判断时哪个按键的操作。另外,鼠标的点击次数也可以通过MouseEvent对象的getClickCount()方法获取到。
public void mouseClicked(MouseEvent e){
if(e.getButton()==e.BUTTON1){
System.out.println("鼠标左键");
}
if(e.getButton()==e.BUTTON2){
System.out.println("鼠标右键");
}
if(e.getButton()==e.BUTTON3){
System.out.println("鼠标滚轮键");
}
}
3、键盘事件
键盘操作也是最常用的用户交互方式,例如键盘按下、释放等,这些操作被定义为键盘事件,在JDK中定义了一个KeyEvent类表示键盘事件,处理KeyEvent事件的监听器对象需要实现KeyListener接口或继承KeyAdapter类。class WindowEventDemo{
public static void main(String[] args){
Frame f = new Frame("我的电脑");
f.setLayout(new FlowLayout());
f.setSize(500,300);
f.setLocation(300,300);
TextField tf = new TextField(30);
f.add(tf);
f.setVisible(true);
tf.addKeyListener(new KeyListener(){
public void keyPressed(KeyEvent e){
int keyCode = e.getKeyCode();
String s = KeyEvent.getKeyText(keyCode);
System.out.print("输入的内容为:"+s",");
System.out.println("对应的keyCode为:"+keycode);
}
public void keyReleased(KeyEvent e){
System.out.println("keyReleased-->键盘放开时");
}
public void keyTyped(KeyEvent e){
System.out.println("keyTyped-->键入某个键时调用");
}
});
}
}4、动作事件
动作事件与前面三种时间有所不同,它不代表某个具体的动作,只是表示一个动作发生了。例如,在关闭一个文件时,可以通过键盘关闭,也可以通过鼠标关闭,但是我们不需要关心使用哪种方式对文件进行关闭,只要是对关闭按钮进行操作,即出发了动作事件。在Java中动作事件用ActionEvent类表示,处理ActionEvent 事件的监听器对象需要实现ActionListener接口,但监听器对象在监听动作时,不会像鼠标事件一样处理鼠标个别的移动和单机的细节,而是去处理“按钮按下”这样有意义的事件。
四、布局管理器
在java.awt包中提供了五中布局管理器,分别是FlowLayout(流式布局管理器)、BorderLayout(边界布局管理器)、GridLayout(网格布局管理器)、GridBagLayout(网格包布局管理器)和CardLayout(卡片布局管理器)。每个容器在创建时都会使用一种默认的布局管理器,在程序中可以通过调用容器对象的setLayout()方法设置布局管理器,通过布局管理器来自动进行组件的布局管理。
1、FlowLayout
流式布局管理器是最贱但的布局管理器,在这种布局下,容器会将组件按照添加顺序从做往右放置。当到达容器的边界时,会自动将组件放到下一行的开始位置。FlowLayout的构造方法:
其中,参数align决定组件在每行中相对于容器边界的对齐方式,可以使用该类中提供的常量作为参数传递给构造方法,FlowLayout.LEFT用于表示左对齐,FlowLayout.RIGHT用于表示右对齐,FlowLayout.CENTER用于表示居中对齐,参数hgap和参数vgap分别设定组件之间的水平和垂直间距。
class WindowEventDemo{
public static void main(String[] args){
Frame f = new Frame("我的电脑");
f.setLayout(new FlowLayout(FlowLayout.LEFT,30,20));
f.setSize(500,300);
f.setLocation(300,300);
Button b = new Button("第1个按钮");
f.add(b);
b.addActionListener(new ActionListener(){
private int num = 1;
public void actionPerformed(ActionEvent e){
f.add(new Button("第"+num+"个按钮"));
f.setVisible(true);
}
});
f.setVisible(true);
}
}
FlowLayout布局管理器的特点就是可以将所有组件想流水一样一次进行排列,不需要用户明确设定,但是在灵活性上相对差了点。
2、BorderLayout
BorderLayout(边界布局管理器)是一种较为复杂的布局方式,它将容器分为无非区域,分别是东(EAST)、南(SOUTH)、西(WEST)、北(NORTH)、中(CENTER)。当向BorderLayout布局管理器的容器中添加组件时,需要使用add(Component comp,Object constraints)方法,其中参数contraints是Object类型,在传参时可以使用BorderLayout类提供的5个常量,分别是EAST、SOUTH、WEST、NORTH、CENTER。
class WindowEventDemo{
public static void main(String[] args){
Frame f = new Frame("我的电脑");
f.setLayout(new BorderLayout());
f.setSize(500,300);
f.setLocation(300,300);
f.setVisible(true);
Button b1 = new Button("东部");
Button b2 = new Button("南部");
Button b3 = new Button("西部");
Button b4 = new Button("北部");
Button b5 = new Button("中部");
f.add(b1,BorderLayout.EAST);
f.add(b2,BorderLayout.SOUTH);
f.add(b3,BorderLayout.WEST);
f.add(b4,BorderLayout.NORTH);
f.add(b5,BorderLayout.CENTER);
}
}
BorderLayout的好处就是可以限定各区域的边界,当用户改变容器大小时,各个组件的相对位置不变。但需要注意的是,向BorderLayout的布局管理器添加组件时,如果不指定添加到哪个曲剧,则默认添加到CENTER区域,并且每个区域只能放置一个组件,如果想一个区域中添加多个组件,则后放入的组件会覆盖先放入的组件。
3.GridLayout
GridLayout(网格布局管理器)使用纵横线将容器分为n行n列大小相等的网格,每个网格中放置一个组件。添加到容器中的组件首先放置在第1行第1列的网格中,然后在第1行的网格中从左到右依次放置其他组件,行满后,继续在下一行中从左往右放置组件。与FlowLayout不同的是,放置在GridLayout布局管理器中的组件将自动占据网格的整个区域。GridLayout的构造方法:
其中,参数rows代表行数,参数cols代表列数,hgap和vgap规定水平和垂直方向的间距。
class WindowEventDemo{
public static void main(String[] args){
Frame f = new Frame("我的电脑");
f.setLayout(new GridLayout(3,3));
f.setSize(500,300);
f.setLocation(300,300);
for(int x=0;x<=9;x++){
Button b = new Button("button"+x);
f.add(b);
}
f.setVisible(true);
}
}
GridLayout布局管理器的特点就是组件的相对位置不随区域的缩放而改变,但组件的大小会随之改变,组件始终占据网格的整个区域。缺点是总是忽略组件的最佳大小,所有组件的宽高相同。
4、GridBagLayout
GridBagLayout(网格包布局管理器)是最灵活、最复杂的布局管理器。与GridBagLayout布局管理器类似,不同的是,它允许网格中的组件大小各不相同,而且允许一个组件跨越一个或多个网格。使用GridBagLayout布局管理器的步骤如下:
创建GridBagLayout布局管理器,并使容器采用该布局管理器
GridBagLayout layout = new GridBagLayout();
container.setLayout(layout);
创建GridBagContaints对象(布局约束条件),并设置该对象的相关属性
GridBagConstraints containts = new GridBagConstraints();
constraints.gridx=1;
constraints.gridy=1;
constraints.gridwidth=1;
constraints.gridheight=1;
调用GridBagLayout对象的setConstraints()方法建立GridBagConstraints对象和受控组件之间的关联
constraints.setConstraints(component,constraints);
向容器中添加组件
constraints.add(component);
使用GridBagLayout布局管理器的关键在于GridBagConstraints对象,它才是控制容器中灭个组件布局的核心类,在GridBagConstraints中有许多约束的属性,下面介绍一些常用属性:
需要注意的是,如果希望组件的大小随容器的增大而增大,必须同时设置GridBagContraints对象的fill属性和weightx、weighty属性。
5、CardLayout
在操作程序时,我们经常会通过选项卡按钮来切换程序中的界面,这些界面就相当于一张张卡片,而管理这些卡片的布局管理器就是卡片布局管理器。卡片布局管理器将界面看做一系列卡片,在任何时候只有其中一张卡片是可见的,这张卡片占据容器的整个区域。CardLayout的常用方法:
6、不使用布局管理器
当一个容器被创建后,他们都会有一个默认的布局管理器。Window、Frame和Dialog的默认布局管理器是BorderLayout,Panel的默认布局管理器是FlowLayout。如果不希望通过布局管理器对容器进行布局,也可以调用容器的setLayout(null)方法,将布局管理器取消。这时候,程序必须调用容器中米格组件的setSize()和SetLoction()方法或者是setBounds()方法来为这个组件定位。
import java.awt.*;
class CardloyoutDemo{
public static void main(String[] args){
Frame frame = new Frame("hello");
f.setLayout(null);
f.setSize(500,300);
Button b1 = new Button("press");
Button b2 = new Button("pop");
b1.setBounds(30,30,100,50);
b2.setBounds(90,90,100,50);
f.add(b1);
f.add(b2);
f.setVisible(true);
}
}
五、AWT绘图
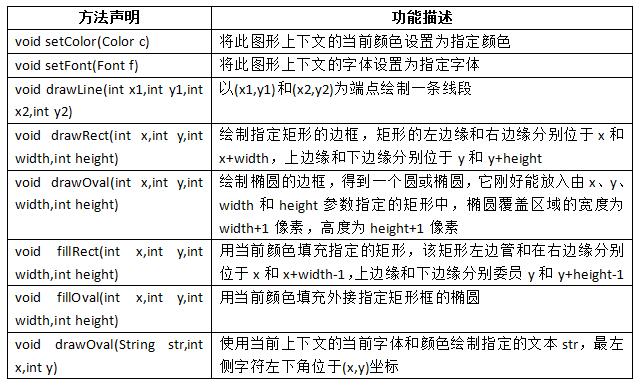
很多GUI程序都需要在组件上绘制图形,比如实现一个五子棋的小游戏,就需要在组件上绘制棋盘和棋子。在java.awt包中专门提供了一个Grapfics类,它相当于一个抽象的画笔,其中提供了各种绘制图形的方法,使用Graphics类的方法就可以完成在组件上绘制图形。Graphics类常用方法:
为了更好的理解和使用它们,下面对这些方法进行说明:
Ø setColor():用于指定上下文颜色,方法中接收一个Color类型的参数,Color类嗲表颜色,其中定义了许多代表个中颜色的常量,比如Color.RED、Color.BLUE等都是Color类型。
Ø setFont():用于指定上下文字体,方法中接收一个Font类型的参数,Font类型嗲表字体,可以使用new关键字创建Font对象。Font的构造方法中接收三个参数,第一个是String类型,表示字体名称,例如宋体、微软雅黑等;第二个参数是int类型,表示字体的样式,接收Font类的三个常量Font.PLAINT、Font.ITALIC和 Font.BOLD;第三个参数为int类型,表示字体大小。
Ø drawRect()和drawOval():用于绘制矩形和椭圆形的边框,fillRect()和fillOval()用于使用当前的 颜色填充绘制的矩形和椭圆形。
Ø drawString():用于绘制一段文本,第一个参数str表示绘制的文本内容,第二个和第三个参数x、y为绘制文本的左下角坐标。
import java.awt.*;
class CardloyoutDemo{
public static void main(String[] args){
Frame frame = new Frame("hello");
Panel panel = new MyPanel();
frame.add(panel);
frame.setLocationRelativeTo(null);//将窗口居中
frame.setVisible(true);
}
}
class MyPanel extends Panel{
public void paint(Graphics g){
int width = 160;
int height = 40;
g.setColor(Color.LIGHT_GRAY);
g.fillRect(0,0,width,height);
g.setColor(Color.BLACK);
g.drawRect(0,0,width-1,height-1);
//绘制干扰点
Random r = new Random();
for(int x=0;x<100;x++){
int x=r.nextInt(width)-2;
int y=r.nextInt(height)-2;
g.drawOval(x,y,2,2);
}
g.setFont(new Font("黑体",Font.BOLD,30));
g.setColor(Color.BLUE);
//产生随机验证码
char[] chs = "0123456789abcdefghijklmnopkrstuvwxyzABCDEFGHIJKLMNOPQRSTUVWXYZ".toCharArray();
StringBuilder sb = new StringBuilder();
for(int x=0;x<4;x++){
int pos = r.nextInt(chs.length);
char ch = chs[pos];
sb.append(ch+"");
}
g.drawString(sb.toString(),20,30);
}
}
六、Swing
相对于AWT来说,Swing包中提供了更加丰富、便捷。强大的GUI组件,而且这些组件都是Java语言编写而成,因此Swing组件不依赖本地平台,可以真正做到e850
跨平台运行。通常来讲我们把以来与本地平台的SWT组件称为重量级组件,而把不依赖本地平台的Swing组件称为轻量级组件。
1、JFrame
在Swing组件中,最常见的一个就是JFrame,它和Frame一样是一个独立存在的顶级窗口,不能放置在其他容器之中,JFrame支持通用窗口所有的基本功能,例如最大化、最小化等。import javax.swing.*;
class JFrameDemo{
public static void main(String[] args){
JFrame jf = new JFrame();
jf.setTitle("我的电脑");
jf.setLayout(new FlowLayout());
jf.setSize(500,300);
JButton jb = new JButton("按钮");
jf.add(jb);
jf.setDefaultCloseOperation(JFrame.EXIT_ON_CLOSE);
jf.setVisible(true);
}
}JFrame类和Frame类最大的区别在于,JFrame类提供了关闭窗口的功能,在程序汇总不需要添加窗体监听器,秩序调用setDefaulCloseOperation()方法,然后将常量JFrame.EXIT_ON_CLOSE作为参数传入即可。
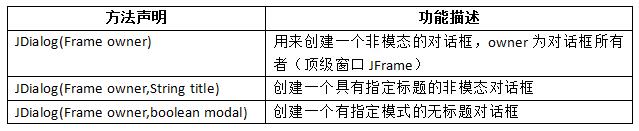
2、JDialog
Jdialog是Swing的另外一个顶级窗口,它和Dialog一样都是表示对话框。JDialog对话框可分为两种:模态对话框和非模态对话框,所谓模态对话框是指用户需要等到处理完对话框后才能继续与其他窗口交互,而非模态对话框允许用户在处理完对话框的同事与其他窗口交互。JDialog的构造方法:
import java.awt.*;
import java.awt.event.*;
import javax.swing.*;
class JFrameDemo{
public static void main(String[] args){
//定义按钮及窗体
JButton b1 = new JButton("模态对话框");
JButton b2 = new JButton("非模态对话框");
JFrame f = new JFrame("我的电脑");
f.setSize(500,300);
f.setLocation(300,300);
f.setLayout(new FlowLayout());
f.add(b1);
f.add(b2);
f.setDefaultClose(JFrame.EXIT_ON_CLOSE);
fsetVisible(true);
//定义面板
JLabel l = new JLabel();
//定义对话框
JDialog d = new JDialog(f,"我的对话框");
d.setSize(200,150);
d.setLocation(350,350);
d.setLayout(new FlowLayout());
JButton b3 = new JButton("确定");
d.add(b3);
//为模态对话框添加点击事件
b1.addActionListener(new ActionListener(){
public void actionPerformed(ActionEvent e){
d.setModal(true);
if(d.getComponents().length == 1){
d.add(l);
}
l.setText("模态对话框,点击确定按钮关闭");
d.setVisible(true);
}
});
//为非模态对话框添加点击事件
b1.addActionListener(new ActionListener(){
public void actionPerformed(ActionEvent e){
d.setModal(false);
if(d.getComponents().length == 1){
d.add(l);
}
l.setText("非模态对话框,点击确定按钮关闭");
d.setVisible(true);
}
});
//为确定按钮添加点击事件
b1.addActionListener(new ActionListener(){
public void actionPerformed(ActionEvent e){
d.dispose();
}
});
}
}
3、中间容器
Swing 组件不仅具有 JFrame 和 JDialog 这样的顶级窗口,还提供了一些中间容器,这些容器不能单独存在,只能放置在顶级窗口汇总。其中最常见的中间容器有两种:JPanel 和 JScrollPane。JPanel:JPanel 和 AWT 中的 Panel 组件使用方法基本一致,它是一个无边框,不能被移动、放大、缩小和关闭的面板,它的默认布局管理器是 FlowLayout。当然也可以使用 JPanel 带参数的构造函数 JPanel(LayoutManager layout) 或者它的 setLayout() 方法为其指定布局管理器。
JScrollPane:与 JPanel 不同的是,JScrollPanel 是一个带滚动条的面板容器,而且这个面板只能添加一个组件,如果想往 JScrollPane 面板中添加多个组件,应该先将组件添加到JPanel 中,然后将 JPanel 添加到 JScrollPane 中。
JScrollPane 的构造函数:
JScrollPane 的方法:
import javax.swing.*;
import java.awt.*;
class JScrollPaneDemo{
public static void main(String[] args){
JFrame f = new JFrame("我的电脑");
//创建滚动面板
JScrollPane pane = new JScrollPane();
//设置水平滚动条需要时显示
pane.setHorizontalScrollBarPolicy(ScrollPaneConstants.HORIZONTAL_SCROLLBAR_AS_NEEDED);
//设置垂直滚动条一直显示
pane.setVerticalScrollBarPolicy(ScrollPaneConstants.VERTICAL_SCROLLBAR_ALWAYS);
//定义一个面板,并添加四个按钮
JPanel p = new JPanel();
p.add(new JButton("按钮1"));
p.add(new JButton("按钮2"));
p.add(new JButton("按钮3"));
p.add(new JButton("按钮4"));
//设置JPanel面板在滚动面板中显示
pane.setViewportView(p);
//将滚动面吧添加到内容面板的center区
f.add(pane,BorderLayout.CENTER);
f.setDefaultCloseOperation(JFrame.EXIT_ON_CLOSE);
f.setSize(500,300);
f.setVisible(true);
}
}
4、文本组件
文本组件用于接收用户输入的信息或向用户展示信息,其中包括文本框(JTextField)、文本域(JTextArea)等,他们有一个共同的父类 JTextComponent,JComponent 是一个抽象类,它提供了文本组件常用的方法:1)、JTextField
JTextField 称为文本框,它只能接收单行文本的输入,JTextField 常用的构造方法如下:JTextField 有一个子类JPassWordText,它表示一个密码框们只能接收用户的单行输入,但是在此框中不显示用户输入的真实信息,而是通过显示指定的回显字符作为占位符。新创建的密码框默认的回显字符为 * 。
2)、JTextArea
JTextArea 称为文本域,它能接受多行文本的输入,使用 JTextArea 构造方法创建对象时们可以设定区域的行数、列数,JTextArea 常用的构造方法如下:import javax.swing.*;
import java.awt.*;
class JScrollPaneDemo{
public static void main(String[] args){
JFrame frame = new JFrame("我的电脑");
frame.setLayout(new BorderLayout());
JButton sendB = new JButton("发送");
JTextField inpur = new JTextField(20);
//创建JTextArea区域,并添加到滚动面板上
JTextArea chat = new JTextArea(12,34);
chat.setEditable(false);
JScrollPane pane = new JScrollPane(chat);
//为按钮添加动作事件
sendB.addActionListener(new ActionListener(){
public void actionPerformed(ActionEvent e){
String content = input.getText();
if(content != null && !content.trim().equals("")){
chat.append("本人:"+content+"\n");
}else{
chat.append("聊天信息不能为空");
}
input.setField("");
}
});
//将文本框、按钮、Label添加到面板中
JPanel panel = new JPanel();
Label label = new Label("聊天信息");
panel.add(label);
panel.add(input);
panel.add(sendB);
f.add(pane,BorderLayout.CENTER);
f.add(panel,BorderLayout.SOUTH);
f.setTitle("聊天窗口");
f.setSize(300,500);
f.setDefaultCloseOperation(JFrame.EXIT_ON_CLOSE);
f.setVisible(true);
}
}5、按钮事件
在 Swing 中常见的按钮组件有 JButton、JCheckBox、JRadioButton 等,他们都是抽象类 AbstractButton 类的直接或间接子类,在 AbstractButton 类中提供了按钮组件通用的一些方法: 1)、JCheckBox
JCheckBox 组件被称为复选框,它有选中/未选中两种状态,如果用户向接收的输入只有“是”和“非”,则可以通过复选框来切换切换状态,如果复选框有多个,则用户可以选中其中一个或者多个。import javax.swing.*;
import java.awt.*;
class JScrollPaneDemo{
public static void main(String[] args){
JFrame f = new JFrame("我的电脑");
f.setLayout(new BorderLayout());
f.setSize(300,300);
//创建标签
JLabel label = new JLabel("传智播客",JLabel.CENTER);
label.setFont(new Font("宋体",Font.PLAIN,20));
f.add(label);
//创建面板
JPanel panel = new JPanel();
//创建两个复选框,并未复选框加入事件监听
JCheckBox i = new JCheckBox("斜体");
JCheckBox b = new JCheckBox("加粗");
ActionListener listener = new ActionListener(){
public void actionPerformed(ActionEvent e){
int mode=0;
if(b.isSelected())
mode += Font.BOLD;
if(i.isSelected())
mode += Font.ITALIC;
label.setFont(new Font("宋体",mode,30));
}
};
i.addActionListener(listener);
b.addActionListener(listener);
//将复选框添加到面板上
panel.add(r);
panel.add(b);
//将面板添加到窗体
f.add(panel,BorderLayout.SOUTH);
f.setDefaultCloseOperation(JFrame.EXIT_ON_CLOSE);
f.setVisible(true);
}
} 2)、JRadioButton
JRadioButton 组件被称为单选按钮,与 JCheckBox 复选框不同的是,单选按钮只能选中一个。由于 JRadioButton 组件本身不具备这种功能,因此若想实现 JRadioButton 按钮之间的排斥,需要使用 javax.swing.ButtonGroup 类,它是一个不可见的组件,不需要将其增加到容器中显示,只是在逻辑上表示一个单选按钮,将多个 JRadioButton 按钮添加到同一个单选按钮组对象中就能实现按钮的单选功能。JRadioButton 的构造方法:
class JRadioButtonDemo{
public static void main(String[] args){
JFrame f = new JFrame("我的电脑");
f.setSize(300,300);
f.setLayout(new BorderLayout());
//创建一个面板,作为掉色斑
JPanel pallet = new JPanel();
f.add(pallet,BorderLayout.CENTER);
//在pallet上添加调色板
JPanel panel = new JPanel();
ButtonGroup group = new ButtonGroup();
addJRadioButton("灰");
addJRadioButton("粉");
addJRadioButton("黄");
f.setDefaultCloseOperation(JFrame.EXIT_ON_CLOSE);
f.setVisible(true);
}
public void addJRadioButton(final String text){
JRadioButton radioButton = new JRadioButton(text);
group.add(radioButton);
panel.add(radioButton);
radioButton.addActionListender(new ActionListener(){
public void actionPerformed(new ActionListener(ActionEvent e)){
Color color = null;
if("灰".equals(text)){
color = Color.GRAY;
}else if("粉".equals(text)){
color = Color.PINK;
}else if("黄".equals(text)){
color = Color.YELLOW;
}else{
color = Color.WHITE;
}
pallet.setBackground(color);
}
});
}
}
6、JComboBox
JComboBox 组件被称为组合框或下拉列表框,它将所有选项折叠收藏在一起,默认显示的是第一个添加的选项。当用户点击组合框时,会出现下拉式的选择类表,用户可以从中选择其中一项显示。JComboBox 组合框组件分为可编辑和不可编辑两种形式,对于不可编辑的组合框,用户只能在现有的选项列表中选择,而对于可编辑的组合框,用户既可以在现有的选项中选择,也可以自己输入新的内容。需要注意的是,自己输入的内容只能作为当前项显示,并不会添加到组合框的选择类表中。
JComboBox 的构造方法:
JComboBox 的常用方法:
import java.awt.*;
import java.awt.event.*;
import javax.swing.*;
class JComboBoxDemo{
public static void main(String[] args){
JFrame f = new JFrame("我的电脑");
f.setSize(300,300);
//创建文本框
JTextField field = new JTextField(20);
//创建下拉选择框,并添加选项及事件监听
JComboBox box = new JComboBox();
box.addItem("请选择城市");
box.addItem("北京");
box.addItem("上海");
box.addItem("广州");
box.addItem("深圳");
box.addItem("河北");
box.addActionListener(new ActionListener(){
public void actionPerformed(ActionEvent e){
String item = (String)box.getSelectedItem();
if("请选择城市".equals(item)){
field.setText("");
}else{
filed.setText("您选择的城市:"+item);
}
}
});
//创建面板,并添加组合框及文本框
JPanel panel = new JPanel();
panel.add(box);
panel.add(field);
f.add(panel,BorderLayout.CENTER);
f.setDefaultCloseOperation(JFrame.EXIT_ON_CLOSE);
f.setVisible(true);
}
}
7、菜单组件
在 GUI 程序中,菜单式很常见的组件,李咏 Swing 提供的菜单组件可以创建多种样式的菜单。 1)、下拉式菜单
创建下拉式菜单需要使用三个组件:JMenuBar(菜单栏)、JMenu(菜单) 和 JMenuItem(菜单项)。JMenuBar:表示一个水平的菜单栏,它用来管理菜单,不参与同用户的交互式操作。菜单栏可以放在容器的任何位置,但通常情况下会使用顶级窗口的 setJMenuBar(JMenuBar bar) 方法将它放置在顶级窗口的顶部。JMenuBar 有一个午餐构造函数,创建爱你菜单栏时,只需要使用 new 关键字创建 JMenuBar 对象即可。创建完菜单栏对象后,可以调用它的 add(JMenu menu) 方法为其添加 JMenu 菜单。
JMenu:表示一个菜单,它用来整合管理菜单项。菜单可以是单一层次的结构,也可以是多层次的结构。大多数情况下,使用 JMenu(String text) 构造函数创建 JMenu 菜单,参数 text 表示菜单上的文本。JMenu 还有一些常用的方法:
JMenuItem:表示一个菜单项,它是菜单系统中最基本的组件。和 JMenu 一样,在创建 JMenuItem 菜单项时,通常会使用 JMenuItem(String text) 这个构造方法为菜单项指定文本内容。
JMenuItem 继承自 AbstractButton 类的,因此可以把它看成是一个按钮,如果使用无参的构造方法创建一个菜单项,则可以调用从 AbstractButton 类中继承的 setText(String tet) 方法和 setIcon() 方法为其设置文本和图标。
import java.awt.*;
import java.awt.event.*;
import javax.swing.*;
class JMenuBarDemo{
public static void main(String[] args){
JFrame f = new JFrame("我的电脑");
f.setSize(300,300);
//创建菜单栏
JMenuBar bar = new JMenuBar();
f.setJMenuBar(bar);
//创建菜单
JMenu menu = new JMenu("操作");
bar.add(menu);
//创建两个菜单项
JMenuItem item1 = new JMenuItem("弹出窗口");
JMenuItem item2 = new JMenuItem("关闭");
item1.addActionListener(new ActionListener(){
public void actionPerformed(ActionEvent e){
JDialog dialog = new JDialog(f,true);
dialog.setTitle("弹出窗口");
dialog.setSize(200,200);
dialog.setLocation(50,50);
dialog.setVisible(true);
}
});
item2.addActionListener(new ActionListener(){
public void actionPerformed(ActionEvent e){
Sytem.exit(0);
}
});
menu.add(item1);
menu.addSeparator();
menu.add(item2);
f.setDefaultCloseOperation(JFrame.EXIT_ON_CLOSE);
f.setVisible(true);
}
}
2)、弹出式菜单
JPopupMenu 弹出式菜单和下拉式菜单一样都通过调用 add() 方法添加 JMenuItem 菜单项,但它默认是不可见的,如果想要显示出来,则必须调用它的 show(Component invoker,int x,int y) 方法,该方法中参数 invoker 表示 JPopupMenu 菜单显示位置的参考组件,x 和 y 表示 invoker 组件坐标空间中的一个坐标,显示的是 JPopupMenu 菜单的左上角坐标。import java.awt.*;
import java.awt.event.*;
import javax.swing.*;
class JMenuBarDemo{
public static void main(String[] args){
JFrame f = new JFrame("我的电脑");
f.setSize(300,300);
//创建弹出式菜单
JPopupMenu menu = new JPopupMenu();
JMenuItem refresh = new JMenuItem("刷新");
JMenuItem create = new JMenuItem("创建");
JMenuItem exit = new JMenuItem("退出");
exit.addActionListener(new ActionListener(){
public void actionPerformed(ActionEvent e){
System.exit(0);
}
});
menu.add(refresh);
menu.add(create);
menu.addSeparator();
menu.add(exit);
//为窗口添加鼠标点击事件
f.addMouseListener(new MouseAdapter{
public void mouseClicked(MouseEvent e){
if(e.getButton() == e.BUTTON3){
menu.show(e.getComponent(),e.getX(),e.getY());
}
}
});
f.setDefaultCloseOperation(JFrame.EXIT_ON_CLOSE);
f.setVisible(true);
}
}

相关文章推荐
- leetcode--Unique Paths && Unique Paths ii
- UVA 1608 Non-boring sequences (递归分治)
- UIButton基础以及使用block+UIButton处理点击事件
- 蓝懿IOS学习核心动画和UIImagePicker
- iOS开发 UItextFielddialing方法详解
- [转] mysql_query("set names gb2312")设置客户端字符集
- leetcode之 Implement Queue using Stacks
- 改变UITextField Placehold位置颜色
- easyui-combobox 实现简单的自动补全功能
- IQueryable与IEnumerable区别
- iOS个人整理12-UIControl与子类:UIPageControl、UIStepper
- UEFI启动视频详解:启动分析+N项操作实例
- Install caffe Some questions--in ubuntu 14.04
- (一)UI AUtoMonkey:xcode 里直接执行monkey
- 1月21号 UITabBarController
- Codeforce 163 A. Substring and Subsequence DP
- 使用WebRequest类下载文件
- iOS学习__UI测试题及答案
- UI组件之ProgressBar及其子类(二)SeekBar拖动条和RatingBar星级评分条的使用
- UIImagePickerController从拍照、图库、相册获取图片