【Storm入门指南】第二章 入门实例
2016-01-19 17:29
375 查看
本章将演示创建一个 Storm 工程和第一个 topology。
下文是建立在你的机器上安装有 JRE 1.6 及以上的环境。建议使用Oralce JRE,可从 http://www.java.com/download 获得。
在开始之前,理解 Storm 的运行模式很重要。Storm 有两种运行模式。
在本地模式中,Storm 运行在本地机器上的一个JVM中。由于可以方便看到所有 topology 组件的运行信息,这种模式可用来开发、测试调试。在这种模式下,可以调整参数来观察 topology 在不同的 Storm 配置环境下的运行状况。为了在本地模式下运行 topology,我们仅需将运行和测试 topology 的 Storm 相关依赖下载下来。一会创建第一个 Storm 工程的时候,将会看到发生了什么。
在本地模式下运行 topology 与集群环境下很相似。但是重要的一点是:确保所有组件都是线程安全的。因为当将 topology 部署到在远程模式时,它们将运行在不同物理机上的不同JVM时,不能够直接交流和共享内存。
本章的所有实例,都运行在本地模式下。
在远程模式中,我们将 topology 提交到 Storm 集群,通常是运行在不同机器上由许多处理组件组成 。远程模式不显示调试信息,这也是为什么它被认为是生产模式。然而,我们也可能在一台开发机器上创建 Storm 集群。在部署到生产环境之前,最好这样做以便验证在生产环境下运行 topology 是否会有问题。
你将在第六章学习远程模式,我将在附录A中演示如何安装一个集群。
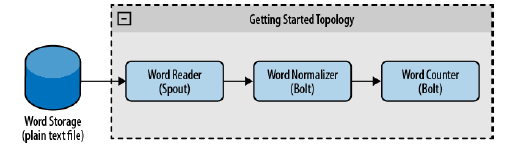
在本节,我们将创建一个简单的用来统计单词频率的 topology。我们可以将此视为 Storm topology 的 “Hello World” 项目。然而,由于可扩展到任意无穷数目的机器上,它的威力无穷。并且,只需要一点点改动,我们就能够在此基础上创建出一个统计系统。作为示例,我们将展示如何修改这个项目让它来确定Twitter上的流行话题。
为了创建 topology,我们使用一个 spout 负责读取单词,一个 bolt 将单词转换成小写的,另一个 bolt 统计单词频率。[如图2.1所示]
本示例的代码可从 http://github.com/storm-book/examples-ch02-getting_started/zipball/master 下载。
如果你使用 Git,你可以运行
第一步设置环境的工作是检查Java版本。打开一个终端,运行
如果不是,请检查你安装的Java。
第一步,创建一个应用的目录(像所有Java应用那样),这个目录将包含工程的源码。
下一步,下载 Storm 依赖相关的 Jar 包,并把它们加入工程的 classpath。有两种方式:
下载依赖,解压,加入classpath
使用 Apache Maven
Maven 是一个软件项目综合管理工具。它可以用来管理一个项目开发周期的几个方面,从依赖到发布构建处理。本书我们将普遍地使用它。通过运行
Maven 是否已安装。如果没有,你可以从Apache Maven 官方主页下来。(http://maven.apache.org) 你不要成为 Maven 方面的专家从而使用
Storm。但是如果能够理解 Maven 运行的基本原理,将会很有用。你可以从Apache Maven 官方主页(http://maven.apache.org)找到更多有用的信息。
我们需要使用一个 pom.xml 文件来定义工程结构,该文件用来描述依赖、打包、源码等等。我们使用 nathanmarz设置的依赖和Maven仓库,可以从如下网页找到https://github.com/nathanmarz/storm/wiki/Maven。
Storm 的 Maven 依赖包含所有本地模式下运行 Storm 的库。
我们可以使用这些依赖,编写一个包含可运行我们的topology所需的基本组件的 pom.xml 文件。
前面几行定义了工程的名称的版本,然后增加了一个编译插件用来告诉 Maven 如何编译我们的代码。接着定义仓库(Maven 支持一个项目中定义多个仓库)。clojars 是Storm依赖所在的仓库。Maven 会自动下载本地模式下运行Storm 所需的所有的子依赖。
项目将有如下的 Maven Java 工程典型的结构:
Java下面的目录将包含源码,单词文件将被放到 resource 目录。
执行
我们将创建一个处理单词计数的topology。可能本例子中的某些部分在本章不会详细介绍,但是会再接下来的章节阐述清楚。
spout 发射一组字段定义了的列表。这种结构允许不同类型的 bolt 读取相同 spout 的数据流,并定义字段供其他 bolt 做后续处理。
示例2-1 包括了该类的所有代码。
示例2-1:src/main/java/spouts/WordReader.javacode
view
spout 中第一个被调用的方法是
topology 数据;
bolt 处理。下面的代码块是其具体实现:
在该方法中,我们也创建了用来读取文件的
一个元组(tuple)是一组数值列表,数值可以是任意类型的可被序列化的Java对象。默认情况下,Storm可以序列化如
现在,我们拥有一个 spout 来读取文件并每行为一个tuple发射出去。接下来要做的就是创建两个 bolt 来处理这些 tuple。这些 bolt 实现 backtype.storm.topology.IRichBolt 接口。
bolt 中最重要的方法是
在接收一个tuple后,可发射若干个 tuple。
一个 bolt 或 spout 可以根据需要反射足够多的 tuple。当
tuple。你可以从第五章获得更多细节。
第一个 bolt 是
首先,我们需要声明 bolt 输出的参数:
这里,我们声明 bolt 将发射一个名字 word 的字段。
接下来,实现
第一行,从tuple中读取值,值可以按照位置或者名称来取得。值会被处理然后使用 collector 对象发射出去。当每个 tuple 被处理后,collector 的
tuple 不能被处理,collector 的
示例2-2包含了这个类的全部代码:
示例2-2:src/main/java/bolts/WordNormalizer.javacode
view
在此类中,我们看到执行一次
is the Storm book”,将发射五个新的tuple。
下一个 bolt 为
完成后(当
bolt 可将其存储到数据库中。
src/main/java/bolts/WordCounter.javacode
view
topology 关闭后,会使用
在主类中,我们创建一个 topology 和 一个用于在本地测试盒调试的
所有的 topology 节点,在处理过程中没有数据共享的前提下,都可以独立地运行。因为在真实的集群环境下,这些处理可能运行在不同的机器上。
可以使用
节点如何安排以及如何交换数据。
spout 和 bolt 之间使用
Storm 以随机分布的方式从源节点向目标节点发送消息。
下一步,创建一个
将
true 。当
topology 是如何运行的。
如早前所述,将使用本地模式来运行 topology。在生产环境下,topology 将会持续运行,但是本例中只将运行数秒钟,这样你能看到结果。
通过使用
topology,休眠两秒(topology 运行在不同的线程中),然后停止 topology,并关闭集群。
示例2-3是该类所有的代码。
示例2-3:src/main/java/TopologyMain.javacode
view
准备好运行第一个topology了吗?如果你创建一个
比如,你的文件中内容如下:
在日志中,你能看到如下结果:
在本例中,每个节点仅有一个实例。但是如果你有一个很大的日志文件,怎么办?你可以简单地通过改变系统中的节点数目来并行化处理工作。比如,你创建两个
程序结束后,你将看到:
太棒了!改变并行程度是如此简单(现实中,每个实例当然运行在一个独立的机器上)。但是从结果可看出一个问题:
以随机分布的方式将每个信息发送到一个实例。但是本例中,希望同一个单词背发送同一个
我们讨论了Storm 本地模式和远程模式的不同点,以及Storm编程的强大和简易。你也学习到了Storm的更多基础概念,我们将在接下来的章节对其进行深入阐述。
原始地址: http://JavanLu.github.io/blog/2013/10/15/getting-started-with-storm-chapter-2/
written by JavanLu posted at http://JavanLu.github.io
下文是建立在你的机器上安装有 JRE 1.6 及以上的环境。建议使用Oralce JRE,可从 http://www.java.com/download 获得。
2.1 运行模式
在开始之前,理解 Storm 的运行模式很重要。Storm 有两种运行模式。
2.1.1 本地模式
在本地模式中,Storm 运行在本地机器上的一个JVM中。由于可以方便看到所有 topology 组件的运行信息,这种模式可用来开发、测试调试。在这种模式下,可以调整参数来观察 topology 在不同的 Storm 配置环境下的运行状况。为了在本地模式下运行 topology,我们仅需将运行和测试 topology 的 Storm 相关依赖下载下来。一会创建第一个 Storm 工程的时候,将会看到发生了什么。在本地模式下运行 topology 与集群环境下很相似。但是重要的一点是:确保所有组件都是线程安全的。因为当将 topology 部署到在远程模式时,它们将运行在不同物理机上的不同JVM时,不能够直接交流和共享内存。
本章的所有实例,都运行在本地模式下。
2.1.2 远程模式
在远程模式中,我们将 topology 提交到 Storm 集群,通常是运行在不同机器上由许多处理组件组成 。远程模式不显示调试信息,这也是为什么它被认为是生产模式。然而,我们也可能在一台开发机器上创建 Storm 集群。在部署到生产环境之前,最好这样做以便验证在生产环境下运行 topology 是否会有问题。你将在第六章学习远程模式,我将在附录A中演示如何安装一个集群。
2.2 Storm,你好!
在本节,我们将创建一个简单的用来统计单词频率的 topology。我们可以将此视为 Storm topology 的 “Hello World” 项目。然而,由于可扩展到任意无穷数目的机器上,它的威力无穷。并且,只需要一点点改动,我们就能够在此基础上创建出一个统计系统。作为示例,我们将展示如何修改这个项目让它来确定Twitter上的流行话题。为了创建 topology,我们使用一个 spout 负责读取单词,一个 bolt 将单词转换成小写的,另一个 bolt 统计单词频率。[如图2.1所示]
本示例的代码可从 http://github.com/storm-book/examples-ch02-getting_started/zipball/master 下载。
如果你使用 Git,你可以运行
git
clone git@github.com:storm-book/examples-ch02-getting_started
将其拉到你想要保存的目录中。
2.2.1 检查Java安装
第一步设置环境的工作是检查Java版本。打开一个终端,运行java -version指令,可以看到如下一些相似的信息:
<span class="line-number" style="margin:0px; padding:0px">1</span> <span class="line-number" style="margin:0px; padding:0px">2</span> <span class="line-number" style="margin:0px; padding:0px">3</span> <span class="line-number" style="margin:0px; padding:0px">4</span> <span class="line-number" style="margin:0px; padding:0px">5</span> | java -version java version "1.6.0_26" Java(TM) SE Runtime Environment (build 1.6.0_26-b03) Java HotSpot(TM) Server VM (build 20.1-b02, mixed mode) |
2.2.2 创建工程
第一步,创建一个应用的目录(像所有Java应用那样),这个目录将包含工程的源码。下一步,下载 Storm 依赖相关的 Jar 包,并把它们加入工程的 classpath。有两种方式:
下载依赖,解压,加入classpath
使用 Apache Maven
Maven 是一个软件项目综合管理工具。它可以用来管理一个项目开发周期的几个方面,从依赖到发布构建处理。本书我们将普遍地使用它。通过运行
mvn来检查
Maven 是否已安装。如果没有,你可以从Apache Maven 官方主页下来。(http://maven.apache.org) 你不要成为 Maven 方面的专家从而使用
Storm。但是如果能够理解 Maven 运行的基本原理,将会很有用。你可以从Apache Maven 官方主页(http://maven.apache.org)找到更多有用的信息。
我们需要使用一个 pom.xml 文件来定义工程结构,该文件用来描述依赖、打包、源码等等。我们使用 nathanmarz设置的依赖和Maven仓库,可以从如下网页找到https://github.com/nathanmarz/storm/wiki/Maven。
Storm 的 Maven 依赖包含所有本地模式下运行 Storm 的库。
我们可以使用这些依赖,编写一个包含可运行我们的topology所需的基本组件的 pom.xml 文件。
<span class="line-number" style="margin:0px; padding:0px">1</span> <span class="line-number" style="margin:0px; padding:0px">2</span> <span class="line-number" style="margin:0px; padding:0px">3</span> <span class="line-number" style="margin:0px; padding:0px">4</span> <span class="line-number" style="margin:0px; padding:0px">5</span><span class="line-number" style="margin:0px; padding:0px">6</span> | <project xmlns="http://maven.apache.org/POM/4.0.0" xmlns:xsi="http://www.w3.org/2001/XMLSchema-instance" xsi:schemaLocation="http://maven.apache.org/POM/4.0.0 http://maven.apache.org/xsd/maven-4.0.0.xsd"> <modelVersion>4.0.0</modelVersion> <groupId>storm.book</groupId> <artifactId>Getting-Started</artifactId> <version>0.0.1-SNAPSHOT</version> <build> <plugins> <plugin> <groupId>org.apache.maven.plugins</groupId> <artifactId>maven-compiler-plugin</artifactId> <version>2.3.2</version> <configuration> <source>1.6</source> <target>1.6</target> <compilerVersion>1.6</compilerVersion> </configuration> </plugin> </plugins> </build> <repositories> <!-- Repository where we can found the storm dependencies --> <repository> <id>clojars.org</id> <url>http://clojars.org/repo</url> </repository> </repositories> <dependencies> <!-- Storm Dependency --> <dependency> <groupId>storm</groupId> <artifactId>storm</artifactId> <version>0.6.0</version> </dependency> </dependencies> </project> |
项目将有如下的 Maven Java 工程典型的结构:
our-application-folder/
├── pom.xml
└── src
└── main
└── java
|   ├── spouts
|   └── bolts
└── resources
Java下面的目录将包含源码,单词文件将被放到 resource 目录。
执行
mkdir -p create创建所需的父目录。
2.3 创建第一个 Topology
我们将创建一个处理单词计数的topology。可能本例子中的某些部分在本章不会详细介绍,但是会再接下来的章节阐述清楚。
2.3.1 Spout
WordReaderspout 是一个实现了
IRichSpout的类。我们将在第四章介绍更多细节。
WordReader负责读取文件、把每行文本传送至bolt。
spout 发射一组字段定义了的列表。这种结构允许不同类型的 bolt 读取相同 spout 的数据流,并定义字段供其他 bolt 做后续处理。
示例2-1 包括了该类的所有代码。
示例2-1:src/main/java/spouts/WordReader.javacode
view
<span class="line-number" style="margin:0px; padding:0px">1</span> <span class="line-number" style="margin:0px; padding:0px">2</span> <span class="line-number" style="margin:0px; padding:0px">3</span> <span class="line-number" style="margin:0px; padding:0px">4</span> <span class="line-number" style="margin:0px; padding:0px">5</span><span class="line-number" style="margin:0px; padding:0px">6</span> | package spouts;
import java.io.BufferedReader;
import java.io.FileNotFoundException;
import java.io.FileReader;
import java.util.Map;
import backtype.storm.spout.SpoutOutputCollector;
import backtype.storm.task.TopologyContext;
import backtype.storm.topology.IRichSpout;
import backtype.storm.topology.OutputFieldsDeclarer;
import backtype.storm.tuple.Fields;
import backtype.storm.tuple.Values;
public class WordReader implements IRichSpout {
private SpoutOutputCollector collector;
private FileReader fileReader;
private boolean completed = false;
private TopologyContext context;
public boolean isDistributed() {return false;}
public void ack(Object msgId) {
System.out.println("OK:"+msgId);
}
public void close() {}
public void fail(Object msgId) {
System.out.println("FAIL:"+msgId);
}
/**
* The only thing that the methods will do It is emit each
* file line
*/
public void nextTuple() {
/**
* The nextuple it is called forever, so if we have been readed the file
* we will wait and then return
*/
if(completed){
try {
Thread.sleep(1000);
} catch (InterruptedException e) {
//Do nothing
}
return;
}
String str;
//Open the reader
BufferedReader reader = new BufferedReader(fileReader);
try{
//Read all lines
while((str = reader.readLine()) != null){
/**
* By each line emmit a new value with the line as a their
*/
this.collector.emit(new Values(str),str);
}
}catch(Exception e){
throw new RuntimeException("Error reading tuple",e);
}finally{
completed = true;
}
}
/**
* We will create the file and get the collector object
*/
public void open(Map conf, TopologyContext context,
SpoutOutputCollector collector) {
try {
this.context = context;
this.fileReader = new FileReader(conf.get("wordsFile").toString());
} catch (FileNotFoundException e) {
throw new RuntimeException("Error reading file ["+conf.get("wordFile")+"]");
}
this.collector = collector;
}
/**
* Declare the output field "word"
*/
public void declareOutputFields(OutputFieldsDeclarer declarer) {
declarer.declare(new Fields("line"));
}
} |
public void open(Map conf, TopologyContext context, SpoutOutputCollector collector)。参数解释:
TopologyContext,包含所有的
topology 数据;
conf对象,topology 定义中创建的;
SpoutOutputCollector,发射数据供
bolt 处理。下面的代码块是其具体实现:
<span class="line-number" style="margin:0px; padding:0px">1</span> <span class="line-number" style="margin:0px; padding:0px">2</span> <span class="line-number" style="margin:0px; padding:0px">3</span> <span class="line-number" style="margin:0px; padding:0px">4</span> <span class="line-number" style="margin:0px; padding:0px">5</span><span class="line-number" style="margin:0px; padding:0px">6</span> | public void open(Map conf, TopologyContext context,
SpoutOutputCollector collector) {
try {
this.context = context;
this.fileReader = new FileReader(conf.get("wordsFile").toString());
} catch (FileNotFoundException e) {
throw new RuntimeException("Error reading file ["+conf.get("wordFile")+"]");
}
this.collector = collector;
} |
reader。下一个需要实现的方法是
public
void nextTuple()
,通过该方法发射可被 bolt 的数据。在我们的例子中,该方法将读取文件并发射每一行内容。
<span class="line-number" style="margin:0px; padding:0px">1</span> <span class="line-number" style="margin:0px; padding:0px">2</span> <span class="line-number" style="margin:0px; padding:0px">3</span> <span class="line-number" style="margin:0px; padding:0px">4</span> <span class="line-number" style="margin:0px; padding:0px">5</span><span class="line-number" style="margin:0px; padding:0px">6</span> | public void nextTuple() {
if(completed){
try {
Thread.sleep(1000);
} catch (InterruptedException e) {
//Do nothing
}
return;
}
String str;
BufferedReader reader = new BufferedReader(fileReader);
try{
while((str = reader.readLine()) != null){
this.collector.emit(new Values(str),str);
}
}catch(Exception e){
throw new RuntimeException("Error reading tuple",e);
}finally{
completed = true;
}
} |
Values是一种实现
ArrayList功能的结构,列表中的元素传入构造函数。
nextTuple()与
ack()、
fail()一起被周期性地调用。当没有任务需要处理的时候,它必须释放线程控制,这样其他方法有机会被调用。所以
nextTuple的第一行代码用来检查处理是否已完成:如果完成,线程睡眠至少1000毫秒从而在处理返回之前减少负载;如果还有任务需要被处理,文件中的每一行文本将被读取并发射出去。
一个元组(tuple)是一组数值列表,数值可以是任意类型的可被序列化的Java对象。默认情况下,Storm可以序列化如
strings、
byte
arrays
、
ArrayList、
HashMap和
HashSet等类型。
2.3.2 Bolts
现在,我们拥有一个 spout 来读取文件并每行为一个tuple发射出去。接下来要做的就是创建两个 bolt 来处理这些 tuple。这些 bolt 实现 backtype.storm.topology.IRichBolt 接口。bolt 中最重要的方法是
execute(Tuple input),每接收一个tuple就被调用一次。bolt
在接收一个tuple后,可发射若干个 tuple。
一个 bolt 或 spout 可以根据需要反射足够多的 tuple。当
nextTuple被执行时,它们可以发射0个、1个或者多个
tuple。你可以从第五章获得更多细节。
第一个 bolt 是
WordNormalizer,用来处理每行文本并将其规范化,将文本分解成单词、转换成小写字母并去除头尾空字符。
首先,我们需要声明 bolt 输出的参数:
<span class="line-number" style="margin:0px; padding:0px">1</span> <span class="line-number" style="margin:0px; padding:0px">2</span> <span class="line-number" style="margin:0px; padding:0px">3</span> | public void declareOutputFields(OutputFieldsDeclarer declarer) {
declarer.declare(new Fields("word"));
} |
接下来,实现
public void execute(Tuple input)方法来处理tuple:
<span class="line-number" style="margin:0px; padding:0px">1</span> <span class="line-number" style="margin:0px; padding:0px">2</span> <span class="line-number" style="margin:0px; padding:0px">3</span> <span class="line-number" style="margin:0px; padding:0px">4</span> <span class="line-number" style="margin:0px; padding:0px">5</span><span class="line-number" style="margin:0px; padding:0px">6</span> | public void execute(Tuple input) {
String sentence = input.getString(0);
String[] words = sentence.split(" ");
for(String word : words){
word = word.trim();
if(!word.isEmpty()){
word = word.toLowerCase();
collector.emit(new Values(word));
}
}
} |
ack()方法被调用来表明处理成功执行。如果
tuple 不能被处理,collector 的
fail()方法将被调用。
示例2-2包含了这个类的全部代码:
示例2-2:src/main/java/bolts/WordNormalizer.javacode
view
<span class="line-number" style="margin:0px; padding:0px">1</span> <span class="line-number" style="margin:0px; padding:0px">2</span> <span class="line-number" style="margin:0px; padding:0px">3</span> <span class="line-number" style="margin:0px; padding:0px">4</span> <span class="line-number" style="margin:0px; padding:0px">5</span><span class="line-number" style="margin:0px; padding:0px">6</span> | package bolts; |
execute发送了多个 tuple。如果方法受到的句子如“This
is the Storm book”,将发射五个新的tuple。
下一个 bolt 为
WordCounter,负责对单词进行计数。当 topology
完成后(当
cleanup()被调用时),将打印出每个单词的统计量。
WordCounter不发射任何数值。在这个案列中,数据被添加进一个
map,但是在现实中
bolt 可将其存储到数据库中。
src/main/java/bolts/WordCounter.javacode
view
<span class="line-number" style="margin:0px; padding:0px">1</span> <span class="line-number" style="margin:0px; padding:0px">2</span> <span class="line-number" style="margin:0px; padding:0px">3</span> <span class="line-number" style="margin:0px; padding:0px">4</span> <span class="line-number" style="margin:0px; padding:0px">5</span><span class="line-number" style="margin:0px; padding:0px">6</span> | package bolts;
package bolts;
import java.util.HashMap;
import java.util.Map;
import backtype.storm.task.OutputCollector;
import backtype.storm.task.TopologyContext;
import backtype.storm.topology.IRichBolt;
import backtype.storm.topology.OutputFieldsDeclarer;
import backtype.storm.tuple.Tuple;
public class WordCounter implement IRichBolt {
Integer id;
String name;
Map<String, Integer> counters;
private OutputCollector collector;
/**
* At the end of the spout (when the cluster is shutdown
* We will show the word counters
*/
@Override
public void cleanup() {
System.out.println("-- Word Counter ["+name+"-"+id+"] --");
for(Map.Entry<String, Integer> entry : counters.entrySet()){
System.out.println(entry.getKey()+": "+entry.getValue());
}
}
/**
* On create
*/
@Override
public void prepare(Map stormConf, TopologyContext context, OutputCollector collector) {
this.counters = new HashMap<String, Integer>();
this.name = context.getThisComponentId();
this.id = context.getThisTaskId();
this.collector = collector;
}
@Override
public void declareOutputFields(OutputFieldsDeclarer declarer) {}
@Override
public void execute(Tuple input) {
String str = input.getString(0);
/**
* If the word dosn't exist in the map we will create
* this, if not We will add 1
*/
if(!counters.containsKey(str)){
counters.put(str, 1);
}else{
Integer c = counters.get(str) + 1;
counters.put(str, c);
}
//Set the tuple as Acknowledge
collector.ack(input);
}
} |
execute方法使用一个map来收集和统计单词。当 topology 终止后,
cleanup()方法将被调用来打印出map中的统计结果。(这仅是一个示例,通常当
topology 关闭后,会使用
cleanup()方法释放一些连接和资源。)
2.3.3 Main Class
在主类中,我们创建一个 topology 和 一个用于在本地测试盒调试的LocalCluster对象。配合
Config对象,你可以使用
LocalCluster尝试不同的集群配置。比如,如果一个全局的或者类变量被意外地使用了,当你使用不同数目的工作节点去测试时将发现错误。(工作细节请参见 第三章)
所有的 topology 节点,在处理过程中没有数据共享的前提下,都可以独立地运行。因为在真实的集群环境下,这些处理可能运行在不同的机器上。
可以使用
TopologyBuilder来创建 topology,这将告诉 Storm
节点如何安排以及如何交换数据。
<span class="line-number" style="margin:0px; padding:0px">1</span> <span class="line-number" style="margin:0px; padding:0px">2</span> <span class="line-number" style="margin:0px; padding:0px">3</span><span class="line-number" style="margin:0px; padding:0px">4</span> | TopologyBuilder builder = new TopologyBuilder();
builder.setSpout("word-reader",new WordReader());
builder.setBolt("word-normalizer", new WordNormalizer()).shuffleGrouping("wordreader");
builder.setBolt("word-counter", new WordCounter()).shuffleGrouping("wordnormalizer"); |
shuffleGrouping来连接。这种分组方式告诉
Storm 以随机分布的方式从源节点向目标节点发送消息。
下一步,创建一个
Config对象来配置 topology,合并了运行时的集群配置,并将通过
prepare方法发送到所有节点。
<span class="line-number" style="margin:0px; padding:0px">1</span> <span class="line-number" style="margin:0px; padding:0px">2</span> <span class="line-number" style="margin:0px; padding:0px">3</span> | Config conf = new Config();
conf.put("wordsFile", args[0]);
conf.setDebug(true); |
wordsFile属性赋值成spout 读取的文件名,在开发过程中将
debug属性赋值成
true 。当
debug = true时,Storm将打印出节点间交换的所有信息和其他有用的调试信息,从而可以很容易理解
topology 是如何运行的。
如早前所述,将使用本地模式来运行 topology。在生产环境下,topology 将会持续运行,但是本例中只将运行数秒钟,这样你能看到结果。
<span class="line-number" style="margin:0px; padding:0px">1</span> <span class="line-number" style="margin:0px; padding:0px">2</span> <span class="line-number" style="margin:0px; padding:0px">3</span><span class="line-number" style="margin:0px; padding:0px">4</span> | LocalCluster cluster = new LocalCluster();
cluster.submitTopology("Getting-Started-Toplogie", conf, builder.createTopology());
Thread.sleep(2000);
cluster.shutdown(); |
createTopology和
submitTopology来创建和运行
topology,休眠两秒(topology 运行在不同的线程中),然后停止 topology,并关闭集群。
示例2-3是该类所有的代码。
示例2-3:src/main/java/TopologyMain.javacode
view
<span class="line-number" style="margin:0px; padding:0px">1</span> <span class="line-number" style="margin:0px; padding:0px">2</span> <span class="line-number" style="margin:0px; padding:0px">3</span> <span class="line-number" style="margin:0px; padding:0px">4</span> <span class="line-number" style="margin:0px; padding:0px">5</span><span class="line-number" style="margin:0px; padding:0px">6</span> | import spouts.WordReader;
import backtype.storm.Config;
import backtype.storm.LocalCluster;
import backtype.storm.topology.TopologyBuilder;
import backtype.storm.tuple.Fields;
import bolts.WordCounter;
import bolts.WordNormalizer;
public class TopologyMain {
public static void main(String[] args) throws InterruptedException {
//Topology definition
TopologyBuilder builder = new TopologyBuilder();
builder.setSpout("word-reader",new WordReader());
builder.setBolt("word-normalizer", new WordNormalizer())
.shuffleGrouping("word-reader");
builder.setBolt("word-counter", new WordCounter(),1)
.fieldsGrouping("word-normalizer", new Fields("word"));
//Configuration
Config conf = new Config();
conf.put("wordsFile", args[0]);
conf.setDebug(false);
//Topology run
conf.put(Config.TOPOLOGY_MAX_SPOUT_PENDING, 1);
LocalCluster cluster = new LocalCluster();
cluster.submitTopology("Getting-Started-Toplogie", conf, builder.createTopology());
Thread.sleep(1000);
cluster.shutdown();
}
} |
2.3.4 查看结果
准备好运行第一个topology了吗?如果你创建一个 src/main/resources/words.txt文件,每行一个单词,那么你可以这样运行topology:
<span class="line-number" style="margin:0px; padding:0px">1</span> <span class="line-number" style="margin:0px; padding:0px">2</span> | mvn exec:java -Dexec.mainClass="TopologyMain" -Dexec.args="src/main/resources/ words.txt" |
<span class="line-number" style="margin:0px; padding:0px">1</span> <span class="line-number" style="margin:0px; padding:0px">2</span> <span class="line-number" style="margin:0px; padding:0px">3</span> <span class="line-number" style="margin:0px; padding:0px">4</span> <span class="line-number" style="margin:0px; padding:0px">5</span><span class="line-number" style="margin:0px; padding:0px">6</span> | test are great is an Storm simple application but very powerful really Storm is great |
<span class="line-number" style="margin:0px; padding:0px">1</span> <span class="line-number" style="margin:0px; padding:0px">2</span> <span class="line-number" style="margin:0px; padding:0px">3</span> <span class="line-number" style="margin:0px; padding:0px">4</span> <span class="line-number" style="margin:0px; padding:0px">5</span><span class="line-number" style="margin:0px; padding:0px">6</span> | is: 2 application: 1 but: 1 great: 1 test: 1 simple: 1 Storm: 3 really: 1 are: 1 great: 1 an: 1 powerful: 1 very: 1 |
WordCounter实例:
<span class="line-number" style="margin:0px; padding:0px">1</span> <span class="line-number" style="margin:0px; padding:0px">2</span> | builder.setBolt("word-counter", new WordCounter(),2)
.shuffleGrouping("word-normalizer"); |
<span class="line-number" style="margin:0px; padding:0px">1</span> <span class="line-number" style="margin:0px; padding:0px">2</span> <span class="line-number" style="margin:0px; padding:0px">3</span> <span class="line-number" style="margin:0px; padding:0px">4</span> <span class="line-number" style="margin:0px; padding:0px">5</span><span class="line-number" style="margin:0px; padding:0px">6</span> | -- Word Counter [word-counter-2] -- application: 1 is: 1 great: 1 are: 1 powerful: 1 Storm: 3 -- Word Counter [word-counter-3] -- really: 1 is: 1 but: 1 great: 1 test: 1 simple: 1 an: 1 very: 1 |
is和
greate在每个
WordCounter实例中各被统计一次。为什么?当使用
shuffleGrouping时,Storm
以随机分布的方式将每个信息发送到一个实例。但是本例中,希望同一个单词背发送同一个
WordCounter节点。为了达到这种效果,你可以将
shuffleGrouping("wordnormalizer") 改变成fieldsGrouping("word-normalizer",new
Fields("word"))。尝试一下,并确认结果。你将在下一章看到更多分组和消息流。
2.4 总结
我们讨论了Storm 本地模式和远程模式的不同点,以及Storm编程的强大和简易。你也学习到了Storm的更多基础概念,我们将在接下来的章节对其进行深入阐述。原始地址: http://JavanLu.github.io/blog/2013/10/15/getting-started-with-storm-chapter-2/
written by JavanLu posted at http://JavanLu.github.io

相关文章推荐
- app跳转到微信指定公众号
- iOS:实现图片的无限轮播(二)---之使用第三方库SDCycleScrollView
- 博客园利用Word发布博客功能[其他博客也可以如此使用]
- 网络篇-NSURLSession介绍
- 包含ABC的随机数组整理
- 老李分享:持续集成学好jenkins之内置命令
- 关于错误Access Violation和too many consecutive exceptions 解决方法
- Unicode和多字节字符集 (MBCS) 杂谈
- LeetCode Merge K Sorted Lists
- 使用webView加载页面,去除页面广告
- xapian简介
- oracle 按字段分组,非分组字段进行合并(可根据字段排序)
- iOS Xcode, 解决“Could not insert new outlet connection”的问题。
- iOS键盘遮挡解决方案--摘抄-
- display:inline、block、inline-block的区别
- win dos 命令
- C# 反射研究
- 转: 技术牛人博客
- 远程连接Oracle时出现ORA-01034 和ORA-27101 的解决办法
- maven pom中的repository节点配置没有起作用