iOS UI界面之间传值方式的整理总结(3)通知传值NSNotification
2016-01-19 14:54
417 查看
1.发送界面 :
// 取到通知中心
NSNotificationCenter * nc = [NSNotificationCenter defaultCenter];
//提供通知的名字,携带的对象、携带的信息,通知中心来创建通知并发送
[nc postNotificationName:@"showText" object:nil userInfo:@{@"showText":_textFiled.text}];
2.接收通知界面:
//添加监听 名字为:showText 的通知
NSNotificationCenter *nc = [NSNotificationCenter defaultCenter];
//注册监听showText通知
//第一个参数:监听通知的对象
//第二个参数:接收到通知后要调用的方法
//第三个参数:监听通知的名字
[nc addObserver:self selector:@selector(showText:) name:@"showText" object:nil];
//接收到通知时调用的方法
-(void)showText:(NSNotification *)notify
{
UILabel *label = (id)[self.view viewWithTag:10];
//取出发送的文字
NSString *userInfo = [notify.userInfo objectForKey:@"showText"];
//显示文字
label.text = userInfo;
}
-(void)dealloc
{
[[NSNotificationCenter defaultCenter] removeObserver:self];
}
总结:
先由第二个界面取到通知中心发送通知,然后在反向传值的接收数值的第一个界面创建一个监听者,注册监听对象 ,确定监听通知的名字和监听到通知之后的事件,最后再 移除观察者。
附:
-(instancetype)initWithNibName:(NSString *)nibNameOrNil bundle:(NSBundle
*)nibBundleOrNil
{
self = [super
initWithNibName:nibNameOrNil
bundle:nibBundleOrNil];
if (self) {
[[NSNotificationCenter
defaultCenter] addObserver:self
selector:@selector(changeColor:)
name:@"changeColor"
object:nil];
}
return
self;
}
上述方法可以在
viewDidLoad之前执行
举例2.
首先,我们在需要接收通知的地方注册观察者,比如:
?
之后,在我们需要时发送通知消息
?
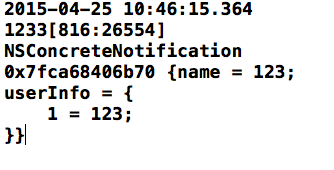
我们可以在回调的函数中取到userInfo内容,如下:
?
打印结果如下:

// 取到通知中心
NSNotificationCenter * nc = [NSNotificationCenter defaultCenter];
//提供通知的名字,携带的对象、携带的信息,通知中心来创建通知并发送
[nc postNotificationName:@"showText" object:nil userInfo:@{@"showText":_textFiled.text}];
2.接收通知界面:
//添加监听 名字为:showText 的通知
NSNotificationCenter *nc = [NSNotificationCenter defaultCenter];
//注册监听showText通知
//第一个参数:监听通知的对象
//第二个参数:接收到通知后要调用的方法
//第三个参数:监听通知的名字
[nc addObserver:self selector:@selector(showText:) name:@"showText" object:nil];
//接收到通知时调用的方法
-(void)showText:(NSNotification *)notify
{
UILabel *label = (id)[self.view viewWithTag:10];
//取出发送的文字
NSString *userInfo = [notify.userInfo objectForKey:@"showText"];
//显示文字
label.text = userInfo;
}
-(void)dealloc
{
[[NSNotificationCenter defaultCenter] removeObserver:self];
}
总结:
先由第二个界面取到通知中心发送通知,然后在反向传值的接收数值的第一个界面创建一个监听者,注册监听对象 ,确定监听通知的名字和监听到通知之后的事件,最后再 移除观察者。
附:
-(instancetype)initWithNibName:(NSString *)nibNameOrNil bundle:(NSBundle
*)nibBundleOrNil
{
self = [super
initWithNibName:nibNameOrNil
bundle:nibBundleOrNil];
if (self) {
[[NSNotificationCenter
defaultCenter] addObserver:self
selector:@selector(changeColor:)
name:@"changeColor"
object:nil];
}
return
self;
}
上述方法可以在
viewDidLoad之前执行
举例2.
通知的使用流程
首先,我们在需要接收通知的地方注册观察者,比如:?
?
?

相关文章推荐
- Java String、StringBuilder 、StringBuffer用法
- 随笔ibatis的queryForMap
- iOS UI界面之间传值方式的整理总结(1)协议方法
- serialVersionUID作用
- UICollectionViewCell--查找cell上的按钮点击后,对应的是哪个cell
- IOS UIAlertView和UIAlertController学习记录
- 红警conquer.mix文件
- Android Volley完全解析(三),定制自己的Request
- LeetCode_Implement Queue using Stacks_队列操作
- 95. Unique Binary Search Trees II
- 加载图片的三种方法imageNamed、imageWithContentsOfFile、NSData
- UE4 4.9 - cast modulated shadows causes flickering on IOS dynamic characters
- C# wpf WebBrowser遮挡上层UI的解决办法
- Jenkins+Git 集成测试(build、zip、curl)
- How to Change RabbitMQ Queue Parameters in Production?
- UE3模块化阴影
- UE4 Directional Lights
- UE4 Dynamic Scene Shadows
- Request的getParameter和getAttribute方法的区别
- Request的getParameter和getAttribute方法的区别
