Android 如何从系统图库中选择图片
2016-01-18 16:01
501 查看
这几天我都在做Android的App,同时学习它的API,我将分享一些我学到的东西,比如: 如何从系统图库中选择图片。
首先,让我们来看看如何将手机系统图库集成到你的App中,然后再从图库中选择图片来做一些事。例如,在Facebook的App,你就可以直接选择手机上的图片上传到你的个人资料。
让我们来做一个简单例子,要求:
屏幕上显示一个按钮和图片视图控件。
点击“载入图片”按钮,将用户重定向到Android的图片库,在那里可以选择一个图片。
一旦图片被选中,图片将在主屏幕上的图片视图控件中显示。
让我们开始。
步骤1:创建基本的Android项目
在Eclipse中,点击New > Project > Android Project,给项目取名为“ImageGalleryDemo”,然后选择Android2.1或sdk 7。
一旦这一步完成,你将看到一个基本的hello world程序。
步骤2:修改布局文件
在我们的例子中,我们需要一个简单的布局:一个ImageView控件来显示我们选中的图片,一个Button控件点击重定向到手机图库。
在项目中打开layout/main.xml,然后替换成下面的代码:
[html]
view plaincopyprint?
<?xml version="1.0" encoding="utf-8"?>
<LinearLayout xmlns:android="http://schemas.android.com/apk/res/android"
android:orientation="vertical"
android:layout_width="fill_parent"
android:layout_height="fill_parent">
<ImageView
android:id="@+id/imgView"
android:layout_width="fill_parent"
android:layout_height="wrap_content"
android:layout_weight="1"></ImageView>
<Button
android:id="@+id/buttonLoadPicture"
android:layout_width="wrap_content"
android:layout_height="wrap_content"
android:layout_weight="0"
android:text="Load Picture"
android:layout_gravity="center"></Button>
</LinearLayout>
步骤3:编写重定向到图片库的代码
现在我们需要写一些Java代码来处理按钮的点击事件,而重定向到图片库的代码如下:
[java]
view plaincopyprint?
Intent i = new Intent(
Intent.ACTION_PICK, android.provider.MediaStore.Images.Media.EXTERNAL_CONTENT_URI);

startActivityForResult(i, RESULT_LOAD_IMAGE);
步骤4:获取选中的图片
一旦用户选择了一张图片,onActivityResult()方法将会被调用。我们需要处理这个方法得到的数据,代码如下:
[java]
view plaincopyprint?
@Override
protected void onActivityResult(int requestCode, int resultCode, Intent data) {
super.onActivityResult(requestCode, resultCode, data);

if (requestCode == RESULT_LOAD_IMAGE && resultCode == RESULT_OK && null != data) {
Uri selectedImage = data.getData();
String[] filePathColumn = { MediaStore.Images.Media.DATA };

Cursor cursor = getContentResolver().query(selectedImage,
filePathColumn, null, null, null);
cursor.moveToFirst();

int columnIndex = cursor.getColumnIndex(filePathColumn[0]);
String picturePath = cursor.getString(columnIndex);
cursor.close();

// String picturePath contains the path of selected Image
}
注意:onActivityResult()方法只有当图片被选中后才会调用。在这个方法中,我们需要检查requestCode是否是我们之前传给startActivityForResult()方法的RESULT_LOAD_IMAGE。
最终代码
[java]
view plaincopyprint?
package net.viralpatel.android.imagegalleray;

import android.app.Activity;
import android.content.Intent;
import android.database.Cursor;
import android.graphics.BitmapFactory;
import android.net.Uri;
import android.os.Bundle;
import android.provider.MediaStore;
import android.view.View;
import android.widget.Button;
import android.widget.ImageView;

public class ImageGalleryDemoActivity extends Activity {

private static int RESULT_LOAD_IMAGE = 1;

@Override
public void onCreate(Bundle savedInstanceState) {
super.onCreate(savedInstanceState);
setContentView(R.layout.main);

Button buttonLoadImage = (Button) findViewById(R.id.buttonLoadPicture);
buttonLoadImage.setOnClickListener(new View.OnClickListener() {

@Override
public void onClick(View arg0) {

Intent i = new Intent(
Intent.ACTION_PICK,
android.provider.MediaStore.Images.Media.EXTERNAL_CONTENT_URI);

startActivityForResult(i, RESULT_LOAD_IMAGE);
}
});
}

@Override
protected void onActivityResult(int requestCode, int resultCode, Intent data) {
super.onActivityResult(requestCode, resultCode, data);

if (requestCode == RESULT_LOAD_IMAGE && resultCode == RESULT_OK && null != data) {
Uri selectedImage = data.getData();
String[] filePathColumn = { MediaStore.Images.Media.DATA };

Cursor cursor = getContentResolver().query(selectedImage,
filePathColumn, null, null, null);
cursor.moveToFirst();

int columnIndex = cursor.getColumnIndex(filePathColumn[0]);
String picturePath = cursor.getString(columnIndex);
cursor.close();

ImageView imageView = (ImageView) findViewById(R.id.imgView);
imageView.setImageBitmap(BitmapFactory.decodeFile(picturePath));

}

}
}
程序截图
第一屏:用户将重定向到手机图库

用户从图库选择图片

在我们的App显示用户选中的图片
源代码:ImageGalleryDemo.zip (46 KB)
这几天我都在做Android的App,同时学习它的API,我将分享一些我学到的东西,比如: 如何从系统图库中选择图片。
首先,让我们来看看如何将手机系统图库集成到你的App中,然后再从图库中选择图片来做一些事。例如,在Facebook的App,你就可以直接选择手机上的图片上传到你的个人资料。
让我们来做一个简单例子,要求:
屏幕上显示一个按钮和图片视图控件。
点击“载入图片”按钮,将用户重定向到Android的图片库,在那里可以选择一个图片。
一旦图片被选中,图片将在主屏幕上的图片视图控件中显示。
让我们开始。
步骤1:创建基本的Android项目
在Eclipse中,点击New > Project > Android Project,给项目取名为“ImageGalleryDemo”,然后选择Android2.1或sdk 7。
一旦这一步完成,你将看到一个基本的hello world程序。
步骤2:修改布局文件
在我们的例子中,我们需要一个简单的布局:一个ImageView控件来显示我们选中的图片,一个Button控件点击重定向到手机图库。
在项目中打开layout/main.xml,然后替换成下面的代码:
[html]
view plaincopyprint?
<?xml version="1.0" encoding="utf-8"?>
<LinearLayout xmlns:android="http://schemas.android.com/apk/res/android"
android:orientation="vertical"
android:layout_width="fill_parent"
android:layout_height="fill_parent">
<ImageView
android:id="@+id/imgView"
android:layout_width="fill_parent"
android:layout_height="wrap_content"
android:layout_weight="1"></ImageView>
<Button
android:id="@+id/buttonLoadPicture"
android:layout_width="wrap_content"
android:layout_height="wrap_content"
android:layout_weight="0"
android:text="Load Picture"
android:layout_gravity="center"></Button>
</LinearLayout>
<?xml version="1.0" encoding="utf-8"?> <LinearLayout xmlns:android="http://schemas.android.com/apk/res/android" android:orientation="vertical" android:layout_width="fill_parent" android:layout_height="fill_parent"> <ImageView android:id="@+id/imgView" android:layout_width="fill_parent" android:layout_height="wrap_content" android:layout_weight="1"></ImageView> <Button android:id="@+id/buttonLoadPicture" android:layout_width="wrap_content" android:layout_height="wrap_content" android:layout_weight="0" android:text="Load Picture" android:layout_gravity="center"></Button> </LinearLayout>
步骤3:编写重定向到图片库的代码
现在我们需要写一些Java代码来处理按钮的点击事件,而重定向到图片库的代码如下:
[java]
view plaincopyprint?
Intent i = new Intent( Intent.ACTION_PICK, android.provider.MediaStore.Images.Media.EXTERNAL_CONTENT_URI); startActivityForResult(i, RESULT_LOAD_IMAGE);
Intent i = new Intent( Intent.ACTION_PICK, android.provider.MediaStore.Images.Media.EXTERNAL_CONTENT_URI); startActivityForResult(i, RESULT_LOAD_IMAGE);注意:这里要传一个整形的常量RESULT_LOAD_IMAGE到
startActivityForResult()方法。
步骤4:获取选中的图片
一旦用户选择了一张图片,onActivityResult()方法将会被调用。我们需要处理这个方法得到的数据,代码如下:
[java]
view plaincopyprint?
@Override protected void onActivityResult(int requestCode, int resultCode, Intent data) { super.onActivityResult(requestCode, resultCode, data); if (requestCode == RESULT_LOAD_IMAGE && resultCode == RESULT_OK && null != data) { Uri selectedImage = data.getData(); String[] filePathColumn = { MediaStore.Images.Media.DATA }; Cursor cursor = getContentResolver().query(selectedImage, filePathColumn, null, null, null); cursor.moveToFirst(); int columnIndex = cursor.getColumnIndex(filePathColumn[0]); String picturePath = cursor.getString(columnIndex); cursor.close(); // String picturePath contains the path of selected Image }
@Override
protected void onActivityResult(int requestCode, int resultCode, Intent data) {
super.onActivityResult(requestCode, resultCode, data);
if (requestCode == RESULT_LOAD_IMAGE && resultCode == RESULT_OK && null != data) {
Uri selectedImage = data.getData();
String[] filePathColumn = { MediaStore.Images.Media.DATA };
Cursor cursor = getContentResolver().query(selectedImage,
filePathColumn, null, null, null);
cursor.moveToFirst();
int columnIndex = cursor.getColumnIndex(filePathColumn[0]);
String picturePath = cursor.getString(columnIndex);
cursor.close();
// String picturePath contains the path of selected Image
}注意:onActivityResult()方法只有当图片被选中后才会调用。在这个方法中,我们需要检查requestCode是否是我们之前传给startActivityForResult()方法的RESULT_LOAD_IMAGE。
最终代码
ImageGalleryDemoActivity类的最终代码如下:
[java]
view plaincopyprint?
package net.viralpatel.android.imagegalleray; import android.app.Activity; import android.content.Intent; import android.database.Cursor; import android.graphics.BitmapFactory; import android.net.Uri; import android.os.Bundle; import android.provider.MediaStore; import android.view.View; import android.widget.Button; import android.widget.ImageView; public class ImageGalleryDemoActivity extends Activity { private static int RESULT_LOAD_IMAGE = 1; @Override public void onCreate(Bundle savedInstanceState) { super.onCreate(savedInstanceState); setContentView(R.layout.main); Button buttonLoadImage = (Button) findViewById(R.id.buttonLoadPicture); buttonLoadImage.setOnClickListener(new View.OnClickListener() { @Override public void onClick(View arg0) { Intent i = new Intent( Intent.ACTION_PICK, android.provider.MediaStore.Images.Media.EXTERNAL_CONTENT_URI); startActivityForResult(i, RESULT_LOAD_IMAGE); } }); } @Override protected void onActivityResult(int requestCode, int resultCode, Intent data) { super.onActivityResult(requestCode, resultCode, data); if (requestCode == RESULT_LOAD_IMAGE && resultCode == RESULT_OK && null != data) { Uri selectedImage = data.getData(); String[] filePathColumn = { MediaStore.Images.Media.DATA }; Cursor cursor = getContentResolver().query(selectedImage, filePathColumn, null, null, null); cursor.moveToFirst(); int columnIndex = cursor.getColumnIndex(filePathColumn[0]); String picturePath = cursor.getString(columnIndex); cursor.close(); ImageView imageView = (ImageView) findViewById(R.id.imgView); imageView.setImageBitmap(BitmapFactory.decodeFile(picturePath)); } } }
package net.viralpatel.android.imagegalleray;
import android.app.Activity;
import android.content.Intent;
import android.database.Cursor;
import android.graphics.BitmapFactory;
import android.net.Uri;
import android.os.Bundle;
import android.provider.MediaStore;
import android.view.View;
import android.widget.Button;
import android.widget.ImageView;
public class ImageGalleryDemoActivity extends Activity {
private static int RESULT_LOAD_IMAGE = 1;
@Override
public void onCreate(Bundle savedInstanceState) {
super.onCreate(savedInstanceState);
setContentView(R.layout.main);
Button buttonLoadImage = (Button) findViewById(R.id.buttonLoadPicture);
buttonLoadImage.setOnClickListener(new View.OnClickListener() {
@Override
public void onClick(View arg0) {
Intent i = new Intent(
Intent.ACTION_PICK,
android.provider.MediaStore.Images.Media.EXTERNAL_CONTENT_URI);
startActivityForResult(i, RESULT_LOAD_IMAGE);
}
});
}
@Override
protected void onActivityResult(int requestCode, int resultCode, Intent data) {
super.onActivityResult(requestCode, resultCode, data);
if (requestCode == RESULT_LOAD_IMAGE && resultCode == RESULT_OK && null != data) {
Uri selectedImage = data.getData();
String[] filePathColumn = { MediaStore.Images.Media.DATA };
Cursor cursor = getContentResolver().query(selectedImage,
filePathColumn, null, null, null);
cursor.moveToFirst();
int columnIndex = cursor.getColumnIndex(filePathColumn[0]);
String picturePath = cursor.getString(columnIndex);
cursor.close();
ImageView imageView = (ImageView) findViewById(R.id.imgView);
imageView.setImageBitmap(BitmapFactory.decodeFile(picturePath));
}
}
}程序截图
第一屏:用户将重定向到手机图库
用户从图库选择图片
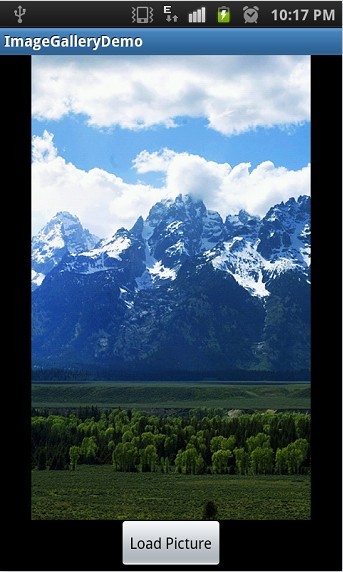
在我们的App显示用户选中的图片
源代码:ImageGalleryDemo.zip (46 KB)

相关文章推荐
- Android 将类中的文字提取到String.xml中
- Android Camera setRecordingHint函数 在部分手机上的问题。
- Android学习之Animation(三)
- Android学习之Animation(三)
- android学习之选择媒体库中的图片
- Android编程中selector背景选择器用法实例分析
- android打开前置摄像头和后置摄像头
- Android Gradle Release Version 2.4 增加多进程并行编译,经测试可以提升编译速度20% 到 40%
- android EditText中imeOptions属性设置无效解决方案
- android欢迎界面的编程实现[手相评分-软件实例]
- android内存泄露监测之leakcanary
- Android递归方式删除某文件夹下的所有文件
- Android编程之selector下设置背景属性值的方法
- android:Invalid file name: must contain only [a-z0-9_.]错误
- 开源框架】Android之史上最全最简单最有用的第三方开源库收集整理,有助于快速开发
- Android仿易信界面SlidingMenu左右滑动
- Android SDK开发包国内下载地址
- Android 开发绕不过的坑:你的 Bitmap 究竟占多大内存?
- Android系统之路(初识MTK) ------ 默认第一次开机屏幕亮度/日期格式/picture makeer model
- Android布局中的常用属性小结