碎片fragment
2016-01-14 16:01
483 查看
碎片(Fragment)是一种可以嵌入在活动当中的 UI 片段,它能让程序更加合理和充分地利用大屏幕的空间,因而在平板上应用的非常广泛。虽然碎片对你来说应该是个全新的概念, 但我相信你学习起来应该毫不费力, 因为它和活动实在是太像了, 同样都能包含布局,同样都有自己的生命周期。你甚至可以将碎片理解成一个迷你型的活动,虽然这个迷你型的活动有可能和普通的活动是一样大的。
那么究竟要如何使用碎片才能充分地利用平板屏幕的空间呢?想象我们正在开发一个新闻应用,其中一个界面使用 ListView 展示了一组新闻的标题,当点击了其中一个标题,就打开另一个界面显示新闻的详细内容。如果是在手机中设计,我们可以将新闻标题列表放在一个活动中,将新闻的详细内容放在另一个活动中
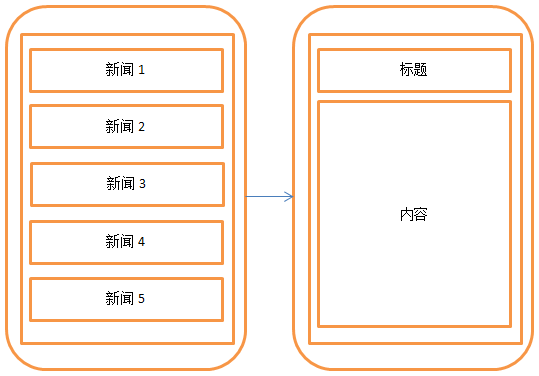
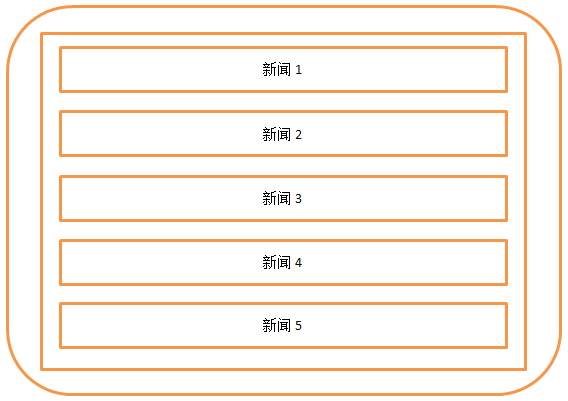
可是如果在平板上也这么设计,那么新闻标题列表将会被拉长至填充满整个平板的屏幕, 而新闻的标题一般都不会太长, 这样将会导致界面上有大量的空白区域
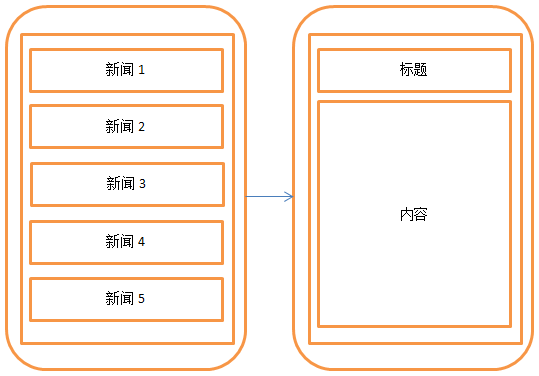
因此,更好的设计方案是将新闻标题列表界面和新闻详细内容界面分别放在两个碎片中,然后在同一个活动里引入这两个碎片,这样就可以将屏幕空间充分地利用起来了
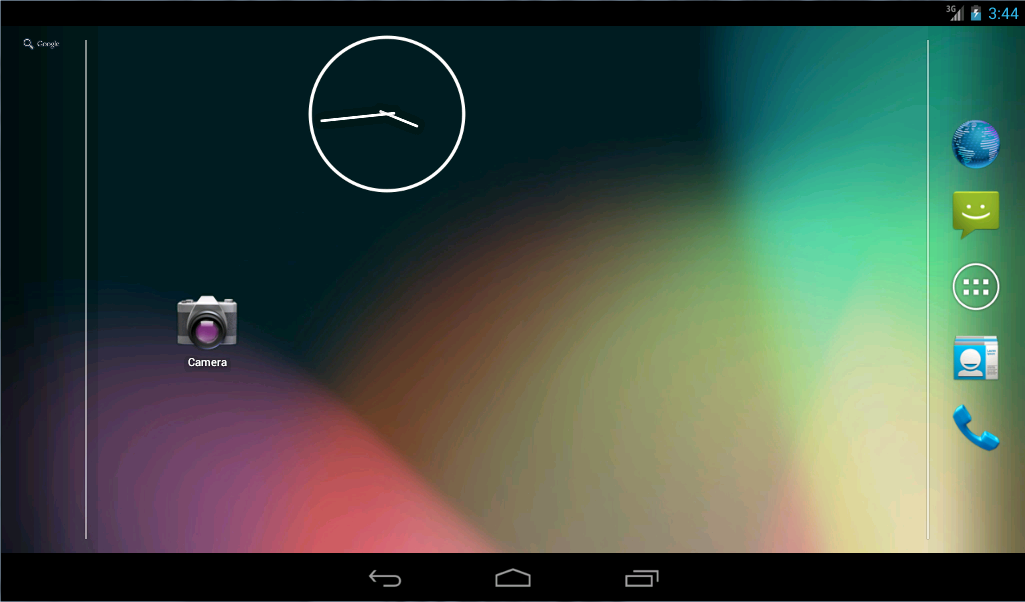
现在启动这个平板模拟器
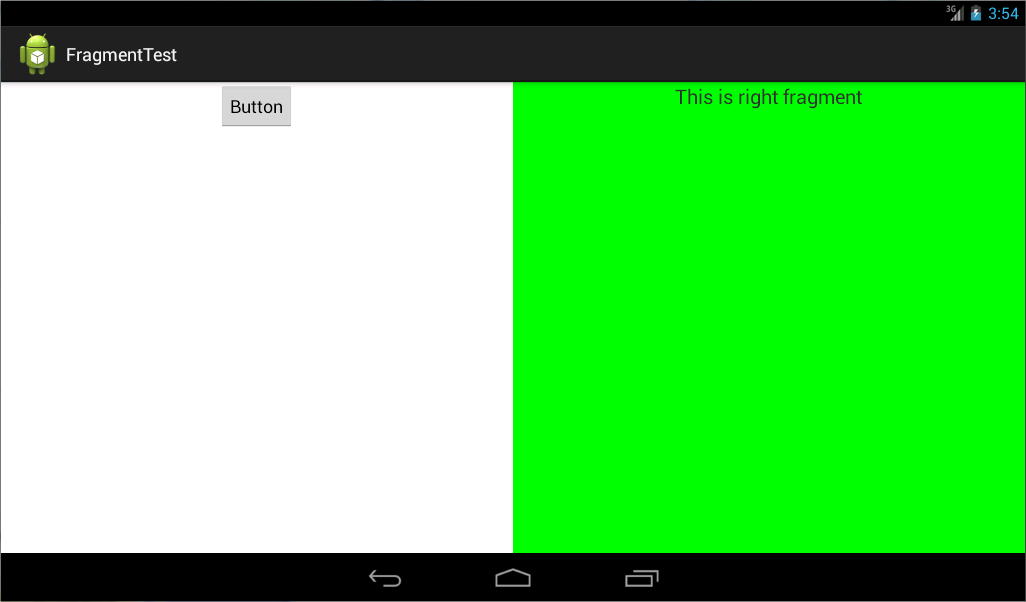
这里我们准备先写一个最简单的碎片示例来练练手,在一个活动当中添加两个碎片,并让这两个碎片平分活动空间。新建一个左侧碎片布局 left_fragment.xml,
这个布局非常简单,只放置了一个按钮,并让它水平居中显示。然后新建右侧碎片布局right_fragment.xml
可以看到,我们将这个布局的背景色设置成绿色,并放置了一个 TextView 用于显示一段文本。接着新建一个 LeftFragment 类,继承自 Fragment。注意,这里可能会有两个不同包下的 Fragment 供你选择,建议使用 android.app.Fragment,因为我们的程序是面向Android 4.0以上系统的, 另一个包下的Fragment主要是用于兼容低版本的Android系统
这里仅仅是重写了 Fragment 的 onCreateView()方法,然后在这个方法中通过LayoutInflater 的 inflate()方法将刚才定义的 left_fragment 布局动态加载进来, 整个方法简单明了。接着我们用同样的方法再新建一个 RightFragment,
动态添加碎片
代 码 同 样 非 常 简 单 , 在 onCreateView() 方 法 中 加 载 了 刚 刚 创 建 的another_right_fragment 布局。这样我们就准备好了另一个碎片,接下来看一下如何将它动态地添加到活动当中。修改 activity_main.xml,
可以看到,现在将右侧碎片放在了一个 FrameLayout 中,还记得这个布局吗?在上一章中我们学过,这是 Android 中最简单的一种布局,它没有任何的定位方式,所有的控件都会摆放在布局的左上角。由于这里仅需要在布局里放入一个碎片,因此非常适合使用FrameLayout。之后我们将在代码中替换 FrameLayout 里的内容,从而实现动态添加碎片的功能。修改 MainA
4000
ctivity 中的代码
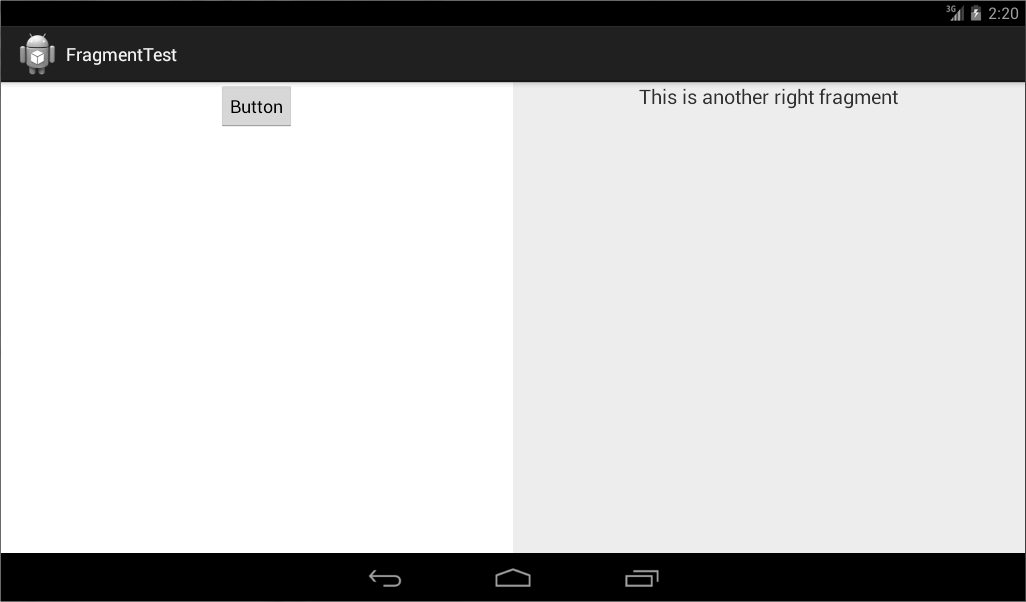
我们成功实现了向活动中动态添加碎片的功能,不过你尝试一下就会发现,通过点击按钮添加了一个碎片之后,这时按下 Back 键程序就会直接退出。如果这里我们想模仿类似于返回栈的效果,按下 Back 键可以回到上一个碎片,FragmentTransaction 中提供了一个 addToBackStack()方法,可以
用于将一个事务添加到返回栈中,修改 MainActivity 中的代码
这里我们在事务提交之前调用了FragmentTransaction的addToBackStack()方法,它可以接收一个名字用于描述返回栈的状态,一般传入 null 即可。现在重新运行程序,并
点击按钮将 AnotherRightFragment 添加到活动中,然后按下 Back 键,你会发现程序并没有退出,而是回到了 RightFragment 界面,再次按下 Back 键程序才会退出
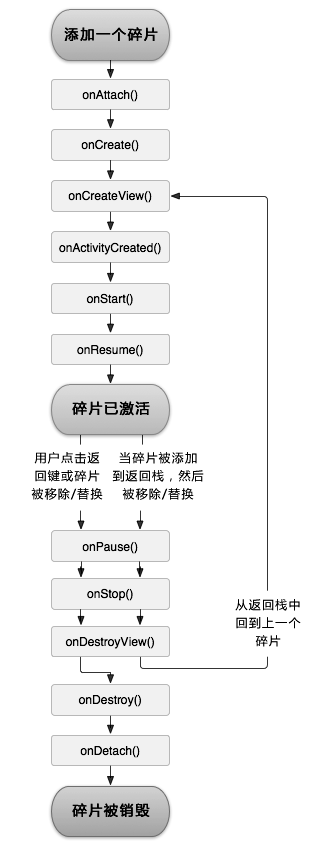
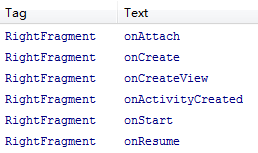
当 RightFragment 第一次被加载到屏幕上时,会依次执行 onAttach()、onCreate()、onCreateView()、onActivityCreated()、onStart()和 onResume()方法。然后点击 LeftFragment 中的按钮,

由于 AnotherRightFragment 替换了 RightFragment,此时的 RightFragment 进入了停止状态,因此 onPause()、onStop()和 onDestroyView()方法会得到执行。当然如果在替换的时候没有调用 addToBackStack()方法,此时的 RightFragment 就会进入销毁状态,onDestroy()和 onDetach()方法就会得到执行接着按下 Back 键RightFragment 会重新回到屏幕

由于 RightFragment 重新回到了运行状态,因此 onActivityCreated()、onStart()和 onResume()方法会得到执行。注意此时 onCreate()和 onCreateView()方法并不会执
行,因为我们借助了 addToBackStack()方法使得 RightFragment 和它的视图并没有销毁。再次按下 Back 键退出程序
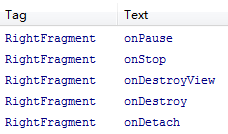
会执行 onPause()、onStop()、onDestroyView()、onDestroy()和 onDetach()方法,最终将活动和碎片一起销毁
fragment与activity:
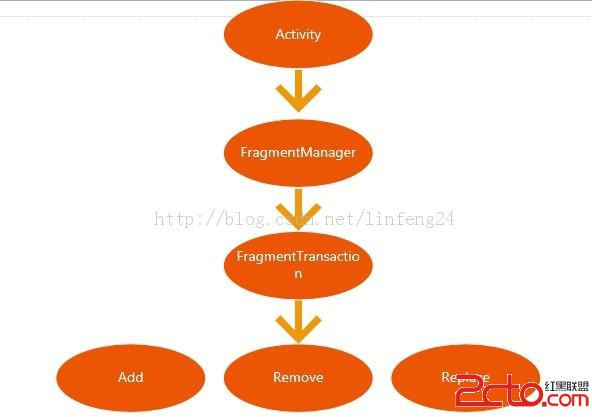
那么究竟要如何使用碎片才能充分地利用平板屏幕的空间呢?想象我们正在开发一个新闻应用,其中一个界面使用 ListView 展示了一组新闻的标题,当点击了其中一个标题,就打开另一个界面显示新闻的详细内容。如果是在手机中设计,我们可以将新闻标题列表放在一个活动中,将新闻的详细内容放在另一个活动中

可是如果在平板上也这么设计,那么新闻标题列表将会被拉长至填充满整个平板的屏幕, 而新闻的标题一般都不会太长, 这样将会导致界面上有大量的空白区域

因此,更好的设计方案是将新闻标题列表界面和新闻详细内容界面分别放在两个碎片中,然后在同一个活动里引入这两个碎片,这样就可以将屏幕空间充分地利用起来了

现在启动这个平板模拟器

这里我们准备先写一个最简单的碎片示例来练练手,在一个活动当中添加两个碎片,并让这两个碎片平分活动空间。新建一个左侧碎片布局 left_fragment.xml,
<?xml version="1.0" encoding="utf-8"?>
<LinearLayout xmlns:android="http://schemas.android.com/apk/res/android"
android:layout_width="match_parent"
android:layout_height="match_parent"
android:orientation="vertical" >

<Button
android:id="@+id/button1"
android:layout_width="wrap_content"
android:layout_height="wrap_content"
android:text="Button" />

</LinearLayout>
这个布局非常简单,只放置了一个按钮,并让它水平居中显示。然后新建右侧碎片布局right_fragment.xml
<?xml version="1.0" encoding="utf-8"?>
<LinearLayout xmlns:android="http://schemas.android.com/apk/res/android"
android:layout_width="match_parent"
android:layout_height="match_parent"
android:background="#00ff00"
android:orientation="vertical" >

<TextView
android:id="@+id/textView1"
android:layout_width="wrap_content"
android:layout_height="wrap_content"
android:text="@string/right1" />

</LinearLayout>
可以看到,我们将这个布局的背景色设置成绿色,并放置了一个 TextView 用于显示一段文本。接着新建一个 LeftFragment 类,继承自 Fragment。注意,这里可能会有两个不同包下的 Fragment 供你选择,建议使用 android.app.Fragment,因为我们的程序是面向Android 4.0以上系统的, 另一个包下的Fragment主要是用于兼容低版本的Android系统
public class LeftFragment extends Fragment{

@Override
public View onCreateView(LayoutInflater inflater, ViewGroup container,
Bundle savedInstanceState) {
// TODO Auto-generated method stub
View view=inflater.inflate(R.layout.left_fragment, container,false);
return view;
}
}
这里仅仅是重写了 Fragment 的 onCreateView()方法,然后在这个方法中通过LayoutInflater 的 inflate()方法将刚才定义的 left_fragment 布局动态加载进来, 整个方法简单明了。接着我们用同样的方法再新建一个 RightFragment,
public class RightFragment extends Fragment{

@Override
public View onCreateView(LayoutInflater inflater, ViewGroup container,
Bundle savedInstanceState) {
// TODO Auto-generated method stub
View view=inflater.inflate(R.layout.right_fragment, container, false);
return view;
}
}
基 本 上 代 码 都 是 相 同 的 , 相 信 已 经 没 有 必 要 再 做 什 么 解 释 了 。 接 下 来 修 改activity_main.xml 中的代码
动态添加碎片
<LinearLayout xmlns:android="http://schemas.android.com/apk/res/android"
android:layout_width="match_parent"
android:layout_height="match_parent"
android:background="#ffff00"
android:orientation="vertical" >
<TextView
android:layout_width="wrap_content"
android:layout_height="wrap_content"
android:layout_gravity="center_horizontal"
android:textSize="20sp"
android:text="This is another right fragment"
/>
</LinearLayout>
这个布局文件的代码和 right_fragment.xml 中的代码基本相同,只是将背景色改成了黄色,并将显示的文字改了改。然后新建 AnotherRightFragment 作为另一个右侧碎片
public class AnotherRightFragment extends Fragment {
@Override
public View onCreateView(LayoutInflater inflater, ViewGroup container,Bundle savedInstanceState) {
View view = inflater.inflate(R.layout.another_right_fragment, container, false);
return view;
}
}
代 码 同 样 非 常 简 单 , 在 onCreateView() 方 法 中 加 载 了 刚 刚 创 建 的another_right_fragment 布局。这样我们就准备好了另一个碎片,接下来看一下如何将它动态地添加到活动当中。修改 activity_main.xml,
<LinearLayout xmlns:android="http://schemas.android.com/apk/res/android"
android:layout_width="match_parent"
android:layout_height="match_parent">
<fragment
android:id="@+id/left_fragment"
android:name="com.example.fragmenttest.LeftFragment"
android:layout_width="0dp"
android:layout_height="match_parent"
android:layout_weight="1" />
<FrameLayout
android:id="@+id/right_layout"
android:layout_width="0dp"
android:layout_height="match_parent"
android:layout_weight="1" >
<fragment
android:id="@+id/right_fragment"
android:name="com.example.fragmenttest.RightFragment"
android:layout_width="match_parent"
android:layout_height="match_parent" />
</FrameLayout>
</LinearLayout>
可以看到,现在将右侧碎片放在了一个 FrameLayout 中,还记得这个布局吗?在上一章中我们学过,这是 Android 中最简单的一种布局,它没有任何的定位方式,所有的控件都会摆放在布局的左上角。由于这里仅需要在布局里放入一个碎片,因此非常适合使用FrameLayout。之后我们将在代码中替换 FrameLayout 里的内容,从而实现动态添加碎片的功能。修改 MainA
4000
ctivity 中的代码
public class MainActivity extends Activity implements OnClickListener {
@Override
protected void onCreate(Bundle savedInstanceState) {
super.onCreate(savedInstanceState);
setContentView(R.layout.activity_main);
Button button = (Button) findViewById(R.id.button);
button.setOnClickListener(this);
}
@Override
public void onClick(View v) {
switch (v.getId()) {
case R.id.button:
AnotherRightFragment fragment = new AnotherRightFragment();
FragmentManager fragmentManager = getFragmentManager();
FragmentTransaction transaction = fragmentManager. beginTransaction();
transaction.replace(R.id.right_layout, fragment);
transaction.commit();
break; default: break; } } }

我们成功实现了向活动中动态添加碎片的功能,不过你尝试一下就会发现,通过点击按钮添加了一个碎片之后,这时按下 Back 键程序就会直接退出。如果这里我们想模仿类似于返回栈的效果,按下 Back 键可以回到上一个碎片,FragmentTransaction 中提供了一个 addToBackStack()方法,可以
用于将一个事务添加到返回栈中,修改 MainActivity 中的代码
public class MainActivity extends Activity implements OnClickListener {
⋯⋯
@Override
public void onClick(View v) {
switch (v.getId()) {
case R.id.button:
AnotherRightFragment fragment = new AnotherRightFragment();
FragmentManager fragmentManager = getFragmentManager();
FragmentTransaction transaction = fragmentManager. beginTransaction();
transaction.replace(R.id.right_layout, fragment);
transaction.addToBackStack(null);
transaction.commit();
break;
default:
break;
}
}
}这里我们在事务提交之前调用了FragmentTransaction的addToBackStack()方法,它可以接收一个名字用于描述返回栈的状态,一般传入 null 即可。现在重新运行程序,并
点击按钮将 AnotherRightFragment 添加到活动中,然后按下 Back 键,你会发现程序并没有退出,而是回到了 RightFragment 界面,再次按下 Back 键程序才会退出

public class RightFragment extends Fragment {
public static final String TAG = "RightFragment";
@Override
public void onAttach(Activity activity) {
super.onAttach(activity);
Log.d(TAG, "onAttach");
}
@Override
public void onCreate(Bundle savedInstanceState) {
super.onCreate(savedInstanceState);
Log.d(TAG, "onCreate");
}
@Override
public View onCreateView(LayoutInflater inflater, ViewGroup container,Bundle savedInstanceState) {
Log.d(TAG, "onCreateView");
View view = inflater.inflate(R.layout.right_fragment, container, false);
return view;
}
@Override
public void onActivityCreated(Bundle savedInstanceState) {
super.onActivityCreated(savedInstanceState);
Log.d(TAG, "onActivityCreated");
}
@Override
public void onStart() {
super.onStart();
Log.d(TAG, "onStart");
}
@Override
public void onResume() {
super.onResume();
Log.d(TAG, "onResume");
}
@Override
public void onPause() {
super.onPause();
Log.d(TAG, "onPause");
}
@Override
public void onStop() {
super.onStop();
Log.d(TAG, "onStop");
}
@Override
public void onDestroyView() {
super.onDestroyView();
Log.d(TAG, "onDestroyView");
}
@Override
public void onDestroy() {
super.onDestroy();
Log.d(TAG, "onDestroy");
}
@Override
public void onDetach() {
super.onDetach();
Log.d(TAG, "onDetach");
}
}
当 RightFragment 第一次被加载到屏幕上时,会依次执行 onAttach()、onCreate()、onCreateView()、onActivityCreated()、onStart()和 onResume()方法。然后点击 LeftFragment 中的按钮,

由于 AnotherRightFragment 替换了 RightFragment,此时的 RightFragment 进入了停止状态,因此 onPause()、onStop()和 onDestroyView()方法会得到执行。当然如果在替换的时候没有调用 addToBackStack()方法,此时的 RightFragment 就会进入销毁状态,onDestroy()和 onDetach()方法就会得到执行接着按下 Back 键RightFragment 会重新回到屏幕

由于 RightFragment 重新回到了运行状态,因此 onActivityCreated()、onStart()和 onResume()方法会得到执行。注意此时 onCreate()和 onCreateView()方法并不会执
行,因为我们借助了 addToBackStack()方法使得 RightFragment 和它的视图并没有销毁。再次按下 Back 键退出程序

会执行 onPause()、onStop()、onDestroyView()、onDestroy()和 onDetach()方法,最终将活动和碎片一起销毁
fragment与activity:

public void onClick(View arg0) {
if (arg0.getId()==R.id.send_data_btn) {
LeftFragment fragment = new LeftFragment();
Bundle bundle = new Bundle();
bundle.putString("order", "带兵攻打岛国");
fragment.setArguments(bundle);
FragmentManager fragmentManager = getFragmentManager();
//开始Fragment事务
FragmentTransaction fTransaction = fragmentManager.beginTransaction();
//将Fragment添加到事务中,并指定一个TAG
fTransaction.add(fragment, "179521");
//提交Fragment事务
fTransaction.commit();
}
相关文章推荐
- 使用C++实现JNI接口需要注意的事项
- Android IPC进程间通讯机制
- Android Manifest 用法
- [转载]Activity中ConfigChanges属性的用法
- Android之获取手机上的图片和视频缩略图thumbnails
- Android之使用Http协议实现文件上传功能
- Android学习笔记(二九):嵌入浏览器
- android string.xml文件中的整型和string型代替
- i-jetty环境搭配与编译
- android之定时器AlarmManager
- android wifi 无线调试
- Android Native 绘图方法
- Android java 与 javascript互访(相互调用)的方法例子
- android 代码实现控件之间的间距
- android FragmentPagerAdapter的“标准”配置
- Android"解决"onTouch和onClick的冲突问题
- android:installLocation简析
- android searchView的关闭事件
- SourceProvider.getJniDirectories
